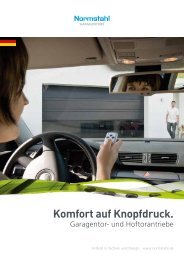
Ultra S - Normstahl
Ultra S - Normstahl
Ultra S - Normstahl

You also want an ePaper? Increase the reach of your titles
YUMPU automatically turns print PDFs into web optimized ePapers that Google loves.
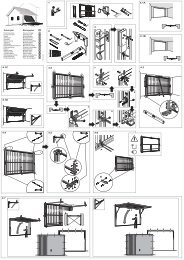
1-channel operation<br />
[42] First button is learned.<br />
Multi-channel operation<br />
[43] 2-channel operation: learn first,<br />
second or arbitrary button.<br />
[44] 3-channel operation: learn first,<br />
second, third or arbitrary button.<br />
[45] 4-channel operation: learn first,<br />
second, third and fourth button.<br />
Reset of all learned radio commands<br />
(if needed only)<br />
[46] Activate „Program“ button (2) at<br />
least 5 seconds long. The red LED<br />
(3) flashes then for 2 seconds<br />
quickly and goes out – now the reset<br />
procedure (duration about 5<br />
seconds) is finished. Any learned<br />
hand-held transmitters are reset.<br />
[47] Terminal configuration<br />
Terminals 1 - 16 of the built-in terminal<br />
strip are connected by default<br />
(=standard connection).<br />
Terminals for additional connections<br />
15 Additional lamp 230 V AC,<br />
L-switched, fused<br />
16 Additional lamp 230 V AC, N<br />
17 Antenna for radio<br />
18 Earth connection for antenna<br />
Additional settings<br />
In the manufacturers default setting the<br />
soft run in closing direction is switched<br />
on and the pre-warning time of drive<br />
lamp is switched off. The soft run in<br />
opening direction is set as standard and<br />
cannot be changed.<br />
If needed, the following additional settings<br />
are possible:<br />
Switch on/off soft run<br />
[48] Activate „Program“ button (2) once,<br />
the red LED (3) flashes once. Push<br />
„Impulse“ button (1) once, the red<br />
LED (3) flashes twice. Activate<br />
„Program“ button (2) once, the soft<br />
run in closing direction is switched<br />
off.<br />
In order to switch the soft run back<br />
on, repeat the aforesaid working<br />
steps.<br />
Switch on/off pre-warning time<br />
By switching on the pre-warning<br />
time first only the drive lamp is lighting<br />
with each control-device impulse, only<br />
four seconds later the motor run is started.<br />
[49] Activate „Program“ button (2) once,<br />
the red LED (3) flashes once. Push<br />
„Impulse“ button (1) twice, the red<br />
LED (3) flashes three times. Activate<br />
the „Program“ button (2) once,<br />
the pre-warning time will be<br />
switched on. In order to switch the<br />
pre-warning time back off, repeat<br />
the aforesaid working steps.<br />
Setting automatic closure<br />
Only authorized specialists are<br />
allowed to carry out this setting.<br />
The automatic closure is a control function,<br />
which runs the door automatically<br />
from opened position back into closed<br />
position. The closing time is freely adjustable<br />
(from 2 s to maximal 8.5 minutes).<br />
The automatic closure is switched<br />
off in the default setting; the jumper is in<br />
„SL1“ position [50].<br />
The operation with automatic<br />
closure is permitted only if additional<br />
safety equipment (light barrier/optical<br />
sensor/safety strip) is installed. The<br />
setting is carried out with connected<br />
mains power. The drive cover has to<br />
be removed for carrying out the setting,<br />
see [57].<br />
[51] Set automatic closure by jumper<br />
(19):<br />
Run door into opened position. After<br />
reaching the desired open time,<br />
plug the jumper into „AZ“ position,<br />
the door runs into closed position.<br />
The set time remains saved. Put<br />
drive cover back in place.<br />
The set automatic closure remains<br />
active even after reset of the control.<br />
Learning runs are delayed accordingly.<br />
Additional illumination<br />
Only a qualified electrician may<br />
perform the connection of an additional<br />
illumination.<br />
In addition to the drive light (40 W) an<br />
additional illumination of max. 60 W (no<br />
fluorescent tube or energy saving lamp)<br />
might be connected.<br />
[47] Connect additional lamp at terminals<br />
15 and 16 (light) parallel to<br />
the drive lamp.<br />
Change drive direction<br />
English<br />
Changing the drive direction is required<br />
for double-doors and, if necessary,<br />
for lateral-sliding doors.<br />
[52] Unlock western plug (5) with green<br />
bridge and pull off.<br />
[53] Activate the „Program“ button<br />
once, the red LED flashes once.<br />
Push „Impulse“ button (1) 5 times,<br />
the red LED flashes 6 times. Activate<br />
„Program“ button once, the<br />
change of drive direction is carried<br />
out and the electronic control is reset.<br />
[54] Plug western plug with green<br />
bridge (5) back in. Carry out basic<br />
setting (carry out learning runs),<br />
see [35].<br />
Additional safety<br />
connections<br />
[30] In delivery state, bridged western<br />
plugs (5=green, 6=yellow) are<br />
plugged in the external connections<br />
„Emergency stop“ (5) and<br />
„Safety strip/light barrier“ (6).<br />
Terminal „Emergency stop“ (5)<br />
An emergency equipment (slip-door<br />
safeguard or emergency-stop pushbutton)<br />
can be connected to this input:<br />
[54] Snap off, pull off and store western<br />
plug with green bridge. Install<br />
emergency stop equipment and<br />
connect by means of western plug.<br />
Check for function: If the emergency<br />
stop equipment is activated during<br />
the door run, the motor has to<br />
stop immediately.<br />
Terminal „Safety strip/optical sensor/light<br />
barrier (SE/LS)“ (6)<br />
A safety strip or an optical sensor (only<br />
in combination with a corresponding external<br />
evaluation equipment) or a light<br />
barrier might be connected to this input.<br />
[54] Snap off, pull off and store western<br />
plug with yellow bridge. Connect<br />
safety strip, optical sensor or light<br />
barrier according to the relevant<br />
enclosed instructions for installation.<br />
Check for function: If the installed<br />
safety device is operated<br />
while the gate is closing, the gate<br />
must stop and allow the object to<br />
move. The next impulse moves the<br />
gate into the open position.<br />
49