Garagentoröffner Modell MotorLift 1000 Instructions - Garagedoors.be
Garagentoröffner Modell MotorLift 1000 Instructions - Garagedoors.be
Garagentoröffner Modell MotorLift 1000 Instructions - Garagedoors.be

Create successful ePaper yourself
Turn your PDF publications into a flip-book with our unique Google optimized e-Paper software.
START BY READING THESE IMPORTANT SAFETY RULES<br />
These safety alert symbols mean Caution – a personal safety or property damage instruction. Read these instructions carefully.<br />
This garage door opener is designed and tested to offer reasonable safe service provided it is installed and operated in strict<br />
accordance with the following safety rules.<br />
Failure to comply with the following instructions may result in serious personal injury or property damage.<br />
Caution: If your garage has no service entrance door, Model 1702EML Outside Quick Release must <strong>be</strong> installed. This accessory allows<br />
manual operation of the garage door from outside in case of power failure.<br />
Keep garage door balanced. Sticking or binding doors<br />
must <strong>be</strong> repaired. Garage doors, door springs, cables,<br />
pulleys, brackets and their hardware are under extreme<br />
tension and can cause serious personal injury. Do not<br />
attempt to loosen, move or adjust them. Call for garage<br />
door service.<br />
Do not wear rings, watches or loose clothing while<br />
installing or servicing a garage door opener.<br />
To avoid serious personal injury from entanglement,<br />
remove all ropes connected to the garage door <strong>be</strong>fore<br />
installing the door opener.<br />
Installation and wiring must <strong>be</strong> in compliance with your<br />
local building and electrical codes. Connect the power<br />
supply cord only to properly earthed mains.<br />
Lightweight doors or fi<strong>be</strong>rglass, aluminum or steel<br />
must <strong>be</strong> substantially reinforced to avoid door<br />
damage. (See page 4.) The <strong>be</strong>st solution is to check with<br />
your garage door manufacturer for an opener installation<br />
reinforcement kit.<br />
The safety reverse system test is very important. Your<br />
garage door MUST reverse on contact with a 50mm<br />
(obstacle placed on the floor. Failure to properly adjust the<br />
opener may result in serious personal injury from a closing<br />
garage door. Repeat the test once a month and make<br />
any needed adjustments.<br />
This unit should not <strong>be</strong> installed in a damp or wet<br />
space.<br />
Door must not extend over public byway during<br />
operation.<br />
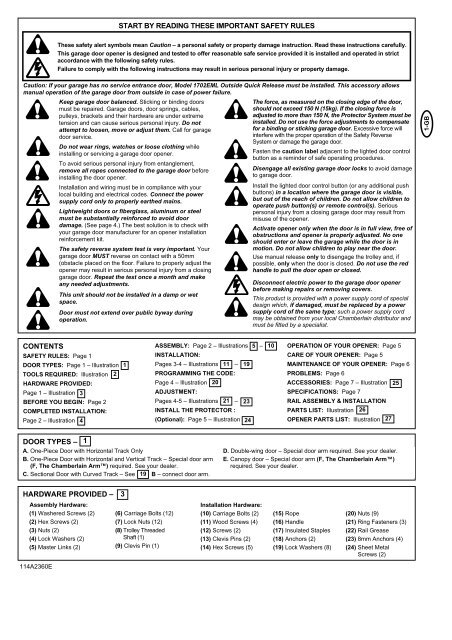
CONTENTS<br />
SAFETY RULES: Page 1<br />
DOOR TYPES: Page 1 – Illustration 1<br />
TOOLS REQUIRED: Illustration 2<br />
HARDWARE PROVIDED:<br />
Page 1 – Illustration 3<br />
BEFORE YOU BEGIN: Page 2<br />
COMPLETED INSTALLATION:<br />
Page 2 – Illustration 4<br />
HARDWARE PROVIDED –<br />
Assembly Hardware:<br />
(1) Washered Screws (2)<br />
(2) Hex Screws (2)<br />
(3) Nuts (2)<br />
(4) Lock Washers (2)<br />
(5) Master Links (2)<br />
(6) Carriage Bolts (12)<br />
(7) Lock Nuts (12)<br />
(8) Trolley Threaded<br />
Shaft (1)<br />
(9) Clevis Pin (1)<br />
ASSEMBLY: Page 2 – Illustrations 5 – 10<br />
INSTALLATION:<br />
Pages 3-4 – Illustrations 11 – 19<br />
PROGRAMMING THE CODE:<br />
Page 4 – Illustration 20<br />
ADJUSTMENT:<br />
Pages 4-5 – Illustrations 21 – 23<br />
INSTALL THE PROTECTOR :<br />
(Optional): Page 5 – Illustration 24<br />
DOOR TYPES – 1<br />
A. One-Piece Door with Horizontal Track Only<br />
B. One-Piece Door with Horizontal and Vertical Track – Special door arm<br />
(F, The Cham<strong>be</strong>rlain Arm) required. See your dealer.<br />
C. Sectional Door with Curved Track – See 19 B – connect door arm.<br />
114A2360E<br />
3<br />
Installation Hardware:<br />
(10) Carriage Bolts (2)<br />
(11) Wood Screws (4)<br />
(12) Screws (2)<br />
(13) Clevis Pins (2)<br />
(14) Hex Screws (5)<br />
The force, as measured on the closing edge of the door,<br />
should not exceed 150 N (15kg). If the closing force is<br />
adjusted to more than 150 N, the Protector System must <strong>be</strong><br />
installed. Do not use the force adjustments to compensate<br />
for a binding or sticking garage door. Excessive force will<br />
interfere with the proper operation of the Safety Reverse<br />
System or damage the garage door.<br />
Fasten the caution la<strong>be</strong>l adjacent to the lighted door control<br />
button as a reminder of safe operating procedures.<br />
Disengage all existing garage door locks to avoid damage<br />
to garage door.<br />
Install the lighted door control button (or any additional push<br />
buttons) in a location where the garage door is visible,<br />
but out of the reach of children. Do not allow children to<br />
operate push button(s) or remote control(s). Serious<br />
personal injury from a closing garage door may result from<br />
misuse of the opener.<br />
Activate opener only when the door is in full view, free of<br />
obstructions and opener is properly adjusted. No one<br />
should enter or leave the garage while the door is in<br />
motion. Do not allow children to play near the door.<br />
Use manual release only to disengage the trolley and, if<br />
possible, only when the door is closed. Do not use the red<br />
handle to pull the door open or closed.<br />
Disconnect electric power to the garage door opener<br />
<strong>be</strong>fore making repairs or removing covers.<br />
This product is provided with a power supply cord of special<br />
design which, if damaged, must <strong>be</strong> replaced by a power<br />
supply cord of the same type; such a power supply cord<br />
may <strong>be</strong> obtained from your local Cham<strong>be</strong>rlain distributor and<br />
must <strong>be</strong> fitted by a specialist.<br />
OPERATION OF YOUR OPENER: Page 5<br />
CARE OF YOUR OPENER: Page 5<br />
MAINTENANCE OF YOUR OPENER: Page 6<br />
PROBLEMS: Page 6<br />
ACCESSORIES: Page 7 – Illustration 25<br />
SPECIFICATIONS: Page 7<br />
RAIL ASSEMBLY & INSTALLATION<br />
PARTS LIST: Illustration 26<br />
OPENER PARTS LIST: Illustration 27<br />
D. Double-wing door – Special door arm required. See your dealer.<br />
E. Canopy door – Special door arm (F, The Cham<strong>be</strong>rlain Arm)<br />
required. See your dealer.<br />
(15) Rope<br />
(16) Handle<br />
(17) Insulated Staples<br />
(18) Anchors (2)<br />
(19) Lock Washers (8)<br />
(20) Nuts (9)<br />
(21) Ring Fasteners (3)<br />
(22) Rail Grease<br />
(23) 8mm Anchors (4)<br />
(24) Sheet Metal<br />
Screws (2)<br />
1-GB