Spritzdecke ADVENTURE SL - Grabner Sports
Spritzdecke ADVENTURE SL - Grabner Sports
Spritzdecke ADVENTURE SL - Grabner Sports

Erfolgreiche ePaper selbst erstellen
Machen Sie aus Ihren PDF Publikationen ein blätterbares Flipbook mit unserer einzigartigen Google optimierten e-Paper Software.
SPRITZDECKE<br />
<strong>ADVENTURE</strong> <strong>SL</strong><br />
MONTAGE UND<br />
GEBRAUCHSANWEISUNG<br />
GRABNER GMBH<br />
3350 HAAG, Weistracherstr. 11<br />
Tel 07434/42251 Fax 42251-66<br />
www.grabner-sports.at; e-mail:<br />
grabner@grabner-sports.at<br />
Subject to change, errors and misprints. 4/2002<br />
LIEBER WASSERSPORTFREUND!<br />
Diese Information soll Ihnen helfen, Ihr <strong>Spritzdecke</strong><br />
richtig zu montieren und zu gebrauchen. Lesen Sie<br />
bitte alle Kapitel sorgfältig durch - Sie ersparen sich<br />
dadurch Ärger und mögliche Beschädigungen.<br />
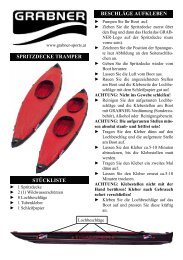
BODEN<br />
RIEFE<br />
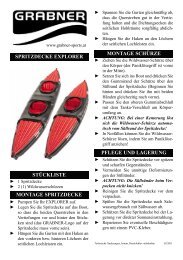
STÜCKLISTE<br />
l<br />
l<br />
l<br />
l<br />
l<br />
l<br />
l<br />
l<br />
l<br />
SPRITZDECKEN-HAKEN<br />
LOCHBESCHLÄGE<br />
1 <strong>Spritzdecke</strong><br />
4 Wildwasser-Schürzen<br />
20 Lochbeschläge<br />
1 Tubenkleber<br />
1 Schleifpapier<br />
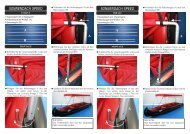
MONTAGE DER LOCHBESCHLÄGE<br />
Pumpen Sie Ihr <strong>ADVENTURE</strong> <strong>SL</strong> auf.<br />
Ziehen Sie die <strong>Spritzdecke</strong> auf das Boot auf (das<br />
GRABNER-Logo auf der <strong>Spritzdecke</strong> muß vorne<br />
sein).<br />
Zeichnen Sie die Position der <strong>Spritzdecke</strong>nhaken<br />
laut Abbildung an den Seitenschläuchen<br />
unterhalb der Riefe an.<br />
Geben Sie die <strong>Spritzdecke</strong> wieder vom Boot<br />
herunter.<br />
Lassen Sie die Luft vom Boot aus.<br />
Rauhen Sie die angezeichneten Stellen am Boot<br />
und die Klebeseite der Lochbeschläge mit dem<br />
Schleifpapier gut auf.<br />
ACHTUNG: Nicht ins Gewebe schleifen!<br />
Reinigen Sie den aufgerauhten Lochbeschläge<br />
und die Klebestellen am Boot mit Alkohol,<br />
Wundbenzin oder GRABNER-Verdünnung<br />
(Sonderzubehör).<br />
ACHTUNG: Die aufgerauhten Stellen müssen<br />
absolut staub- und fettfrei sein!<br />
Tragen Sie den Kleber dünn auf den<br />
Lochbeschlag und die aufgerauhte Stelle am Boot<br />
auf.<br />
Lassen Sie den Kleber ca.5-10 Minuten<br />
abtrocknen, bis die Klebestellen matt werden.<br />
l Tragen Sie den Kleber ein zweites Mal dünn auf.<br />
l Lassen Sie den Kleber erneut ca.5-10 Minuten<br />
trocknen.<br />
ACHTUNG: Klebestellen nicht mit der Hand<br />
berühren! Kleber nach Gebrauch sofort verschließen!<br />
l Kleben Sie die Lochbeschläge auf das Boot auf<br />
und pressen oder reiben Sie diese kräftig an.<br />
l Entfernen Sie eventuelle Kleberreste mit<br />
GRABNER-Verdünnung (Sonderzubehör) und<br />
pressen oder reiben Sie die Beschläge nochmals<br />
an.<br />
ACHTUNG: Verdünnung darf nicht in die<br />
Verklebung kommen - Gefahr das sich die<br />
Verklebung wieder auflöst!<br />
l Warten Sie mindestens zwei Stunden bis zur<br />
Verwendung Ihres Bootes. Am besten ist es, wenn<br />
Sie das Boot unaufgeblasen über Nacht liegen<br />
lassen.<br />
VORSICHT<br />
- Verwenden Sie den Kleber nicht im prallen<br />
Sonnenschein!<br />
- Sorgen Sie für gute Durchlüftung in geschlossenen<br />
Räumen!<br />
- Bewahren Sie den Kleber für Kinder unerreichbar<br />
auf!<br />
- Verwenden Sie den Kleber nicht neben<br />
offenem Feuer - FEUERGEFAHR!<br />
- Entsorgung: Sondermüll lt. Etikette am Kleber<br />
MONTAGE DER SPRITZDECKE<br />
l<br />
l<br />
l<br />
l<br />
l<br />
l<br />
l<br />
Pumpen Sie Ihr <strong>ADVENTURE</strong> auf.<br />
Bohren Sie die markierten Stellen an den Bug-<br />
und Heckschutzleisten mit einem 10 mm Bohrer<br />
durch.<br />
Entfernen Sie den Bug- und Heckgurt vom Boot.<br />
Ziehen Sie die <strong>Spritzdecke</strong> auf das Boot auf (das<br />
GRABNER-Logo auf der <strong>Spritzdecke</strong> muß vorne<br />
sein).<br />
Befestigen Sie die <strong>Spritzdecke</strong> mit den beiden<br />
Gurten am Bug und Heck der <strong>Spritzdecke</strong> an den<br />
Bohrungen der Bug- und Heckschutzleisten.<br />
Hängen Sie die Haken der <strong>Spritzdecke</strong> an den<br />
seitlichen Lochbeschlägen ein .<br />
Stecken Sie die Nirosta D-Ringe durch die<br />
Schlitze der <strong>Spritzdecke</strong> und montieren Sie den<br />
Bug- und Heckgurt wieder.<br />
MONTAGE DER WILDWASSERSCHÜRZEN<br />
l<br />
l<br />
l<br />
l<br />
l<br />
l<br />
l<br />
l<br />
l<br />
l<br />
l<br />
Ziehen Sie die Wildwasser-Schürze über den<br />
Körper (der Paniklösegriff ist vorne in der Mitte).<br />
Setzen Sie sich ins Boot und drücken Sie den<br />
Gummirand der Schürze über den Süllrand der<br />
<strong>Spritzdecke</strong>. Beginnen Sie hinten und drücken<br />
Sie ihn mit beiden Händen gleichzeitig nach<br />
vorne.<br />
Passen Sie den oberen Gummiabschluß mit dem<br />
Tanka-Verschluß am Körperumfang an.<br />
ACHTUNG: Bei einer Kenterung löst sich die<br />
Wildwasser-Schürze automatisch vom Süllrand<br />
der <strong>Spritzdecke</strong>!<br />
In Notfällen können Sie die Wildwasser-Schürze<br />
lösen, indem Sie am Paniklösegriff anziehen!<br />
ACHTUNG: Die Kunststoff-Süllränder ändern<br />
bei Temperaturveränderung ihre Steifigkeit (Bei<br />
kalten Temperaturen ist der Süllrand hart - bei<br />
warmen Temperaturen wird er weich)!<br />
Die grundsätzlich rostfreien Nirosta-Haken<br />
können eventuell leichten "Flugrost"ansetzen -<br />
das ist keine Qualitätsminderung!<br />
PFLEGE UND LAGERUNG<br />
Schützen Sie die <strong>Spritzdecke</strong> vor spitzen und<br />
scharfen Gegenständen.<br />
Vermeiden Sie unnötige Deformierungen der<br />
Süllränder .<br />
ACHTUNG: Die Süllränder beim Verpacken<br />
nicht knicken!<br />
Reinigen Sie die <strong>Spritzdecke</strong> vor dem verpacken.<br />
Spülen Sie die <strong>Spritzdecke</strong> nach<br />
Salzwassergebrauch mit Süßwasser ab.<br />
Bei häufiger Verwendung im Meer, empfehlen<br />
wir Ihnen die Nirosta-Haken mit einem ölgetränkten<br />
Lappen einzulassen.<br />
Die <strong>Spritzdecke</strong> darf bei der Lagerung keinen<br />
extremen Temperaturschwankungen ausgesetzt<br />
werden.<br />
Schützen Sie die <strong>Spritzdecke</strong> bei der Lagerung<br />
vor direkter Sonneneinstrahlung.<br />
Reparieren Sie eventuelle Beschädigungen mit<br />
einem PVC-Kleber.
SPRAY COVER<br />
<strong>ADVENTURE</strong> <strong>SL</strong><br />
INSTRUCTIONS FOR<br />
ASSEMBLY AND USE<br />
GRABNER GMBH<br />
3350 HAAG, Weistracherstr. 11<br />
Tel 07434/42251 Fax 42251-66<br />
www.grabner-sports.at; e-mail:<br />
grabner@grabner-sports.at<br />
Subject to change, errors and misprints. 4/2002<br />
I-BEAM<br />
DEAR WATERSPORTS FRIEND,<br />
This information should assist in mounting and<br />
using your SPRAY COVER.<br />
Please read through the chapters carefully to avoid<br />
problems or possible damages.<br />
LIST OF PARTS<br />
1 spray cover<br />
4 white water aprons<br />
20 perforated fittings (hole fitting)<br />
1 tube glue<br />
1 sandpaper<br />
l<br />
l<br />
l<br />
l<br />
l<br />
PERFORATED FITTING (HOLE FITTING)<br />
FLOOR<br />
SPRAY COVER HOOKS<br />
MOUNTING THE PERFORATED FITTINGS<br />
Inflate your boat.<br />
Pull the spray cover first over the bow and then<br />
over the stern (the GRABNER insignia on the<br />
spray cover should be in front).<br />
Mark the position of the spray cover hooks<br />
on the side tubes of the boat, underneath the<br />
I-beam.<br />
Remove the spray cover from the boat.<br />
Deflate the boat.<br />
l Sand the marked areas on the boat and the side<br />
of the perforated fittings to be glued well with<br />
the sandpaper.<br />
ATTENTION: Do not sand into the fabric!<br />
l Clean the sanded areas with alcohol, benzine or<br />
GRABNER thinner (special accessories).<br />
ATTENTION: The sanded areas must be<br />
absolutely free of dust and oil!<br />
l Apply glue thinly to the perforated fitting and<br />
the sanded areas on the boat.<br />
l Allow glue to dry aprox. 5-10 minutes, until the<br />
glue surface has dulled.<br />
l Apply a second thin coat of glue.<br />
l Allow a second 5-10 minute drying period.<br />
ATTENTION: Do not touch glued areas with<br />
hands! Reseal the glue immediately<br />
after using!<br />
l Glue the fittings to the boat and press or rub<br />
these vigorously.<br />
l Remove any glue residue with GRABNER<br />
thinner (special accessories) and press or ub the<br />
fittings a second time.<br />
ATTENTION: Thinner may not come into<br />
contact with the glued areas - danger of glue<br />
dissolving!<br />
l Wait at least two hours before using the boat.<br />
Ideally, the boat should rest, deflatet, overnight.<br />
MOUNTING THE SPRAY COVER<br />
l<br />
l<br />
l<br />
l<br />
l<br />
l<br />
CAUTION<br />
- Do not use the glue in full sunlight!<br />
- Ensure proper air circulation in enclosed areas!<br />
- Keep out of children's reach!<br />
- Do not use the glue near an open flame -<br />
DANGER OF FIRE!<br />
Inflate your boat.<br />
Drill through the marked postions on the bowand<br />
stern protecting stripes with a 10 mm drill.<br />
Remove the bow-and sternbelt from the boat.<br />
Pull the spray cover first over the bow and then<br />
over the stern (the GRABNER insignia on the<br />
spray cover should be in front).<br />
Fasten the spray deck on the boat with the 2<br />
belts on bow and stern on the drills of the bow-<br />
and stern protecting stripe.<br />
Glue on the perforated fittings (hole fittings).<br />
Hang the spray cover hooks into the holes of the<br />
fitting you have glued to your boat.<br />
l<br />
l<br />
l<br />
l<br />
l<br />
l<br />
l<br />
l<br />
l<br />
l<br />
l<br />
l<br />
Put the Nirosta-D-rings through the slits of the<br />
spray deck and put on again the bow-and<br />
sternbelt.<br />
MOUNTING THE WHITE WATER APRONS<br />
Pull the white water apron over your body (the<br />
panic release handle is front-center).<br />
Sit in the boat and push the rubber edge of the<br />
apron over the spray cover coaming. Beginning<br />
at the rear, push with both hands at the same<br />
time toward the front.<br />
Adjust the upper rubber closure to your body<br />
with the Tanka closure.<br />
ATTENTION: When capsizing, the white water<br />
apron is automatically released from the spray<br />
cover coaming.<br />
In emergencies, you can release the white water<br />
apron by pulling on the panic release handle.<br />
ATTENTION: The stiffness of the plastic<br />
coaming edges varies with changes in<br />
temperature (stiff in cold temperatures, soft in<br />
warm temperatures)!<br />
The rust-free Nirosta hooks can develop a light<br />
rust-film - this doesn´t indicate a decrease in<br />
quality!<br />
CARE AND STORAGE<br />
Protect the spray cover from sharp and pointed<br />
objects.<br />
Avoid any unnecessary deformation of the<br />
coamings.<br />
ATTENTION: Do not bend the coamings when<br />
packing!<br />
Clean the spray cover before packing.<br />
Rinse the spray cover with fresh water after<br />
salt-water usage.<br />
With frequent salt-water usage, we recommend<br />
going over the Nirosta hooks with an oilsaturated<br />
cloth.<br />
The spray cover should not be exposed to<br />
extreme changes in temperature during storage.<br />
Store the spray cover out of direct sunlight.<br />
Repair any damages with PVC glue.