ZUBEHÖR für das proGAV - Christoph Miethke GmbH & Co. KG
ZUBEHÖR für das proGAV - Christoph Miethke GmbH & Co. KG
ZUBEHÖR für das proGAV - Christoph Miethke GmbH & Co. KG

Sie wollen auch ein ePaper? Erhöhen Sie die Reichweite Ihrer Titel.
YUMPU macht aus Druck-PDFs automatisch weboptimierte ePaper, die Google liebt.
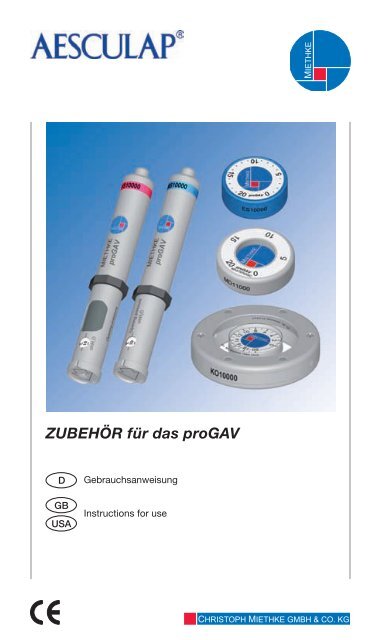
<strong>ZUBEHÖR</strong> <strong>für</strong> <strong>das</strong> <strong>proGAV</strong><br />
D<br />
GB<br />
USA<br />
0297<br />
Gebrauchsanweisung<br />
Instructions for use<br />
MIETHKE<br />
CHRISTOPH MIETHKE GMBH & CO. <strong>KG</strong>
<strong>ZUBEHÖR</strong> <strong>für</strong> <strong>das</strong> <strong>proGAV</strong> D<br />
Inhaltsverzeichnis<br />
Indikation<br />
Prüfinstrument<br />
masterdisc<br />
messkomPass<br />
VersteLLinstrument<br />
VersteLLscheibe<br />
Technische Beschreibung<br />
Arbeitsweise des proGaV<br />
Physikalischer Hintergrund<br />
Auswahl des geeigneten proGaV<br />
Einstellung des proGaV<br />
Druckstufenerkennung im Röntgenbild<br />
Unverbindliche Druckstufenempfehlung<br />
<strong>für</strong> <strong>das</strong> proGaV<br />
Sterilisierbarkeit<br />
Reinigung<br />
Medizinprodukteberater<br />
Allgemeine Informationen<br />
Varianten<br />
4<br />
4<br />
4<br />
4<br />
5<br />
5<br />
6<br />
6<br />
8<br />
9<br />
10<br />
11<br />
12<br />
14<br />
14<br />
14<br />
14<br />
15
4<br />
D<br />
Indikation<br />
Das proGaV ist ein Implantat zur Behandlung<br />
des Hydrocephalus. Mit den<br />
proGaV-Instrumenten kann die gewählte<br />
Druckstufe des proGaV ermittelt, verändert<br />
und kontrolliert werden.<br />
Prüfinstrument<br />
Um den eingestellten Öffnungsdruck<br />
des Ventils abzulesen, wird <strong>das</strong> Prüfinstrument<br />
verwendet. Das Prüfinstrument<br />
wird zentral über dem Ventil auf die Haut<br />
aufgesetzt. Es beinhaltet zwei Magnete.<br />
Sobald die Anzeige (1) durch Drücken auf<br />
den Entriegelungsknopf (2) freigegeben<br />
ist, richten sich die Magnete des Instrumentes<br />
an den Magneten im Ventil aus<br />
und der Öffnungsdruck wird angezeigt.<br />
Die Markierung des Prüfinstrumentes ( )<br />
muss beim Aufsetzen auf <strong>das</strong> Ventil in<br />
Richtung proximalem (zum Ventil führenden)<br />
Katheter zeigen.<br />
2<br />
abb. 1: Prüfinstrument<br />
1<br />
<strong>ZUBEHÖR</strong> <strong>für</strong> <strong>das</strong> <strong>proGAV</strong><br />
masterdisc<br />
Das Prüfinstrument kann vor dem Ablesen<br />
des Ventilöffnungsdruckes durch <strong>das</strong><br />
Aufsetzen auf die Masterdisc überprüft<br />
werden. Auf der Disk sind die Stellungen<br />
0, 5, 10, 15 und 20 cmH2O angegeben.<br />
Wird beim Aufsetzen des Prüfinstrumentes<br />
<strong>das</strong> Anzeigefenster auf den Wert der<br />
Masterdisc ausgerichtet, müssen beide<br />
Werte übereinstimmen.<br />
Beispiel: Das Prüfinstrument wird auf die<br />
Masterdisc so aufgesetzt, <strong>das</strong>s <strong>das</strong> Anzeigefenster<br />
auf den Wert 10 der Masterdisc<br />
zeigt. In diesem Fall sollte auch <strong>das</strong><br />
Prüfinstrument den Wert 10 anzeigen.<br />
abb. 2: masterdisc<br />
messkomPass<br />
Neben dem Prüfinstrument gibt es eine<br />
weitere Möglichkeit, den eingestellten<br />
Öffnungsdruck zu messen. Der Messkompass<br />
wird über dem implantierten<br />
Ventil auf die Haut gesetzt und solange<br />
leicht kreisend bewegt, bis sich die innere<br />
Scheibe stabil ausrichtet. Der Öffnungsdruck<br />
entspricht dem in Richtung Ventrikelkatheter<br />
angezeigten Wert.<br />
abb. 3: messkomPass
<strong>ZUBEHÖR</strong> <strong>für</strong> <strong>das</strong> <strong>proGAV</strong> D<br />
VERSTELLINSTRUMENT<br />
Das Verstellinstrument dient zur Einstellung<br />
des Ventilöffnungsdruckes. Die<br />
gewünschte Druckstufe wird durch Verdrehen<br />
des Verstellrades (1) gewählt, die<br />
Druckstufe erscheint im Anzeigefenster<br />
(2). Das Instrument wird zentral auf <strong>das</strong><br />
Ventil aufgesetzt. Durch Betätigen des<br />
Entriegelungsknopfes (3) wird die Verstellspitze<br />
(4) aus dem Boden gedrückt,<br />
der Rotor im Ventil entriegelt und der<br />
Ventilöffnungsdruck eingestellt. Die Markierung<br />
( ) des Verstellinstrumentes muss<br />
beim Aufsetzen auf <strong>das</strong> Ventil in Richtung<br />
proximalem (zum Ventrikel führenden) Katheter<br />
zeigen.<br />
Warnhinweis<br />
Ist der Implantationsort ungünstig gewählt<br />
oder ist die Haut über dem Ventil<br />
zu dick, besteht die Möglichkeit, <strong>das</strong>s<br />
sich <strong>das</strong> <strong>proGAV</strong> nicht mehr verstellen<br />
lässt. Das Ventil arbeitet dann mit<br />
unveränderlichen Druckstufen. Über<br />
dieses Risiko sollte der Patient aufgeklärt<br />
werden.<br />
3<br />
1<br />
2<br />
Abb. 4: Verstellinstrument<br />
4<br />
VERSTELLSchEIbE<br />
Eine weitere Möglichkeit die Druckstufe zu<br />
verändern, ist die Verwendung der Verstellscheibe.<br />
Die Verstellscheibe<br />
wird zentral auf <strong>das</strong> Ventil aufgesetzt. Dabei<br />
muss die gewünschte Druckstufe in<br />
Richtung Ventrikelkatheter zeigen. Durch<br />
leichten Druck mit der Verstellscheibe auf<br />
<strong>das</strong> Ventil wird die Bremse gelöst und die<br />
<strong>proGAV</strong>-Druckstufe verändert.<br />
a)<br />
b)<br />
c)<br />
Abb. 5: Verstellscheibe<br />
a) Größe s b) Größe m<br />
c) Größe l<br />
Bei der Verstellung ist darauf zu achten,<br />
<strong>das</strong>s der Öffnungsdruck um maximal<br />
8 cmH 2 O pro Verstellvorgang verändert<br />
wird. (siehe „Einstellung des<br />
<strong>proGAV</strong>“) Bei dickerer Haut kann eine<br />
größere Kuppe verwendet werden.
6<br />
D<br />
Technische Beschreibung des<br />
proGaV<br />
Das proGaV ist ein lageabhängig arbeitendes<br />
Hydrocephalusventil. Es besteht<br />
aus einer Kugel-Konus-Einheit mit verstellbarem<br />
Ventilöffnungsdruck und einer<br />
Gravitationseinheit (Abb. 6). Auf diese<br />
Weise kann in jeder Körperposition eine<br />
<strong>für</strong> den individuellen Patienten optimale<br />
Liquor-Drainage sichergestellt werden.<br />
Im Folgenden wird der Aufbau des pro-<br />
GaV beschrieben. Abb. 7 zeigt eine schematische<br />
Querschnittszeichnung.<br />
Die Verstelleinheit besteht aus einem stabilen<br />
Titangehäuse, in dessen proximalem<br />
Teil ein bewährtes Kugel-Konus-Ventil (1)<br />
integriert ist. Eine Stabfeder (2) gewähr-<br />
abb. 6: <strong>das</strong> proGaV ist eine kombination<br />
aus Verstelleinheit und Gravitationseinheit.<br />
Gravitationseinheit<br />
Verstelleinheit<br />
4<br />
5<br />
<strong>ZUBEHÖR</strong> <strong>für</strong> <strong>das</strong> <strong>proGAV</strong><br />
leistet den Öffnungsdruck des Kugel-Konus-Ventils.<br />
Über einen drehbar gelagerten<br />
Rotor ( ) kann die Vorspannung der<br />
Feder und damit der Ventil-Öffnungsdruck<br />
durch die Haut verstellt werden.<br />
Wesentliche Bestandteile der aus Titan<br />
gefertigten Gravitationseinheit sind eine<br />
Tantalkugel (4), die den Öffnungsdruck<br />
dieses Ventils bestimmt und eine Saphirkugel<br />
(5), die den präzisen Verschluss<br />
garantiert. Unter den Silikonkatheteranschlüssen<br />
(6) befindet sich immer ein<br />
Konnektor.<br />
Arbeitsweise des proGaV<br />
Der Öffnungsdruck des proGaV setzt sich<br />
aus den Öffnungsdrücken der Verstell-<br />
und der Gravitationseinheit zusammen.<br />
1<br />
2<br />
1 saphirkugel<br />
2 stabfeder<br />
3 rotor<br />
4 tantalkugel<br />
5 saphirkugel<br />
6 konnektor unter dem katheter<br />
abb. 7: proGaV im Querschnitt<br />
6<br />
6
<strong>ZUBEHÖR</strong> <strong>für</strong> <strong>das</strong> <strong>proGAV</strong><br />
horizontale körperposition<br />
Die Gravitationseinheit ist in der Liegendposition<br />
immer geöffnet und stellt keinen<br />
Widerstand dar (Abb. 8).<br />
abb. 8: Gravitationseinheit in horizontaler<br />
Position<br />
Demnach ist der Öffnungsdruck des pro-<br />
GaV in der horizontalen Körperposition<br />
durch die Verstelleinheit charakterisiert.<br />
Die prinzipielle Arbeitsweise der Verstelleinheit<br />
ist in Abb. 9a und b dargestellt.<br />
Das Kugel-Konus-Ventil ist in der Abb. 9a<br />
geschlossen, es ist keine Drainage möglich.<br />
In Abb. 9b ist die Verstelleinheit im<br />
geöffneten Zustand abgebildet.<br />
Der intraventrikuläre Druck (IVP) des Patienten<br />
ist erhöht und die Federkraft, die<br />
<strong>das</strong> Kugel-Konus-Ventil sonst geschlossen<br />
hält, ist überwunden. Jetzt bewegt<br />
sich die Verschlusskugel aus dem Konus<br />
und ein Spalt zur Liquordrainage wird freigegeben.<br />
a)<br />
b)<br />
abb. 9: Verstelleinheit a) geschlossen<br />
b) offen<br />
Vertikale körperposition<br />
In dem Moment, in dem sich der Patient<br />
aufrichtet, schließt die Gravitationseinheit.<br />
Der Öffnungsdruck des proGaV wird<br />
somit stark erhöht, denn nun muss zusätzlich<br />
zum Öffnungsdruck der Verstelleinheit<br />
die Gewichtskraft der Tantalkugel<br />
(Öffnungsdruck der Gravitationseinheit)<br />
überwunden werden. Erst wenn die Summe<br />
aus IVP und hydrostatischem Sog den<br />
Öffnungsdruck übersteigt, ist eine Drainage<br />
erneut möglich.<br />
a)<br />
b)<br />
abb. 10: Gravitationseinheit in aufrechter<br />
körperhaltung a) geschlossen b) offen<br />
D<br />
7
8<br />
D<br />
Physikalischer Hintergrund<br />
In der liegenden Körperposition ist der<br />
intraventrikuläre Druck beim gesunden<br />
Menschen positiv. Um diesen Druck mittels<br />
Ventildrainage einzustellen, ist unter<br />
Berücksichtigung des Bauchraumdruckes<br />
die geeignete Druckstufe zu wählen.<br />
Dann errechnet sich der IVP aus der<br />
Summe des Ventilöffnungsdrucks und<br />
des Bauchraumdrucks (Abb. 11).<br />
In der stehenden Körperposition wird der<br />
Ventrikeldruck beim gesunden Menschen<br />
IVP Intraventrikulärer Druck<br />
PVli Ventilöffnungsdruck im Liegen (nur<br />
Kugel-Konusventil)<br />
PVst Ventilöffnungsdruck im Stehen (Kugel-<br />
Konusventil + Gravitationsventil)<br />
PB Druck in der Bauchhöhle<br />
PHyd Hydrostatischer Druck<br />
Liegend: IVP = PVli + PB<br />
Stehend: IVP = PHyd - PVst - PB<br />
IVP<br />
CHRISTOPH MIETHKE<br />
0...20<br />
<strong>proGAV</strong><br />
PVli<br />
PB<br />
<strong>ZUBEHÖR</strong> <strong>für</strong> <strong>das</strong> <strong>proGAV</strong><br />
leicht negativ. Um diesen Druck mittels<br />
Ventildrainage einzustellen, muss der<br />
Ventilöffnungsdruck weit höher ausgelegt<br />
werden, als in der liegenden Position<br />
nötig wäre. Nur dann kann <strong>das</strong> Ventil<br />
den hydrostatischen Druck abzüglich des<br />
Bauchraumdrucks und des gewünschten,<br />
leicht negativen intraventrikulären Drucks<br />
kompensieren. Konventionelle Ventile öffnen<br />
in der aufrechten Körperposition sofort<br />
und es kann zu einer kritischen Überdrainage<br />
kommen.<br />
<strong>proGAV</strong><br />
0...20<br />
CHRISTOPH MIETHKE<br />
PHyd<br />
abb. 11: druckverhältnisse im Ventil <strong>für</strong> die liegende und die aufrechte körperposition.<br />
IVP<br />
PVst<br />
PB
<strong>ZUBEHÖR</strong> <strong>für</strong> <strong>das</strong> <strong>proGAV</strong><br />
Auswahl des geeigneten proGaV<br />
Das proGaV ist ein lageabhängig arbeitendes<br />
Ventil, d. h. der Öffnungsdruck ändert<br />
sich mit der Körperposition des Patienten.<br />
Um <strong>das</strong> proGaV individuell dem Patienten<br />
anzupassen, wird ein Öffnungsdruck <strong>für</strong><br />
die horizontale und ein Öffnungsdruck <strong>für</strong><br />
die vertikale Körperposition des Patienten<br />
ausgelegt.<br />
horizontale körperposition:<br />
Der Öffnungsdruck <strong>für</strong> die horizontale Körperposition<br />
wird durch die Verstelleinheit<br />
errreicht. Hier sollte je nach Krankheitsbild<br />
und Indikation eine Druckstufe eingestellt<br />
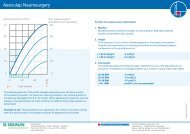
werden. Der Einstellbereich beträgt 0 cm-<br />
H 2 O bis 20 cmH 2 O.<br />
Vertikale körperposition:<br />
Der Öffnungsdruck des proGaV <strong>für</strong> die<br />
vertikale Körperposition errechnet sich aus<br />
der Summe des Öffnungsdrucks der Verstell-<br />
und der Gravitationseinheit. Die<br />
Auswahl der Gravitationseinheit ist abhängig<br />
von der Größe des Patienten (Hydrostatik).<br />
Es wird empfohlen, ein proGaV<br />
zu wählen, <strong>das</strong> sich an dem Höhenunterschied<br />
zwischen drittem Ventrikel und<br />
Zwerchfell orientiert. Zusätzlich sollte<br />
die Aktivität und ein möglicherweise erhöhter<br />
Bauchraumdruck (Adipositas) des<br />
Patienten berücksichtigt werden. (siehe<br />
Druckstufenempfehlung unter www.miethke.com)<br />
Im Röntgenbild sind die Druckstufen<br />
durch Kodierungen zu erkennen. Folgende<br />
Druckstufen <strong>für</strong> die Gravitationseinheit<br />
sind möglich:<br />
Öffnungsdruck<br />
<strong>für</strong> die vertikale<br />
Position<br />
Kodierungsring<br />
a) b)<br />
abb. 12: röntgenbild der Gravitationseinheit<br />
a) groß, 1 ringe = 20 cmh2o,<br />
b) klein = 10 cmh2o<br />
D<br />
Kodierung der<br />
Gravitationseinheit<br />
10 cmH 2 O klein, kein Ring<br />
15 cmH 2 O groß, kein Ring<br />
9
10<br />
D<br />
Einstellung des proGaV<br />
Der Öffnungsdruck der Verstelleinheit<br />
kann vor oder nach der Implantation verändert<br />
werden. Er ist vom Hersteller auf<br />
5cmH2O voreingestellt. Um eine Verstellung<br />
des Ventils vorzunehmen, müssen<br />
folgende Schritte ausgeführt werden:<br />
1. Die Verstelleinheit wird unter der Haut<br />
lokalisiert (Abb. 1 ).<br />
abb. 13: Lokalisation des Ventils<br />
2. Das Prüfinstrument wird zentriert auf<br />
<strong>das</strong> Ventil aufgesetzt. Dabei muss die<br />
Markierung auf dem Prüfinstrument in<br />
Richtung proximalen (zum Ventrikel führenden)<br />
Katheter zeigen. Der Entriegelungsknopf<br />
des Messinstrumentes wird<br />
gedrückt und anschließend die eingestellte<br />
Druckstufe abgelesen. (Abb. 14).<br />
a)<br />
b)<br />
abb. 14: messen der druckstufe<br />
a) richtig b) falsch<br />
p r o G A V<br />
0...20<br />
CHRISTOPH MIETHKE<br />
<strong>ZUBEHÖR</strong> <strong>für</strong> <strong>das</strong> <strong>proGAV</strong><br />
Achtung: Das Prüfinstrument muss<br />
mittig auf <strong>das</strong> Ventil aufgesetzt werden,<br />
sonst kann es zu einer fehlerhaften<br />
Bestimmung des Öffnungsdruckes<br />
kommen!<br />
. Das Verstellinstrument wird auf den<br />
gewünschten Öffnungsdruck eingestellt.<br />
Dies erfolgt durch Verdrehen des Verstellrades,<br />
bis der gewünschte Öffnungsdruck<br />
in der Anzeige erscheint (Abb. 15).<br />
abb. 15: einstellung des Verstellinstrumentes<br />
Achtung: Der neu eingestellte Öffnungsdruck<br />
des Ventils sollte pro Einstellung<br />
nicht mehr als 8 cmH2O von<br />
dem gemessenen Öffnungsdruck abweichen,<br />
da es anderenfalls zu Fehlern<br />
kommen kann (siehe Erklärung S. 10).<br />
4. Das Verstellinstrument wird zentriert<br />
auf <strong>das</strong> Ventil aufgesetzt. Dabei muss die<br />
Markierung auf dem Verstellinstrument<br />
bzw. <strong>das</strong> Ablesefester in Richtung proximalem<br />
(zum Ventrikel führenden) Katheter<br />
zeigen.<br />
5. Ist <strong>das</strong> Verstellinstrument zentral auf<br />
dem Ventil positioniert, wird der Entriegelungsknopf<br />
gedrückt und die Verstellspitze<br />
bewegt sich aus dem Boden des<br />
Verstellinstrumentes. Damit wird im Ventil<br />
die mechanische Bremse gelöst und der<br />
gewünschte Öffnungsdruck eingestellt<br />
(Abb. 16).<br />
Achtung: Während des Betätigens des<br />
Entriegelungsknopfes muss sicher<br />
gestellt sein, <strong>das</strong>s sich <strong>das</strong> Instrument<br />
nicht vom Ventil entfernt.
<strong>ZUBEHÖR</strong> <strong>für</strong> <strong>das</strong> <strong>proGAV</strong><br />
a)<br />
b)<br />
abb. 16: Verstellung der druckstufe<br />
6. Nach der Einstellung des Ventilöffnungsdruckes<br />
wird eine Prüfung durchgeführt.<br />
Dazu wird wie unter Punkt 2 vorgegangen.<br />
Sollte der gemessene Druck<br />
nicht mit der gewünschten Druckstufe<br />
übereinstimmen, wird der Verstellvorgang<br />
wiederholt. Dazu wird erneut bei Punkt<br />
begonnen.<br />
Achtung: Durch die Schwellung der<br />
Haut kann die Einstellung einige Tage<br />
postoperativ erschwert sein!<br />
Bei der Verstellung ist darauf zu achten,<br />
<strong>das</strong>s der Öffnungsdruck um maximal<br />
8cmH2O pro Verstellvorgang verändert<br />
wird.<br />
Beispiel: Der Öffnungsdruck soll von auf<br />
18 cmH2O verändert werden. Bei einem<br />
einzigen Verstellvorgang würde sich der<br />
Rotor entgegen dem Uhrzeigersinn drehen<br />
(kurzer Weg) und bei der Stellung<br />
0 cmH2O anschlagen (Abb. 17a).<br />
Richtig ist die Verstellung in 2 Schritten:<br />
Verstellung von auf 11 und von 11 auf<br />
18 cmH2O. Der Rotor dreht in Uhrzeigerrichtung<br />
(Abb. 17b).<br />
0<br />
a) b) 18<br />
abb. 17: rotordrehung bei Verstellung<br />
a) falsche richtung b) korrekt<br />
Druckstufenerkennung im Röntgenbild<br />
Die eingestellte Druckstufe des proGaV<br />
sollte immer mit dem Prüfinstrument<br />
kontrolliert werden, kann aber auch mittels<br />
eines Röntgenbildes geprüft werden.<br />
Dabei ist die Stellung des Rotors entscheidend.<br />
Die Magnete sind im Röntgenbild<br />
als weiße Punkte zu erkennen.<br />
Anhand der Richtung der Rotorspitze ist<br />
die Druckstufe ablesbar.<br />
Bis auf den dargestellten Bereich (Abb.<br />
18) kann die Rotorspitze jede Position einnehmen.<br />
Somit kann der Öffnungsdruck<br />
des proGaV stufenlos von 0 bis auf 20cm-<br />
H2O eingestellt werden. Um die Druckstufe<br />
nicht seitenverkehrt abzulesen, ist <strong>das</strong><br />
Ventil an einer Seite abgeflacht im Röntgenbild<br />
sichtbar.<br />
1<br />
0<br />
nicht<br />
einstellbarer<br />
Bereich<br />
20<br />
19<br />
abb. 18: schematische darstellung des<br />
rotors im röntgenbild<br />
7<br />
9<br />
11<br />
D<br />
11<br />
Ventil einseitig<br />
abgeflacht<br />
11
12<br />
D<br />
<strong>ZUBEHÖR</strong> <strong>für</strong> <strong>das</strong> <strong>proGAV</strong><br />
Unverbindliche Druckstufenempfehlung <strong>für</strong> <strong>das</strong> proGaV<br />
Einstellempfehlung <strong>für</strong> die Verstelleinheit<br />
Standard (Kinder und NPH-Patienten)<br />
Defensiv (z.B. Patienten mit extrem weiten Ventrikeln,<br />
Aquäduktstenosen oder stark erhöhtem ICP)<br />
Spezial (z.B. Patienten mit Pseudotumor cerebri)<br />
Größe in cm Body-Mass-Index (BMI) Gewicht in kg<br />
125<br />
130<br />
135<br />
140<br />
145<br />
150<br />
155<br />
160<br />
165<br />
170<br />
175<br />
180<br />
185<br />
190<br />
195<br />
200<br />
205<br />
210<br />
extrem adipös<br />
adipös<br />
übergewichtig<br />
normal<br />
Beispiel-Person:<br />
175cm, 65kg, BMI 21,5<br />
untergewichtig<br />
kg<br />
m2 BMI=<br />
Grad II<br />
Grad I<br />
5 cmH2O<br />
10 cmH2O<br />
15 cmH2O<br />
Diese Empfehlungen sind keine verbindlichen Richtwerte, da je nach Patient und Krankengeschichte<br />
auch andere Werte sinnvoll sein können.<br />
BMI<br />
Legen Sie ein Lineal links an Ihre Größe und rechts an Ihr Gewicht.<br />
In der Mitte lässt sich dann Ihr BMI ablesen.<br />
70<br />
60<br />
50<br />
40<br />
30<br />
20<br />
10<br />
150<br />
140<br />
130<br />
120<br />
110<br />
100<br />
95<br />
90<br />
85<br />
80<br />
75<br />
70<br />
65<br />
60<br />
55<br />
50<br />
45<br />
40<br />
35<br />
30<br />
25
<strong>ZUBEHÖR</strong> <strong>für</strong> <strong>das</strong> <strong>proGAV</strong><br />
Kinder bis 5 Jahre<br />
Gravitationseinheit<br />
Kinder (ab 5 Jahre) & Erwachsene (bis 60 Jahre)<br />
Erwachsene ab 60 Jahre<br />
Übergewicht<br />
Bettlägerigkeit<br />
Körpergröße<br />
Kontrolle<br />
Körperposition<br />
Verstellungen<br />
D<br />
20 cmH2O<br />
25 cmH2O<br />
20 cmH2O<br />
Der Druck im Bauchraum wirkt der Drainage entgegen. So<br />
sollte man bei Adipositas-Patienten folgende Korrektur <strong>für</strong><br />
die Gravitationseinheit (abhängig vom BMI) berücksichtigen:<br />
25-29 BMI - 5 cmH 2 O Korrektur<br />
0- 4 BMI -10 cmH 2 O Korrektur<br />
5- 9 BMI -15 cmH 2 O Korrektur<br />
> 40 BMI nur die Verstelleinheit verwenden<br />
(keine Gravitationseinheit nötig)<br />
Bei aktiven Menschen gelten die Standard-Druckstufen.<br />
Bettlägerige Patienten sollten mit einem max. Druck von 20<br />
cmH 2 O in der Gravitationseinheit behandelt werden.<br />
Der hydrostatische Sogeffekt hängt i.d.R. von der Körpergröße<br />
ab. Deshalb empfehlen wir folgende Korrekturfaktoren <strong>für</strong><br />
die Gravitationseinheit:<br />
< 1,60m Körpergröße: - 5 cmH 2 O<br />
> 1,80m Körpergröße: +5 cmH 2 O<br />
Die Verstelleinheit ist vom Hersteller auf 5 cmH 2 O voreingestellt.<br />
Bitte kontrollieren Sie die Werkseinstellung.<br />
Die Verstelleinheit bestimmt allein die Druckstufe im Liegen.<br />
Die entsprechende Druckstufe <strong>für</strong> die vertikale Position<br />
errechnet sich dagegen aus beiden Einheiten (Verstell- &<br />
Gravitationseinheit).<br />
Wenn die Verstelleinheit verändert wird, hat <strong>das</strong> auch einen<br />
entsprechenden Einfluss auf den Öffnungsdruck in der stehenden<br />
Körperposition.<br />
1
14<br />
D<br />
Sterilisierbarkeit<br />
Die Instrumente sind nicht sterilisierbar.<br />
Reinigungsempfehlung<br />
Achtung:<br />
<strong>proGAV</strong> Instrumente sind aus thermolabilen,<br />
wärme- und feuchtigkeitssensiblen<br />
sowie chemisch reagierenden<br />
Bauteilen gefertigt.<br />
<strong>proGAV</strong> Instrument nicht in Reinigungslösungen<br />
einlegen oder Flüssigkeiten<br />
in <strong>das</strong> Gehäuse gelangen<br />
lassen, da eine Beeinträchtigung der<br />
Funktionsweise durch Feuchtigkeit,<br />
Korrosion und Verunreinigung möglich<br />
ist.<br />
Oberflächliche Verunreinigungen der pro-<br />
GAV Instrumente sollten sofort nach dem<br />
Gebrauch prinzipiell mit Reinigern auf<br />
alkoholischer Basis (mindestens 75% Alkohol)<br />
durch ein Wischverfahren entfernt<br />
werden.<br />
Die Einwirkzeit sollte mindestens 60 Sekunden<br />
betragen und sollte dem Grad der<br />
Verunreinigung angepasst werden. Die Instrumente<br />
sollten im Anschluss mit einem<br />
trockenem Tuch abgewischt werden.<br />
Folgende Reinigungsverfahren sind nicht<br />
zur Aufbereitung der <strong>proGAV</strong> Instrumente<br />
geeignet:<br />
Bestrahlung<br />
Ultraschall<br />
Sterilisation<br />
Maschinelle Aufbereitung<br />
Einlegen in Reinigungsflüssigkeiten<br />
<strong>ZUBEHÖR</strong> <strong>für</strong> <strong>das</strong> <strong>proGAV</strong><br />
Medizinprodukteberater<br />
Die <strong>Christoph</strong> <strong>Miethke</strong> <strong>GmbH</strong> & <strong>Co</strong>. <strong>KG</strong><br />
benennt entsprechend den Forderungen<br />
der Medizinprodukterichtlinie 9 /42/EWG<br />
vom 14. Juni 199 Medizinprodukteberater,<br />
die Ansprechpartner <strong>für</strong> alle produktrelevanten<br />
Fragen sind:<br />
Dipl.-Ing. <strong>Christoph</strong> <strong>Miethke</strong><br />
Dipl.-Ing. Roland Schulz<br />
<strong>Christoph</strong> <strong>Miethke</strong> <strong>GmbH</strong> & <strong>Co</strong>. <strong>KG</strong><br />
Ulanenweg 2<br />
D-14469 Potsdam<br />
Tel.:+49(0) 7000 MIETHKE oder<br />
Tel.:+49 (0) 1 6208 -0<br />
Fax:+49 (0) 1 6208 -40<br />
e-mail: info@miethke.com<br />
Bei Rückfragen wenden Sie sich bitte an:<br />
AESCULAP AG & CO. <strong>KG</strong><br />
Am Aesculap Platz<br />
D-785 2 Tuttlingen<br />
Tel.:+49 (0) 7461 95-0<br />
Fax:+49 (0) 7461 95-26 00<br />
e-mail: information@aesculap.de<br />
Allgemeine Informationen<br />
Hersteller <strong>Christoph</strong> <strong>Miethke</strong><br />
<strong>GmbH</strong> & <strong>Co</strong>. <strong>KG</strong><br />
Produktbezeichnung<br />
Verwendungszweck<br />
trocken und sauber lagern<br />
Zubehör <strong>für</strong> <strong>das</strong><br />
proGaV<br />
Behandlung des<br />
Hydrocephalus
<strong>ZUBEHÖR</strong> <strong>für</strong> <strong>das</strong> <strong>proGAV</strong><br />
Varianten<br />
PRÜFINSTRUMENT<br />
MESSKOMPASS<br />
MASTERDISC<br />
VERSTELLINSTRUMENT<br />
VERSTELLSCHEIBE<br />
D<br />
15
16<br />
GB<br />
<strong>Co</strong>ntent<br />
Indication<br />
Verification tooL<br />
masterdisc<br />
Verification comPass<br />
adjustment tooL<br />
adjustment disc<br />
Technical description<br />
Function of the proGaV<br />
Physics background<br />
Selecting the appropriate proGaV<br />
Adjusting the proGaV<br />
Reading the pressure setting from an X-ray image<br />
Cleaning<br />
Medical products consultant<br />
General information<br />
Recommendation of pressure levels<br />
Variants<br />
TOOLS for <strong>proGAV</strong><br />
17<br />
17<br />
17<br />
17<br />
18<br />
18<br />
19<br />
20<br />
21<br />
22<br />
2<br />
24<br />
25<br />
25<br />
25<br />
26<br />
28
TOOLS for <strong>proGAV</strong><br />
Indication<br />
The proGaV is an implant for the treatment<br />
of hydrocephalus. With the proGaV tooL<br />
set the opening pressure of the valve can<br />
be verified, changed and controled.<br />
Verification tooL<br />
The verification tool is used for reading<br />
the valve opening pressure setting. First,<br />
the verification tool should be placed on<br />
the valve. The marking (3) on the verification<br />
tool must be in line with the proximal<br />
(ventricular) catheter. The tool contains<br />
two magnets. As soon as the button on<br />
the instrument is pushed (2) the magnets<br />
in the tool align with the magnets in the<br />
valve. The opening pressure is shown on<br />
the scale (1).<br />
fig. 1: Verification tool<br />
2<br />
1<br />
masterdisc<br />
GB<br />
The verification tool can be easily checked<br />
by using the masterdisc before measuring<br />
the opening pressure of the valve. On the<br />
disc the positions 0, 5, 10, 15 and 20 cm-<br />
H 2 O are indicated. If the verification tool<br />
is placed on the disc the opening pressure<br />
shown by the instrument should be<br />
aligned to the value of the masterdisc. Example:<br />
The verification tool is put on the<br />
masterdisc so that the marking on the instrument<br />
is in line with the value 10 cmH 2 O<br />
on the masterdisc. The verification tool<br />
should indicate the value of 10 cmH 2 O.<br />
fig. 2: masterdisc<br />
Verification comPass<br />
Alongside the verification tool there is an<br />
additional device for measuring the adjusted<br />
opening pressure. The compass can<br />
be used to locate the valve when palpation<br />
is not possible. The measuring compass<br />
is set on the skin over the implanted<br />
valve and moved in a circling motion until<br />
the internal disc is fixed over the valve.<br />
The opening pressure corresponds to the<br />
value indicated toward the direction of the<br />
ventricular catheter.<br />
fig. 3: Verification compass<br />
17
18<br />
GB<br />
Adjustment tool<br />
The adjustment tool is used for adjusting<br />
the valve opening pressure. First the intended<br />
pressure setting is selected at<br />
the knurled dial (1), the opening pressure<br />
is shown on a scale (2). Then the adjustment<br />
tool is placed central on the valve.<br />
By pushing the button (3), the adjustment<br />
tip (4) appears, the brake is decoupled,<br />
the rotor turns and the adjusted pressure<br />
is achieved.<br />
The marking (5) on the adjustment tool<br />
has to point towards the proximal catheter<br />
(leading to the ventricle).<br />
Warning note<br />
If the implantation site is poorly selected<br />
or if the skin over the valve is<br />
too thick, adjustment of the <strong>proGAV</strong><br />
can be difficult or sometimes impossible.<br />
The valve works then as gravitational<br />
valve with constant opening<br />
pressure. The patient should be informed<br />
about the risk.<br />
3<br />
1<br />
2<br />
5<br />
Fig. 4: Adjustment tool<br />
4<br />
Adjustment disc<br />
TOOLS for <strong>proGAV</strong><br />
The adjustment disc offers an other option<br />
to adjust the pressure setting. The adjustment<br />
disc is placed centrally over the<br />
valve. The desired pressure setting should<br />
be aligned with the proximal catheter (leading<br />
to the ventricle). By pressing down<br />
the adjustment disc on the valve, the brake<br />
is decoupled and the opening pressure<br />
of the <strong>proGAV</strong> is changed.<br />
a)<br />
b)<br />
c)<br />
Fig. 5: Adjustment disc<br />
a) size S b) size M c) size L<br />
Ensure that the pressure setting is<br />
changed no more than 8 cmH 2 O. (see<br />
„Adjusting the <strong>proGAV</strong>“)<br />
Use a longer tip (size L) for thicker skin.<br />
(Fig. 5)
TOOLS for <strong>proGAV</strong><br />
Technical description of the proGaV<br />
The proGaV is a posture dependent hydrocephalus<br />
valve. It comprises a ballcone<br />
valve with adjustable opening pressure,<br />
and a fixed pressure gravitational<br />
unit. In this way, optimal CSF drainage is<br />
ensured for each individual patient in any<br />
body position.<br />
The function of both units is described as<br />
follows. Fig. 7 shows a schematic cross<br />
section of the proGaV. The adjustable unit<br />
fig. 6: the proGaV is a combination of an<br />
adjustable unit and a gravitational unit.<br />
Gravitational unit<br />
Adjustable unit<br />
4<br />
5<br />
GB<br />
is composed of a solid titanium body with<br />
a well-tried ball-cone valve (1) integrated<br />
in its proximal part. A bow spring (2) defines<br />
the opening pressure of the ball-cone<br />
valve. The pretensioning of the spring,<br />
and thus the valve opening pressure, can<br />
be adjusted by turning a rotor (3), with the<br />
valve implanted under the patient’s skin.<br />
The gravitational unit contains a tantalum<br />
ball (4), which defines the opening pressure<br />
of this valve, and a saphire ball (5),<br />
which ensures the precise closure of the<br />
valve. A connector under the silicone catheter<br />
(6) alway allows a later disconnection<br />
of the catheter if necessary.<br />
CAUTION<br />
Federal law restricts this device to<br />
sale by or on order of a physician!<br />
6<br />
6<br />
1<br />
2<br />
1 saphire ball<br />
2 torsion bar<br />
3 rotor<br />
4 tantalum ball<br />
5 saphire ball<br />
6 connector under the silicone<br />
fig. 7: schematic cross section of the<br />
proGaV<br />
19
20<br />
GB<br />
Function of the proGaV<br />
The opening pressure of the proGaV is<br />
composed of the opening pressure of the<br />
adjustable unit and the opening pressure<br />
of the gravitational unit.<br />
fig. 8: Gravitational unit in horizontal position<br />
horizontal posture<br />
When the patient is lying down, the gravitational<br />
unit is always open and therefore<br />
does not present any resistance to the<br />
fluid flow.<br />
Hence, the opening pressure of the pro-<br />
GaV is defined by the adjustable unit. The<br />
operational principle of the adjustable unit<br />
is illustrated in figures 9a and b. In fig. 9a,<br />
the ball-cone valve is closed. The drainage<br />
is blocked. In fig. 9b, the adjustable<br />
unit is shown in the open condition. The<br />
patient’s IVP is increased and the spring<br />
force, which otherwise keeps closed the<br />
ball-cone valve, is overcome. The closing<br />
ball moves out of the cone and a gap<br />
opens to allow drainage.<br />
a)<br />
b)<br />
fig. 9: adjustable unit<br />
a) closed b) open<br />
TOOLS for <strong>proGAV</strong><br />
Vertical position<br />
As soon as the patient moves into an<br />
upright position, the gravitational unit<br />
closes, the opening pressure of the pro-<br />
GaV is significantly increased and CSF<br />
drainage is blocked (fig. 10a). Only when<br />
the sum of the IVP and the hydrostatic<br />
pressure exceeds the opening pressure<br />
of the proGaV, drainage will be possible<br />
again (fig. 10b). The opening pressure of<br />
the proGaV in the vertical position is the<br />
sum of the opening pressures of both the<br />
adjustable unit and the gravitational unit<br />
(weight of the tantalum ball).<br />
a)<br />
b)<br />
fig. 10: Gravitational unit in upright<br />
position a) closed, b) open
TOOLS for <strong>proGAV</strong><br />
Physics background<br />
The intraventricular pressure is positive<br />
in a healthy human in a horizontal position.<br />
To adjust this pressure through shunt<br />
drainage, one has to choose the appropriate<br />
pressure range, taking into account<br />
the abdominal cavity pressure. The resulting<br />
IVP is the sum of the shunt opening<br />
pressure and the abdominal cavity pressure<br />
(fig. 11).<br />
IVP Intraventricular pressure<br />
PVli Opening pressure in horizontal position<br />
(adjustable unit only)<br />
PVst Opening pressure in vertical position<br />
(adjustable + gravitational unit)<br />
PB Pressure in the abdominal cavity<br />
PHyd Hydrostatic pressure<br />
horizontal: IVP = PVli + PB<br />
standing: IVP = PHyd - PVst - PB<br />
IVP<br />
CHRISTOPH MIETHKE<br />
0...20<br />
<strong>proGAV</strong><br />
PVli<br />
PB<br />
GB<br />
The ventricular pressure in a healthy human<br />
in a vertical position becomes slightly<br />
negative. To maintain this pressure by<br />
means of shunt drainage, the shunt opening<br />
pressure has to be significantly higher<br />
so that the shunt can compensate the<br />
hydrostatic pressure minus the sum of the<br />
abdominal cavity pressure and the slightly<br />
negative intraventricular pressure.<br />
<strong>proGAV</strong><br />
0...20<br />
CHRISTOPH MIETHKE<br />
PHyd<br />
fig. 11: Pressure situation at the shunt for horizontal and vertical position<br />
IVP<br />
PVst<br />
PB<br />
21
22<br />
GB<br />
Selecting the appropriate proGaV<br />
The proGaV is a position-dependent shunt,<br />
meaning the opening pressure changes<br />
depending on the position of the patient.<br />
To choose the proGaV for an individual patient,<br />
one opening pressure is set for the<br />
horizontal position (patient lying down),<br />
and one for the vertical position (patient<br />
standing upright).<br />
horizontal position:<br />
The opening pressure for the horizontal position<br />
is defined by the adjustable unit. The<br />
pressure level should be chosen according<br />
to the clinical situation and indication. The<br />
unit can be adjusted to a pressure setting<br />
between 0 cmH2O and 20 cmH2O.<br />
Vertical position:<br />
The opening pressure of the proGaV for<br />
the vertical position is calculated by the<br />
sum of the opening pressure of the adjustment<br />
and of the gravitational unit. The<br />
selection of the gravitational unit depends<br />
on the activity and the abdominal pressure<br />
(adiposity). The following opening pressure<br />
ranges for the gravitation unit are possible,<br />
the pressure range selected can be checked<br />
postoperatively on X-ray image:<br />
Opening pressure<br />
for vertical posture<br />
<strong>Co</strong>ding ring<br />
TOOLS for <strong>proGAV</strong><br />
a) b)<br />
<strong>Co</strong>ding of<br />
gravitational unit<br />
10 cmH2O small, no ring<br />
15 cmH2O large, no ring<br />
20 cmH2O large, 1 ring<br />
25 cmH2O large, 2 rings<br />
30 cmH2O large, 3 rings<br />
35 cmH2O large, 4 rings<br />
fig. 12: X-ray image of the gravitational<br />
unit a) large, 2 rings = 25cmh2o,<br />
b) small = 10cmh2o
TOOLS for <strong>proGAV</strong><br />
Adjusting the proGaV<br />
Each proGaV is calibrated under strict<br />
quality control procedures.<br />
The presetting of the adjustable unit is<br />
5 cmH2O, but it must be checked before<br />
implantation. The setting is changed in<br />
the following steps:<br />
1. The valve is located under the skin (fig.<br />
13).<br />
fig. 13: Locating the valve<br />
2. The verification tool is positioned centrally<br />
on the valve. The marking on the<br />
instrument has to point towards the proximal<br />
catheter (leading to the ventricle). The<br />
button is pushed and the pressure setting<br />
is read (fig. 14).<br />
fig. 14: measuring the pressure setting a)<br />
correctly, b) incorrectly<br />
a)<br />
p r o G A V<br />
0...20<br />
CHRISTOPH MIETHKE<br />
b)<br />
GB<br />
Caution: Placing the verification tool<br />
in a non-central position on the valve<br />
can lead to erroneous readings!<br />
3. The adjustment tool is set to the required<br />
opening pressure by turning the<br />
knurled dial of the unit (fig. 15).<br />
abb. 15: adjustment of the verification<br />
tool<br />
Caution: The new opening pressure<br />
setting of the valves must not differ<br />
from the measured opening pressure<br />
by more than 8 cmH2O in any one setting<br />
(see page 23)<br />
4. The adjustment tool is positioned centrally<br />
on the valve. The marking on the instrument<br />
has to point towards the proximal<br />
catheter (leading to the ventricle).<br />
5. As soon as the adjustment tool has<br />
been positioned centrally on the valve,<br />
the button is pushed onto the valve and<br />
the adjustment tip appears. This triggers<br />
the mechanical decoupling and the valve<br />
setting is adjusted to the required opening<br />
pressure setting (fig. 16)<br />
Caution: By pushing the button the instrument<br />
should stay very close to the<br />
valve.<br />
2
a)<br />
24<br />
GB<br />
fig. 16: adjusting the pressure setting<br />
6. After the adjustment, the valve opening<br />
pressure is measured again, as described<br />
in step 2. If the pressure measured now<br />
differs from the intended pressure level,<br />
the adjustment procedure has to be repeated<br />
from step 3.<br />
Caution: Due to postoperative swelling<br />
of the skin the adjustment of the<br />
valve setting may be difficult within<br />
the first few days.<br />
During the adjustment the opening<br />
pressure of the adjustable unit should<br />
not be changed more than 8 cmH2O<br />
per adjustment procedure. Example:<br />
Opening pressure is to be changed from<br />
3 to 18 cmH2O. With only one adjustment<br />
procedure the rotor would turn in a<br />
counter clockwise direction (short way)<br />
b)<br />
TOOLS for <strong>proGAV</strong><br />
and would stop at the position 0 cmH2O<br />
(fig. 17a). The correct adjustment is in 2<br />
steps: Adjustment from 3 to 11, and from<br />
11 to 18 cmH2O. The rotor turns now in a<br />
clockwise direction (fig. 17b).<br />
0<br />
a) b)<br />
18<br />
fig. 17: rotor rotation during adjustment<br />
a) false b) correct<br />
Reading the pressure setting from<br />
an X-ray image<br />
The pressure setting of the proGaV should<br />
be measured with the verification tool, but<br />
if there is any discrepancy between the<br />
desired adjustment setting and the setting<br />
that is read by the verification tool,<br />
then a radiographic confirmation (x-ray)<br />
can be performed to confirm the actual<br />
valve setting. The magnets are visible in<br />
the image as white dots. The direction of<br />
the rotor tip indicates the pressure setting.<br />
The rotor tip can take any position<br />
outside region (Fig. 18). Thus, the opening<br />
pressure of the proGaV can be adjusted<br />
in increments of 1 cmH2O between 0 and<br />
20 cmH2O.<br />
In order to avoid misidentification of the<br />
adjusted opening pressure in the X-ray<br />
image, the valve is flattened on one side.<br />
1<br />
0<br />
range<br />
not adjustable<br />
11<br />
20<br />
19<br />
valve is flattened<br />
on one<br />
side<br />
fig. 18: schematic X-ray image<br />
7<br />
9<br />
11
TOOLS for <strong>proGAV</strong><br />
Cleaning recommendation<br />
Attention:<br />
<strong>proGAV</strong> instruments are made from<br />
thermal unstable components which<br />
are affectable by heat or humidity or<br />
chemical agressive substances.<br />
Do not steep the <strong>proGAV</strong> instrument<br />
in liquids and keep the inside of the instruments<br />
dry!<br />
Remove surface pollution of the <strong>proGAV</strong><br />
instruments after the use immediately<br />
with alcohol based cleaners (more than<br />
75% alc.) by a wiping procedure.<br />
The time of impact should be more than<br />
60 sec. and should be depending on the<br />
level of pollution. For final cleaning use a<br />
dry wipe.<br />
The following cleaning methods are not<br />
allowed for the cleaning of the <strong>proGAV</strong><br />
instruments:<br />
Irradiation<br />
Ultrasonic<br />
Sterilization<br />
Machine preparation<br />
Inserting into liquids<br />
Medical products consultant<br />
In compliance with the requirements of<br />
the European law MDD 93/42/EEC, <strong>Christoph</strong><br />
<strong>Miethke</strong> <strong>GmbH</strong> & <strong>Co</strong>. <strong>KG</strong> names<br />
medical product consultants as the individuals<br />
to be addressed with all queries<br />
concerning the products:<br />
Dipl.-Ing. <strong>Christoph</strong> <strong>Miethke</strong><br />
Dipl.-Ing. Roland Schulz<br />
<strong>Christoph</strong> <strong>Miethke</strong> <strong>GmbH</strong> & <strong>Co</strong>. <strong>KG</strong><br />
Ulanenweg 2<br />
D-14469 Potsdam<br />
Phone: +49(0) 7000 6438453 or<br />
Phone: +49(0) 331 620 83 0<br />
Fax: +49(0) 331 620 83 40<br />
e-mail: info@miethke.com<br />
Please address any enquiries to:<br />
AESCULAP AG & CO. <strong>KG</strong><br />
Am Aesculap Platz<br />
D-78532 Tuttlingen<br />
Phone: +49 (0) 7461 95-9<br />
Fax: +49 (0) 7461 95-26 00<br />
e-mail: information@aesculap.de<br />
Service address in the US<br />
AESCULAP Inc.<br />
Attn. AESCULAP Technical Services<br />
615 Lambert Pointe Road<br />
Hazelwood, MO, 63042<br />
AESCULAP Repair Hotline<br />
Phone: +1 (800) 214-3392<br />
Fax: +1 (314) 895-4420<br />
GB<br />
Distributor in the US/ <strong>Co</strong>ntact in Canada<br />
AESCULAP Inc.<br />
3773 <strong>Co</strong>rporate Parkway<br />
Center Valley, PA 18034<br />
Phone: +1-800-282-9000<br />
www.aesculapusa.com<br />
General information<br />
Manufacturer<br />
Product name<br />
<strong>Christoph</strong> <strong>Miethke</strong><br />
<strong>GmbH</strong> & <strong>Co</strong>. <strong>KG</strong><br />
tooLs for<br />
proGaV<br />
Intended use Treatment of<br />
Hydrocephalus<br />
Store in a clean, dry place<br />
25
26<br />
GB<br />
Recommendation of pressure levels<br />
Adjustable unit<br />
Standard (children and NPH-patients)<br />
Defensive (e.g. patients with extremely wide ventricles<br />
and highly elevated ICP or aqueductal stenosis)<br />
Special (e.g. patients with pseudotumor cerebri)<br />
125<br />
130<br />
135<br />
140<br />
145<br />
150<br />
155<br />
160<br />
165<br />
170<br />
175<br />
180<br />
185<br />
190<br />
195<br />
200<br />
205<br />
210<br />
TOOLS for <strong>proGAV</strong><br />
height in cm weight in kg<br />
e.g. person:<br />
extremely adipose<br />
adipose<br />
overweight<br />
normal<br />
175cm, 65kg, BMI 21,5<br />
underweight<br />
kg<br />
m2 BMI=<br />
Body-Mass-Index (BMI)<br />
level II<br />
level I<br />
BMI<br />
Draw a line between height on left side and weight on right<br />
side. In the middle you can read the individual´s BMI.<br />
The recommendations are based on common patient treatments, but can vary<br />
depending on the individual patient´s condition.<br />
70<br />
60<br />
50<br />
40<br />
30<br />
20<br />
10<br />
5 cmH2O<br />
10 cmH2O<br />
15 cmH2O<br />
150<br />
140<br />
130<br />
120<br />
110<br />
100<br />
95<br />
90<br />
85<br />
80<br />
75<br />
70<br />
65<br />
60<br />
55<br />
50<br />
45<br />
40<br />
35<br />
30<br />
25
TOOLS for <strong>proGAV</strong><br />
Children up to 5 years<br />
Children over 5 years and<br />
Adults up to 60 years<br />
Adults over 60 years<br />
Overweight<br />
Mobility<br />
Height<br />
<strong>Co</strong>ntrol<br />
Body position<br />
Adjustment<br />
Gravitational unit<br />
GB<br />
20 cmH2O<br />
25 cmH2O<br />
20 cmH2O<br />
The peritoneal pressure inhibits drainage. Therefore the<br />
gravitational unit should consider the following adjustments<br />
concerning adipose patients as a function of body-mass-index<br />
(BMI):<br />
25-29 BMI -5 cmH 2 O below standard recommendation<br />
0- 4 BMI -10 cmH 2 O below standard recommendation<br />
5- 9 BMI -15 cmH 2 O below standard recommendation<br />
>40 BMI only apply the adjustable unit<br />
(no gravitational unit necessary)<br />
Standard pressure levels are suitable for active people. Not<br />
very mobile patients should be treated with a maximum pressure<br />
of 20 cmH 2 O in the gravitational unit.<br />
The hydrostatic suction effect normally depends on the height.<br />
Therefore we recommend the following corrections for the<br />
gravitational unit:<br />
< 1,60 m height: - 5 cmH 2 O below standard recommendation<br />
> 1,80 m height: +5 cmH 2 O above standard recommendation<br />
The adjustable unit is adjusted to 5 cmH 2 O by the manufacturer.<br />
Please control the pressure setting before use.<br />
Only the adjustable unit determines the pressure level in the<br />
horizontal body position. The analogous pressure level for the<br />
vertical body position results from the addition of both - adjustable<br />
and gravitational unit.<br />
Changing the adjustable unit also influences the opening pressure<br />
level in the vertical body position.<br />
27
28<br />
GB<br />
Variants<br />
VERIFICATION TOOL<br />
VERIFICATION COMPASS<br />
MASTERDISC<br />
ADjUSTMENT TOOL<br />
ADjUSTMENT DISC<br />
TOOLS for <strong>proGAV</strong>
0297<br />
CE-Kennzeichnung gemäß Richtlinie 93/42/EWG<br />
CE marking according to directive 93/42/EEC<br />
Label CE conforme à la directive 93/42/CEE<br />
Identificatión CE en conformidad con la directriz 93/42/CEE<br />
Marchio CE conforme alla direttiva 93/42/CEE<br />
Technische Änderungen vorbehalten<br />
Technical alterations reserved<br />
Sous réserve de modifications techniques<br />
Sujeto a modificationes técnicas<br />
<strong>Co</strong>n riserva di modifiche tecniche<br />
Distributed by Manufacturer acc. MDD 93/42/EEC<br />
AESCULAP AG & CO. <strong>KG</strong><br />
Am Aesculap-Platz<br />
D-78532 Tuttlingen<br />
Tel.:+49 (0) 7461 95-0<br />
Fax:+49 (0) 7461 95-26 00<br />
e-mail: information@aesculap.de<br />
www.aesculap.de<br />
Ulanenweg 2<br />
D-14469 Potsdam<br />
Tel.:+49 (0) 7000 MIETHKE or<br />
Tel.:+49 (0) 331 62083-0<br />
Fax:+49 (0) 331 62083-40<br />
e-mail: info@miethke.com<br />
www.miethke.com<br />
TA 012597 GBA 08 010807<br />
CHRISTOPH MIETHKE GMBH & CO. <strong>KG</strong>