PDF-Download der Bedienungsanleitung - Audio Design GmbH
PDF-Download der Bedienungsanleitung - Audio Design GmbH
PDF-Download der Bedienungsanleitung - Audio Design GmbH

Erfolgreiche ePaper selbst erstellen
Machen Sie aus Ihren PDF Publikationen ein blätterbares Flipbook mit unserer einzigartigen Google optimierten e-Paper Software.
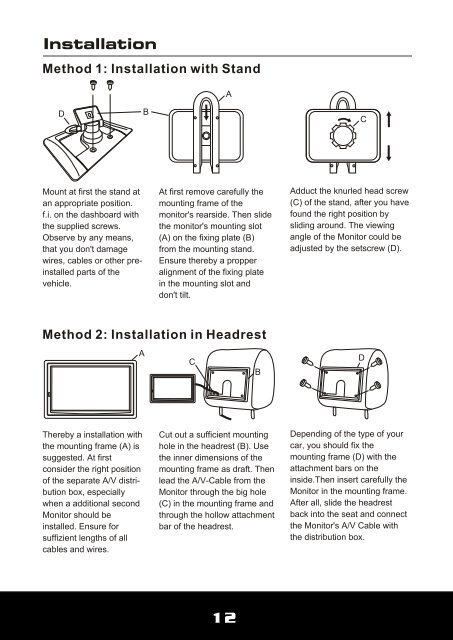
Installation<br />
Method 1: Installation with Stand<br />
2<br />
D<br />
Mount at first the stand at<br />
an appropriate position.<br />
f.i. on the dashboard with<br />
the supplied screws.<br />
Observe by any means,<br />
that you don't damage<br />
wires, cables or other preinstalled<br />
parts of the<br />
vehicle.<br />
B<br />
At first remove carefully the<br />
mounting frame of the<br />
monitor's rearside. Then slide<br />
the monitor's mounting slot<br />
(A) on the fixing plate (B)<br />
from the mounting stand.<br />
Ensure thereby a propper<br />
alignment of the fixing plate<br />
in the mounting slot and<br />
don't tilt.<br />
Method 2: Installation in Headrest<br />
Thereby a installation with<br />
the mounting frame (A) is<br />
suggested. At first<br />
consi<strong>der</strong> the right position<br />
of the separate A/V distribution<br />
box, especially<br />
when a additional second<br />
Monitor should be<br />
installed. Ensure for<br />
suffizient lengths of all<br />
cables and wires.<br />
A<br />
C<br />
Cut out a sufficient mounting<br />
hole in the headrest (B). Use<br />
the inner dimensions of the<br />
mounting frame as draft. Then<br />
lead the A/V-Cable from the<br />
Monitor through the big hole<br />
(C) in the mounting frame and<br />
through the hollow attachment<br />
bar of the headrest.<br />
A<br />
12<br />
B<br />
C<br />
Adduct the knurled head screw<br />
(C) of the stand, after you have<br />
found the right position by<br />
sliding around. The viewing<br />
angle of the Monitor could be<br />
adjusted by the setscrew (D).<br />
D<br />
Depending of the type of your<br />
car, you should fix the<br />
mounting frame (D) with the<br />
attachment bars on the<br />
inside.Then insert carefully the<br />
Monitor in the mounting frame.<br />
After all, slide the headrest<br />
back into the seat and connect<br />
the Monitor's A/V Cable with<br />
the distribution box.