DE - JET GmbH
DE - JET GmbH
DE - JET GmbH

Erfolgreiche ePaper selbst erstellen
Machen Sie aus Ihren PDF Publikationen ein blätterbares Flipbook mit unserer einzigartigen Google optimierten e-Paper Software.
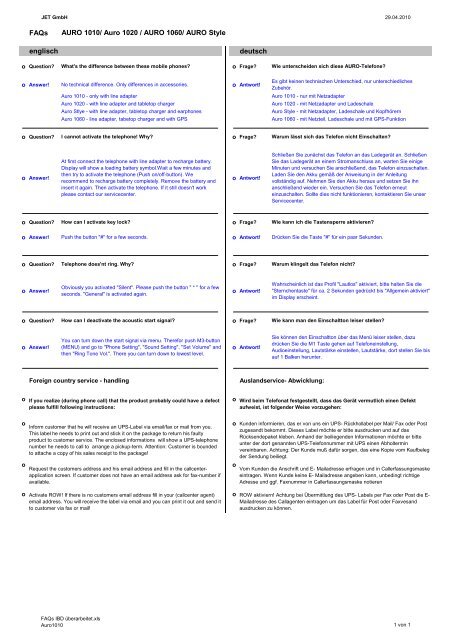
<strong>JET</strong> <strong>GmbH</strong> 29.04.2010<br />
FAQs<br />
AURO 1010/ Auro 1020 / AURO 1060/ AURO Style<br />
englisch<br />
deutsch<br />
o Question?<br />
What's the difference between these mobile phones?<br />
o Frage?<br />
Wie unterscheiden sich diese AURO-Telefone?<br />
o Answer!<br />
No technical difference. Only differences in accessories.<br />
o Antwort!<br />
Es gibt keinen technischen Unterschied, nur unterschiedliches<br />
Zubehör.<br />
Auro 1010 - only with line adapter<br />
Auro 1020 - with line adapter and tabletop charger<br />
Auro Stlye - with line adapter, tabletop charger and earphones<br />
Auro 1060 - line adapter, tabetop charger and with GPS<br />
Auro 1010 - nur mit Netzadapter<br />
Auro 1020 - mit Netzadapter und Ladeschale<br />
Auro Style - mit Netzadapter, Ladeschale und Kopfhörern<br />
Auro 1060 - mit Netzteil, Ladeschale und mit GPS-Funktion<br />
o Question?<br />
I cannot activate the telephone! Why?<br />
o Frage?<br />
Warum lässt sich das Telefon nicht Einschalten?<br />
o Answer!<br />
At first connect the telephone with line adapter to recharge battery.<br />
Display will show a loading battery symbol.Wait a few minutes and<br />
then try to activate the telephone (Push on/off-button). We<br />
recommend to recharge battery completely. Remove the battery and<br />
insert it again. Then activate the telephone. If it still doesn't work<br />
please contact our servicecenter.<br />
o Antwort!<br />
Schließen Sie zunächst das Telefon an das Ladegerät an. Schließen<br />
Sie das Ladegerät an einem Stromanschluss an, warten Sie einige<br />
Minuten und versuchen Sie anschließend, das Telefon einzuschalten.<br />
Laden Sie den Akku gemäß der Anweisung in der Anleitung<br />
vollständig auf. Nehmen Sie den Akku heraus und setzen Sie ihn<br />
anschließend wieder ein. Versuchen Sie das Telefon erneut<br />
einzuschalten. Sollte dies nicht funktionieren, kontaktieren Sie unser<br />
Servicecenter.<br />
o Question?<br />
How can I activate key lock?<br />
o Frage?<br />
Wie kann ich die Tastensperre aktivieren?<br />
o Answer!<br />
Push the button "#" for a few seconds.<br />
o Antwort!<br />
Drücken Sie die Taste "#" für ein paar Sekunden.<br />
o Question?<br />
Telephone does'nt ring. Why?<br />
o Frage?<br />
Warum klingelt das Telefon nicht?<br />
o Answer!<br />
Obviously you activated "Silent". Please push the button " * " for a few<br />
seconds. "General" is activated again.<br />
o Antwort!<br />
Wahrscheinlich ist das Profil "Lautlos" aktiviert, bitte halten Sie die<br />
"Sternchentaste" für ca. 2 Sekunden gedrückt bis "Allgemein aktiviert"<br />
im Display erscheint.<br />
o Question?<br />
How can I deactivate the acoustic start signal?<br />
o Frage?<br />
Wie kann man den Einschaltton leiser stellen?<br />
o Answer!<br />
You can turn down the start signal via menu. Therefor push M3-button<br />
(MENU) and go to "Phone Setting", "Sound Setting", "Set Volume" and<br />
then "Ring Tone Vol.". There you can turn down to lowest level.<br />
o Antwort!<br />
Sie können den Einschaltton über das Menü leiser stellen, dazu<br />
drücken Sie die M1 Taste gehen auf Telefoneinstellung,<br />
Audioeinstellung, Lautstärke einstellen, Lautstärke, dort stellen Sie bis<br />
auf 1 Balken herunter.<br />
Foreign country service - handling<br />
Auslandservice- Abwicklung:<br />
o<br />
o<br />
o<br />
o<br />
If you realize (during phone call) that the product probably could have a defect<br />
please fulfill following instructions:<br />
Inform customer that he will receive an UPS-Label via email/fax or mail from you.<br />
This label he needs to print out and stick it on the package to return his faulty<br />
product to customer service. The enclosed informations will show a UPS-telephone<br />
number he needs to call to arrange a pickup-term. Attention: Customer is bounded<br />
to attache a copy of his sales receipt to the package!<br />
Request the customers address and his email address and fill in the callcenterapplication<br />
screen. If customer does not have an email address ask for fax-number if<br />
available.<br />
Activate ROW! If there is no customers email address fill in your (callcenter agent)<br />
email address. You will receive the label via email and you can print it out and send it<br />
to customer via fax or mail!<br />
o<br />
o<br />
o<br />
o<br />
Wird beim Telefonat festgestellt, dass das Gerät vermutlich einen Defekt<br />
aufweist, ist folgender Weise vorzugehen:<br />
Kunden informieren, das er von uns ein UPS- Rückhollabel per Mail/ Fax oder Post<br />
zugesandt bekommt. Dieses Label möchte er bitte ausdrucken und auf das<br />
Rücksendepaket kleben. Anhand der beiliegenden Informationen möchte er bitte<br />
unter der dort genannten UPS-Telefonnummer mit UPS einen Abholtermin<br />
vereinbaren. Achtung: Der Kunde muß dafür sorgen, das eine Kopie vom Kaufbeleg<br />
der Sendung beiliegt.<br />
Vom Kunden die Anschrift und E- Mailadresse erfragen und in Callerfassungsmaske<br />
eintragen. Wenn Kunde keine E- Mailadresse angeben kann, unbedingt richtige<br />
Adresse und ggf. Faxnummer in Callerfassungsmaske notieren<br />
ROW aktiviern! Achtung bei Übermittlung des UPS- Labels per Fax oder Post die E-<br />
Mailadresse des Callagenten eintragen um das Label für Post oder Faxvesand<br />
ausdrucken zu können.<br />
FAQs IBD überarbeitet.xls<br />
Auro1010 1 von 1
1020_Inbetriebnahme_GB_FINAL.qxd:Branddistribution 29.07.2008 10:39 U<br />
Auro Comfort 1020<br />
GB<br />
Overview:<br />
LED indicates<br />
network coverage<br />
and call<br />
Flashlight Earpiece<br />
Help call key<br />
Loudspeaker for<br />
Eye for strap hands-free<br />
Socket for earphone<br />
M2 direct dialling key<br />
Shortcut menu<br />
M1 direct dialling key<br />
Call menu<br />
Save<br />
OK<br />
Accept call<br />
v<br />
Scroll up<br />
Scroll down Phonebook<br />
Display<br />
Volume adjustment<br />
M3 direct dialling key<br />
Back/Delete<br />
Hands-free<br />
Switch for torch<br />
Device ON/OFF<br />
End call<br />
Digit and letter keys<br />
Socket for power supply Microphone<br />
Battery compartment cover<br />
2
1020_Inbetriebnahme_GB_FINAL.qxd:Branddistribution 29.07.2008 10:39 U<br />
Auro Title 1Comfort 1020<br />
GB<br />
Enjoy pure telephony<br />
NOTE<br />
Go to<br />
www.branddistribution.de and<br />
read the detailed operating<br />
instructions in the chapters<br />
“Additional Safety Information”,<br />
“Technical Data”,<br />
“Maintenance and Care”.<br />
Thank you for choosing the Auro Comfort 1020.<br />
Particularly easy operation, extra-loud listening and ringtone<br />
volume, large characters, integrated flashlight, hearing-aidcompatibility<br />
and a one-click emergency call key - with these<br />
performance characteristics this mobile phone can provide<br />
you with increased safety and add to your feeling of wellbeing.<br />
To enable you to start using your Auro Comfort 1020 as<br />
soon as possible, we have summarized the most important<br />
information in this manual. Also included is a handy compact<br />
manual which you can carry around with you.<br />
We wish you every enjoyment and success with your new<br />
Auro Comfort 1020 mobile phone.<br />
Keys with important<br />
additional functions in<br />
the idle mode<br />
Press in idle mode to open the main menu<br />
Press in idle mode to open the phonebook<br />
Press in idle mode to open the shortcut menu<br />
Press in idle mode to open the call list<br />
3
1020_Inbetriebnahme_GB_FINAL.qxd:Branddistribution 29.07.2008 10:39 U<br />
Table of Contents<br />
GB<br />
1 Important Safety Information . . . . . . . . . . . . . . . . . . . . . . . . . . . . . . . . . . . . . . . . . . . . . . . . . . . . . . . . . 6<br />
2 Before Operation<br />
2.1 Scope of Delivery .................................................................. 8<br />
2.2 Information on Disposal .......................................................... 8<br />
3 Starting Up<br />
3.1 Inserting the SIM Card ............................................................ 9<br />
3.2 Inserting the Battery ............................................................... 9<br />
3.3 Charging the Mobile Phone ...................................................... 9<br />
3.4 / 3.5 Switching the Device On / Off ............................................... 10<br />
3.6 Display Symbols ................................................................... 10<br />
4 Making Phone Calls<br />
4.1 Accepting a Call ................................................................... 11<br />
4.2 Making a Call ...................................................................... 11<br />
4.3 Making a Call with Direct Dialling ................................................ 11<br />
4.4 Making a Call with the Phonebook .............................................. 12<br />
4.5 Calling Names (A-Z) from the Phonebook (Quick Search) ..................... 12<br />
4.6 Redialling ........................................................................... 13<br />
4.7 / 4.8 Make Emergency Call / End Emergency Call .............................. 13/14<br />
4.9 Phoning with the Hands-Free Function ......................................... 14<br />
4.10 Listening and Key Tone Volume ................................................. 14<br />
5 Menu<br />
5.1 Navigating in the Menu ........................................................... 15<br />
5.2 Fast Keys .......................................................................... 16<br />
5.3 Set Fast Key 2-9 ................................................................... 16<br />
6 Messages<br />
6.1 Messages (SMS) .................................................................. 17<br />
6.1.1 / 2 / 3 Receive / Display / Reply to SMS Message ...................... 17<br />
4
1020_Inbetriebnahme_GB_FINAL.qxd:Branddistribution 29.07.2008 10:39 U<br />
Title Table 1of Contents<br />
GB<br />
7 Settings<br />
7.1 Display Setting .................................................................... 18<br />
7.1.1 Change Language ......................................................... 18<br />
7.2 Sound Setting ..................................................................... 18<br />
7.2.1 Change Ringtone Volume ................................................. 18<br />
7.2.2 Change Message Tone Volume .......................................... 19<br />
7.2.3 Change Alarm Volume ..................................................... 19<br />
7.2.4 Change Key Tone Volume ................................................ 19<br />
7.2.5 Change System Tone Volume ............................................ 19<br />
7.2.6 Alert Type ................................................................... 19<br />
7.2.7 Help Tone ................................................................... 20<br />
7.3 Auto Key Lock ..................................................................... 20<br />
7.4 Security Setting .................................................................... 21<br />
7.4.1 Change Password ......................................................... 21<br />
7.5 Restore Factory Settings .......................................................... 22<br />
7.6 Set M1/ M2 / M3 .................................................................. 23<br />
7.6.1 / 2 / 3 Set M1 / M2 / M3 Call Number .................................... 23<br />
7.7 Clock & Alarm ..................................................................... 24<br />
7.7.1 Set Time & Date ............................................................ 24<br />
7.8 Phonebook ......................................................................... 25<br />
7.8.1 Add New Entry ............................................................. 25<br />
7.8.2 / 3 Delete Entry / Copy Entries ............................................ 26/27<br />
7.8.4 Set the Default Phonebook ............................................... 28<br />
7.9 Help Setting ........................................................................ 29<br />
7.9.1 / 2 / 3 Set Help Number 1 / 2 / 3 .......................................... 29<br />
7.9.4 Predefine Help Message .................................................. 30<br />
8 Guarantee ............................................................................... 31<br />
5
1020_Inbetriebnahme_GB_FINAL.qxd:Branddistribution 29.07.2008 10:39 U<br />
1 Important Safety Information GB<br />
IMPORTANT<br />
Non-observance of these<br />
manual can result in serious<br />
injury or damage to the device.<br />
Read this instruction manual carefully, in particular the safety<br />
instructions, before you begin using the device, and keep the<br />
instruction manual for future use. If you pass the device on to<br />
a third party, be sure to pass on this manual, too. For more<br />
detailed information than is contained in this manual, go to<br />
www.branddistribution.de.<br />
6<br />
WARNING<br />
These warning notices must<br />
be observed in order to prevent<br />
any injury to the user or to<br />
third parties.<br />
• In different countries, different regulations may apply to the<br />
use of mobile phones (e.g. when driving, in hospitals, at<br />
petrol stations, in aircrafts). Note the laws for using a mobile<br />
phone in your country, and turn the device off when usage<br />
is not permitted, or when dangerous situations or<br />
interference could occur.<br />
• Only use the device in accordance with its purpose, and<br />
only at locations where telephoning poses no dangers.<br />
• Only use the manufacturer’s power supply and battery.<br />
Inserting an unsuitable battery, or inserting the battery<br />
incorrectly, can result in the danger of explosion. The<br />
battery must not be opened or exposed to a flame.<br />
• The operation of medical devices can be affected. The<br />
manufacturers of pacemakers recommend a minimum<br />
distance of 20 cm between the devices when the mobile<br />
phone is switched on. Do not carry the phone in your breast<br />
pocket.<br />
• If you suspect that there has been interference between<br />
the phone and a medical device, please consult your doctor<br />
before using the phone again.
1020_Inbetriebnahme_GB_FINAL.qxd:Branddistribution 29.07.2008 10:39 U<br />
1 Important Safety Information GB<br />
• Make sure than small children do not play with the packaging<br />
material (danger of suffocation). The device and its<br />
accessories may contain small parts that can be ingested.<br />
Special care is needed if the device is to be used in the<br />
vicinity of small children or sick or disabled people. Keep the<br />
phone out of reach of such persons. Do not leave the device<br />
unattended when it is connected to the mains power supply.<br />
CAUTION<br />
Alerts you to possible<br />
damage to the device or<br />
other objects.<br />
• Your mobile phone is suitable for hearing aids. However, if<br />
some hearing aids produce a buzzing noise, contact your<br />
hearing aid specialist.<br />
• Do not expose the device to moisture, or to extreme heat<br />
(strong, direct sunlight) or cold (permafrost). Do not drop<br />
the device, and avoid joltings, shocks and pressure.<br />
• The phone must only be opened to replace the battery or<br />
the SIM card. Any other changes made to the device are<br />
not permitted and result in the loss of the operating licence<br />
and the guarantee.<br />
• The phone can cause interference in the vicinity of<br />
televisions, radios and other electronic devices.<br />
7
1020_Inbetriebnahme_GB_FINAL.qxd:Branddistribution 29.07.2008 10:39 U<br />
2 Before Operation GB<br />
2.1<br />
Scope of Delivery<br />
• 1 Auro Comfort 1020 mobile phone<br />
• 1 battery<br />
• 1 power supply unit Input: 100-240 V~, 50/60 Hz, 200 mA<br />
Output: 5 V ..., 800 mA<br />
• 1 charging station<br />
• 1 operating manual<br />
• 1 compact manual<br />
2.2<br />
Information on Disposal<br />
Packaging is reusable, or can be recycled. Please correctly<br />
dispose of packaging matarial no longer required. Should<br />
you detect any transportation damage when unpacking the<br />
device, please contact your dealer immediately.<br />
This device may not be disposed of along with household<br />
refuse! Every consumer is obliged to deposit all electrical or<br />
electronic devices, no matter whether they contain harmful<br />
substances or not, at a collection point in his/her town or<br />
with a commercial dealer, so that it can be disposed of in an<br />
environmentally-friendly way.<br />
Remove the battery before disposing of the device. Do not<br />
throw used batteries into the household refuse; put them in<br />
with special waste or in a collection station in a specialist<br />
shop. If you have any questions about disposal, contact<br />
your local authority or your dealer.<br />
8
1020_Inbetriebnahme_GB_FINAL.qxd:Branddistribution 29.07.2008 10:39 U<br />
3 Starting Up GB<br />
3.1<br />
Inserting the SIM Card<br />
1<br />
3<br />
SIM<br />
2<br />
62 2475<br />
87456<br />
A 01724<br />
3.2<br />
Inserting the Battery<br />
1<br />
2<br />
3<br />
4<br />
3.3<br />
Charging the<br />
Mobile Phone<br />
9
1020_Inbetriebnahme_GB_FINAL.qxd:Branddistribution 29.07.2008 10:39 U<br />
3 Starting Up GB<br />
3.4<br />
Switching the Device On<br />
Press and hold down until the device<br />
switches on<br />
PIN:<br />
Enter the PIN of the SIM card<br />
Confirm PIN OK = device is ready for use<br />
3.5<br />
Switching the Device Off<br />
Press and hold down until the device<br />
switches off<br />
3.6<br />
Display Symbols<br />
10<br />
Battery Display<br />
Signal Strength<br />
Alarm Switched On<br />
Headset Plugged In<br />
Key Lock On<br />
Foreign Network<br />
Call Transfer Active<br />
Call Missed<br />
SMS Received<br />
Muting<br />
Silent<br />
Ringtone Switched On<br />
Vibration Only<br />
Vibration Then Ring<br />
Vibration And Ring
1020_Inbetriebnahme_GB_FINAL.qxd:Branddistribution 29.07.2008 10:39 U<br />
4 Making Phone Calls GB<br />
4.1<br />
Accepting a Call<br />
Press to accept a call<br />
Press to end a call or to reject an<br />
incoming call<br />
4.2<br />
Making a Call<br />
Enter the desired phone number with the<br />
area code<br />
Press to delete the last number<br />
Press and hold down to delete all numbers<br />
Press to dial the number displayed<br />
Press to end the call or to interrupt the<br />
dialling<br />
4.3<br />
Making a Call with<br />
Direct Dialling<br />
NOTE<br />
Setting phone numbers for direct<br />
dialling keys – see section 7.6.1.<br />
Press and hold down direct dialling key M1,<br />
M2 or M3 until the corresponding number<br />
stored is called<br />
Press to end the call<br />
11
1020_Inbetriebnahme_GB_FINAL.qxd:Branddistribution 29.07.2008 10:39 U<br />
4 Making Phone Calls GB<br />
4.4<br />
Making a Call with the<br />
Phonebook<br />
NOTE<br />
To save phone numbers in<br />
the phonebook, read<br />
section 7.8.1.<br />
Press to open “Phonebook List”<br />
Press until the desired phone number<br />
appears<br />
Press to dial the phone number displayed<br />
Press to end the call or to close the<br />
phonebook<br />
4.5<br />
Calling Names (A-Z)<br />
from the Phonebook<br />
(Quick Search)<br />
Press to open “Phonebook”<br />
Enter the first letters for the person you want<br />
to call<br />
E.g. Press key 6 once for M<br />
key 3 twice for E<br />
key 9 three times for Y<br />
until the name MEYER is displayed with its<br />
phone number<br />
Press to dial the phone number displayed<br />
Press to end the call or to close the<br />
phonebook<br />
12
1020_Inbetriebnahme_GB_FINAL.qxd:Branddistribution 29.07.2008 10:39 U<br />
4 Making Phone Calls GB<br />
4.6<br />
Redialling<br />
Press to open the call list<br />
Press until the desired phone number is<br />
selected<br />
Press to dial the phone number displayed<br />
Press to end the call or to close the call list<br />
4.7<br />
Making an<br />
Emergency Call<br />
NOTE<br />
Save up to three emergency<br />
phone numbers that will be<br />
dialled in sequence in the<br />
case of an emergency. If no<br />
emergency number is<br />
entered, the phone dials 112<br />
For reporting settings, see<br />
section 7.9.<br />
Press the help call key on the back of the<br />
device and push it firmly upwards to trigger<br />
the emergency call.<br />
The emergency call begins after a delay of<br />
5 seconds. In this time you can prevent a<br />
possible false alarm by pushing the<br />
emergency call key back down again.<br />
Your mobile phone dials in sequence the<br />
three emergency call numbers saved until<br />
the call is accepted. The phone then<br />
switches to the hands-free mode.<br />
After the call, the phone emits an emergency<br />
ringtone. The display shows the predefined<br />
help message.<br />
13
1020_Inbetriebnahme_GB_FINAL.qxd:Branddistribution 29.07.2008 10:39 U<br />
4 Making Phone Calls GB<br />
4.8<br />
Ending the Emergency<br />
Call Mode<br />
Press the help call key and push it<br />
downwards<br />
4.9<br />
Phoning with the<br />
Hands-Free Function<br />
Press during a phone call to switch the<br />
hands-free function on<br />
Press again during a phone call to switch the<br />
hands-free function off again<br />
4.10<br />
Listening and Key Tone<br />
Volume<br />
14<br />
WARNING<br />
Never hold the mobile phone<br />
to your ear when it is ringing,<br />
when the hands-free function<br />
is active, or when an<br />
emergency call has been<br />
triggered.<br />
This could damage your<br />
hearing.<br />
Press during a phone call to increase or<br />
decrease the listening volume<br />
Press during a phone call with the handsfree<br />
function on to increase or decrease the<br />
loudspeaker volume<br />
Press in idle mode to adjust the Key Tone<br />
Volume
1020_Inbetriebnahme_GB_FINAL.qxd:Branddistribution 29.07.2008 10:39 U<br />
5 Menu GB<br />
5.1<br />
Navigating in the Menu<br />
The device is equipped with<br />
numerous functions that can<br />
be set in the menu.<br />
Press in idle mode to go to the main menu.<br />
The following menu items are displayed:<br />
Messages<br />
Phone Setting<br />
Set M1/M2/M3<br />
Clock & Alarm<br />
Phonebook<br />
Help Setting<br />
Calculator<br />
Calendar<br />
SIM Toolkit<br />
Press in the main menu to select the desired<br />
menu item<br />
Press again to open the selected menu item,<br />
e.g.:<br />
NOTE<br />
Pressing the M3 key takes<br />
you back to the previous<br />
menu from any menu.<br />
Messages<br />
-> Write a message<br />
-> Inbox<br />
-> Outbox<br />
-> Message Settings<br />
15
1020_Inbetriebnahme_GB_FINAL.qxd:Branddistribution 29.07.2008 10:39 U<br />
5 Menu GB<br />
5.2<br />
Fast Keys<br />
Fast keys 2 to 9 are useful for getting to the most important<br />
menu items quickly. By pressing and holding down one of<br />
these keys, you call up the menu item assigned to it. For<br />
example, “Alarm”, “Select image”, etc...<br />
5.3<br />
Set Fast Key 2-9<br />
Press to open the main menu<br />
Press to go to “Phone Setting”<br />
Press to open “Phone Setting”<br />
Press until the “Set Fast Key 2-9” menu item<br />
appears<br />
Press to open the menu<br />
16<br />
NOTE<br />
Pressing the M3 key takes<br />
you back to the previous level<br />
from any level.<br />
Press until you get to the fast key you want to<br />
set, e.g. key 3<br />
Press to open the list of functions for the fast<br />
keys.<br />
Press until you get to the menu item you want<br />
for key 3 (e.g. “Time & Date”)<br />
Press to confirm your selection<br />
Pressing and holding down key 3 in idle mode<br />
now takes you directly to the “Time and Date”<br />
menu item
1020_Inbetriebnahme_GB_FINAL.qxd:Branddistribution 29.07.2008 10:39 U<br />
6 Messages GB<br />
6.1<br />
Messages (SMS)<br />
6.1.1 Receive SMS<br />
message<br />
6.1.2 Display SMS<br />
Message<br />
6.1.3 Reply to SMS<br />
Message<br />
NOTE<br />
Pressing the key<br />
switches from upper case to<br />
lower case, and vice versa.<br />
Press and hold switches<br />
to the numeric mode (123).<br />
Pressing this key<br />
enters a space.<br />
Pressing the key<br />
selects special characters.<br />
SMS messages are short written messages. They can be<br />
entered, sent and received with mobile phones and some<br />
landline phones.<br />
A signal tone and the message “1 New Message!” in the<br />
display indicate that a new SMS message has been received.<br />
Press to display the message<br />
Press to scroll down and display the rest of the<br />
text<br />
Press to go to “Message Option”<br />
Press to open the window for replying to the<br />
SMS message<br />
Use the number keys to enter the desired text<br />
(e.g. HELLO = 4 twice for H,<br />
3 twice for E,<br />
5 three times for L, brief pause,<br />
5 three times for L and<br />
6 three times for O)<br />
Press to delete an incorrect entry<br />
Press to send the reply<br />
Press to return to idle mode<br />
17
1020_Inbetriebnahme_GB_FINAL.qxd:Branddistribution 29.07.2008 10:39 U<br />
7 Settings GB<br />
7.1<br />
Display Setting<br />
7.1.1 Change Language<br />
In the Display Setting menu, you can adapt, for example, the<br />
language, screen saver, etc. to your personal requirements.<br />
Press to open the main menu<br />
Press to go to “Phone Setting”<br />
Press to open “Phone Setting”<br />
Press to open “Display Setting”<br />
Press to open “Language”<br />
NOTE<br />
Pressing the key<br />
returns you to the idle mode.<br />
Press until the desired language is selected<br />
Press to confirm your selection<br />
7.2<br />
Sound Setting<br />
7.2.1 Change Ringtone<br />
Volume<br />
Press to open the main menu<br />
Press to select “Phone Setting”<br />
Press to open “Phone Setting”<br />
Press to select “Sound Setting”<br />
18
1020_Inbetriebnahme_GB_FINAL.qxd:Branddistribution 29.07.2008 10:39 U<br />
7 Settings GB<br />
Press to open “Sound Setting”<br />
Press to select “Set Volume”<br />
NOTE<br />
Pressing the M3 key takes<br />
you back to the previous level<br />
from any level.<br />
Pressing the key<br />
returns you to the idle mode.<br />
7.2.2 Change Message<br />
Tone Volume<br />
7.2.3 Change Alarm Tone<br />
Volume<br />
7.2.4 Change Key Tone<br />
Volume<br />
7.2.5 Change System Tone<br />
Volume<br />
7.2.6 Alert Type<br />
Press to open “Set Volume”<br />
Press to open “Ring Tone Vol.”<br />
Press to select the volume<br />
you desire<br />
Press to confirm your selection<br />
Procedure to change “Message Tone Vol.” (7 volume levels)<br />
as in section 7.2.1 Change Ringtone Volume<br />
Procedure to change “Alarm Tone Vol.” (7 volume levels) as<br />
in section 7.2.1 Change Ringtone Volume<br />
Procedure to change “Key Tone Volume” (7 volume levels) as<br />
in section 7.2.1 Change Ringtone Volume<br />
Procedure to change “System Tone Vol.” (7 volume levels) as<br />
in section 7.2.1 Change Ringtone Volume<br />
Procedure to change “Alert Type” (Ring Only, Vibration Only,<br />
Vibrate And Ring, Vibrate Then Ring, Silent) as in section<br />
7.2.1 Change Ringtone Volume<br />
19
1020_Inbetriebnahme_GB_FINAL.qxd:Branddistribution 29.07.2008 10:39 U<br />
7 Settings GB<br />
7.2.7 Help Tone<br />
Procedure to change Help Tone (Help Tone ON /OFF) as in<br />
section 7.2.1 Change Ringtone Volume<br />
7.3<br />
Auto Key Lock<br />
Protects against accidental pressing of phone keys<br />
Press to go to menu<br />
Press to go to “Phone Setting”<br />
Press to enter “Phone Setting”<br />
Press to go to “Auto KeyLock”<br />
Press to enter “Auto KeyLock”<br />
NOTE<br />
A call can be accepted by<br />
pressing the accept call key<br />
even if the keys are locked.<br />
The lock is reactivated when<br />
the call is finished.<br />
To deactivate the keypad lock<br />
again, set None in the menu.<br />
Press to select the time (None, 5 sec, 30 sec,<br />
1 min, 5 min) after which the keypad lock is to<br />
be activated (after the last time the phone is<br />
used)<br />
Press to confirm your selection<br />
Press to return to idle mode<br />
The keys will now be locked after the last time<br />
the phone is used, as set<br />
Press M3 followed by to unlock the keys<br />
20
1020_Inbetriebnahme_GB_FINAL.qxd:Branddistribution 29.07.2008 10:39 U<br />
7 Settings GB<br />
7.4<br />
Security Setting<br />
7.4.1 Change Password<br />
Press to go to the main menu<br />
Press to go to “Phone Setting”<br />
NOTE<br />
Pressing the M3 key takes<br />
you back to the previous<br />
level from any level.<br />
Pressing the key<br />
returns you directly to the<br />
idle mode.<br />
Old PIN2:<br />
9 9 9 9<br />
New PIN2:<br />
I<br />
Press to enter “Phone Setting”<br />
Press to go to “Security Setting”<br />
Press to enter “Security Setting”<br />
Press to go to “Change Password”<br />
Press to enter “Change Password”<br />
Press to go to the password you want to<br />
change (e.g. PIN2)<br />
Press to go to the PIN entry for “Old PIN2:”<br />
Enter the PIN set (factory setting: 9999)<br />
Press to go to the PIN entry for “New PIN2:”<br />
Enter the new PIN<br />
Press to confirm your entry<br />
21
1020_Inbetriebnahme_GB_FINAL.qxd:Branddistribution 29.07.2008 10:39 U<br />
7 Settings GB<br />
Enter Again:<br />
I<br />
Repeat the new PIN<br />
Press to confirm your entry<br />
7.5<br />
Restore Factory Settings<br />
Press to go to the main menu<br />
Press to go to “Phone Setting”<br />
22<br />
NOTE<br />
The settings in the phone are<br />
changed. Data stored on the<br />
SIM card is retained.<br />
Password:<br />
I<br />
Press to enter “Phone Setting”<br />
Press to go to “Restore Factory Settings”<br />
Press to enter “Password:”<br />
Enter the password set (factory setting: 1122)<br />
Press to confirm your entry<br />
The message ARE YOU SURE? appears in the<br />
display<br />
Press if you are sure you want to restore the<br />
factory settings or<br />
Press if you do not want the current settings to<br />
be changed<br />
Press to return to idle mode
1020_Inbetriebnahme_GB_FINAL.qxd:Branddistribution 29.07.2008 10:39 U<br />
7 Settings GB<br />
7.6<br />
Set M1 / M2 / M3<br />
7.6.1 Set M1 Call Number<br />
Press to go to the main menu<br />
Press to go to “Set M1/M2/M3”<br />
Press to enter “Set M1/M2/M3”<br />
Press to enter “M1 Call Number”<br />
Press to enter “From Phonebook”<br />
Press to enter “From Phonebook”<br />
Press to go to the number you want in the<br />
phonebook<br />
Press to confirm your selection<br />
Press to return to idle mode<br />
7.6.2 Set M2 Call Number<br />
7.6.3 Set M3 Call Number<br />
Procesure to set “M2 Call Number” as in section 7.6.1,<br />
Set M1 Call Number<br />
Procesure to set “M3 Call Number” as in section 7.6.1,<br />
Set M1 Call Number<br />
23
1020_Inbetriebnahme_GB_FINAL.qxd:Branddistribution 29.07.2008 10:39 U<br />
7 Settings GB<br />
7.7<br />
Clock & Alarm<br />
7.7.1 Set Time & Date<br />
Press to go to the main menu<br />
Press to go to “Clock & Alarm”<br />
Press to go to “Time & Date”<br />
Press to go to “Set Time & Date”<br />
Press to enter “Set Time & Date”<br />
Enter the current time:<br />
hours (HH), minutes (MM)<br />
Press to enter the date<br />
Enter the current date:<br />
year (YYYY), month (MM), day (TT)<br />
NOTE<br />
In the “Format” menu you can<br />
change the display time<br />
format: 12/24 hours and the<br />
date format e.g.:<br />
DD/MM/YYYY.<br />
Press to confirm your entry<br />
Press to return to idle mode<br />
24
1020_Inbetriebnahme_GB_FINAL.qxd:Branddistribution 29.07.2008 10:40 U<br />
7 Settings GB<br />
7.8<br />
Phonebook<br />
7.8.1 Add a New Entry<br />
Press to go to the main menu<br />
Press to go to “Phonebook”<br />
Press to enter “Phonebook”<br />
Press to go to “Add New”<br />
Press to select “Add New”<br />
Press to select “To SIM” or “To Phone”<br />
Press to go to “Name”<br />
Press to open “Name” input field<br />
Enter the name<br />
Press to save entered name<br />
Press to open “Mobile Number” input field<br />
Enter the mobile number<br />
25
1020_Inbetriebnahme_GB_FINAL.qxd:Branddistribution 29.07.2008 10:40 U<br />
7 Settings GB<br />
Press to save the entry<br />
Press to confirm saving the entry or<br />
Press to cancel<br />
Press to return to the idle mode<br />
7.8.2 Delete entry<br />
Press to open “Phonebook”<br />
Press until the desired phone number<br />
appears or<br />
Enter the first letters for the person you want<br />
to call<br />
E.g. Press key 6 once for M<br />
key 3 twice for E<br />
key 9 three times for Y<br />
until the name MEYER is displayed with its<br />
phone number<br />
Press to open the “Entry Option”<br />
Press to select “Delete”<br />
26
1020_Inbetriebnahme_GB_FINAL.qxd:Branddistribution 29.07.2008 10:40 U<br />
7 Settings GB<br />
When you press this, “Delete?” appears<br />
Press to delete the entry or<br />
If you do not want to delete it<br />
Press to return to idle mode<br />
7.8.3 Copy Entries<br />
(SIM Phone)<br />
Press to open “Phonebook”<br />
Press until the desired phone number<br />
appears or<br />
Enter the first letters for the person you want<br />
to call<br />
E.g. Press key 6 once for M<br />
key 3 twice for E<br />
key 9 three times for Y<br />
until the name MEYER is displayed with its<br />
phone number<br />
Press to open the “Entry Option”<br />
Press to select “Copy”<br />
27
1020_Inbetriebnahme_GB_FINAL.qxd:Branddistribution 29.07.2008 10:40 U<br />
7 Settings GB<br />
When you press this, “Copy?” appears<br />
Press to copy the entry or<br />
If you do not want to copy it<br />
Press to return to idle mode<br />
7.8.4 Set the Default<br />
Phonebook<br />
Press to go to the “Main Menu”<br />
Press to go to “Phonebook”<br />
Press to enter “Phonebook”<br />
Press to go to “Default Phonebook”<br />
Press to enter “Default Phonebook”<br />
Press to select the “SIM Only”, the “Phone<br />
Only” or “Both”<br />
Press to confirm your selection<br />
Press to return to idle mode<br />
28
1020_Inbetriebnahme_GB_FINAL.qxd:Branddistribution 29.07.2008 10:40 U<br />
7 Settings GB<br />
7.9<br />
Help Setting<br />
7.9.1 Set Help Number 1<br />
Press to go to the main menu<br />
Press to go to “Help Setting”<br />
Press to enter “Help Setting”<br />
Press to enter “Set Help Numbers”<br />
Press to enter “Help No. 1”<br />
Press to go to “Select”<br />
Press to choose from Phonebook<br />
Press to go to the number you want in the<br />
phonebook<br />
Press to confirm your selection<br />
Press to return to idle mode<br />
7.9.2 Set Help Number 2<br />
7.9.3 Set Help Number 3<br />
Procesure to set “Help No. 2” as in section 7.9.1, Set Help<br />
Number 1<br />
Procesure to set “Help No. 3” as in section 7.9.1, Set Help<br />
Number 1<br />
29
1020_Inbetriebnahme_GB_FINAL.qxd:Branddistribution 29.07.2008 10:40 U<br />
7 Settings GB<br />
7.9.4 Predefine Help<br />
Message<br />
Press to go to the main menu<br />
Press to go to “Help Setting”<br />
Press to enter “Help Setting”<br />
Press to go to “Predefine Help Message”<br />
Press to enter the “Predefine Help Message”<br />
input field<br />
Enter the message text<br />
Press to save your entry<br />
Press to return to idle mode<br />
30
1020_Inbetriebnahme_GB_FINAL.qxd:Branddistribution 29.07.2008 10:40 U<br />
8 Guarantee GB<br />
If the device is used correctly, International Brand Distribution <strong>GmbH</strong>, Fahrgasse 5, 65549<br />
Limburg, guarantees it for a period of 24 months from the date of purchase. This guarantee<br />
declaration will cover all legal requirements. During the guarantee period, all defects will be<br />
resolved by repairing or replacing the device free of charge if the defect is due to a material<br />
or manufacturing error.<br />
Damage caused by incorrect use, by the intervention of third parties, or by acts of God, is<br />
excluded from the guarantee, as are accessory parts that are subject to normal wear and<br />
tear (batteries, etc.). Additional claims such as compensation are also excluded, even if the<br />
damage to the device is recognised as a guarantee case. The device is subjected to strict<br />
quality controls. However, if you do have a problem with this product, please always first<br />
contact our<br />
technical service hotline +49 (0) 180-5118870-2<br />
<strong>JET</strong> <strong>GmbH</strong>, Am Weimarer Berg 6, 99510 Apolda<br />
(14 cents/minute from the German Telekom landline network, charges from mobile networks can differ)<br />
In guarantee cases, send the device to <strong>JET</strong> <strong>GmbH</strong> along with a description of the error and<br />
proof of purchase. If devices are sent in for repair without proof of purchase, repairs can<br />
only be carried out against payment. This also applies to devices that are not packaged<br />
sufficiently.<br />
We reserve the right to make formal changes towards improving and developing the product<br />
further. © International Brand Distribution <strong>GmbH</strong> 07/2008<br />
The Auro Comfort 1020 mobile phone complies with EU directive R&TTE. It also complies with<br />
the European Electromagnetic Compatibility (EMC) and Product Safety Directive. Thus, the<br />
Auro Comfort 1020 carries the CE marking. You can view the conformity declaration and<br />
certificates for permission to operate and registration at www.branddistribution.de.<br />
31
1020_Inbetriebnahme_<strong>DE</strong>_FINAL.qxd:Branddistribution 29.07.2008 10:36 U<br />
Auro Comfort 1020<br />
<strong>DE</strong><br />
Auf einen Blick:<br />
LED signalisiert<br />
Netzempfang<br />
und Anruf<br />
Taschenlampe Hörer<br />
Öse für Lautsprecher für<br />
Trageband Freisprechen<br />
Notruftaste<br />
Buchse für<br />
Kopfhörer<br />
M2 Direktwahltaste<br />
Abkürzungsmenü<br />
M1 Direktwahltaste<br />
Menü Aufrufen<br />
Speichern<br />
OK<br />
Gespräch<br />
annehmen<br />
v<br />
Aufwärts scrollen<br />
Abwärts scrollen Telefonbuch<br />
Display<br />
Lautstärkeregler<br />
M3 Direktwahltaste<br />
Zurück/Löschen<br />
Freisprechen<br />
Schalter für<br />
Taschenlampe<br />
Gerät EIN/AUS<br />
Gespräch beenden<br />
Ziffern- & Buchstabentasten<br />
Buchse für Netzteil Mikrofon<br />
Akkufachdeckel<br />
2
1020_Inbetriebnahme_<strong>DE</strong>_FINAL.qxd:Branddistribution 29.07.2008 10:36 U<br />
Auro Titel 1Comfort 1020<br />
<strong>DE</strong><br />
Pure Telefonie genießen<br />
HINWEIS<br />
Lesen Sie im Internet auf<br />
www.branddistribution.de<br />
die ausführliche Bedienungsanleitung<br />
mit den Kapiteln<br />
“Zusätzliche Sicherheitshinweise”,<br />
“Technische Daten”,<br />
“Wartung und Pflege”.<br />
Herzlichen Dank, dass Sie sich für das Auro Comfort 1020<br />
entschieden haben.<br />
Besonders einfache Bedienung, extra laute Hörer- und Ruftonlautstärke,<br />
große Schriftzeichen, eine integrierte Taschenlampe,<br />
Hörgerätetauglichkeit und die Ein-Klick-Notruftaste,<br />
- mit diesen Leistungsmerkmalen kann, das Mobiltelefon Ihre<br />
Sicherheit erhöhen und zu Ihrem Wohbefinden beitragen.<br />
Für eine rasche Inbetriebnahme Ihres Auro Comfort 1020<br />
haben wir die wichtigsten Informationen in dieser Anleitung<br />
zusammengestellt. Außerdem liegt eine handliche Kurzanleitung<br />
bei, die Sie einfach mit sich führen können.<br />
Wir wünschen Ihnen viel Freude und Erfolg mit dem neuen<br />
Mobiltelefon Auro Comfort 1020.<br />
Tasten mit wichtiger<br />
zusätzlicher Funktion<br />
im Stand-by-Modus<br />
Drücken im Stand-by-Modus öffnet das<br />
Hauptmenü<br />
Drücken im Stand-by-Modus öffnet das<br />
Telefonbuch<br />
Drücken im Stand-by-Modus öffnet das<br />
Abkürzungsmenü<br />
Drücken im Stand-by-Modus öffnet die<br />
Anrufliste<br />
3
1020_Inbetriebnahme_<strong>DE</strong>_FINAL.qxd:Branddistribution 29.07.2008 10:36 U<br />
Inhaltsverzeichnis<br />
<strong>DE</strong><br />
1 Wichtige Sicherheitshinweise . . . . . . . . . . . . . . . . . . . . . . . . . . . . . . . . . . . . . . . . . . . . . . . . . . . . . . . . 6<br />
2 Vor dem Betrieb<br />
2.1 Lieferumfang ....................................................................... 8<br />
2.2 Hinweis zur Entsorgung ........................................................... 8<br />
3 Inbetriebnahme<br />
3.1 SIM-Karte einsetzen .............................................................. 9<br />
3.2 Akku einsetzen .................................................................... 9<br />
3.3 Mobiltelefon laden ................................................................. 9<br />
3.4 /3.5 Gerät einschalten / Gerät ausschalten ...................................... 10<br />
3.6 Display-Symbole .................................................................. 10<br />
4 Telefonieren<br />
4.1 Anruf entgegennehmen ........................................................... 11<br />
4.2 Anrufen ............................................................................. 11<br />
4.3 Anrufen mit Direktwahl ............................................................ 11<br />
4.4 Anrufen mit Telefonbuch .......................................................... 12<br />
4.5 Namen (A-Z) aus dem Telefonbuch anrufen (Schnelle Suche) ................ 12<br />
4.6 Wahlwiederholung ................................................................. 13<br />
4.7 /4.8 Notruf auslösen / Notruf beenden ........................................... 13/14<br />
4.9 Telefonieren mit der Freisprechfunktion ......................................... 14<br />
4.10 Hörer-/Tastentonlautstärke ....................................................... 14<br />
5 Menü<br />
5.1 Navigieren im Menü ............................................................... 15<br />
5.2 Schnellwahltasten ................................................................ 16<br />
5.3 Schnellwahltaste 2-9 festlegen ................................................... 16<br />
6 Nachrichten<br />
6.1 Nachrichten (SMS) ................................................................ 17<br />
6.1.1 /2 /3 SMS Nachricht empfangen / anzeigen / beantworten ............ 17<br />
4
1020_Inbetriebnahme_<strong>DE</strong>_FINAL.qxd:Branddistribution 29.07.2008 10:37 U<br />
Titel Inhaltsverzeichnis<br />
1<br />
<strong>DE</strong><br />
7 Einstellungen<br />
7.1 Displayeinstellungen .............................................................. 18<br />
7.1.1 Sprache ändern ............................................................ 18<br />
7.2 Audioeinstellungen ................................................................ 18<br />
7.2.1 Ruftonlautstärke ändern ................................................... 18<br />
7.2.2 SMS Ton-Lautstärke ändern .............................................. 19<br />
7.2.3 Alarmtonlautstärke ändern ................................................ 19<br />
7.2.4 Tastentonlautstärke ändern ............................................... 19<br />
7.2.5 Systemtonlautstärke ändern .............................................. 19<br />
7.2.6 Anrufsignalisierung ........................................................ 19<br />
7.2.7 Hilfeton ..................................................................... 20<br />
7.3 Automatische Tastensperre ...................................................... 20<br />
7.4 Sicherheitseinstellung ............................................................. 21<br />
7.4.1 Passwort ändern ........................................................... 21<br />
7.5 Werkseinstellungen wiederherstellen ............................................ 22<br />
7.6 M1/M2 /M3 festlegen ............................................................ 23<br />
7.6.1 /2 /3 Rufnummer M1 /M2 /M3 festlegen ................................. 23<br />
7.7 Uhr & Alarm ........................................................................ 24<br />
7.7.1 Zeit & Datum einstellen .................................................... 24<br />
7.8 Telefonbuch ........................................................................ 25<br />
7.8.1 Neuen Eintrag einfügen ................................................... 25<br />
7.8.2 /3 Eintrag löschen / Einträge kopieren ................................... 26/27<br />
7.8.4 Standard-Telefonbuch festlegen ......................................... 28<br />
7.9 Notrufeinstellungen ................................................................ 29<br />
7.9.1 /2 /3 Notrufnummer 1 / 2 / 3 einstellen .................................... 29<br />
7.9.4 SOS-Nachricht vorbereiten ............................................... 30<br />
8 Garantie ............................................................................... 31<br />
5
1020_Inbetriebnahme_<strong>DE</strong>_FINAL.qxd:Branddistribution 29.07.2008 10:37 U<br />
1 Wichtige Sicherheitshinweise <strong>DE</strong><br />
WICHTIG<br />
Die Nichtbeachtung dieser<br />
Anleitung kann zu schweren<br />
Verletzungen oder zu<br />
Schäden am Gerät führen.<br />
Lesen Sie diese Inbetriebnahme-Anleitung, insbesondere die<br />
Sicherheitshinweise, sorgfältig durch, bevor Sie das Gerät<br />
einsetzen und bewahren Sie die Anleitung für die weitere<br />
Nutzung auf. Wenn Sie das Gerät an Dritte weitergeben,<br />
geben Sie unbedingt diese Anleitung mit. Weiterführende<br />
Informationen, über diese Anleitung hinaus, finden Sie im<br />
Internet unter www.branddistribution.de.<br />
6<br />
WARNUNG<br />
Diese Warnhinweise müssen<br />
eingehalten werden, um<br />
mögliche Verletzungen des<br />
Benutzers oder Dritter zu<br />
verhindern.<br />
• In verschiedenen Ländern können unterschiedliche Vorschriften<br />
für den Betrieb von Mobiltelefonen (z.B. beim<br />
Autofahren, in Krankenhäusern, an Tankstellen, in Flugzeugen)<br />
gelten. Beachten Sie die Gesetze für den Betrieb<br />
des Mobiltelefons in Ihrem Land und schalten Sie das Gerät<br />
aus, wenn der Einsatz verboten ist oder gefährliche<br />
Situationen oder Störungen entstehen können.<br />
• Verwenden Sie das Gerät nur entsprechend seiner Bestimmung<br />
und nur an Orten, die gefahrloses Telefonieren<br />
ermöglichen.<br />
• Verwenden Sie nur Netzteil und Akku des Herstellers. Bei<br />
ungeeignetem oder falsch eingesetztem Akku besteht Explosionsgefahr.<br />
Der Akku darf weder geöffnet, noch einer<br />
Flamme ausgesetzt werden.<br />
• Medizinische Geräte können in ihrer Funktion beeinflusst<br />
werden. Hersteller von Herzschrittmachern empfehlen einen<br />
Mindestabstand von 20 cm zwischen den Geräten, wenn<br />
das Mobiltelefon eingeschaltet ist. Tragen Sie das Telefon<br />
nicht in der Brusttasche.
1020_Inbetriebnahme_<strong>DE</strong>_FINAL.qxd:Branddistribution 29.07.2008 10:37 U<br />
1 Wichtige Sicherheitshinweiseq <strong>DE</strong><br />
• Wenn Sie vermuten, dass es zu einer Störung zwischen<br />
dem Telefon und einem medizinischen Gerät gekommen<br />
ist, halten Sie bitte vor weiterer Nutzung des Mobiltelefons<br />
Rücksprache mit Ihrem Arzt.<br />
• Stellen Sie sicher, dass Kleinkinder nicht mit den Verpackungsfolien<br />
(Erstickungsgefahr) spielen. Das Gerät und<br />
sein Zubehör können Kleinteile enthalten, die verschluckt<br />
werden können. Besondere Sorgfalt ist notwendig, wenn<br />
das Gerät in der Nähe von Kleinkindern, Kranken und<br />
hilflosen Personen verwendet wird. Halten Sie es außerhalb<br />
der Reichweite dieser Personen. Lassen Sie das Gerät nicht<br />
unbeaufsichtigt, wenn es ans Stromnetz angeschlossen ist.<br />
ACHTUNG<br />
weist auf mögliche Beschädigungen<br />
am Gerät<br />
oder anderen Gegenständen<br />
hin.<br />
• Ihr Mobiltelefon ist Hörgeräte geeignet. Sollte bei manchen<br />
Hörgeräten jedoch ein Brummton auftreten, wenden Sie<br />
sich an Ihr Hörgeräte-Fachgeschäft.<br />
• Setzen Sie das Gerät weder Feuchtigkeit, noch extremer<br />
Hitze (starke, direkte Sonneneinstrahlung) oder Kälte<br />
(Dauerfrost) aus. Lassen Sie das Gerät nicht fallen und<br />
vermeiden Sie Erschütterungen, Schlag und Druck.<br />
• Das Telefon darf nur geöffnet werden, um Akku oder SIM-<br />
Karte auszuwechseln. Jede weitere Änderung am Gerät ist<br />
unzulässig und führt zum Verlust von Betriebserlaubnis und<br />
Garantie.<br />
• Das Telefon kann in der Nähe von Fernsehgeräten, Radios<br />
und anderen elektronischen Geräten Störungen verursachen.<br />
7
1020_Inbetriebnahme_<strong>DE</strong>_FINAL.qxd:Branddistribution 29.07.2008 10:37 U<br />
2 Vor dem Betrieb <strong>DE</strong><br />
2.1<br />
Lieferumfang<br />
• 1 Mobiltelefon Auro Comfort 1020<br />
• 1 Akku<br />
• 1 Netzteil Eingang: 100-240 V~, 50/60 Hz, 200 mA<br />
Ausgang: 5 V ..., 800 mA<br />
• 1 Ladestation<br />
• 1 Inbetriebnahme-Anleitung<br />
• 1 Kurzanleitung<br />
2.2<br />
Hinweis zur Entsorgung<br />
Verpackungen sind wiederverwendbar oder können dem<br />
Rohstoffkreislauf zurückgeführt werden. Bitte entsorgen Sie<br />
nicht mehr benötigtes Verpackungsmaterial ordnungsgemäß.<br />
Sollten Sie beim Auspacken einen Transportschaden bemerken,<br />
setzen Sie sich bitte sofort mit Ihrem Händler in Verbindung.<br />
Dieses Gerät darf nicht zusammen mit dem Hausmüll entsorgt<br />
werden! Jeder Verbraucher ist verpflichtet, alle elektrischen<br />
oder elektronischen Geräte, egal, ob sie Schadstoffe enthalten<br />
oder nicht, bei einer Sammelstelle seiner Stadt oder im<br />
Handel abzugeben, damit sie einer umweltschonenden<br />
Entsorgung zugeführt werden können.<br />
Entnehmen Sie den Akku, bevor Sie das Gerät entsorgen.<br />
Werfen Sie verbrauchte Akkus nicht in den Hausmüll, sondern<br />
in den Sondermüll oder in eine Batterie-Sammelstation im<br />
Fachhandel. Wenden Sie sich hinsichtlich der Entsorgung an<br />
Ihre Kommunalbehörde oder Ihren Händler.<br />
8
1020_Inbetriebnahme_<strong>DE</strong>_FINAL.qxd:Branddistribution 29.07.2008 10:37 U<br />
3 Inbetriebnahme <strong>DE</strong><br />
3.1<br />
SIM-Karte einsetzen<br />
1<br />
3<br />
SIM<br />
2<br />
62 2475<br />
87456<br />
A 01724<br />
3.2<br />
Akku einsetzen<br />
1<br />
2<br />
3<br />
4<br />
3.3<br />
Mobiltelefon laden<br />
9
1020_Inbetriebnahme_<strong>DE</strong>_FINAL.qxd:Branddistribution 29.07.2008 10:37 U<br />
3 Inbetriebnahme <strong>DE</strong><br />
3.4<br />
Gerät einschalten<br />
Drücken und Halten, bis sich das Gerät<br />
einschaltet<br />
PIN:<br />
PIN der SIM-Karte eingeben<br />
PIN bestätigen OK = Gerät ist betriebsbereit<br />
3.5<br />
Gerät ausschalten<br />
Drücken und Halten, bis sich das Gerät<br />
ausschaltet<br />
3.6<br />
Display-Symbole<br />
10<br />
Akkuanzeige<br />
Signalstärke<br />
Alarm eingeschaltet<br />
Headset angeschlossen<br />
Tastatursperre an<br />
Fremdes Netzwerk<br />
Anrufweiterleitung aktiv<br />
Entgangener Anruf<br />
SMS eingegangen<br />
Stummschaltung<br />
Alarm ausgeschaltet<br />
Nur Rufton<br />
Nur Vibrationsalarm<br />
Erst Vibration dann Rufton<br />
Vibration und Rufton
1020_Inbetriebnahme_<strong>DE</strong>_FINAL.qxd:Branddistribution 29.07.2008 10:37 U<br />
4 Telefonieren <strong>DE</strong><br />
4.1<br />
Anruf entgegennehmen<br />
Drücken, um einen Anruf entgegenzunehmen<br />
Drücken, um ein Gespräch zu beenden<br />
oder einen eingehenden Anruf abzuweisen<br />
4.2<br />
Anrufen<br />
Eingabe der gewünschten Rufnummer<br />
mit Ortsvorwahl<br />
Drücken, um die letzte Ziffer zu löschen<br />
Gedrückt halten, um alle Ziffern zu löschen<br />
Drücken, um die angezeigte Rufnummer zu<br />
wählen<br />
Drücken, um das Gespräch zu beenden<br />
oder um die Wahl abzubrechen<br />
4.3<br />
Anrufen mit Direktwahl<br />
Direktwahltaste M1, M2 oder M3 so lange<br />
gedrückt halten, bis der jeweils gespeicherte<br />
Teilnehmer angerufen wird<br />
HINWEIS<br />
Rufnummern für Direktwahltasten<br />
festlegen Kapitel 7.6.1.<br />
Drücken, um das Gespräch zu beenden<br />
11
1020_Inbetriebnahme_<strong>DE</strong>_FINAL.qxd:Branddistribution 29.07.2008 10:37 U<br />
4 Telefonieren <strong>DE</strong><br />
4.4<br />
Anrufen mit Telefonbuch<br />
HINWEIS<br />
Um Rufnummern im<br />
Telefonbuch zu speichern,<br />
lesen Sie Kapitel 7.8.1.<br />
Drücken öffnet “Telefonbuch”<br />
Drücken, bis die gewünschte Rufnummer<br />
erscheint<br />
Drücken, um die angezeigte Rufnummer<br />
anzurufen<br />
Drücken, um das Gespräch zu beenden<br />
oder um das Telefonbuch zu schließen<br />
4.5<br />
Namen (A-Z) aus dem<br />
Telefonbuch anrufen<br />
(Schnelle Suche)<br />
Drücken öffnet “Telefonbuch”<br />
Eingabe der ersten Buchstaben des<br />
gewünschten Teilnehmers,<br />
z.B. 1mal Taste 6 für M<br />
2mal Taste 3 für E<br />
3mal Taste 9 für Y<br />
bis der gesuchte Name MEYER mit<br />
Rufnummer angezeigt wird<br />
Drücken, um die angezeigte Rufnummer<br />
anzurufen<br />
Drücken, um das Gespräch zu beenden<br />
oder, um das Telefonbuch zu schließen<br />
12
1020_Inbetriebnahme_<strong>DE</strong>_FINAL.qxd:Branddistribution 29.07.2008 10:37 U<br />
4 Telefonieren <strong>DE</strong><br />
4.6<br />
Wahlwiederholung<br />
Drücken öffnet die Anrufliste<br />
Drücken, bis die gewünschte Rufnummer<br />
ausgewählt ist<br />
Drücken, um die angezeigte Rufnummer<br />
anzurufen<br />
Drücken, um das Gespräch zu beenden<br />
oder um die Anrufliste zu schließen<br />
4.7<br />
Notruf auslösen<br />
HINWEIS<br />
Speichern Sie bis zu drei<br />
Notrufnummern, die bei<br />
einem Notruf nacheinander<br />
angewählt werden. Ist keine<br />
Notrufnummer eingegeben,<br />
wählt das Telefon 112.<br />
Notrufeinstellungen siehe<br />
Kapitel 7.9.<br />
Drücken Sie die Notruftaste auf der Rückseite<br />
des Gerätes und schieben Sie diese fest nach<br />
oben, um dem Notruf auszulösen.<br />
Der Notruf beginnt mit einer Verzögerung<br />
von 5 Sekunden. Innerhalb dieser Zeit<br />
können Sie einen eventuellen Fehlalarm<br />
verhindern, indem Sie die Notruftaste wieder<br />
nach unten schieben.<br />
Ihr Mobiltelefon wählt nacheinander die drei<br />
eingespeicherten Notrufnummern an, bis der<br />
Anruf entgegengenommen wird. Dann schaltet<br />
das Telefon in den Freisprechmodus.<br />
Nach dem Gespräch ertönt am Mobiltelefon<br />
ein Notrufton (ta tü ta ta). Das Display zeigt<br />
die eingestellte SOS-Nachricht.<br />
13
1020_Inbetriebnahme_<strong>DE</strong>_FINAL.qxd:Branddistribution 29.07.2008 10:37 U<br />
4 Telefonieren <strong>DE</strong><br />
4.8<br />
Notruf beenden<br />
Notruftaste drücken und nach unten schieben<br />
4.9<br />
Telefonieren mit der<br />
Freisprechfunktion<br />
Drücken während eines Telefonats schaltet<br />
die Freisprechfunktion ein<br />
Erneutes Drücken während eines Telefonats<br />
schaltet die Freisprechfunktion wieder aus<br />
4.10<br />
Hörer-/Tastentonlautstärke<br />
14<br />
WARNUNG<br />
Das Mobiltelefon nie an das<br />
Ohr halten, während es<br />
klingelt, die Freisprechfunktion<br />
aktiv ist oder ein Notruf ausgelöst<br />
wurde.<br />
Es könnten Gehörschäden<br />
verursacht werden.<br />
Drücken während eines Telefonats erhöht<br />
oder verringert die Hörerlautstärke<br />
Drücken während eines Telefonats mit<br />
eingeschalteter Freisprechfunktion erhöht<br />
oder verringert die Lautsprecherlautstärke<br />
Drücken im Stand-by-Modus verändert die<br />
Tastentonlautstärke
1020_Inbetriebnahme_<strong>DE</strong>_FINAL.qxd:Branddistribution 29.07.2008 10:37 U<br />
5 Menü <strong>DE</strong><br />
5.1<br />
Navigieren im Menü<br />
Das Gerät verfügt über zahlreiche<br />
Funktionen, die über<br />
das Menü einstellbar sind.<br />
Drücken im Stand-by-Modus führt in das<br />
Hauptmenü. Es werden folgende Menüpunkte<br />
angezeigt:<br />
Nachrichten<br />
Telefoneinstellung<br />
M1/M2/M3 einstellen<br />
Uhr & Alarm<br />
Telefonbuch<br />
Notrufeinstellungen<br />
Taschenrechner<br />
Kalender<br />
SIM Toolkit<br />
Drücken im Hauptmenü um den gewünschten<br />
Menüpunkt auszuwählen<br />
Erneutes Drücken öffnet den ausgewählten<br />
Menüpunkt z.B.:<br />
HINWEIS<br />
Drücken der Taste M3 führt<br />
aus jedem Menü in das vorherige<br />
zurück.<br />
Nachrichten-> Nachricht schreiben<br />
-> Kurzmitteilungseingang<br />
-> Kurzmitteilungsausgang<br />
-> Nachrichteneinstellungen<br />
15
1020_Inbetriebnahme_<strong>DE</strong>_FINAL.qxd:Branddistribution 29.07.2008 10:37 U<br />
5 Menü <strong>DE</strong><br />
5.2<br />
Schnellwahltasten<br />
5.3<br />
Schnellwahltaste<br />
festlegen 2-9<br />
Die Schnellwahltasten 2 bis 9 sind nützlich, um schnell in<br />
die wichtigsten Menüpunkte zu gelangen. Durch Drücken<br />
und Halten einer dieser Tasten wird der ihr zugeordnete<br />
Menüpunkt aufgerufen. z.B.: “Alarm”, “Bild auswählen” etc..<br />
Drücken, um das Hauptmenü zu öffnen<br />
Drücken bis zum Menüpunkt<br />
“Telefoneinstellung”<br />
Drücken, um “Telefoneinstellung” zu öffnen<br />
Drücken bis zum Menüpunkt “Schnellwahltaste<br />
festlegen 2-9“<br />
Drücken, um das Menü zu öffnen<br />
Drücken bis zur festzulegenden<br />
Schnellwahltaste z.B. Taste 3<br />
Drücken, um die Liste mit Funktionen für die<br />
Schnellwahltasten zu öffnen.<br />
16<br />
HINWEIS<br />
Drücken der Taste M3 führt<br />
aus jeder Ebene in die vorherige<br />
zurück.<br />
Drücken, bis zum gewünschten Menüpunkt<br />
für die Taste 3 (z.B. “Zeit und Datum”)<br />
Drücken, um die Auswahl zu bestätigen<br />
Drücken und Halten der Taste 3 im Stand-by-<br />
Modus führt nun direkt in den Menüpunkt<br />
“Zeit und Datum”
1020_Inbetriebnahme_<strong>DE</strong>_FINAL.qxd:Branddistribution 29.07.2008 10:37 U<br />
6 Nachrichten <strong>DE</strong><br />
6.1<br />
Nachrichten (SMS)<br />
6.1.1 SMS Nachricht<br />
empfangen<br />
6.1.2 SMS Nachricht<br />
anzeigen<br />
6.1.3 SMS Nachricht<br />
beantworten<br />
HINWEIS<br />
Drücken der Taste<br />
wechselt zwischen Großund<br />
Kleinbuchstaben.<br />
Gedrückthalten der Taste<br />
wechselt zur<br />
Nummerneingabe.<br />
Drücken der Taste<br />
fügt einen Zwischenraum ein.<br />
Drücken der Taste<br />
ruft Sonderzeichen auf.<br />
SMS sind geschriebene Kurzmitteilungen. Sie können von<br />
Mobiltelefonen und einigen Festnetztelefonen verfasst, versendet<br />
und empfangen werden.<br />
Ein Signalton und die Meldung "1 Neue Nachricht!" im<br />
Display zeigt den Eingang einer neuen SMS Nachricht an.<br />
Drücken, um die Nachricht anzuzeigen<br />
Drücken, um nach unten zu blättern um den<br />
restlichen Text anzeigen zu lassen<br />
Drücken führt zu den “Nachrichtenoptionen”<br />
Drücken öffnet das Fenster zum beantworten<br />
der SMS Nachticht<br />
Mit den Zifferntasten den gewünschten Text<br />
(z.B. HALLO = 2mal 4 für H,<br />
1mal 2 für A,<br />
3mal 5 für L, kurze Pause,<br />
3mal 5 für L und<br />
3mal 6 für O) eingeben<br />
Drücken, um eine falsche Eingabe zu löschen<br />
Drücken, um die Antwort zu senden<br />
Drücken führt in den Stand-by-Modus<br />
17
1020_Inbetriebnahme_<strong>DE</strong>_FINAL.qxd:Branddistribution 29.07.2008 10:37 U<br />
7 Einstellungen <strong>DE</strong><br />
7.1<br />
Displayeinstellungen<br />
7.1.1 Spache ändern<br />
Im Menü Displayeinstellungen können (z.B. Sprache, Bildschirmschoner,<br />
Schriftgröße etc. den persönlichen<br />
Bedürfnissen angepasst werden.<br />
Drücken, um das Hauptmenü zu öffnen<br />
Drücken, um “Telefoneinstellung”<br />
auszuwählen<br />
Drücken, um “Telefoneinstellung” zu öffnen<br />
Drücken, um “Displayeinstellungen” zu öffnen<br />
Drücken, um “Sprache” zu öffnen<br />
HINWEIS<br />
Drücken der Taste<br />
führt in den Stand-by-Modus.<br />
Drücken, bis die gewünschte Sprache<br />
ausgewählt ist<br />
Drücken, um die Auswahl zu bestätigen<br />
7.2<br />
Audioeinstellungen<br />
7.2.1 Ruftonlautstärke<br />
ändern<br />
Drücken, um das Hauptmenü zu öffnen<br />
Drücken, um “Telefoneinstellung”<br />
auszuwählen<br />
Drücken, um “Telefoneinstellung” zu öffnen<br />
Drücken, um “Audioeinstellungen” auszuwählen<br />
18
1020_Inbetriebnahme_<strong>DE</strong>_FINAL.qxd:Branddistribution 29.07.2008 10:37 U<br />
7 Einstellungen <strong>DE</strong><br />
Drücken, um “Audioeinstellungen” zu öffnen<br />
Drücken, um “Lautstärke einstellen”<br />
auszuwählen<br />
HINWEIS<br />
Drücken der Taste M3 führt<br />
aus jeder Ebene in die vorherige<br />
zurück<br />
Drücken der Taste<br />
führt in den Stand-by-Modus.<br />
Drücken, um “Lautstärke einstellen” zu öffnen<br />
Drücken, um in “Ruftonlautstärke” zu gelangen<br />
Drücken, um die gewünschte<br />
Lautstärke auszuwählen<br />
Drücken, um die Auswahl zu bestätigen<br />
7.2.2 SMS Ton-Lautstärke<br />
ändern<br />
7.2.3 Alarmtonlautstärke<br />
ändern<br />
7.2.4 Tastentonlautstärke<br />
ändern<br />
7.2.5 Systemtonlautstärke<br />
ändern<br />
7.2.6 Anrufsignalisierung<br />
Vorgehen zum Ändern von “Lautst. Nachricht” (7 Lautstärken)<br />
wie Kapitel 7.2.1 Ruftonlautstärke ändern<br />
Vorgehen zum Ändern von “Alarmlautst.” (7 Lautstärken) wie<br />
Kapitel 7.2.1 Ruftonlautstärke ändern<br />
Vorgehen zum Ändern von “Tastenton” (7 Lautstärken) wie<br />
Kapitel 7.2.1 Ruftonlautstärke ändern<br />
Vorgehen zum Ändern von “Lautst. Systemton” (7 Lautstärken)<br />
wie Kapitel 7.2.1 Ruftonlautstärke ändern<br />
Vorgehen zum Ändern von “Anrufsignalisierung” (nur Rufton,<br />
nur Vibration, Vibration und Rufton, Vibration dann Rufton,<br />
Still) wie Kapitel 7.2.1 Ruftonlautstärke ändern<br />
19
1020_Inbetriebnahme_<strong>DE</strong>_FINAL.qxd:Branddistribution 29.07.2008 10:37 U<br />
7 Einstellungen <strong>DE</strong><br />
7.2.7 Hilfeton<br />
Vorgehen zum Ändern des Hilfetones (Hilfeton AN / AUS) wie<br />
Kapitel 7.2.1 Ruftonlautstärke ändern<br />
7.3<br />
Automatische<br />
Tastensperre<br />
20<br />
HINWEIS<br />
Ein Anruf kann über die<br />
Gespräch annehmen-Taste<br />
trotz Tastensperre angemommen<br />
werden.<br />
Nach dem Gespräch wird<br />
die Sperre wieder<br />
automatisch aktiviert.<br />
Um die Tastensperre wieder<br />
zu deaktivieren, im Menü<br />
Keine einstellen.<br />
Schützt vor unbeabsichtigtem Betätigen der Telefontasten<br />
Drücken, um ins Menü zu gelangen<br />
Drücken, um zu “Telefoneinstellung” zu<br />
gelangen<br />
Drücken führt in ““Telefoneinstellung”<br />
Drücken, um zu “Automatische Tastensperre”<br />
zu gelangen<br />
Drücken führt in “Automatische Tastensperre”<br />
Drücken, um die Zeit auszuwählen (Keine,<br />
5 Sec, 30 Sec, 1 Min, 5 Min.), nach der die<br />
Tastensperre (nach letzter Telefonbenutzung),<br />
aktiviert werden soll<br />
Drücken, um die Auswahl zu bestätigen<br />
Drücken führt in den Stand-by-Modus<br />
Wie eingestellt, werden nun die Tasten nach<br />
der letzten Telefonbenutzung gesperrt<br />
Drücken, anschließend drücken, um die<br />
Tasten freizugeben
1020_Inbetriebnahme_<strong>DE</strong>_FINAL.qxd:Branddistribution 29.07.2008 10:37 U<br />
7 Einstellungen <strong>DE</strong><br />
7.4<br />
Sicherheitseinstellung<br />
7.4.1 Passwort ändern<br />
Drücken, um ins Hauptmenü zu gelangen<br />
Drücken, um zu “Telefoneinstellung” zu<br />
gelangen<br />
Drücken führt in “Telefoneinstellung”<br />
Drücken, um zu “Sicherheitseinstellung” zu<br />
gelangen<br />
Drücken führt in “Sicherheitseinstellung”<br />
Drücken, um zu “Passwort ändern” zu<br />
gelangen<br />
Drücken führt in “Passwort ändern”<br />
Drücken um zum Passwort zu gelangen, das<br />
geändert werden soll (z.B. PIN2)<br />
Drücken führt zur PIN-Eingabe “Alte PIN2:”<br />
HINWEIS<br />
Drücken der Taste M3 führt<br />
aus jeder Ebene in die vorherige<br />
zurück.<br />
Drücken der Taste führt<br />
in den Stand-by-Modus.<br />
Alte PIN2:<br />
9 9 9 9<br />
Neue PIN2:<br />
I<br />
Eingeben des eingestellen PINs<br />
(Werkseinstellung: 9999)<br />
Drücken führt zur PIN-Eingabe “Neue PIN2:”<br />
Eingeben des neuen PINs<br />
Drücken, um die Eingabe zu bestätigen<br />
21
1020_Inbetriebnahme_<strong>DE</strong>_FINAL.qxd:Branddistribution 29.07.2008 10:37 U<br />
7 Einstellungen <strong>DE</strong><br />
Wiederholen<br />
I<br />
Wiederholen des neuen PINs<br />
Drücken, um die Eingabe zu bestätigen<br />
7.5<br />
Werkseinstellungen<br />
wiederherstellen<br />
22<br />
HINWEIS<br />
Es werden die im Telefon<br />
gespeicherten Einstellungen<br />
geändert, auf der SIM-Karte<br />
gespeicherte Daten bleiben<br />
erhalten.<br />
Passwort:<br />
I<br />
Drücken, um ins Hauptmenü zu gelangen<br />
Drücken, um zu “Telefoneinstellung” zu<br />
gelangen<br />
Drücken führt in “Telefoneinstellung”<br />
Drücken, um zu “Werkseinstellungen<br />
wiederherstellen” zu gelangen<br />
Drücken führt zu “Passwort eingeben”<br />
Eingeben des eingestellten Passwortes<br />
(Werkseinstellung: 1122)<br />
Drücken, um die Eingabe zu bestätigen<br />
Im Display erscheint die Anzeige ?SIND SIE...<br />
Drücken, wenn Sie sicher sind, die Werkseinstellungen<br />
wiederherstellen zu wollen oder<br />
Drücken, wenn die aktuellen Einstellungen<br />
nicht geändert werden sollen<br />
Drücken führt in den Stand-by-Modus
1020_Inbetriebnahme_<strong>DE</strong>_FINAL.qxd:Branddistribution 29.07.2008 10:37 U<br />
7 Einstellungen <strong>DE</strong><br />
7.6<br />
M1 / M2 / M3 festlegen<br />
7.6.1 M1 Rufnummer<br />
festlegen<br />
Drücken, um ins Hauptmenü zu gelangen<br />
Drücken, um zu “M1/M2/M3 einstellen” zu<br />
gelangen<br />
Drücken führt in “M1/M2/M3 einstellen”<br />
Drücken führt in “M1 Rufnummer”<br />
Drücken führt in “Aus Telefonbuch”<br />
Drücken führt in “Telefonbuch”<br />
Drücken, um im Telefonbuch zur gewünschten<br />
Rufnummer zu gelangen<br />
Drücken, um die Auswahl zu bestätigen<br />
Drücken führt in den Stand-by-Modus<br />
7.6.2 M2 Rufnummer<br />
festlegen<br />
7.6.3 M3 Rufnummer<br />
festlegen<br />
Vorgehen zum Einstellen der “M2 Rufnummer” wie Kapitel<br />
7.6.1, M1 Rufnummer festlegen<br />
Vorgehen zum Einstellen der “M3 Rufnummer ” wie Kapitel<br />
7.6.1, M1 Rufnummer festlegen<br />
23
1020_Inbetriebnahme_<strong>DE</strong>_FINAL.qxd:Branddistribution 29.07.2008 10:37 U<br />
7 Einstellungen <strong>DE</strong><br />
7.7<br />
Uhr & Alarm<br />
7.7.1 Zeit & Datum<br />
einstellen<br />
Drücken, um ins Hauptmenü zu gelangen<br />
Drücken, um zu “Uhr & Alarm” zu gelangen<br />
Drücken führt zu “Zeit und Datum”<br />
Drücken führt zu “Zeit und Datum einstellen”<br />
Drücken führt in “Zeit und Datum einstellen”<br />
Eingeben der aktuellen Zeit:<br />
Stunden (HH), Minuten (MM),<br />
Drücken führt zur Eingabe des Datums<br />
HINWEIS<br />
Im Menü “Format” können<br />
Uhrzeitformat: 12/24 Stunden<br />
und Datumsformat z.B.:<br />
TT/MM/JJJJ umgestellt<br />
werden.<br />
Eingeben des aktuellen Datums:<br />
Jahr (JJJJ), Monat (MM), Tag (TT)<br />
Drücken, um die Eingabe zu bestätigen<br />
Drücken führt in den Stand-by-Modus<br />
24
1020_Inbetriebnahme_<strong>DE</strong>_FINAL.qxd:Branddistribution 29.07.2008 10:37 U<br />
7 Einstellungen <strong>DE</strong><br />
7.8<br />
Telefonbuch<br />
7.8.1 Neuen Eintrag<br />
einfügen<br />
Drücken, um ins Hauptmenü zu gelangen<br />
Drücken, um zu “Telefonbuch” zu gelangen<br />
Drücken führt in “Telefonbuch”<br />
Drücken, um zu “Neuer Eintrag” zu gelangen<br />
Drücken führt in “Nummer speichern”<br />
Drücken, um Speicherort “SIM” (SIM-Karte)<br />
oder “Telefon” auszuwählen<br />
Drücken führt zu “Name”<br />
Drücken öffnet Eingabefeld “Name”<br />
Eingeben des Namens<br />
Drücken speichert den eingegebenen Namen<br />
Drücken öffnet Eingabefeld “Handynummer”<br />
Eingeben der Rufnummer<br />
25
1020_Inbetriebnahme_<strong>DE</strong>_FINAL.qxd:Branddistribution 29.07.2008 10:37 U<br />
7 Einstellungen <strong>DE</strong><br />
Drücken führt zu “Speichern?”<br />
Drücken, um den Eintrag zu speichern oder<br />
Drücken, um Speichern abzubrechen<br />
Drücken führt in den Stand-by-Modus<br />
7.8.2 Eintrag löschen<br />
Drücken öffnet “Telefonbuch”<br />
Drücken, bis die gewünschte Rufnummer<br />
erscheint oder<br />
Eingabe der ersten Buchstaben des<br />
gewünschten Teilnehmers,<br />
z.B. 1mal Taste 6 für M<br />
2mal Taste 3 für E<br />
3mal Taste 9 für Y<br />
bis der gesuchte Name MEYER mit<br />
Rufnummer angezeigt wird<br />
Drücken öffnet die “Eintragoptionen”<br />
Drücken, um “Löschen” auszuwählen<br />
26
1020_Inbetriebnahme_<strong>DE</strong>_FINAL.qxd:Branddistribution 29.07.2008 10:37 U<br />
7 Einstellungen <strong>DE</strong><br />
Drücken führt zu “Löschen?”<br />
Drücken, um den Eintrag zu löschen oder<br />
Drücken, wenn nicht gelöscht werden soll<br />
Drücken führt in den Stand-by-Modus<br />
7.8.3 Einträge kopieren<br />
(SIM Telefon)<br />
Drücken öffnet “Telefonbuch”<br />
Drücken, bis die gewünschte Rufnummer<br />
erscheint oder<br />
Eingabe der ersten Buchstaben des<br />
gewünschten Teilnehmers,<br />
z.B. 1mal Taste 6 für M<br />
2mal Taste 3 für E<br />
3mal Taste 9 für Y<br />
bis der gesuchte Name MEYER mit<br />
Rufnummer angzeigt wird<br />
Drücken öffnet die “Eintragoptionen”<br />
Drücken, um “Kopieren” auszuwählen<br />
27
1020_Inbetriebnahme_<strong>DE</strong>_FINAL.qxd:Branddistribution 29.07.2008 10:37 U<br />
7 Einstellungen <strong>DE</strong><br />
Drücken führt zu “Kopieren?”<br />
Drücken, um den Eintrag zu kopieren oder<br />
Drücken, wenn nicht kopiert werden soll<br />
Drücken führt in den Stand-by-Modus<br />
7.8.4 Standard-Telefonbuch<br />
festlegen<br />
Drücken, um ins “Hauptmenü” zu gelangen<br />
Drücken, um zu “Telefonbuch” zu gelangen<br />
Drücken führt in “Telefonbuch”<br />
Drücken, um zu “Standard-Telefonbuch” zu<br />
gelangen<br />
Drücken führt in “Standard-Telefonbuch”<br />
Drücken, um das gewünschte Telefonbuch<br />
“SIM, “Telefon” oder “Beides” auszuwählen<br />
Drücken, um die Auswahl zu bestätigen<br />
Drücken führt in den Stand-by-Modus<br />
28
1020_Inbetriebnahme_<strong>DE</strong>_FINAL.qxd:Branddistribution 29.07.2008 10:37 U<br />
7 Einstellungen <strong>DE</strong><br />
7.9<br />
Notrufeinstellungen<br />
7.9.1 Notrufnummer 1<br />
einstellen<br />
Drücken, um ins Hauptmenü zu gelangen<br />
Drücken, um zu “Notrufeinstellungen” zu<br />
gelangen<br />
Drücken führt in “Notrufeinstellungen”<br />
Drücken führt in “Notrufnr. einstellen”<br />
zu “Notrufnr. 1”, die eingestellt werden soll<br />
Drücken führt in “Optionen”<br />
Drücken, um zu “Auswählen” zu gelangen<br />
Drücken führt in “Telefonbuch”<br />
Drücken, um im Telefonbuch zur gewünschten<br />
Rufnummer zu gelangen<br />
Drücken, um die Auswahl zu bestätigen<br />
Drücken führt in den Stand-by-Modus<br />
7.9.2 Notrufnummer 2<br />
einstellen<br />
7.9.3 Notrufnummer 3<br />
einstellen<br />
Vorgehen zum Einstellen der “Notrufnr. 2” wie Kapitel 7.9.1,<br />
Notrufnummer 1 einstellen<br />
Vorgehen zum Einstellen der “Notrufnr. 3” wie Kapitel 7.9.1,<br />
Notrufnummer 1 einstellen<br />
29
1020_Inbetriebnahme_<strong>DE</strong>_FINAL.qxd:Branddistribution 29.07.2008 10:37 U<br />
7 Einstellungen <strong>DE</strong><br />
7.9.4 SOS-Nachricht<br />
vorbereiten<br />
Drücken, um ins Hauptmenü zu gelangen<br />
Drücken, um zu “Notrufeinstellungen” zu<br />
gelangen<br />
Drücken führt in “Notrufeinstellungen”<br />
Drücken, um zu “SOS-Nachricht vorbereiten”<br />
zu gelangen<br />
Drücken führt in das Eingabefeld “SOS-<br />
Nachricht..”<br />
Eingeben des Nachrichtentextes<br />
Drücken, um die Eingabe zu speichern<br />
Drücken führt in den Stand-by-Modus<br />
30
1020_Inbetriebnahme_<strong>DE</strong>_FINAL.qxd:Branddistribution 29.07.2008 10:37 U<br />
8 Garantie <strong>DE</strong><br />
Bei sachgerechter Nutzung übernimmt International Brand Distribution <strong>GmbH</strong>, Fahrgasse 5,<br />
65549 Limburg, die Garantie für die Dauer von 24 Monaten vom Kaufdatum an gerechnet.<br />
Durch diese Garantieerklärung werden sämtliche gesetzliche Ansprüche abgedeckt.<br />
Während der Garantiezeit werden alle Defekte durch Reparatur bzw. Austausch kostenlos<br />
behoben, wenn der Mangel auf einen Material- oder Fabrikationsfehler zurückzuführen ist.<br />
Von der Garantie ausgenommen sind Schäden, die auf unsachgemäßen Gebrauch, Eingriff<br />
durch Dritte oder höhere Gewalt zurückzuführen sind, sowie Zubehörteile, die einer<br />
normalen Abnutzung unterliegen (Akkus etc.). Weitergehende Ansprüche, wie Schadenersatz<br />
sind ebenfalls ausgeschlossen, auch wenn der Schaden an dem Gerät als ein Garantiefall<br />
anerkannt wird. Das Gerät unterliegt einer strengen Qualitätskontrolle. Sollten Sie jedoch<br />
einmal ein Problem mit diesem Produkt haben, wenden Sie sich bitte immer zuerst an unsere<br />
technische Service-Hotline Tel.: +49 (0) 180-5118870-2<br />
<strong>JET</strong> <strong>GmbH</strong>, Am Weimarer Berg 6, 99510 Apolda<br />
(14 Ct/Min. aus dem Festnetz der deutschen Telekom, Preise aus dem Mobilfunknetz können abweichen)<br />
Im Garantiefall senden Sie das Gerät mit Fehlerbeschreibung und Kaufbeleg an <strong>JET</strong> <strong>GmbH</strong><br />
ein. Werden Geräte ohne Kaufbelege zur Reparatur eingesandt, kann die Reparatur nur<br />
kostenpflichtig erfolgen. Dies trifft auch bei nicht ausreichend verpackten Produkten zu.<br />
Technische und formale Änderungen zur Verbesserung und Weiterentwicklung des Produktes<br />
behalten wir uns vor. © International Brand Distribution <strong>GmbH</strong> 07/2008<br />
Das Mobiltelefon Auro Comfort 1020 entspricht der EU-Richtlinie R&TTE. Es entspricht<br />
außerdem den europäischen Vorschriften zur Elektromagnetischen Verträglichkeit (EMV) und<br />
zur Produktsicherheit. Das Auro Comfort 1020 trägt hierfür das CE-Zeichen.<br />
Konformitätserklärungen und Urkunden zu Betriebserlaubnis und Zulassung können unter<br />
www.branddistribution.de eingesehen werden.<br />
31