ARGUS 220, fernbedienbar 565519/565560 - Merten
ARGUS 220, fernbedienbar 565519/565560 - Merten
ARGUS 220, fernbedienbar 565519/565560 - Merten
Sie wollen auch ein ePaper? Erhöhen Sie die Reichweite Ihrer Titel.
YUMPU macht aus Druck-PDFs automatisch weboptimierte ePaper, die Google liebt.
AUTO ON OFF<br />
SET<br />
-30s +30s<br />
SET +<br />
<strong>ARGUS</strong> <strong>220</strong>, <strong>fernbedienbar</strong>© <strong>Merten</strong> 2009V5655-581-0204/13<br />
de en<br />
<strong>ARGUS</strong> <strong>220</strong>, <strong>fernbedienbar</strong><br />
Gebrauchsanleitung<br />
• Horizontal, vertikal und axial verstellbarer Sensorkopf<br />
für optimale Anpassung an die örtlichen Gegebenheiten<br />
• Ausblenden unerwünschter Zonen oder Störquellen<br />
(wie z. B. Bäume) durch die mitgelieferten Segmente.<br />
• Fernbedienung für bequeme Bedienung und Einstellung<br />
des <strong>ARGUS</strong>.<br />
Lieferumfang<br />
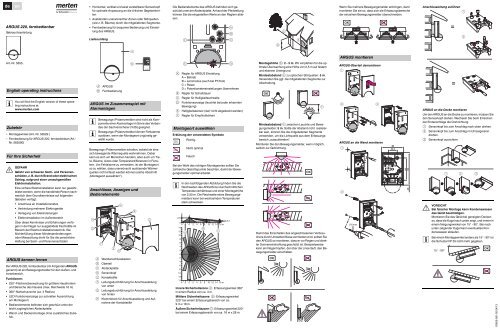
Die Bedienelemente des <strong>ARGUS</strong> befinden sich geschützt<br />
unter der Abdeckplatte. Anhand der Pfeilstellung<br />
können Sie die eingestellten Werte an den Reglern ablesen.<br />
F<br />
D<br />
A<br />
C<br />
B<br />
A<br />
B<br />
C<br />
E<br />
E<br />
Wenn Sie mehrere Bewegungsmelder anbringen, dann<br />
montieren Sie sie so, dass sich die Erfassungsbereiche<br />
der einzelnen Bewegungsmelder überschneiden.<br />
Anschlussleitung zuführen<br />
1<br />
=<br />
2<br />
D<br />
A<br />
<strong>ARGUS</strong> montieren<br />
Art.-Nr. 5655..<br />
English operating instructions<br />
A<br />
B<br />
<strong>ARGUS</strong><br />
Fernbedienung<br />
B<br />
merten<br />
E<br />
D<br />
A Regler für <strong>ARGUS</strong> Einstelung<br />
A = Betrieb<br />
B = Lernmodus (auch bei PT-Tool)<br />
C = Reset<br />
D = Potentiometereinstellungen übernehmen<br />
B Regler für Schaltdauer<br />
Montagehöhe D: 2 - 3 m. Wir empfehlen für die optimale<br />
Überwachung eine Höhe von 2,5 m auf festem<br />
und ebenem Untergrund.<br />
Mindestabstand E zu optischen Störquellen: 5m.<br />
Verwenden Sie ggf. die mitgelieferten Segmente zur<br />
Abschattung.<br />
OK<br />
OK<br />
<strong>ARGUS</strong>-Oberteil demontieren<br />
1<br />
=<br />
|<br />
You will find the English version of these operating<br />
instructions at:<br />
www.merten.com<br />
Zubehör<br />
– Montagewinkel (Art.-Nr. 56529.)<br />
– Fernbedienung für <strong>ARGUS</strong> <strong>220</strong>, <strong>fernbedienbar</strong> (Art.-<br />
Nr. 565590)<br />
Für Ihre Sicherheit<br />
¼ GEFAHR<br />
Gefahr von schweren Sach- und Personenschäden,<br />
z. B. durch Brand oder elektrischen<br />
Schlag, aufgrund einer unsachgemäßen<br />
Elektroinstallation.<br />
Eine sichere Elektroinstallation kann nur gewährleistet<br />
werden, wenn die handelnde Person nachweislich<br />
über Grundkenntnisse auf folgenden<br />
Gebieten verfügt:<br />
• Anschluss an Installationsnetze<br />
• Verbindung mehrerer Elektrogeräte<br />
• Verlegung von Elektroleitungen<br />
• Elektroinstallation im Außenbereich<br />
Über diese Kenntnisse und Erfahrungen verfügen<br />
in der Regel nur ausgebildete Fachkräfte im<br />
Bereich der Elektro-Installationstechnik. Bei<br />
Nichterfüllung dieser Mindestanforderungen<br />
oder Missachtung droht für Sie die persönliche<br />
Haftung bei Sach- und Personenschäden<br />
<strong>ARGUS</strong> im Zusammenspiel mit<br />
Alarmanlagen<br />
|<br />
|<br />
Bewegungs-/Präsenzmelder sind nicht als Komponente<br />
einer Alarmanlage im Sinne des Verbandes<br />
der Sachversicherer (VdS) geeignet.<br />
Bewegungs-/Präsenzmelder können Fehlalarme<br />
auslösen, wenn der Montageort ungünstig gewählt<br />
wurde.<br />
Bewegungs-/Präsenzmelder schalten, sobald sie eine<br />
sich bewegende Wärmequelle wahrnehmen. Dabei<br />
kann es sich um Menschen handeln, aber auch um Tiere,<br />
Bäume, Autos oder Temperaturdifferenzen in Fenstern.<br />
Um Fehlalarme zu vermeiden, ist der Montageort<br />
so zu wählen, dass unerwünscht auslösende Wärmequellen<br />
nicht erfasst werden können (siehe Abschnitt<br />
„Montageort auswählen“).<br />
Anschlüsse, Anzeigen und<br />
Bedienelemente<br />
H<br />
G<br />
F<br />
A<br />
E<br />
D<br />
B<br />
C<br />
C Regler für Helligkeitsschwelle<br />
D Funktionsanzeige (leuchtet bei jeder erkannten<br />
Bewegung)<br />
E Helligkeitssensor (darf nicht abgedeckt werden)<br />
F Regler für Empfindlichkeit<br />
Montageort auswählen<br />
Erklärung der verwendeten Symbole<br />
Bei der Wahl des richtigen Montageortes sollten Sie<br />
zahlreiche Gesichtspunkte beachten, damit der Bewegungsmelder<br />
optimal arbeitet.<br />
|<br />
Richtig<br />
Nicht optimal<br />
Falsch<br />
In der nachfolgenden Abbildung finden Sie die<br />
Reichweiten des <strong>ARGUS</strong> bei durchschnittlichen<br />
Temperaturverhältnisse und einer Montagehöhe<br />
von 2,50 m. Die Reichweite eines Bewegungsmelders<br />
kann bei wechselnden Temperaturen<br />
stark schwanken.<br />
m<br />
2,5<br />
0,8 m<br />
0<br />
4 0 2 4 6 8 10 12 14 16 m<br />
14<br />
B<br />
12<br />
C<br />
A<br />
10<br />
8<br />
6<br />
4<br />
2<br />
0<br />
Mindestabstand F zwischen Leuchte und Bewegungsmelder:<br />
5m. Sollte der Abstand nicht realisierbar<br />
sein, können Sie die mitgelieferten Segmente<br />
verwenden, um die Lichtquelle aus dem Erfassungsbereich<br />
„auszublenden“.<br />
Montieren Sie den Bewegungsmelder, wenn möglich,<br />
seitlich zur Gehrichtung.<br />
OK<br />
OK<br />
OK<br />
F<br />
Damit das Einschalten des angeschlossenen Verbrauchers<br />
durch Umwelteinflüsse vermieden wird, sollten Sie<br />
den <strong>ARGUS</strong> so montieren, dass er vor Regen und direkter<br />
Sonneneinstrahlung geschützt ist. Beispielsweise<br />
kann ein Regentropfen, der über die Linse läuft, den Bewegungsmelder<br />
einschalten.<br />
2 3<br />
<strong>ARGUS</strong> an die Wand montieren<br />
1<br />
2<br />
<strong>ARGUS</strong> an die Decke montieren<br />
Um den <strong>ARGUS</strong> an die Decke zu montieren, müssen Sie<br />
den Sensorkopf drehen. Wechseln Sie beim Erreichen<br />
der Endanschläge die Drehrichtung.<br />
1 Sensorkopf bis zum Anschlag nach oben drehen.<br />
2 Sensorkopf bis zum Anschlag im Uhrzeigersinn<br />
drehen.<br />
3 Sensorkopf ausrichten.<br />
½ VORSICHT<br />
Bei falscher Montage kann Kondenswasser<br />
das Gerät beschädigen.<br />
Montieren Sie das Gerät bei geneigten Decken<br />
so, dass die Kugel nach unten zeigt, und immer in<br />
einem Neigungswinkel von 15° - 90°. Bei nach<br />
unten zeigender Kugel kann eventuelles Kondenswasser<br />
ablaufen.<br />
|<br />
Bei einem Montagewinkel anders als 15° - 90° ist<br />
die Schutzart IP 55 nicht mehr gegeben.<br />
15° - 90°<br />
1 2 3<br />
<strong>ARGUS</strong> kennen lernen<br />
Der <strong>ARGUS</strong> <strong>220</strong>, <strong>fernbedienbar</strong> (im Folgenden <strong>ARGUS</strong><br />
genannt) ist ein Bewegungsmelder für den Außen- und<br />
Innenbereich.<br />
Funktionen:<br />
• <strong>220</strong>°-Flächenüberwachung für größere Hausfronten<br />
und Bereiche des Hauses (max. Reichweite 16 m)<br />
• 360°-Nahschutzzone (ca. 4 Radius)<br />
• LED-Funktionsanzeige zur schnellen Aussrichtung<br />
am Montageort.<br />
• Bedienelemente befinden sich geschüzt unter der<br />
leicht zugänglichen Abdeckplatte.<br />
• Wand- und Deckenmontage ohne zusätzliches Zubehör.<br />
A Wandanschlusskasten<br />
B Oberteil<br />
C Abdeckplatte<br />
D Sensorkopf<br />
E Kontaktstifte<br />
F Leitungsdurchführung für Anschlussleitung<br />
von unten<br />
G Leitungsdurchführung für Anschlussleitung<br />
von hinten<br />
H Klemmblock für Anschlussleitung und Aufnahme<br />
der Kontaktstifte<br />
2<br />
4<br />
6<br />
8<br />
10<br />
12<br />
14<br />
4 2 0 2 4 6 8 10 12 14 16 m<br />
Innere Sicherheitszone A: Erfassungswinkel 360°<br />
in einem Radius von ca. 4 m.<br />
Mittlere Sicherheitszone B: Erfassungswinkel<br />
<strong>220</strong>° bei einem Erfassungsbereich von ca.<br />
9mx18m.<br />
Äußere Sicherheitszone C: Erfassungswinkel <strong>220</strong>°<br />
bei einem Erfassungsbereich von ca. 16 m x 28 m.<br />
V5655-581-02 04/13
AUTO ON OFF<br />
SET<br />
-30s +30s<br />
SET +<br />
SET<br />
<strong>ARGUS</strong> an Ecken und ortsfesten Rohren montieren<br />
Mit dem Montagewinkel (Art.-Nr. MTN5652..) können<br />
Sie den <strong>ARGUS</strong> an Innen-/Außenecken oder an ortsfesten<br />
Rohren montieren. Die Anschlussleitung können Sie<br />
von hinten durch den Montagewinkel an das Gerät heranführen.<br />
<strong>ARGUS</strong> anschließen<br />
½ VORSICHT<br />
Das Gerät kann beschädigt werden.<br />
Betrieb nur mit sinusförmigen Netzspannungen<br />
möglich. Phasenanschnittdimmer oder Wechselrichter<br />
mit rechteckigem oder trapezförmigen<br />
Spannungsverlauf schädigen das Gerät.<br />
|<br />
|<br />
Sichern Sie den <strong>ARGUS</strong> über einen 16 A-Leitungsschutzschalter<br />
ab.<br />
Beim Schalten von induktiven Lasten wie z. B.<br />
Transformatoren, Relais, Schützen oder Leuchtstofflampen<br />
entstehen Spannungsspitzen, die<br />
zum Wiedereinschalten führen können („Dauerlichteffekt“).<br />
Schalten Sie an der induktiven Last<br />
einen Kondensator parallel, um diese Spannungsspitzen<br />
zu verringern.<br />
14 mm<br />
Eine Durchverdrahtung zu anderen Verbrauchern ist zulässig<br />
<strong>ARGUS</strong> ständig am Netz<br />
Der <strong>ARGUS</strong> überwacht ständig seinen Bereich<br />
L<br />
N<br />
<strong>ARGUS</strong>-Oberteil montieren<br />
1 2<br />
3<br />
Nun können den <strong>ARGUS</strong> in Betrieb nehmen.<br />
L<br />
N<br />
<strong>ARGUS</strong> in Betrieb nehmen<br />
1 Versorgungsspannung zuschalten.<br />
Der Verbraucher wird für ca. 10 s bzw. die eingestellte<br />
Zeit eingeschaltet. Die Funktionsanzeige leuchtet ca.<br />
10 s lang.<br />
Funktionstest durchführen<br />
|<br />
|<br />
Eingeschränkte Funktion<br />
Der Helligkeitssensor darf niemals abgedeckt<br />
sein, da dies die Funktion des <strong>ARGUS</strong> stark einschränkt.<br />
A<br />
1 2<br />
D B<br />
1s<br />
C<br />
3 4<br />
5<br />
=<br />
Die Funktionsanzeige leuchtet bei jeder erkannten<br />
Bewegung auf.<br />
<strong>ARGUS</strong> manuell einstellen<br />
½ VORSICHT<br />
Das Gerät kann beschädigt werden.<br />
Drehen Sie den Sensorkopf nur bis zum Anschlag,<br />
nicht darüber hinaus. Um einen Winkel<br />
„über“ dem Anschlag zu erreichen, wechseln Sie<br />
die Drehrichtung.<br />
1 Den Sensorkopf auf den zu überwachenden Bereich<br />
ausrichten.<br />
4° 29°<br />
9°<br />
24° 12° 12° 12° 12°<br />
25°<br />
25°<br />
8,5° 8,5°<br />
2 Vom Rand her in den Erfassungsbereich gehen, um<br />
zu überprüfen, ob der <strong>ARGUS</strong> den Verbraucher und<br />
die Funktionsanzeige wie gewünscht schaltet.<br />
Empfindlichkeit einstellen<br />
Hierüber können Sie stufenlos einstellen, bis zu welcher<br />
Entfernung der <strong>ARGUS</strong> Bewegungen erkennen kann<br />
(bis max. 16 m).<br />
Helligkeitsschwelle einstellen<br />
Hier stellen Sie stufenlos ein, ab welcher Umgebungshelligkeit<br />
der <strong>ARGUS</strong> Bewegungen erkennen und ein<br />
Schalten auslösen soll.<br />
– Mondsymbol (Nachtbetrieb): <strong>ARGUS</strong> erkennt nur bei<br />
Dunkelheit (bis ca. 3 Lux) Bewegungen.<br />
– Sonnensymbol (Tag- und Nachtbetrieb): <strong>ARGUS</strong> erkennt<br />
Bewegungen bis ca. 1000 Lux.<br />
Schaltdauer einstellen<br />
Hierüber können Sie einstellen, wie lange der an den<br />
<strong>ARGUS</strong> angeschlossene Verbraucher eingeschaltet<br />
sein soll. Bei Erkennen einer Bewegung wird der Verbraucher<br />
eingeschaltet und leuchtet so lange, bis die<br />
eingestellte Zeit verstrichen ist. Jede registrierte Bewegung<br />
startet die Schaltdauer neu.<br />
|<br />
Der <strong>ARGUS</strong> ignoriert nach dem Einschalten des<br />
Verbrauchers den Dämmerungsschalter. Wenn<br />
der Bewegungsmelder nicht mehr ausschaltet,<br />
dann liegt die Ursache wahrscheinlich darin,<br />
dass der <strong>ARGUS</strong> ständig neue Bewegungen erfasst<br />
und so die Schaltdauer immer wieder neu<br />
startet.<br />
Einzelne Bereiche ausblenden<br />
Durch die vier mitgelieferten Segmente können Sie unerwünschte<br />
Zonen und Störquellen aus dem Erfassungsbereich<br />
ausblenden.<br />
|<br />
3 LUX 1000 LUX<br />
40 80<br />
20 3<br />
1s<br />
8<br />
min<br />
1,2 sec<br />
Achten Sie darauf, dass der Helligkeitssensor A<br />
nicht verdeckt wird, da sich sonst die Lichtempfindlichkeit<br />
reduziert.<br />
<strong>ARGUS</strong> zurücksetzen<br />
40 80<br />
20 3<br />
1s<br />
8<br />
min<br />
8 min 10 sec<br />
Zurücksetzen in den Auslieferungszustand(Reset)<br />
In bestimmten Fällen ist es notwendig dieses Gerät in<br />
den Auslieferungszustand zurück zu setzen und neu zu<br />
konfigurieren:<br />
½ VORSICHT<br />
Fehlfunktionen können entstehen!<br />
Beim Zurücksetzten in den Auslieferungszustand<br />
gehen alle Einstellungen und Verbindungen dieses<br />
CONNECT-Gerätes verloren. Eventuell funktioniert<br />
das Funsystem nicht mehr und muss neu<br />
konfiguriert werden, siehe separate Beschreibung<br />
Funk-System CONNECT (liegt den Geräten<br />
mit Systemverwaltung bei).<br />
1 Drehen Sie den Regler A am <strong>ARGUS</strong> auf die Position<br />
C.<br />
2 LED blinkt nach ca. 1 s kurz auf: Das Gerät ist wieder<br />
im Auslieferungszustand.<br />
A<br />
1 2<br />
<strong>ARGUS</strong> über Fernbedienung einstellen<br />
Zurücksetzen in den Auslieferungszustand<br />
(Reset)<br />
In bestimmten Fällen ist es notwendig dieses Gerät in<br />
den Auslieferungszustand zurück zu setzen und neu zu<br />
konfigurieren:<br />
½ VORSICHT<br />
Beim Zurücksetzten in den Auslieferungszustand<br />
gehen alle Einstellungen und Verbindungen des<br />
Gerätes verloren.<br />
1 Drehen Sie den Regler A am <strong>ARGUS</strong> auf die Position<br />
C.<br />
2 Warten Sie, bis die rote LED am <strong>ARGUS</strong> erlischt<br />
(ca. 5 s): Das Gerät ist wieder im Auslieferungszustand.<br />
|<br />
Es Kann immer nur 1 <strong>ARGUS</strong> pro Fernbedienung<br />
angelernt werden!<br />
AUTO ON OFF<br />
SET<br />
-30s +30s<br />
SET +<br />
merten<br />
A Einstellung: <strong>ARGUS</strong> Betriebsart<br />
B Einstellung: Helligkeit<br />
C Einstellung: Nachlaufzeit<br />
D Einstellung: Empfindlichkeit<br />
E Status LED (rot, grün)<br />
Fernbedienung aktivieren<br />
A<br />
B<br />
C<br />
D<br />
1 Schutzfolie herausziehen: Die Fernbedienung ist<br />
sofort betriebsbereit!<br />
<strong>ARGUS</strong> an Fernbedienung anlernen<br />
1<br />
merten<br />
2<br />
3<br />
4<br />
D<br />
D<br />
AUTO<br />
3x<br />
A<br />
C<br />
10 s<br />
„A“<br />
C<br />
„B“<br />
B<br />
=<br />
merten<br />
SET +<br />
15 s<br />
-30s +30s<br />
AUTO ON OFF<br />
6s<br />
|<br />
Mit der Fernbedienung kann man den <strong>ARGUS</strong><br />
bequem und einfach im laufenden Betrieb einstellen.<br />
Betriebsart einstellen<br />
Stellen Sie per Knopfdruck einen der folgenden Status<br />
ein:<br />
– [ON] Taste drücken: Der <strong>ARGUS</strong> ist permanent aktiv,<br />
unabhängig von Bewegungen (Dauer AN).<br />
– [OFF] Taste drücken: Der <strong>ARGUS</strong> ist permanent ausgeschaltet<br />
(Dauer AUS).<br />
– [AUTO] Taste drücken: Bei einem bereits eingeschalteten<br />
<strong>ARGUS</strong> wird die Nachlaufzeit gestartet (Automatik<br />
Betrieb). Ansonsten bleibt der <strong>ARGUS</strong> solange<br />
aus, bis eine Bewegung erkannt wird.<br />
Helligkeitsschwelle einstellen<br />
– [SET] Taste drücken: der aktuelle Helligkeitswert wird<br />
übernommen.<br />
Schaltdauer einstellen<br />
– [+30] oder [-30] Taste drücken: die aktuelle Nachlaufzeit<br />
wird pro Knopfdruck um 30 s verkürzt oder verlängert.<br />
Empfindlichkeit einstellen<br />
– [SET] Taste drücken: <strong>ARGUS</strong> blinkt schnell = Einlern-<br />
Modus aktiviert (Regler F am <strong>ARGUS</strong> auf Maximum).<br />
Danach innerhalb von 30 s einmal durch den Sensorbereich<br />
des <strong>ARGUS</strong> laufen: Die Empfindlichkeit des<br />
<strong>ARGUS</strong> wird so eingestellt, dass die gemessene Bewegung<br />
erkannt wird. Mit der [+] und [-] Taste kann<br />
der Wert nachträglich verändert werden.<br />
Status LED<br />
leuchtet rot<br />
blinkt rot<br />
leuchtet grün<br />
Batteriewechsel<br />
|<br />
Fernbedienung und <strong>ARGUS</strong> nicht mit<br />
einander verbunden<br />
Anlernmodus aktiviert<br />
Fernbedienung mit <strong>ARGUS</strong> verbunden<br />
1<br />
2 3<br />
Die neue Batterie immer mit dem (+) Pol nach<br />
oben einlegen.<br />
Fernbedienung zurücksetzen<br />
1 3x die [AUTO] Taste drücken und bis zum Erlöschen<br />
der grünen LED gedrückt halten: Die Fernbedienung<br />
ist gelöscht.<br />
Technische Daten<br />
Fernbedienung<br />
Kanäle: 1<br />
Funkfrequenz: 868 mHz<br />
Reichweite<br />
Freifeld: bis zu 100 m<br />
Im Gebäude: bis zu 30 m<br />
Batterie: 1 Lithium Knopfzelle (CR 2450N)<br />
Anzeigeelemente: Status-LED<br />
<strong>ARGUS</strong><br />
Nennspannung: AC 230 V ±10%, 50 Hz<br />
Sicherung: Der <strong>ARGUS</strong> ist über einen 16 A-<br />
Leitungsschutzschalter abzusichern.<br />
Max. Schaltstrom: 16 A, AC 230 V, cosϕ = 1<br />
Nennleistung<br />
Glühlampen: AC 230 V, max. 2000 W<br />
Halogenlampen: AC 230 V, max. 1200 W<br />
Leuchtstofflampen: AC 230 V, max. 1200 W,<br />
unkompensiert<br />
Kapazitive Last: 35 µF<br />
Trafolast:<br />
max. 600 VA<br />
Eigenverbrauch: < 1 W<br />
Anschlussklemmen: für 2x1,5 mm 2 oder 2x2,5 mm 2<br />
starre Leiter, Abisolierlänge<br />
14 mm<br />
Außendurchmesser<br />
einer Leitung:<br />
Gothaer Straße 29, 40880 Ratingen<br />
www.merten.de<br />
www.merten-austria.at<br />
Kundenbetreuung:<br />
Telefon: +49 2102 - 404 6000<br />
<strong>ARGUS</strong> <strong>220</strong>, remote-controlled© <strong>Merten</strong> 2009V5655-581-0204/13<br />
max. 14,5<br />
mm<br />
Erfassungswinkel: <strong>220</strong>°<br />
Reichweite:<br />
max. 16 m<br />
Anzahl der Ebenen: 7<br />
Anzahl der Zonen: 112 mit 448 Schaltsegmenten<br />
Mindestanbauhöhe: 1,7 m<br />
Empfohlene<br />
Anbauhöhe:<br />
Empfindlichkeit:<br />
Lichtfühler:<br />
Schaltdauer:<br />
Einstellmöglich-keiten<br />
des Sensorkopfes:<br />
Wandmontage:<br />
Deckenmontage:<br />
Schutzart:<br />
EG-Richtlinien:<br />
2,5<br />
m<br />
stufenlos einstellbar<br />
stufenlos von außen einstellbar,<br />
von ca. 3 Lux bis ca. 1000 Lux<br />
in 6 Stufen von außen einstellbar,<br />
von ca. 1s bis ca. 8min.<br />
9° auf, 24° ab, 12° rechts/links,<br />
±12° axial<br />
4° auf, 29° ab, 25° rechts/links,<br />
±8,5° axial<br />
IP 55 bei einem Neigungswinkelvon<br />
15° bis 90°<br />
Niederspannungs-Richtlinie<br />
2006/95/EG<br />
EMV-Richtlinie 2004/108/EG<br />
Schneider Electric GmbH c/o <strong>Merten</strong><br />
V5655-581-02 04/13
AUTO ON OFF<br />
SET<br />
-30s +30s<br />
SET +<br />
de<br />
en<br />
Scope of delivery<br />
The <strong>ARGUS</strong> operating elements are protected under the<br />
cover plate. The arrow's position on the controllers<br />
shows you the set values.<br />
If you wish to attach several movement detectors, install<br />
them so that the detection areas of the individual movement<br />
detectors intersect each other.<br />
Feeding in the connecting cable<br />
1<br />
<strong>ARGUS</strong> <strong>220</strong>, remote-controlled<br />
Operating instructions<br />
A<br />
B<br />
merten<br />
K<br />
H<br />
G<br />
A<br />
F<br />
B<br />
C<br />
D<br />
E<br />
A<br />
B<br />
C<br />
D<br />
D<br />
E<br />
E<br />
=<br />
2<br />
Art. no. 5655..<br />
Accessories<br />
– Mounting bracket (Art. no. 56529.)<br />
– Remote control for <strong>ARGUS</strong> <strong>220</strong>, remote control (Art.<br />
no. 565590)<br />
For your safety<br />
¼ DANGER<br />
Risk of serious damage to property and personal<br />
injury, e.g. from fire or electric shock,<br />
due to incorrect electrical installation.<br />
Safe electrical installation can only be ensured if<br />
the person in question can prove basic knowledge<br />
in the following areas:<br />
• Connecting to installation networks<br />
• Connecting several electrical devices<br />
• Laying electric cables<br />
• Outdoor electrical installation<br />
These skills and experience are normally only<br />
possessed by skilled professionals who are<br />
trained in the field of electrical installation technology.<br />
If these minimum requirements are not met<br />
or are disregarded in any way, you will be solely liable<br />
for any damage to property or personal injury.<br />
<strong>ARGUS</strong> introduction<br />
The <strong>ARGUS</strong> <strong>220</strong> (referred to below as <strong>ARGUS</strong>) is a<br />
movement detector for indoor and outdoor installation.<br />
Functions:<br />
• <strong>220</strong>° surface monitoring for large house fronts and<br />
sections of the house (max. range. 16 m)<br />
• 360° short-range zone (approx. 4 m radius)<br />
• LED function display for fast alignment at the installation<br />
site.<br />
• Operating elements are protected under the easily accessible<br />
cover plate.<br />
• Can be installed on walls and ceilings without additional<br />
accessories.<br />
• Horizontally, vertically and axially adjustable sensor<br />
head for optimum adaptation to immediate surroundings<br />
• Hide unwanted zones or sources of disturbance (e.g.<br />
trees) using the segments supplied.<br />
• Remote control for setting and operating the <strong>ARGUS</strong><br />
conveniently.<br />
|<br />
|<br />
A <strong>ARGUS</strong><br />
B Remote control<br />
Using <strong>ARGUS</strong> with alarm systems<br />
Movement/presence detectors are not suitable<br />
for use as components of an alarm system.<br />
Movement/presence detectors can trigger false<br />
alarms if the installation site has been chosen unfavourably.<br />
Movement/presence detectors switch on as soon as<br />
they detect a moving heat source. This can be a person,<br />
but also animals, trees, cars or differences in temperature<br />
in windows. In order to avoid false alarms, the chosen<br />
installation site should be such that undesired heat<br />
sources cannot be detected (see section „Selecting the<br />
installation site“).<br />
Connections, displays and operating<br />
elements<br />
H<br />
G<br />
F<br />
A<br />
E<br />
D<br />
B<br />
C<br />
A Wall connection box<br />
B Top section<br />
C Cover plate<br />
D Sensor head<br />
E Contact pins<br />
F Cable routing for connecting cable from underneath<br />
G Cable routing for connecting cable from behind<br />
H Terminal block for the connecting cable and for<br />
locating the contact pins<br />
A <strong>ARGUS</strong> settings controller; Radio operation<br />
B Switching duration controller<br />
C Brightness threshold controller<br />
D Functional display (lights up each time movement<br />
is detected)<br />
E Brightness sensor (must not be covered)<br />
F Sensitivity controller<br />
Selecting the installation site<br />
Explanation of the symbols used<br />
When selecting a suitable installation site, you should<br />
take a number of factors into account so that the movement<br />
detector operates optimally.<br />
|<br />
F<br />
Correct<br />
Not optimal<br />
Incorrect<br />
E<br />
The following figure shows the ranges of the AR-<br />
GUS at average temperature conditions and a<br />
mounting height of 2.5 m. The range of a movement<br />
detector can vary greatly depending on the<br />
temperature.<br />
m<br />
2,5<br />
0,8 m<br />
0<br />
4 0 2 4 6 8 10 12 14 16 m<br />
14<br />
B<br />
12<br />
C<br />
A<br />
10<br />
8<br />
6<br />
4<br />
2<br />
0<br />
2<br />
4<br />
6<br />
8<br />
10<br />
12<br />
14<br />
4 2 0 2 4 6 8 10 12 14 16 m<br />
Inner security zone A: Angle of detection 360° over<br />
a radius of approx. 4 m.<br />
Middle security zone B: Angle of detection <strong>220</strong>°<br />
with an area of detection of approx. 9 m x 18 m.<br />
Outer security zone C: Angle of detection <strong>220</strong>° with<br />
an area of detection of approx. 16 m x 28 m.<br />
Mounting height D: 2-3 m. For optimum monitoring,<br />
we recommend a height of 2.5 m on a solid and even<br />
base.<br />
Minimum distance E to sources of optical interference:<br />
5 m If necessary, use the segments supplied to<br />
shade the device.<br />
OK<br />
OK<br />
Minimum distance F between luminaire and movement<br />
detector: 5 m. If this distance cannot be<br />
achieved, you can use the segments provided to<br />
"mask" the light source from the area of detection.<br />
If possible, install the movement detector sideways to the<br />
direction of movement.<br />
OK<br />
OK<br />
OK<br />
F<br />
To avoid the connected load being switched on due to<br />
environmental influences, the <strong>ARGUS</strong> should be installed<br />
so that it is protected against rain and direct sunlight.<br />
A raindrop running over the lens, for example, can<br />
activate the movement detector.<br />
<strong>ARGUS</strong> installation<br />
Dismantlement of the top section of the <strong>ARGUS</strong><br />
1<br />
2 3<br />
Installing the <strong>ARGUS</strong> to the wall<br />
1<br />
2<br />
Installing the <strong>ARGUS</strong> on the ceiling<br />
In order to install the <strong>ARGUS</strong> on the ceiling, you must rotate<br />
the sensor head. Change the direction of rotation<br />
once you have reached the end stops.<br />
1 Turn the sensor head upwards as far as it will go.<br />
2 Turn the sensor head clockwise as far as it will go.<br />
3 Align the sensor head.<br />
½ CAUTION<br />
If not installed correctly, the device can be<br />
damaged by condensation.<br />
In the case of sloping ceilings, install the device<br />
so that spherical head is pointing down and always<br />
at an angle of 15° - 90°. When the spherical<br />
head points downwards, any water from condensation<br />
could run down the device.<br />
|<br />
Type of protection IP 55 cannot be guaranteed if<br />
the mounting bracket is not 15° - 90°.<br />
15° - 90°<br />
=<br />
1 2 3<br />
V5655-581-02 04/13
AUTO ON OFF<br />
SET<br />
-30s +30s<br />
SET +<br />
SET<br />
Installing the <strong>ARGUS</strong> on corners and fixedpipes<br />
You can attach the <strong>ARGUS</strong> to inner/outer corners or fixed<br />
pipes using the mounting bracket (art. no. 5652..). You<br />
can feed the connecting cable to the device from behind<br />
through the mounting bracket.<br />
Connecting the <strong>ARGUS</strong><br />
½ CAUTION<br />
The device can become damaged.<br />
Operation only possible with sinusoidal mains<br />
voltages. Phase control dimmers or inverters with<br />
square-wave or trapezoidal voltage curves will<br />
damage the device.<br />
| Protect the <strong>ARGUS</strong> using a 16 A circuit breaker.<br />
|<br />
When switching inductive loads such as transformers,<br />
relays, contactors or fluorescent lamps,<br />
spikes occur which could lead to the load being<br />
switched on again ("maintained light effect").<br />
Connect a capacitor in parallel to the inductive<br />
load to reduce these spikes.<br />
14 mm<br />
"Through-wiring" to other loads is permitted.<br />
<strong>ARGUS</strong> permanently connected to the mains<br />
The <strong>ARGUS</strong> constantly monitors its area<br />
L<br />
N<br />
Putting <strong>ARGUS</strong> into operation<br />
1 Connect the supply voltage.<br />
The load is switched on for approx. 10 s or for the set period.<br />
The functional display lights up for approx. 10 s.<br />
2 Teach the remote control.<br />
Conducting a functional test<br />
|<br />
|<br />
The brightness sensor must not be covered up.<br />
A<br />
1 2<br />
D B<br />
1s<br />
C<br />
3 4<br />
5<br />
=<br />
The functional display lights up each time movement<br />
is detected.<br />
Setting up the <strong>ARGUS</strong> manually<br />
½ CAUTION<br />
The device could become damaged.<br />
The sensor head should only be rotated until it<br />
reaches the stop and no further. To achieve an<br />
angle "above" the stop, change the direction of<br />
rotation.<br />
1 Align the sensor head in the direction of the area<br />
that is to be monitored.<br />
9°<br />
24° 12° 12° 12° 12°<br />
Setting the brightness threshold<br />
Here you can infinitely set the ambient brightness level at<br />
which the <strong>ARGUS</strong> detects movements and triggers a<br />
switching procedure.<br />
– Moon symbol (night operation): The <strong>ARGUS</strong> will only<br />
detect movements during the hours of darkness (approx.<br />
3 lux).<br />
– Sun symbol (day and night operation): The <strong>ARGUS</strong><br />
detects movements up to approx. 1000 lux.<br />
Setting the switching duration<br />
Here you can set how long the loads connected to AR-<br />
GUS are switched on for. When a movement is detected,<br />
the load is switched on and stays switched on until the<br />
set period has elapsed. Every further movement restarts<br />
the switching duration.<br />
|<br />
The <strong>ARGUS</strong> ignores the light-sensitive switch<br />
once the load has been switched on. If the movement<br />
detector does not switch the load off again,<br />
the reason probably is that the <strong>ARGUS</strong> constantly<br />
detects further movements and thus keeps restarting<br />
the switching duration.<br />
Blocking out individual areas<br />
Using the four segments supplied, you can block out unwanted<br />
zones and sources of interference from the area<br />
of detection.<br />
|<br />
3 LUX 1000 LUX<br />
40 80<br />
20 3<br />
1s<br />
8<br />
min<br />
1,2 sec<br />
Ensure that the brightness sensor A is not covered,<br />
as the sensitivity to light is otherwise reduced.<br />
Resetting the <strong>ARGUS</strong><br />
40 80<br />
20 3<br />
1s<br />
8<br />
min<br />
8 min 10 sec<br />
A<br />
1 2<br />
Setting up the <strong>ARGUS</strong> via remote<br />
control<br />
Resetting to the factory settings<br />
Under certain circumstances, it may be neccessary to<br />
reset this device to its factory settings and to reconfigure<br />
it:<br />
½ CAUTION<br />
When you reset to the factory settings, all the settings<br />
and connections for this device are deleted.<br />
1 Turn the controller A on the <strong>ARGUS</strong> to position C.<br />
2 Wait until the red LED on the <strong>ARGUS</strong> goes out<br />
(approx. 5 s): The device has now been reset to its<br />
factory settings.<br />
| Only 1 <strong>ARGUS</strong> can be taught per remote control!<br />
AUTO ON OFF<br />
A Setting: <strong>ARGUS</strong> operating mode<br />
B Setting: Brightness<br />
C Setting: Overshoot time<br />
D Setting: Sensitivity<br />
E Status LED (red, green)<br />
Activating the remote control<br />
SET<br />
-30s +30s<br />
SET +<br />
merten<br />
A<br />
B<br />
C<br />
D<br />
1 Remove the protective foil: The remote control is<br />
ready to use immediately!<br />
Teaching the <strong>ARGUS</strong> for use with remote control<br />
1<br />
Setting the operating mode<br />
Use the buttons to select one of the following statuses:<br />
– Press the [ON] button: The local <strong>ARGUS</strong> is permanently<br />
active, regardless of whether or not movement<br />
is detected (permanent ON).<br />
– Press the [OFF] button: The local <strong>ARGUS</strong> is permanently<br />
switched off (permanent OFF).<br />
– Press the [AUTO] button: .f the <strong>ARGUS</strong> is already on,<br />
the overshoot time is started (automatic mode). Otherwise<br />
the <strong>ARGUS</strong> remains off until a movement is detected.<br />
Setting the brightness threshold<br />
– Press the [SET] button: the current brightness value is<br />
adopted.<br />
Setting the switching duration<br />
– Press the [+30] or the [-30] button: the current overshoot<br />
time is reduced or increased by 30 s per push<br />
of the button.<br />
Setting the sensitivity<br />
– Press the [SET] button: <strong>ARGUS</strong> flashes fast: Teaching<br />
mode activated (controller F at the <strong>ARGUS</strong>at maximum).<br />
Then, run across the sensor range of the<br />
<strong>ARGUS</strong> once within 30 s. The sensitivity of the AR-<br />
GUS is set such that the measured movement is detected.<br />
You can alter this value afterwards using the [+]<br />
and [-] buttons.<br />
Status LED<br />
Red light<br />
Flashing red<br />
light<br />
Green light<br />
Remote control no longer connected to<br />
<strong>ARGUS</strong><br />
Teaching mode activated<br />
Remote control connected to <strong>ARGUS</strong><br />
How to change the battery<br />
1<br />
2 3<br />
Technical data<br />
Remote control<br />
Channels: 1<br />
Radio frequency: 868 mHz<br />
Range<br />
Free field: up to 100 m<br />
Indoors: up to 30 m<br />
Battery: 1 lithium button cell (CR 2450N)<br />
Display elements: Status-LED<br />
<strong>ARGUS</strong><br />
Nominal voltage: AC 230 V ±10%, 50 Hz<br />
Fuse:<br />
Protect the <strong>ARGUS</strong> using a 16 A<br />
circuit breaker.<br />
Max. switching current:<br />
16 A, AC 230 V, cosϕ = 1<br />
Nominal output<br />
Incandescent AC 230 V, max. 2000 W<br />
lamps:<br />
Halogen lamps: AC 230 V, max. 1200 W<br />
Fluorescent lamps: AC 230 V, max. 1200 W,<br />
uncompensated<br />
Capacitive load: 35 µF<br />
Transformer load: max. 600 VA<br />
Power consumption: < 1 W<br />
Connecting terminals: for 2x1.5 mm 2 or 2x2.5 mm 2 rigid<br />
conductor, stripped length<br />
14 mm<br />
External diameter of<br />
one cable:<br />
max. 14.5<br />
mm<br />
Angle of detection: <strong>220</strong>°<br />
Range:<br />
max. 16 m<br />
Number of levels: 7<br />
Number of zones: 112 with 448 switching segments<br />
Minimum mounting 1.7 m<br />
height:<br />
Recommended<br />
mounting height:<br />
Sensitivity:<br />
Light sensor:<br />
Switching duration:<br />
2.5<br />
m<br />
infinitely adjustable<br />
infinitely adjustable externally,<br />
from approx. 3 lux to approx.<br />
1000 lux<br />
externally adjustable in 6 levels<br />
of approx. 1 sec. to approx.<br />
8min.<br />
Possible settings for<br />
sensor head:<br />
Wall mounting: 9° up, 24° down, 12° left/right, ±<br />
12° axial<br />
Ceiling mounting: 4° up, 29° down, 25° left/right, ±<br />
8.5° axial<br />
Type of protection: IP 55 at an angle of inclination<br />
from 15° to 90°<br />
EC directives: Low-voltage guideline<br />
2006/95/EC<br />
EMC directive 2004/108/EC<br />
Installation of the top section of the <strong>ARGUS</strong><br />
1 2<br />
3<br />
L<br />
N<br />
4° 29°<br />
25°<br />
25°<br />
8,5° 8,5°<br />
2 From its edge step into the area of detection to see<br />
whether the <strong>ARGUS</strong> switches the load and the functional<br />
display as required.<br />
Setting the sensitivity<br />
Here you can infinitely set the distance up to which AR-<br />
GUS detects movements (any distance up to max. 16<br />
m).<br />
Reset to the factory settings<br />
Under certain circumstances, it may be neccessary to<br />
reset this device to its factory settings and to reconfigure<br />
it:<br />
½<br />
CAUTION Malfunctions can occur! When resetting<br />
to the factory settings, all the settings and<br />
connections for this CONNECT device are deleted.<br />
Maybe the radio system is not working any<br />
longer and must be reconfigured (See the separate<br />
description of the CONNECT radio system).<br />
1 Turn the controller A on the <strong>ARGUS</strong> to position C.<br />
2 After approx. 1 s the LED flashes short: The device<br />
has now been reset to its factory settings.<br />
merten<br />
2<br />
3<br />
4<br />
D<br />
D<br />
AUTO<br />
3x<br />
A<br />
C<br />
10 s<br />
„A“<br />
C<br />
„B“<br />
B<br />
=<br />
merten<br />
SET +<br />
15 s<br />
-30s +30s<br />
AUTO ON OFF<br />
6s<br />
|<br />
Always insert the battery with the (+) pole facing<br />
upwards.<br />
Reset remote control<br />
1 Press the [AUTO] button 3 times and hold it down<br />
until the green light goes out. The remote control<br />
has been cleared.<br />
Schneider Electric GmbH c/o <strong>Merten</strong><br />
Gothaer Straße 29, 40880 Ratingen<br />
www.merten.com<br />
www.merten-austria.at<br />
Customer care centre:<br />
Phone: +49 2102 - 404 6000<br />
The <strong>ARGUS</strong> can now be put into operation.<br />
|<br />
You can use the remote control to adjust the AR-<br />
GUS simply and conveniently during operation.<br />
V5655-581-02 04/13


