Bedienungsanleitung MADMAXX MULTI TAUCHKREISSÄGE

Erfolgreiche ePaper selbst erstellen
Machen Sie aus Ihren PDF Publikationen ein blätterbares Flipbook mit unserer einzigartigen Google optimierten e-Paper Software.
TM<br />
– Read the desired measurement on the mark<br />
(16).<br />
– Tighten lightly the fixing screws (3).<br />
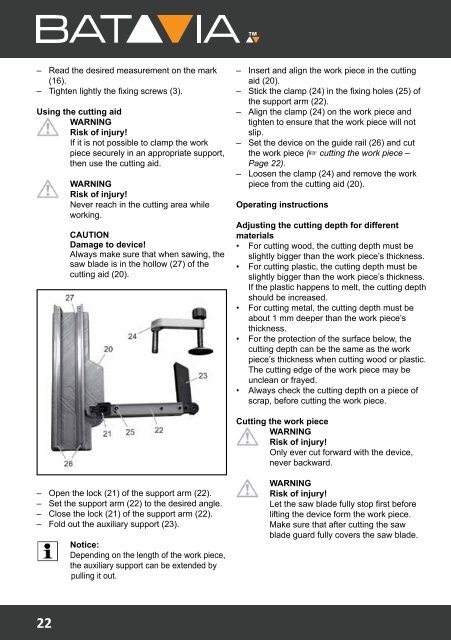
Using the cutting aid<br />
WARNING<br />
Risk of injury!<br />
If it is not possible to clamp the work<br />
piece securely in an appropriate support,<br />
then use the cutting aid.<br />
WARNING<br />
Risk of injury!<br />
Never reach in the cutting area while<br />
working.<br />
CAUTION<br />
Damage to device!<br />
Always make sure that when sawing, the<br />
saw blade is in the hollow (27) of the<br />
cutting aid (20).<br />
– Insert and align the work piece in the cutting<br />
aid (20).<br />
– Stick the clamp (24) in the fixing holes (25) of<br />
the support arm (22).<br />
– Align the clamp (24) on the work piece and<br />
tighten to ensure that the work piece will not<br />
slip.<br />
– Set the device on the guide rail (26) and cut<br />
the work piece (☞ cutting the work piece –<br />
Page 22).<br />
– Loosen the clamp (24) and remove the work<br />
piece from the cutting aid (20).<br />
Operating instructions<br />
Adjusting the cutting depth for different<br />
materials<br />
• For cutting wood, the cutting depth must be<br />
slightly bigger than the work piece’s thickness.<br />
• For cutting plastic, the cutting depth must be<br />
slightly bigger than the work piece’s thickness.<br />
If the plastic happens to melt, the cutting depth<br />
should be increased.<br />
• For cutting metal, the cutting depth must be<br />
about 1 mm deeper than the work piece’s<br />
thickness.<br />
• For the protection of the surface below, the<br />
cutting depth can be the same as the work<br />
piece’s thickness when cutting wood or plastic.<br />
The cutting edge of the work piece may be<br />
unclean or frayed.<br />
• Always check the cutting depth on a piece of<br />
scrap, before cutting the work piece.<br />
Cutting the work piece<br />
WARNING<br />
Risk of injury!<br />
Only ever cut forward with the device,<br />
never backward.<br />
– Open the lock (21) of the support arm (22).<br />
– Set the support arm (22) to the desired angle.<br />
– Close the lock (21) of the support arm (22).<br />
– Fold out the auxiliary support (23).<br />
Notice:<br />
Depending on the length of the work piece,<br />
the auxiliary support can be extended by<br />
pulling it out.<br />
WARNING<br />
Risk of injury!<br />
Let the saw blade fully stop first before<br />
lifting the device form the work piece.<br />
Make sure that after cutting the saw<br />
blade guard fully covers the saw blade.<br />
22