Manual XXL Speed Saw - Mini Circular Saw

Sie wollen auch ein ePaper? Erhöhen Sie die Reichweite Ihrer Titel.
YUMPU macht aus Druck-PDFs automatisch weboptimierte ePaper, die Google liebt.
TM<br />
should also be considered such as, for example,<br />
continued turning and idling of the tool).<br />
Limit noise and vibration to a minimum!<br />
• Use only problem free electric power tools.<br />
• Regularly maintain and clean the electric<br />
power tool.<br />
• Adapt your working methods to the electric<br />
power tool.<br />
• Do not overload the electric power tool.<br />
• Have the electric power tool inspected, if<br />
necessary.<br />
• Switch the electric power tool off when it is not<br />
in use.<br />
6. ASSEMBLY AND OPERATION<br />
This multi-cutter precision saw is a versatile tool<br />
that is designed for use in confined work spaces.<br />
By selecting the appropriate cutting blades, it will<br />
cut copper and aluminum tubing, ceramic and<br />
marble tile, and assorted wood products. The<br />
following assembly and operating instructions will<br />
explain the tool and its operation in detail.<br />
6.1 Install vacuum adaptor<br />
The vacuum adaptor can be used to attach a<br />
workshop vacuum hose to the tool. This will prevent<br />
most cutting dust from escaping into the work area.<br />
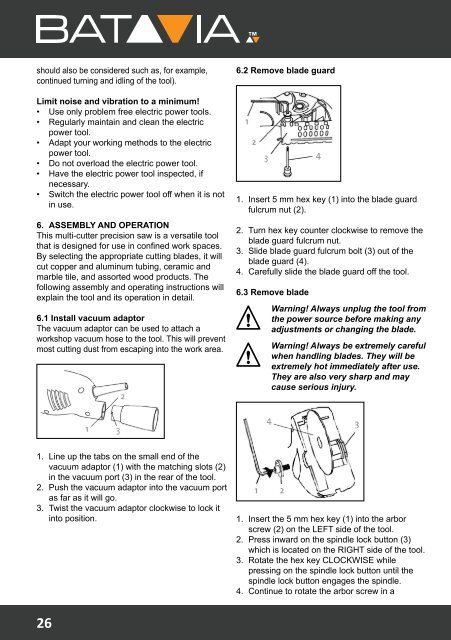
6.2 Remove blade guard<br />
1. Insert 5 mm hex key (1) into the blade guard<br />
fulcrum nut (2).<br />
2. Turn hex key counter clockwise to remove the<br />
blade guard fulcrum nut.<br />
3. Slide blade guard fulcrum bolt (3) out of the<br />
blade guard (4).<br />
4. Carefully slide the blade guard off the tool.<br />
6.3 Remove blade<br />
Warning! Always unplug the tool from<br />
the power source before making any<br />
adjustments or changing the blade.<br />
Warning! Always be extremely careful<br />
when handling blades. They will be<br />
extremely hot immediately after use.<br />
They are also very sharp and may<br />
cause serious injury.<br />
1. Line up the tabs on the small end of the<br />
vacuum adaptor (1) with the matching slots (2)<br />
in the vacuum port (3) in the rear of the tool.<br />
2. Push the vacuum adaptor into the vacuum port<br />
as far as it will go.<br />
3. Twist the vacuum adaptor clockwise to lock it<br />
into position.<br />
1. Insert the 5 mm hex key (1) into the arbor<br />
screw (2) on the LEFT side of the tool.<br />
2. Press inward on the spindle lock button (3)<br />
which is located on the RIGHT side of the tool.<br />
3. Rotate the hex key CLOCKWISE while<br />
pressing on the spindle lock button until the<br />
spindle lock button engages the spindle.<br />
4. Continue to rotate the arbor screw in a<br />
26