Manual XXL Speed Saw - Mini Circular Saw

Erfolgreiche ePaper selbst erstellen
Machen Sie aus Ihren PDF Publikationen ein blätterbares Flipbook mit unserer einzigartigen Google optimierten e-Paper Software.
EN<br />
6.11 Cutting (without edge guide)<br />
Warning! Always use two hands on<br />
the tool when cutting. This will make<br />
operation of the tool easier and<br />
promote maximum safety.<br />
avoid the blade touching the workpiece when<br />
the blade guard is raised to expose the blade<br />
as outlined in instruction.<br />
7. Turn switch ON as outlined on Page 28.<br />
NOTE: Do not proceed any further until the<br />
blade is running at full speed.<br />
8. Using the thumb on your left hand, press the<br />
blade guard release button (6).<br />
9. Gently press downward on the front of the tool<br />
to raise the blade guard until it touches the<br />
depth control stop (9).<br />
10. Re-check the alignment of the front cut line<br />
indicator (7) and the cutting line marked on the<br />
workpiece (8).<br />
11. Slowly move the tool forward until the blade<br />
touches the workpiece and begins to cut at the<br />
cutting line. NOTE: Feed the blade into the<br />
workpiece at a slow steady pace. Do not force<br />
the tool so the motor slows down. The red<br />
“overload” light (10) will illuminate if the motor<br />
is being overloaded. The blade will cut faster<br />
and cleaner when turning at full speed.<br />
Warning! Never try to cut a curve. This<br />
tool is designed only for straight line<br />
cuts. Attempting to cut curves will<br />
damage the blade, make rough cuts and<br />
possible break the blade. Serious injury<br />
may result.<br />
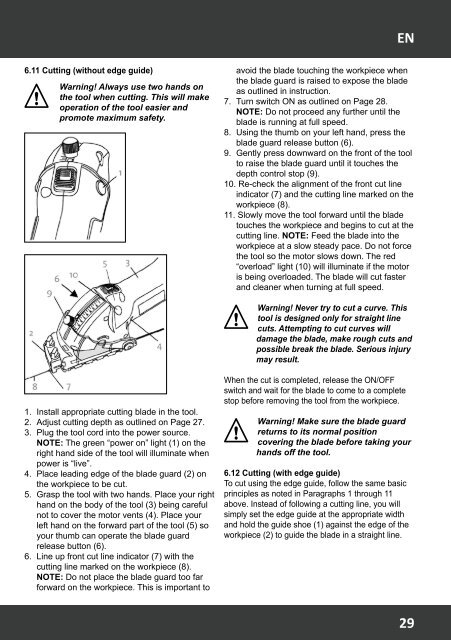
1. Install appropriate cutting blade in the tool.<br />
2. Adjust cutting depth as outlined on Page 27.<br />
3. Plug the tool cord into the power source.<br />
NOTE: The green “power on” light (1) on the<br />
right hand side of the tool will illuminate when<br />
power is “live”.<br />
4. Place leading edge of the blade guard (2) on<br />
the workpiece to be cut.<br />
5. Grasp the tool with two hands. Place your right<br />
hand on the body of the tool (3) being careful<br />
not to cover the motor vents (4). Place your<br />
left hand on the forward part of the tool (5) so<br />
your thumb can operate the blade guard<br />
release button (6).<br />
6. Line up front cut line indicator (7) with the<br />
cutting line marked on the workpiece (8).<br />
NOTE: Do not place the blade guard too far<br />
forward on the workpiece. This is important to<br />
When the cut is completed, release the ON/OFF<br />
switch and wait for the blade to come to a complete<br />
stop before removing the tool from the workpiece.<br />
Warning! Make sure the blade guard<br />
returns to its normal position<br />
covering the blade before taking your<br />
hands off the tool.<br />
6.12 Cutting (with edge guide)<br />
To cut using the edge guide, follow the same basic<br />
principles as noted in Paragraphs 1 through 11<br />
above. Instead of following a cutting line, you will<br />
simply set the edge guide at the appropriate width<br />
and hold the guide shoe (1) against the edge of the<br />
workpiece (2) to guide the blade in a straight line.<br />
29