Manual XXL Speed Saw - Mini Circular Saw

Erfolgreiche ePaper selbst erstellen
Machen Sie aus Ihren PDF Publikationen ein blätterbares Flipbook mit unserer einzigartigen Google optimierten e-Paper Software.
EN<br />
CLOCKWISE direction until the arbor screw is<br />
removed. NOTE: The arbor screw has a left<br />
hand thread. It must be turned CLOCKWISE<br />
to be removed.<br />
5. Remove the blade (4).<br />
6.4 Select the correct blade<br />
Before installing a blade into the tool, it is<br />
important to select the correct blade for the type<br />
of material being cut.<br />
Warning! Using the incorrect blade<br />
type can result in damage to the blade<br />
and possible injury to the operator.<br />
Carbide tipped blade<br />
• 85 mm x 1.7 mm x 24 teeth<br />
• Cuts aluminum, hardwood, laminates,<br />
plastics<br />
2. Slide blade (5) into the tool so the hole in the<br />
blade (6) slides over the arbor. NOTE: Make<br />
sure the exposed teeth of a blade with teeth are<br />
pointing forward.<br />
3. Re-install thick arbor washer and arbor screw in<br />
the reverse order in which they were removed.<br />
4. Lock spindle using the spindle lock button and<br />
tighten the arbor screw by turning it COUNTER<br />
CLOCKWISE. NOTE: The arbor screw has a<br />
left hand thread. It must be turned COUNTER<br />
CLOCKWISE to be tightened.<br />
5. Re-install blade guard in the reverse order in<br />
which it were removed. NOTE: At this point you<br />
must decide whether to install the universal<br />
blade guard or the pipe cutting blade guard.<br />
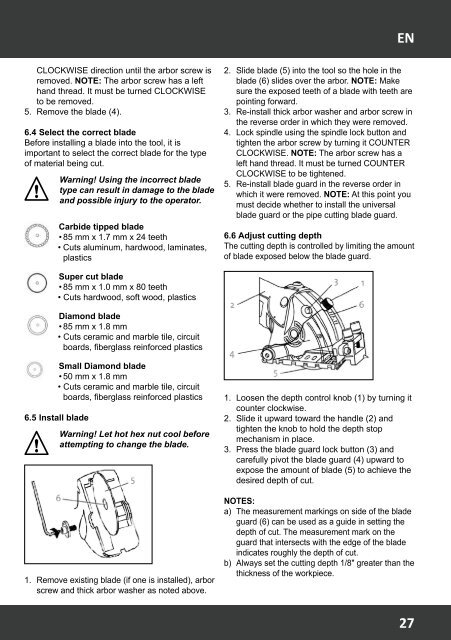
6.6 Adjust cutting depth<br />
The cutting depth is controlled by limiting the amount<br />
of blade exposed below the blade guard.<br />
Super cut blade<br />
• 85 mm x 1.0 mm x 80 teeth<br />
• Cuts hardwood, soft wood, plastics<br />
Diamond blade<br />
• 85 mm x 1.8 mm<br />
• Cuts ceramic and marble tile, circuit<br />
boards, fiberglass reinforced plastics<br />
Small Diamond blade<br />
• 50 mm x 1.8 mm<br />
• Cuts ceramic and marble tile, circuit<br />
boards, fiberglass reinforced plastics<br />
6.5 Install blade<br />
Warning! Let hot hex nut cool before<br />
attempting to change the blade.<br />
1. Remove existing blade (if one is installed), arbor<br />
screw and thick arbor washer as noted above.<br />
1. Loosen the depth control knob (1) by turning it<br />
counter clockwise.<br />
2. Slide it upward toward the handle (2) and<br />
tighten the knob to hold the depth stop<br />
mechanism in place.<br />
3. Press the blade guard lock button (3) and<br />
carefully pivot the blade guard (4) upward to<br />
expose the amount of blade (5) to achieve the<br />
desired depth of cut.<br />
Notes:<br />
a) The measurement markings on side of the blade<br />
guard (6) can be used as a guide in setting the<br />
depth of cut. The measurement mark on the<br />
guard that intersects with the edge of the blade<br />
indicates roughly the depth of cut.<br />
b) Always set the cutting depth 1/8" greater than the<br />
thickness of the workpiece.<br />
27