Hai 2 - Pichler
Hai 2 - Pichler
Hai 2 - Pichler

Sie wollen auch ein ePaper? Erhöhen Sie die Reichweite Ihrer Titel.
YUMPU macht aus Druck-PDFs automatisch weboptimierte ePaper, die Google liebt.
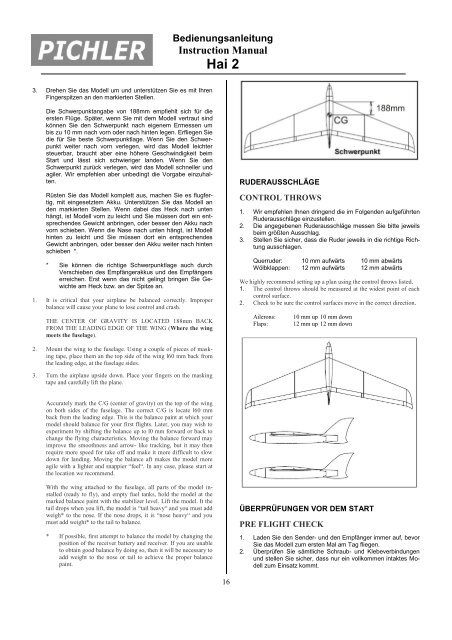
Bedienungsanleitung<br />
Instruction Manual<br />
<strong>Hai</strong> 2<br />
3. Drehen Sie das Modell um und unterstützen Sie es mit Ihren<br />
Fingerspitzen an den markierten Stellen.<br />
Die Schwerpunktangabe von 188mm empfiehlt sich für die<br />
ersten Flüge. Später, wenn Sie mit dem Modell vertraut sind<br />
können Sie den Schwerpunkt nach eigenem Ermessen um<br />
bis zu 10 mm nach vorn oder nach hinten legen. Erfliegen Sie<br />
die für Sie beste Schwerpunktlage. Wenn Sie den Schwerpunkt<br />
weiter nach vorn verlegen, wird das Modell leichter<br />
steuerbar, braucht aber eine höhere Geschwindigkeit beim<br />
Start und lässt sich schwieriger landen. Wenn Sie den<br />
Schwerpunkt zurück verlegen, wird das Modell schneller und<br />
agiler. Wir empfehlen aber unbedingt die Vorgabe einzuhalten.<br />
Rüsten Sie das Modell komplett aus, machen Sie es flugfertig,<br />
mit eingesetztem Akku. Unterstützen Sie das Modell an<br />
den markierten Stellen. Wenn dabei das Heck nach unten<br />
hängt, ist Modell vorn zu leicht und Sie müssen dort ein entsprechendes<br />
Gewicht anbringen, oder besser den Akku nach<br />
vorn schieben. Wenn die Nase nach unten hängt, ist Modell<br />
hinten zu leicht und Sie müssen dort ein entsprechendes<br />
Gewicht anbringen, oder besser den Akku weiter nach hinten<br />
schieben *.<br />
* Sie können die richtige Schwerpunktlage auch durch<br />
Verschieben des Empfängerakkus und des Empfängers<br />
erreichen. Erst wenn das nicht gelingt bringen Sie Gewichte<br />
am Heck bzw. an der Spitze an.<br />
1. It is critical that your airplane be balanced correctly. Improper<br />
balance will cause your plane to lose control and crash.<br />
THE CENTER OF GRAVITY IS LOCATED 188mm BACK<br />
FROM THE LEADING EDGE OF THE WING (Where the wing<br />
meets the fuselage).<br />
RUDERAUSSCHLÄGE<br />
CONTROL THROWS<br />
1. Wir empfehlen Ihnen dringend die im Folgenden aufgeführten<br />
Ruderausschläge einzustellen.<br />
2. Die angegebenen Ruderausschläge messen Sie bitte jeweils<br />
beim größten Ausschlag.<br />
3. Stellen Sie sicher, dass die Ruder jeweils in die richtige Richtung<br />
ausschlagen.<br />
Querruder: 10 mm aufwärts 10 mm abwärts<br />
Wölbklappen: 12 mm aufwärts 12 mm abwärts<br />
We highly recommend setting up a plan using the control throws listed.<br />
1. The control throws should be measured at the widest point of each<br />
control surface.<br />
2. Check to be sure the control surfaces move in the correct direction.<br />
Ailerons:<br />
Flaps:<br />
10 mm up 10 mm down<br />
12 mm up 12 mm down<br />
2. Mount the wing to the fuselage. Using a couple of pieces of masking<br />
tape, place them an the top side of the wing l60 mm back from<br />
the leading edge, at the fuselage sides.<br />
3. Turn the airplane upside down. Place your fingers on the masking<br />
tape and carefully lift the plane.<br />
Accurately mark the C/G (center of gravity) on the top of the wing<br />
on both sides of the fuselage. The correct C/G is locate l60 mm<br />
back from the leading edge. This is the balance paint at which your<br />
model should balance for your first flights. Later, you may wish to<br />
experiment by shifting the balance up to l0 mm forward or back to<br />
change the flying characteristics. Moving the balance forward may<br />
improve the smoothness and arrow- like tracking, but it may then<br />
require more speed for take off and make it more difficult to slow<br />
down for landing. Moving the balance aft makes the model more<br />
agile with a lighter and snappier “feel“. In any case, please start at<br />
the location we recommend.<br />
With the wing attached to the fuselage, all parts of the model installed<br />
(ready to fly), and empty fuel tanks, hold the model at the<br />
marked balance paint with the stabilizer level. Lift the model. It the<br />
tail drops when you lift, the model is “tail heavy“ and you must add<br />
weigh* to the nose. If the nose drops, it is “nose heavy“ and you<br />
must add weight* to the tail to balance.<br />
* If possible, first attempt to balance the model by changing the<br />
position of the receiver battery and receiver. If you are unable<br />
to obtain good balance by doing so, then it will be necessary to<br />
add weight to the nose or tail to achieve the proper balance<br />
paint.<br />
ÜBERPRÜFUNGEN VOR DEM START<br />
PRE FLIGHT CHECK<br />
1. Laden Sie den Sender- und den Empfänger immer auf, bevor<br />
Sie das Modell zum ersten Mal am Tag fliegen.<br />
2. Überprüfen Sie sämtliche Schraub- und Klebeverbindungen<br />
und stellen Sie sicher, dass nur ein vollkommen intaktes Modell<br />
zum Einsatz kommt.<br />
16