Download Arbeitsanweisung - scheibe aircraft gmbh
Download Arbeitsanweisung - scheibe aircraft gmbh
Download Arbeitsanweisung - scheibe aircraft gmbh

Sie wollen auch ein ePaper? Erhöhen Sie die Reichweite Ihrer Titel.
YUMPU macht aus Druck-PDFs automatisch weboptimierte ePaper, die Google liebt.
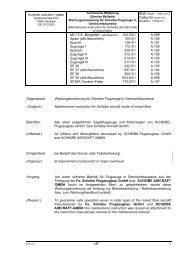
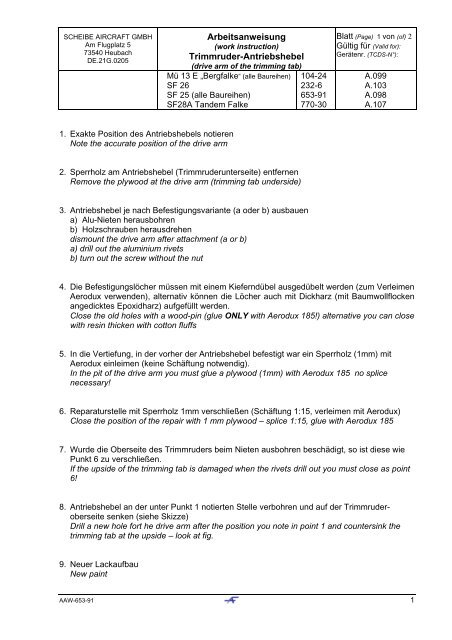
SCHEIBE AIRCRAFT GMBH<br />
Am Flugplatz 5<br />
73540 Heubach<br />
DE.21G.0205<br />
<strong>Arbeitsanweisung</strong><br />
(work instruction)<br />
Trimmruder-Antriebshebel<br />
(drive arm of the trimming tab)<br />
Mü 13 E „Bergfalke“ (alle Baureihen)<br />
SF 26<br />
SF 25 (alle Baureihen)<br />
SF28A Tandem Falke<br />
104-24<br />
232-60<br />
653-91<br />
770-30<br />
Blatt (Page) 1 von (of) 2<br />
Gültig für (Valid for):<br />
Gerätenr. (TCDS-N°):<br />
A.099<br />
A.103<br />
A.098<br />
A.107<br />
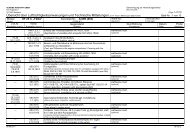
1. Exakte Position des Antriebshebels notieren<br />
Note the accurate position of the drive arm<br />
2. Sperrholz am Antriebshebel (Trimmruderunterseite) entfernen<br />
Remove the plywood at the drive arm (trimming tab underside)<br />
3. Antriebshebel je nach Befestigungsvariante (a oder b) ausbauen<br />
a) Alu-Nieten herausbohren<br />
b) Holzschrauben herausdrehen<br />
dismount the drive arm after attachment (a or b)<br />
a) drill out the aluminium rivets<br />
b) turn out the screw without the nut<br />
4. Die Befestigungslöcher müssen mit einem Kieferndübel ausgedübelt werden (zum Verleimen<br />
Aerodux verwenden), alternativ können die Löcher auch mit Dickharz (mit Baumwollflocken<br />
angedicktes Epoxidharz) aufgefüllt werden.<br />
Close the old holes with a wood-pin (glue ONLY with Aerodux 185!) alternative you can close<br />
with resin thicken with cotton fluffs<br />
5. In die Vertiefung, in der vorher der Antriebshebel befestigt war ein Sperrholz (1mm) mit<br />
Aerodux einleimen (keine Schäftung notwendig).<br />
In the pit of the drive arm you must glue a plywood (1mm) with Aerodux 185 no splice<br />
necessary!<br />
6. Reparaturstelle mit Sperrholz 1mm verschließen (Schäftung 1:15, verleimen mit Aerodux)<br />
Close the position of the repair with 1 mm plywood – splice 1:15, glue with Aerodux 185<br />
7. Wurde die Oberseite des Trimmruders beim Nieten ausbohren beschädigt, so ist diese wie<br />
Punkt 6 zu verschließen.<br />
If the upside of the trimming tab is damaged when the rivets drill out you must close as point<br />
6!<br />
8. Antriebshebel an der unter Punkt 1 notierten Stelle verbohren und auf der Trimmruderoberseite<br />
senken (siehe Skizze)<br />
Drill a new hole fort he drive arm after the position you note in point 1 and countersink the<br />
trimming tab at the upside – look at fig.<br />
9. Neuer Lackaufbau<br />
New paint<br />
AAW-653-91 1
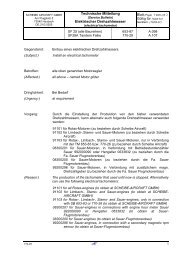
SCHEIBE AIRCRAFT GMBH<br />
Am Flugplatz 5<br />
73540 Heubach<br />
DE.21G.0205<br />
<strong>Arbeitsanweisung</strong><br />
(work instruction)<br />
Trimmruder-Antriebshebel<br />
(drive arm of the trimming tab)<br />
Blatt (Page) 1 von (of) 2<br />
Gültig für (Valid for):<br />
Gerätenr. (TCDS-N°):<br />
10. Antriebshebel an der unter Punkt 1 notierten Stelle mit 2 Senkschrauben M3, Beilag<strong>scheibe</strong>n<br />
und Stoppmuttern M3 festschrauben (siehe Skizze)<br />
Mount the drive arm with 2 pc. Machine screws with flat head M3, washer and stop-nuts<br />
(also M3) – look at fig.<br />
SCHEIBE AIRCRAFT GMBH<br />
Heubach den 23.03.2009<br />
(H. Sammet)<br />
AAW-653-91 2