Bedienungsanleitung - motogadget
Bedienungsanleitung - motogadget
Bedienungsanleitung - motogadget

Sie wollen auch ein ePaper? Erhöhen Sie die Reichweite Ihrer Titel.
YUMPU macht aus Druck-PDFs automatisch weboptimierte ePaper, die Google liebt.
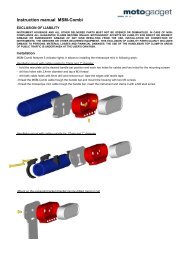
Instruction Manual<br />
Thank you for choosing a quality product from <strong>motogadget</strong>.<br />
The grip and its components may be damaged easily if mounted improperly. Please read the advice given below<br />
carefully and follow them when mounting your turn indicator.<br />
THIS PRODUCT IS EXCLUSIVELY PERMITTED TO BE USED AS GRIP FOR 22 CM / 1 IN. MOTORCYCLE HANDLEBARS WITH CORRESPONDING THROTTLE<br />
HANDLES.<br />
THE CASING MAY NOT BE MANIPULATED. IN CASE OF MECHANICAL DAMAGES ALL WARRANTY IS VOIDED. IF THE DEVICE IS USED FOR OTHER<br />
PURPOSES THAN THOSE INTENDED, ALL WARRANTIES WILL BECOME VOID. MOTOGADGET ACCEPTS NO LIABILITY FOR DIRECT OR INDIRECT<br />
DAMAGES OF ANY KIND RESULTING FROM USAGE, INSTALLATION OR CONNECTION OF THE INSTRUMENT OR INCLUDED ACCESSORIES. THESE ARE,<br />
AMONG OTHERS, DAMAGES TO PERSONS, GOODS AND FINANCIAL ASSETS. ESPECIALLY THE USAGE ON PUBLIC ROADS IS AT THE CUSTOMER'S OWN<br />
RISK.<br />
Layout<br />
Preparing<br />
• manually screw the clamping ring counter-clockwise completely into the casing of the grip (Attention! left-handed thread!).<br />
• choose a fitting O-ring grease it with silicon oil and apply the O-ring into the grove inside the grip end.<br />
• Screw the end cap by using screw adhesive onto the handle (does not apply if using handlebar end type turn indicators). Tighten the cap with a long screw<br />
driver through the grip bore<br />
• Push your grip to the desired position on the handlebar and orient the end cap logo horizontally. Shorten the handlebar if necessary.<br />
• With a pen, mark the position of the grip on the handlebar with a line to clamping ring and handle bar.<br />
• Unscrew the tension ring from the grip and screw 6 grub screws (fitting your type of handlebar or throttle grip resp.) into the clamping ring. Choose your<br />
screw length according to the table below:<br />
- Grub screw, 6 mm: 22 mm OD handlebar<br />
- Grub screw, 5 mm: 1 in. OD handlebar<br />
- Grub screw, 4 mm: throttle grip bushing<br />
Mounting the left grip<br />
• Push the clamping ring to the handlebar mark applied earlier and carefully and evenly tighten the grub screws<br />
IMPORTANT! THE CLAMPING RING HAS TO BE ALIGNED PERFECTLY CONCENTRIC WITH THE HANDLEBAR. E. G. ALL GRUB SCREWS HAVE TO<br />
PROTRUDE EQUALLY FROM THE CLAMPING RING. THE RING HAS TO BE ALIGNED PERPENDICULAR TO THE HANDLEBAR. ONLY HAND-SCREW THE<br />
GRUB SCREWS. IF TIGHTENED TOO FIRMLY THEY MAY DEFORM THE CLAMPING RING, PREVENTING THE GRIP FROM BEING ABLE TO BE SCREWED<br />
ONTO THE CLAMPING RING. DO NOT LET THE GRUB SCREWS PROTRUDE ABOVE THE EXTERNAL THREAD UNDER ANY CIRCUMSTANCES, THEY MIGHT<br />
DAMAGE THE THREADS OF THE GRIP WHEN MOUNTING.<br />
• Now carefully screw the grip counter-clockwise onto the clamping ring.<br />
IMPORTANT! DO NOT USE TOOLS AND DO NOT APPLY FORCE. DISCONTINUE MOUNTING IF THE THREADING JAMS. CHECK THE CLAMPING RING FOR<br />
DEFORMATIONS, WEDGING OR LACK OF CONCENTRICITY. CHECK FOR GRUB SCREWS PROTRUDING INTO THE THREADING OF THE CLAMPING RING.<br />
Mounting the right grip (onto throttle shell)<br />
• clean throttle shell outside carefully with spirit<br />
• remove protection foil on the rubber strip<br />
• only for 22mm throttle shell: on the clamping ring installation spot attach the rubber strip on the throttle shell. Cut surplus rubber so that the strip does not<br />
overlap<br />
• attach 6 grub screw 4mm long to the clamping ring. Push the clamping ring over the rubber strip and align the ring according the pen marking<br />
• tighten the grub screws carefully and evenly, check often if the throttle shell can still turn easily<br />
• Now carefully screw the grip counter-clockwise onto the clamping ring.<br />
The <strong>motogadget</strong> team wishes you a safe and pleasant ride, enjoy<br />
your new "m-grip" handlebar grips.