Breakout Box J1850 TwinCam - motogadget
Breakout Box J1850 TwinCam - motogadget
Breakout Box J1850 TwinCam - motogadget

You also want an ePaper? Increase the reach of your titles
YUMPU automatically turns print PDFs into web optimized ePapers that Google loves.
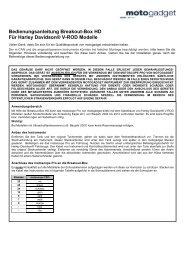
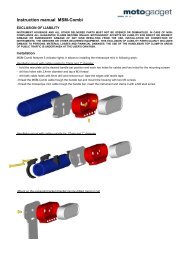
<strong>Breakout</strong>-<strong>Box</strong> HD – Installation and Operating InstructionsFor Harley Davidson® TWIN - CAM model seriesThank you very much for choosing a high quality product of <strong>motogadget</strong>.The m-CAN and connected instruments might be damaged when installed improperly. Please read the followinginformation carefully and follow instructions during installation.Please note the correct order of the steps performed in these operating instructions.THE CASING MUST NOT BE OPENED. IN CASE OF NON-COMPLIANCE, ALL WARRANTY CLAIMS WILL BECOME VOID.THE ONLY INTENDED USE OF THIS DEVICE IS THE COMBINATION WITH MOTOGADGET INSTRUMENTS. IN CASE OFIMPROPER USE WITH THIRD-PARTY INSTRUMENTS, ALL WARRANTY CLAIMS WILL BECOME VOID. IN CASE OF NON-INTENDED USE, THE DEVICE MAY BE DAMAGED. IN CASE OF MALFUNCTIONS, THE DEVICE HAS TO BE RETURNED TOMOTOGADGET FOR INSPECTION, TOGETHER WITH THE USED MOTOGADGET INSTRUMENT. MOTOGADGET WILLACCEPT NO LIABILITY FOR ANY DIRECT, INDIRECT OR SUBSEQUENT DAMAGE OF ANY KIND RESULTING FROM USE,INSTALLATION OR CONNECTION OF THE DEVICE OR OTHER DELIVERED EQUIPMENT. THIS EXCLUSION OF LIABILITYAPPLIES TO, INCLUDING BUT NOT LIMITED TO, PERSONAL, MATERIAL AND FINANCIAL DAMAGES. PARTICULARLY,THE USE IN PUBLIC TRAFFIC IS AT THE USER'S OWN RISK.Scope of ApplicationUsing the <strong>Breakout</strong>-<strong>Box</strong> HD, the motoscope Pro can be connected directly to the wiring harness of the Harley Davidson® Twin-Cam series (models built 2004 to 2011; Softail to 2010). There is no need for modifications on the original motorbike wiring harness.Not compatible with newer HD model years equipped with "HDLAN".Instrument installationAccording to the respective manual, remove the original speedometer. Disconnect the connectors of the original instrument and theindicator lights assembly. Subsequently, these two connectors are used to connect the <strong>Breakout</strong>-<strong>Box</strong> connectors. Mount themotoscope Pro on the vehicle. Please use the extensive mounting hardware provided for Harley Davidson® vehicles. Now route thecables of the instrument to the position of the two original connectors. Carefully remove 50 mm (2 in.) of the cable jacket. Next,remove 10 mm (approx. 1/2 in.) of the strand insulation and slide the end ferrules onto the exposed strand ends. Cut off any excesscable material using wire-cutting pliers.Connecting the motoscope Pro to the m-<strong>Breakout</strong>-<strong>Box</strong>To protect the components, make sure to apply contact grease to all metal parts of the screw-type terminals. Insert the instrumentcables into the corresponding terminals (see table below) and tighten the screws.Terminalmotoscope PRO25 red26 brown24 black10 green8 yellow7 white9 orange- blue- purple
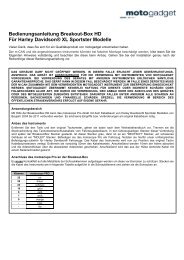
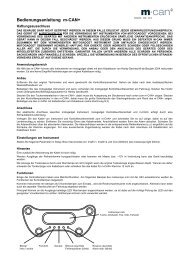
Connecting the supplied <strong>motogadget</strong> TWIN CAM vehicle connector to the <strong>Breakout</strong>-<strong>Box</strong>Insert the cable of the model-specific connector (included)with the attached end ferrules into the screw-typeterminals (shown in table on right side) and tighten thescrews.ATTENTION ! Please make sure to note the properpolarity when inserting the connector attached to thevehicle!8 pin Deutsch Connector:The connector is equipped with a large and a small tab onthe left side and the right side respectively. Please makesure they fit into the corresponding seat.12 pin Connector:The white dot sticker from <strong>motogadget</strong> connector and thenose of the HD connector stand adverse after plug in.TerminalConnector cable – Color code28 red14 white12 blue13 yellow27 brown30 green16 grey15 purple6 orange29 and 31 blackConnecting the menu push-buttonThe menu push-button is connected to the terminals No. 17 and 18. The polarity is irrelevant.Mounting the cables to the <strong>Breakout</strong>-<strong>Box</strong>Screw the provided black mounting plate to the twomounting bolts on the <strong>Breakout</strong>-<strong>Box</strong>. To ensure optimumstrain relief, combine all connecting cables (see rightfigure) and mount them to the mounting plate using bothtie-bands. The <strong>Breakout</strong>-<strong>Box</strong> is mounted to vehicle partsor the vehicle wiring harness by screws or tiebandsrespectively, with both bores of the mounting plate.NotesNo additional mounting of cables required.Short-circuits of terminal block outputs or contact to ground or +12V respectively may damage the device.Instrument settingsPlease access the instrument setup to adjust the following parameters: ImpE=1, ImpW=4 and Circ=2000mm.Teach the tank sensor according to the descriptions provided in the installation and operating instructions.The <strong>motogadget</strong> team wishes you a pleasant and safe trip and a lot of funwith your new <strong>motogadget</strong> instrument.