Bedienungsanleitung Rollmat Plus GS - Friedrich-schroeder.de
Bedienungsanleitung Rollmat Plus GS - Friedrich-schroeder.de
Bedienungsanleitung Rollmat Plus GS - Friedrich-schroeder.de
- Keine Tags gefunden...

Sie wollen auch ein ePaper? Erhöhen Sie die Reichweite Ihrer Titel.
YUMPU macht aus Druck-PDFs automatisch weboptimierte ePaper, die Google liebt.
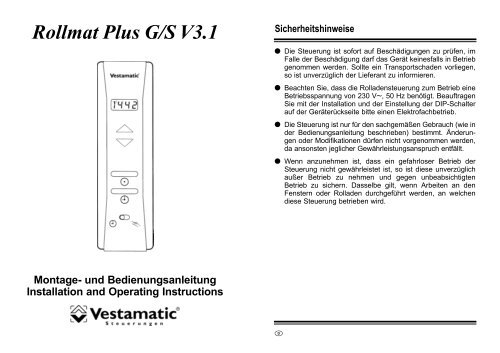
<strong>Rollmat</strong> <strong>Plus</strong> G/S V3.1Sicherheitshinweise· Die Steuerung ist sofort auf Beschädigungen zu prüfen, imFalle <strong>de</strong>r Beschädigung darf das Gerät keinesfalls in Betriebgenommen wer<strong>de</strong>n. Sollte ein Transportscha<strong>de</strong>n vorliegen,so ist unverzüglich <strong>de</strong>r Lieferant zu informieren.· Beachten Sie, dass die Rolla<strong>de</strong>nsteuerung zum Betrieb eineBetriebsspannung von 230 VW, 50 Hz benötigt. BeauftragenSie mit <strong>de</strong>r Installation und <strong>de</strong>r Einstellung <strong>de</strong>r DIP-Schalterauf <strong>de</strong>r Geräterückseite bitte einen Elektrofachbetrieb.· Die Steuerung ist nur für <strong>de</strong>n sachgemäßen Gebrauch (wie in<strong>de</strong>r <strong>Bedienungsanleitung</strong> beschrieben) bestimmt. Än<strong>de</strong>rungeno<strong>de</strong>r Modifikationen dürfen nicht vorgenommen wer<strong>de</strong>n,da ansonsten jeglicher Gewährleistungsanspruch entfällt.· Wenn anzunehmen ist, dass ein gefahrloser Betrieb <strong>de</strong>rSteuerung nicht gewährleistet ist, so ist diese unverzüglichaußer Betrieb zu nehmen und gegen unbeabsichtigtenBetrieb zu sichern. Dasselbe gilt, wenn Arbeiten an <strong>de</strong>nFenstern o<strong>de</strong>r Rolla<strong>de</strong>n durchgeführt wer<strong>de</strong>n, an welchendiese Steuerung betrieben wird.Montage- und <strong>Bedienungsanleitung</strong>Installation and Operating InstructionsD
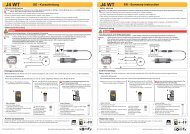
Kurzinformation / Short <strong>de</strong>scriptionDetaillierte Angaben und Programmierhinweise fin<strong>de</strong>n Sie auf <strong>de</strong>n folgen<strong>de</strong>n Seiten.Please find <strong>de</strong>tails and programming instructions on the following pages.A Reset-Taste B Sommer-/Winterzeit C Tageszeit D Auffahrzeit E AbfahrzeitNach erfolgter Installation die Ab<strong>de</strong>ckhaubedurch leichtes Ziehen entfernen und Reset-Taste drücken. Dadurch wer<strong>de</strong>n die werkseitigvoreingestellten Zeiten aktiviert.Entspricht die momentane Einstellung nicht<strong>de</strong>r aktuellen Zeit, aktualisieren Sie diesedurch Drücken <strong>de</strong>r S/W-Taste. Die gewählteEinstellung erscheint im Display und dieTageszeit än<strong>de</strong>rt sich um eine Stun<strong>de</strong>.1. Stell-Taste drücken (gedrückt halten)2. Uhr-Taste drücken R schneller VorlaufUhr-Taste tippen R langsamer Vorlaufo<strong>de</strong>r1. Uhr-Taste drücken (gedrückt halten)2. Stell-Taste drücken L schneller RücklaufStell-Taste tippen L langsamer RücklaufWichtig: Wahlschalter auf (A) stellen1. Stell-Taste drücken (gedrückt halten)2. Auf-Taste drücken R schneller VorlaufAuf-Taste tippen R langsamer Vorlaufo<strong>de</strong>r1. Auf-Taste drücken (gedrückt halten)2. Stell-Taste drücken L schneller RücklaufStell-Taste tippen L langsamer RücklaufWichtig: Wahlschalter auf (A) stellen1. Stell-Taste drücken (gedrückt halten)2. Ab-Taste drücken R schneller VorlaufAb-Taste tippen R langsamer Vorlaufo<strong>de</strong>r1. Ab-Taste drücken (gedrückt halten)2. Stell-Taste drücken L schneller RücklaufStell-Taste tippen L langsamer RücklaufA Reset button B Summer/winter time C Current time D Up time E Down timeAfter having completed the installation, carefullypull to remove the cover cap and press the resetbutton. This will activate the times preset by themanufacturer.If the manufacturer setting does not correspond tothe correct current time, update the setting to thecurrent time by pressing the summer/winter button.The display will indicate the selected time and thetime will be changed by one hour.1. Keep the set button pressed2. Press the time button R fast forwardTap the time button R slow forwardor1. Keep the time button pressed2. Press the set button L fast reverseTap the set button L slow reverseImportant: Set the selector switch to (A)1. Keep the set button pressed2. Press the up button R fast forwardTap the up button R slow forwardor1. Keep the up button pressed2. Press the set button L fast reverseTap the set button L slow reverseImportant: Set the selector switch to (A)1. Keep the set button pressed2. Press the down button R fast forwardTap the down button R slow forwardor1. Keep the down button pressed2. Press the set button L fast reverseTap the set button L slow reverse
InhaltInhaltEinleitung Allgemeines Seite 5Hand-Steuerung Seite 6Automatik-Steuerung Seite 7Programmierung Allgemeines Seite 8<strong>de</strong>r Grund- Sommer-/Winterzeit Seite 9funktionen Tageszeit (aktuelle Uhrzeit) Seite 10Hinweis Seite 11Auffahrzeit Seite 12Abfahrzeit Seite 13Zufallsgenerator Seite 14Programmierung Wochen-Funktion Seite 15<strong>de</strong>r Son<strong>de</strong>r- Astro-Funktion / Fahrzeitkorrektur Seite 16 – 19funktionen Astro-Funktion – Einstellung BRD Seite 20Astro-Funktion – Einstellung Europa Seite 21Wen<strong>de</strong>-Funktion Seite 22Beispiel Einstellung DIP-Schalter Seite 23G/S-Funktionen Allgemeines Seite 24Funktionsbeschreibung Glasbruchmel<strong>de</strong>r Seite 25Funktionsbeschreibung Sonnenschutz Seite 26Einstellung Ansprechempfindlichkeit(Sonnenintensität) Seite 27Fehlersuchanleitung Seite 28Installation Hinweise für <strong>de</strong>n Elektrofachbetrieb Seite 29 – 30Montageanleitung / Technische Daten Seite 31Anschlussplan Seite 32Installation Glasbruchmel<strong>de</strong>r Seite 33 – 34Installation Sonnensensor Seite 35 – 36Anschlussbild Seite 37Übersicht Bedienungselemente Seite 38GarantiebedingungenAusklapper letzteUmschlagseite- 3 - DD- 4 -
AllgemeinesEinleitungEinleitungHand-SteuerungDer Kauf <strong>de</strong>r Rolla<strong>de</strong>nsteuerung Vestamatic <strong>Rollmat</strong> <strong>Plus</strong> G/S V3.1war eine gute Entscheidung. Sie haben damit ein hochwertigesProdukt erworben. Es verfügt über eine Vielzahl sinnvoller Programmiermöglichkeitenund wird nach höchsten Qualitätsanfor<strong>de</strong>rungenhergestellt. Das garantiert Ihnen eine optimale Ausnutzungund hohe Zuverlässigkeit. Nehmen Sie sich bitte etwasZeit und lesen diese <strong>Bedienungsanleitung</strong> vor <strong>de</strong>r Inbetriebnahme.Wir haben uns bemüht, die Programmieranweisungenso verständlich wie möglich zu gestalten.Der Lieferumfang <strong>de</strong>r Rolla<strong>de</strong>nsteuerung besteht aus:1. Ab<strong>de</strong>ckhaube2. Grundgehäuse3. EinstellwerkzeugIm Falle eines Stromausfalls beginnt das gesamte Display zublinken. Die zuvor programmierten Zeiten bleiben <strong>de</strong>nnoch mehrereJahre gespeichert.Sie können die von Ihnen programmierten Zeiten o<strong>de</strong>r an<strong>de</strong>reFunktionen in einem Schnelllauf überprüfen (speziell <strong>de</strong>n Test<strong>de</strong>r Sonnenschutz-Funktion). Drücken Sie für die Aktivierung <strong>de</strong>sSchnelllaufs die Uhr- und Tag-Taste für 3 Sekun<strong>de</strong>n gemeinsam.Die Uhr-Funktion läuft dann um <strong>de</strong>n Faktor 60 schneller.Um <strong>de</strong>n Schnelllauf zu been<strong>de</strong>n drücken Sie kurz die Uhr- undTag-Taste nochmals gemeinsam.Die Rolla<strong>de</strong>nsteuerung Vestamatic <strong>Rollmat</strong> <strong>Plus</strong> G/S V3.1 verfügtüber einen Wahlschalter, <strong>de</strong>r die Auswahl Hand-Steuerung (H)o<strong>de</strong>r Automatik-Steuerung (A) regelt.Um die Hand-Steuerung zu aktivieren, Wahlschalter auf (H)stellen (ganz nach rechts schieben bis zum „Klick“).Alle Automatik-Funktionen sind somit außer Kraft gesetzt. Wirddie Auf-Taste bzw. Ab-Taste gedrückt, fährt <strong>de</strong>r Rolla<strong>de</strong>n hochbzw. runter.Um die Fahrt zu stoppen, drücken Sie einfach die Gegentaste,d.h.:· fährt <strong>de</strong>r Rolla<strong>de</strong>n gera<strong>de</strong> hoch, drücken Sie die Ab-Taste,· fährt <strong>de</strong>r Rolla<strong>de</strong>n gera<strong>de</strong> runter, drücken Sie die Auf-Taste.Ein weiteres Hoch- bzw. Runterfahren ist erst nach erneutemDrücken <strong>de</strong>r Auf-Taste bzw. Ab-Taste möglich. Das garantierteine exakte Positionierung <strong>de</strong>s Rolla<strong>de</strong>ns.- 5 - DD- 6 -
Automatik-SteuerungEinleitungGrundfunktionenAllgemeinesUm die Automatik-Steuerung zu aktivieren, Wahlschalter auf (A)stellen (ganz nach links schieben bis zum „Klick“).Die Automatik-Steuerung ist somit aktiviert. Der Rolla<strong>de</strong>n fährtnun zu <strong>de</strong>n jeweilig programmierten Zeiten hoch und runter. Esist aber auch weiterhin möglich, <strong>de</strong>n Rolla<strong>de</strong>n außerhalb <strong>de</strong>rprogrammierten Zeiten durch Drücken <strong>de</strong>r Auf-Taste bzw. Ab-Taste hoch bzw. runter zu fahren (<strong>de</strong>r Programmablauf wirddadurch nicht gestört).Wird die Auf-Taste bzw. Ab-Taste länger als 2 Sekun<strong>de</strong>ngedrückt, fährt <strong>de</strong>r Rolla<strong>de</strong>n hoch bzw. runter.Um die Fahrt zu stoppen, drücken Sie einfach die Gegentaste,d.h.:· fährt <strong>de</strong>r Rolla<strong>de</strong>n gera<strong>de</strong> hoch, drücken Sie die Ab-Taste,· fährt <strong>de</strong>r Rolla<strong>de</strong>n gera<strong>de</strong> runter, drücken Sie die Auf-Taste.Ein weiteres Hoch- bzw. Runterfahren ist erst nach erneutemDrücken <strong>de</strong>r Auf-Taste bzw. Ab-Taste möglich.Die Automatik kann auch für längere Zeit unterbrochen wer<strong>de</strong>n.Hierzu genügt es, <strong>de</strong>n Wahlschalter auf Hand-Steuerung (H) zustellen.Nach Rückstellung auf Automatik-Steuerung wird dann <strong>de</strong>r letzteBefehl ausgeführt, <strong>de</strong>n die Rolla<strong>de</strong>nsteuerung Vestamatic<strong>Rollmat</strong> <strong>Plus</strong> G/S V3.1 in Automatik-Stellung ausgeführt hätte.Das Gleiche geschieht bei Wie<strong>de</strong>reinschaltung <strong>de</strong>s Stromesnach einem Netzausfall.Nach<strong>de</strong>m die fachgerechte Installation been<strong>de</strong>t ist (Hinweise dazuauf <strong>de</strong>n Seiten 29 bis 36), können Sie mit <strong>de</strong>r Programmierungbeginnen.Wichtig: Beachten Sie bitte, dass sich die Rolla<strong>de</strong>nsteuerungVestamatic <strong>Rollmat</strong> <strong>Plus</strong> G/S V3.1 bei Netzausfallnicht programmieren lässt.Entfernen Sie durch leichtes Ziehen die Ab<strong>de</strong>ckhaube unddrücken Sie die Reset-Taste. Nehmen Sie dazu das mitgelieferteEinstellwerkzeug o<strong>de</strong>r etwas in ähnlicher Form.Das Drücken <strong>de</strong>r Reset-Taste bewirkt, dass die werkseitig vorprogrammiertenZeiten aktiviert wer<strong>de</strong>n.· Aktuelle Tageszeit – 0ß8:0ß0 Uhr· Auffahrzeit – 0ß6:0ß0 Uhr· Abfahrzeit – 2ß0:0ß0 UhrAuf <strong>de</strong>n nächsten Seiten wird beschrieben, wie Sie diese Zeitenauf Ihre persönlichen Bedürfnisse einstellen können.- 7 - DD- 8 -
Sommer-/WinterzeitGrundfunktionenGrundfunktionenTageszeitIm Display sehen Sie, welche Zeit eingestellt ist.Das (S) oben links im Display steht für Sommerzeit.(0S9:0ß0)Das (W) oben rechts im Display steht für Winterzeit.(0ß8:0W0)Entspricht die momentane Einstellung nicht <strong>de</strong>r aktuellen Zeit,können Sie diese einfach durch Drücken <strong>de</strong>r S/W-Taste aktualisieren.Die gewählte Einstellung erscheint dann sofort im Displayund die Tageszeit än<strong>de</strong>rt sich entsprechend um eine Stun<strong>de</strong>.Zur Einstellung <strong>de</strong>r aktuellen Tageszeit bedienen Sie sich <strong>de</strong>rTastenkombination aus Stell-Taste und Uhr-Taste.Die Einstellung kann wie folgt durchgeführt wer<strong>de</strong>n:1. Zuerst die Stell-Taste drücken (gedrückt halten), danach:A. Uhr-Taste drücken (gedrückt halten) erzeugt einenschnellen Vorlauf <strong>de</strong>r Tageszeit.B. Ein kurzes Tippen <strong>de</strong>r Uhr-Taste erzeugt einen langsamenVorlauf <strong>de</strong>r Tageszeit.o<strong>de</strong>r2. Zuerst die Uhr-Taste drücken (gedrückt halten), danach:A. Stell-Taste drücken (gedrückt halten) erzeugt einenschnellen Rücklauf <strong>de</strong>r Tageszeit.B. Ein kurzes Tippen <strong>de</strong>r Stell-Taste erzeugt einen langsamenRücklauf <strong>de</strong>r Tageszeit.- 9 - DD- 10 -
HinweisGrundfunktionenGrundfunktionenAuffahrzeitAusgeliefert wird die Rolla<strong>de</strong>nsteuerung Vestamatic <strong>Rollmat</strong><strong>Plus</strong> G/S V3.1 mit einer werkseitigen Einstellung folgen<strong>de</strong>r Aufbzw.Abfahrzeiten (Tag-Funktion ist aktiv):· Tägliche Auffahrzeit – 0ß6:0ß0 Uhr· Tägliche Abfahrzeit – 2ß0:0ß0 UhrDie werkseitige DIP-Schaltereinstellung entnehmen Sie bitte<strong>de</strong>n Tabellen auf Seite 20 und Seite 23.Wichtig: Für die nächsten Programmierschritte ist es wichtig,dass <strong>de</strong>r Wahlschalter „Automatik-/Hand-Steuerung“auf Automatik-Steuerung (A) steht.Überprüfen Sie die momentane Einstellung. Steht <strong>de</strong>rWahlschalter nicht auf (A), korrigieren Sie die Einstellung.Dazu schieben Sie <strong>de</strong>n Wahlschalter bis zum„Klick“ ganz nach links.Zur Einstellung <strong>de</strong>r Auffahrzeit bedienen Sie sich <strong>de</strong>r Tastenkombinationaus Stell-Taste und Auf-Taste.Die Einstellung kann wie folgt durchgeführt wer<strong>de</strong>n:1. Zuerst die Stell-Taste drücken (gedrückt halten), danach:A. Auf-Taste drücken (gedrückt halten) erzeugt einenschnellen Vorlauf <strong>de</strong>r Auffahrzeit.B. Ein kurzes Tippen <strong>de</strong>r Auf-Taste erzeugt einen langsamenVorlauf <strong>de</strong>r Auffahrzeit.o<strong>de</strong>r2. Zuerst die Auf-Taste drücken (gedrückt halten), danach:A. Stell-Taste drücken (gedrückt halten) erzeugt einenschnellen Rücklauf <strong>de</strong>r Auffahrzeit.B. Ein kurzes Tippen <strong>de</strong>r Stell-Taste erzeugt einen langsamenRücklauf <strong>de</strong>r Auffahrzeit.Im Display können Sie <strong>de</strong>n eingestellten Wert ablesen. Wird die zurProgrammierung notwendige Tastenkombination nicht mehr betätigt,schaltet das Display wie<strong>de</strong>r auf die aktuelle Tageszeit um. ZurÜberprüfung <strong>de</strong>s eingestellten Wertes genügt ein kurzes Drücken<strong>de</strong>r Auf-Taste. Im Display erscheint jetzt abermals die von Ihneneingestellte Auffahrzeit. Nach ca. 2 Sekun<strong>de</strong>n schaltet das Displaywie<strong>de</strong>r auf die aktuelle Tageszeit um.- 11 - D D- 12 -
AbfahrzeitGrundfunktionenGrundfunktionenZufallsgeneratorZur Einstellung <strong>de</strong>r Abfahrzeit bedienen Sie sich <strong>de</strong>r Tastenkombinationaus Stell-Taste und Ab-Taste.Die Einstellung kann wie folgt durchgeführt wer<strong>de</strong>n:1. Zuerst die Stell-Taste drücken (gedrückt halten), danach:A. Ab-Taste drücken (gedrückt halten) erzeugt einenschnellen Vorlauf <strong>de</strong>r Abfahrzeit.B. Ein kurzes Tippen <strong>de</strong>r Ab-Taste erzeugt einen langsamenVorlauf <strong>de</strong>r Abfahrzeit.o<strong>de</strong>r2. Zuerst die Ab-Taste drücken (gedrückt halten), danach:A. Stell-Taste drücken (gedrückt halten) erzeugt einenschnellen Rücklauf <strong>de</strong>r Abfahrzeit.B. Ein kurzes Tippen <strong>de</strong>r Stell-Taste erzeugt einen langsamenRücklauf <strong>de</strong>r Abfahrzeit.Im Display können Sie <strong>de</strong>n eingestellten Wert ablesen. Wird die zurProgrammierung notwendige Tastenkombination nicht mehr betätigt,schaltet das Display wie<strong>de</strong>r auf die aktuelle Tageszeit um. ZurÜberprüfung <strong>de</strong>s eingestellten Wertes genügt ein kurzes Drücken<strong>de</strong>r Ab-Taste. Im Display erscheint jetzt abermals die von Ihneneingestellte Abfahrzeit. Nach ca. 2 Sekun<strong>de</strong>n schaltet das Displaywie<strong>de</strong>r auf die aktuelle Tageszeit um.Der Zufallsgenerator erzeugt eine sogenannte Zufallszeit. Siebewirkt, dass <strong>de</strong>r Rolla<strong>de</strong>n mit einer Abweichung von bis zu+/-15 Minuten von <strong>de</strong>n zuvor programmierten Zeiten(*) hochbzw.runterfährt.Das „unregelmäßige“ Hoch- und Runterfahren <strong>de</strong>s Rolla<strong>de</strong>nsvermittelt <strong>de</strong>n Eindruck eines bewohnten Hauses und bietetsomit einen zusätzlichen Schutz bei längerer Abwesenheit.Um <strong>de</strong>n Zufallsgenerator zu aktivieren, drücken Sie einfach dieZufall-Taste.Im Display erscheint jetztoben rechts ein (Z).(0ß8:0ß0ZHinweis: Der Zufallsgenerator setzt die ggf. eingestellte Wen<strong>de</strong>-Funktion (siehe Seite 22) außer Kraft.Zum Deaktivieren <strong>de</strong>s Zufallsgenerators drücken Sie bitte erneutdie Zufall-Taste. Jetzt ist <strong>de</strong>r Zufallsgenerator wie<strong>de</strong>r ausgeschaltet,das (Z) im Display erlischt und <strong>de</strong>r Rolla<strong>de</strong>n fährt dannwie<strong>de</strong>r exakt zu <strong>de</strong>n von Ihnen programmierten Zeiten hoch undrunter.(*)Anmerkung: Bei Aktivierung <strong>de</strong>r Astro-Funktion +/-15 Minutenvon <strong>de</strong>r sich dort ergeben<strong>de</strong>n Zeit.- 13 - DD- 14 -
Wochen-FunktionSon<strong>de</strong>rfunktionenSon<strong>de</strong>rfunktionenAstro-FunktionDie Wochen-Funktion ermöglicht es Ihnen, für je<strong>de</strong>n Tag <strong>de</strong>rWoche eine an<strong>de</strong>re Auf- bzw. Abfahrzeit zu programmieren.Um die Wochen-Funktion zu aktivieren, müssen die DIP-Schalterauf <strong>de</strong>m Grundgehäuse gemäß Tabelle (siehe Seite 23) eingestelltwer<strong>de</strong>n.Folgen<strong>de</strong> Zeiten sind in dieser Betriebsart werkseitig voreingestellt:· Auffahrzeit Montag bis Freitag – 0ß6:0ß0 Uhr· Abfahrzeit Montag bis Freitag – 2ß0:0ß0 Uhr· Samstag / Sonntag – keine Zeit voreingestellt.Sollten an<strong>de</strong>re Auf- bzw. Abfahrzeitengewünscht wer<strong>de</strong>n,gehen Sie wie folgt vor:(QS8:0ß0)Drücken Sie die Tag-Taste.Im Display erscheint nach je<strong>de</strong>mDrücken ein neuer Wochentag. (0w8:0ß0) … u.s.w.Um für <strong>de</strong>n Tag, <strong>de</strong>r gera<strong>de</strong> im Display angezeigt wird, die AufundAbfahrzeit zu programmieren, verfahren Sie wie bereits auf<strong>de</strong>n Seiten 12 und 13 beschrieben.Die Astro-Funktion ist im Prinzip ein elektronischer Kalen<strong>de</strong>r. InAbhängigkeit aller gespeicherten Sonnenauf- und Sonnenuntergangszeitenwird so – unter Berücksichtigung <strong>de</strong>r geographischenLage Ihres Wohnortes – automatisch eine Fahrzeitkorrekturdurchgeführt. Grundlage <strong>de</strong>r Fahrzeitkorrektur sind die zuvorvon Ihnen eingestellten Auf- und Abfahrzeiten.Erläuterungen zur Programmierung <strong>de</strong>r Astro-Funktion fin<strong>de</strong>nSie ab Seite 18.Beispiel:Sie haben die Astro-Funktion aktiviert und zuvor folgen<strong>de</strong> Aufbzw.Abfahrzeiten gemäß Anleitung (Seiten 12 und 13) programmiert:Auffahrzeit – 0ß6:3ß0 Uhr (½ Std. vor Sonnenaufgangszeit,gemäß Diagramm Seite 19)Abfahrzeit – 1ß9:3ß0 Uhr (½ Std. vor Sonnenuntergangszeit,gemäß Diagramm Seite 19)Die aktuelle Kalen<strong>de</strong>rwoche sei KW 14.In unserem Beispiel fährt <strong>de</strong>r Rolla<strong>de</strong>n nicht, wie programmiert,um 6§= Uhr hoch, son<strong>de</strong>rn zum Sonnenaufgang um ca. 7== Uhr.Am Abend fährt <strong>de</strong>r Rolla<strong>de</strong>n zur programmierten Zeit um19§= Uhr runter.- 15 - DD- 16 -
Astro-FunktionSon<strong>de</strong>rfunktionenSon<strong>de</strong>rfunktionenAstro-FunktionMerke:Liegt die programmierte Auffahrzeit vor <strong>de</strong>r Sonnenaufgangszeit,fährt <strong>de</strong>r Rolla<strong>de</strong>n zur Sonnenaufgangszeit hoch.Liegt die programmierte Auffahrzeit nach <strong>de</strong>r Sonnenaufgangszeit,fährt <strong>de</strong>r Rolla<strong>de</strong>n zur programmierten Auffahrzeit hoch.Liegt die programmierte Abfahrzeit nach <strong>de</strong>r Sonnenuntergangszeit,fährt <strong>de</strong>r Rolla<strong>de</strong>n zur Sonnenuntergangszeit runter.Liegt die programmierte Abfahrzeit vor <strong>de</strong>r Sonnenuntergangszeit,fährt <strong>de</strong>r Rolla<strong>de</strong>n zur programmierten Abfahrzeit runter.Wichtig: Die Aktivierung <strong>de</strong>r Astro-Funktion setzt automatischdie Wochen-Funktion außer Kraft.Aktivierung <strong>de</strong>r Astro-Funktion und Einstellung <strong>de</strong>r aktuellenKalen<strong>de</strong>rwoche erfolgen in einem Programmierschritt.Drücken Sie zuerst die Stell-Taste (gedrückt halten) unddanach 2 x die Tag-Taste.Im Display sollte jetztfolgen<strong>de</strong>s erscheinen:(ßßßß0ß1AStellen Sie jetzt die aktuelle Kalen<strong>de</strong>rwoche ein.Drücken Sie dazu die Tag-Taste (Stell-Taste weiterhin gedrückthalten). Je<strong>de</strong>s weitere Drücken <strong>de</strong>r Tag-Taste bewirkt ein Hochzählenum eine Woche.Haben Sie die aktuelle Kalen<strong>de</strong>rwoche eingestellt und bei<strong>de</strong>Tasten losgelassen, ist die Astro-Funktion aktiviert. Das Displayschaltet wie<strong>de</strong>r auf die aktuelle Uhrzeit um. Das (A) oben rechtsbleibt weiterhin sichtbar.Zum Deaktivieren <strong>de</strong>r Astro-Funktion drücken Sie die Tag-Taste(Stell-Taste weiterhin gedrückt halten) so oft, bis im Display „0ß0“erscheint.Hinweis: Um ein optimales Arbeiten <strong>de</strong>r Astro-Funktion zu erzielen,muss über die DIP-Schalter die geographischeLage Ihres Wohnortes eingestellt wer<strong>de</strong>n (sieheTabelle Seite 20 und Seite 21).- 17 - DD- 18 -
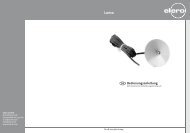
Astro-Funktion / FahrzeitkorrekturSon<strong>de</strong>rfunktionenSon<strong>de</strong>rfunktionenAstro-Funktion – Einstellung BRDSchaltungsverlauf im Laufe eines Jahres, unter Berücksichtigungvon Sommer-/Winterzeit, bei einer vorgewählten Auffahrzeitvon 6§= Uhr und einer Abfahrzeit von 19§= Uhr. Diese Zeitenbeziehen sich auf 10° östliche Länge und 50° nördliche Breite.Das entspricht etwa <strong>de</strong>r geographischen Lage <strong>de</strong>r Stadt Würzburg.Wird <strong>de</strong>r DIP-Schalter 6 auf „ON“ gestellt, verzögert sichdas Abfahren <strong>de</strong>s Rolla<strong>de</strong>ns um 30 Minuten.DIP 2 DIP 3 DIP 4 DIP 5 GebietOFF OFF OFF OFF Schleswig-Holstein, Nord-Nie<strong>de</strong>rsachsenOFF OFF OFF ON Mecklenburg-VorpommernOFF OFF ON OFF Nordrhein-Westfalen, Süd-Nie<strong>de</strong>rsachsenOFF OFF ON ON Bran<strong>de</strong>nburg, Sachsen-AnhaltOFF ON OFF OFF Rheinland-Pfalz, Saarland, HessenOFF ON OFF ON Sachsen, ThüringenOFF ON ON OFF Ba<strong>de</strong>n-WürttembergOFF ON ON ON Bayern= Werkseinstellung: Schleswig-Holstein,Y12345C Nord-Nie<strong>de</strong>rsachsenFahrzeitkorrektur:DIP 6OFFONKorrekturkeine VerzögerungAb-Befehl 30 Minuten später- 19 - DD- 20 -
Astro-Funktion – Einstellung EuropaSon<strong>de</strong>rfunktionenSon<strong>de</strong>rfunktionenWen<strong>de</strong>-FunktionDIP 2 DIP 3 DIP 4 DIP 5 GebietON OFF OFF OFF SkandinavienON OFF OFF ON GroßbritannienON OFF ON OFF Nord-Frankreich, BeneluxON OFF ON ON DeutschlandON ON OFF OFF Süd-FrankreichON ON OFF ON Schweiz, Österreich, Nord-ItalienON ON ON OFF SpanienON ON ON ON Süd-Italien, Sizilien, Korsika, SardinienDie Wen<strong>de</strong>-Funktion bewirkt, dass <strong>de</strong>r Rolla<strong>de</strong>n, nach<strong>de</strong>m er zurprogrammierten Zeit automatisch runtergefahren ist, für kurzeZeit wie<strong>de</strong>r hochfährt (z.B. zur Belüftung o<strong>de</strong>r als Öffnung fürHaustiere).Die Wen<strong>de</strong>zeit ist über die DIP-Schalter 7 und 8 einstellbar undwird nur im Automatikbetrieb zu <strong>de</strong>n programmierten Tages-,Wochen- und Astro-Abfahrzeiten ausgeführt. Die Wen<strong>de</strong>zeit wir<strong>de</strong>benfalls durch Drücken <strong>de</strong>r Ab-Taste im Automatikbetrieb ausgeführt.Wichtig: Erst nach Ablauf <strong>de</strong>s Abfahr-Impulses von 2 Minutenwird die Wen<strong>de</strong>-Funktion eingeleitet.Einstellung Wen<strong>de</strong>zeit:DIP 7 DIP 8 Wen<strong>de</strong>zeitOFF OFF keineOFF ON 2 Sekun<strong>de</strong>nON OFF 4 Sekun<strong>de</strong>nON ON 10 Sekun<strong>de</strong>nIst eine Wen<strong>de</strong>zeit eingestellt,so wird dieses durchAnzeigen <strong>de</strong>s Symbols (O)im Display angezeigt.Während Ausführung <strong>de</strong>rWen<strong>de</strong>zeit blinkt diesesZeichen im Display.- 21 - DD- 22 -
Beispiel Einstellung DIP-SchalterSon<strong>de</strong>rfunktionenG/S-FunktionenAllgemeinesDie nachfolgen<strong>de</strong> Tabelle zeigt die verschie<strong>de</strong>nen Einstellmöglichkeiten.Die Stellung von S1 entschei<strong>de</strong>t, ob die Tages- o<strong>de</strong>r die Wochen-Funktion gewählt wur<strong>de</strong>.Werkseitige Tag-Funktion (S1 = OFF)Voreinstellungen: keine Astro-Korrekturzeit (S6 = OFF)keine Wen<strong>de</strong>-Funktion (S7 und S8 = OFF)TagY123$5678XBeispiel <strong>de</strong>r DIP-Schalterstellung für Nordrhein-Westfalen.An<strong>de</strong>re Län<strong>de</strong>r siehe Seiten 20 und 21.WocheY!wert678XDIP-Schalter S2 – S5 sind bei dieser Einstellung ohne Funktion.DIP-Schalter S6 siehe Seite 19, S7 und S8 Seite 22.Ihre Rolla<strong>de</strong>nsteuerung Vestamatic <strong>Rollmat</strong> <strong>Plus</strong> G/S V3.1 verfügtüber zwei weitere, sehr nützliche Zusatzfunktionen:1. Glasbruchmel<strong>de</strong>r (G)Die Funktion „Glasbruchmel<strong>de</strong>r“ ist nur im Automatikbetriebwirksam.2. Sonnenschutz (S)Die Funktion „Sonnenschutz“ arbeitet nur im Automatikbetriebinnerhalb <strong>de</strong>r zuvor programmierten Auf- und Abfahrzeiten.Hinweis: Standardlänge <strong>de</strong>r Sonnensensorleitung – 2,0 mStandardlänge <strong>de</strong>r Glasbruchmel<strong>de</strong>rleitung – 1,0 mFür bei<strong>de</strong> Funktionen sind Leitungen von bis zu 10 Meter Längelieferbar.- 23 - DD- 24 -
Funktionsbeschreibung Glasbruchmel<strong>de</strong>rG/S-FunktionenG/S-FunktionenFunktionsbeschreibung SonnenschutzBei Glasbruch fährt <strong>de</strong>r Rolla<strong>de</strong>n verzögerungsfrei runter.Im Display erscheint danndas Glasbruch-Symbol (g):(0S8:0g0)Die zuvor programmierte Auffahrzeit wird jetzt nicht mehr berücksichtigt,d.h. <strong>de</strong>r Rolla<strong>de</strong>n wür<strong>de</strong> bei Erreichen <strong>de</strong>r programmiertenAuffahrzeit aus Sicherheitsgrün<strong>de</strong>n nicht automatischhochfahren. Um <strong>de</strong>n normalen Funktionsablauf wie<strong>de</strong>r aufzunehmen,drücken Sie einfach die Auf-Taste. Das Glasbruch-Symbol im Display erlischt und <strong>de</strong>r Rolla<strong>de</strong>n fährt jetzt wie<strong>de</strong>r zu<strong>de</strong>n programmierten Auf- und Abfahrzeiten hoch bzw. runter.Anmerkung: Ein Glasbruch-Signal wird ausgelöst, wenn imErfassungsbereich <strong>de</strong>s Glasbruchmel<strong>de</strong>rs eineheftige Erschütterung o<strong>de</strong>r Glasbruch auftritt.Der Erfassungsbereich beträgt etwa einen Meter(siehe Abbildung Seite 33). Aus diesem Grun<strong>de</strong>sollten bei größeren Fensterflächen mehrereGlasbruchmel<strong>de</strong>r auf <strong>de</strong>m Fenster installiert wer<strong>de</strong>n.Dazu wird <strong>de</strong>r Glasbruchmel<strong>de</strong>r-Verteilerbenötigt.Ist <strong>de</strong>r Sonnensensor einer Sonneneinstrahlung ausgesetzt,blinkt das Sonnen-Symbol im Display. Nach 1 Minute ununterbrochenerSonneneinstrahlung fährt <strong>de</strong>r Rolla<strong>de</strong>n soweit runter,bis er <strong>de</strong>n Sonnensensor be<strong>de</strong>ckt. Um <strong>de</strong>n Sonnensensor für dieweitere Überwachung freizugeben, fährt <strong>de</strong>r Rolla<strong>de</strong>n anschließendwie<strong>de</strong>r einige Zentimeter hoch. Diese Rolla<strong>de</strong>npositionnennen wir „Schattenstellung“.Im Display wird die momentaneBeleuchtungsstärke durch entsprechen<strong>de</strong>Symbole angezeigt (S):(Beispiel: starke Sonneneinstrahlung)s0S8:0ß0)Wird über einen Zeitraum von 16 Minuten ohne Unterbrechungkeine Sonneneinstrahlung vom Sonnensensor festgestellt (auchwährend dieser Verzögerungszeit blinkt das Sonnen-Symbol imDisplay), fährt <strong>de</strong>r Rolla<strong>de</strong>n automatisch wie<strong>de</strong>r hoch. Die Sensor-Signale wer<strong>de</strong>n ständig überprüft und die Position <strong>de</strong>s Rolla<strong>de</strong>nsim Laufe eines Sonnentages mehrfach korrigiert.Wichtig: Der Sonnensensor arbeitet nur im Automatikbetriebinnerhalb <strong>de</strong>r programmierten Auf- und Abfahrzeiten.Wollen Sie die Sonnen-Funktion für einen längeren Zeitraum nichtbenutzen, entfernen Sie <strong>de</strong>n Sonnensensor.- 25 - DD- 26 -
Einstellung Ansprechempfindlichkeit (Sonnenintensität) G/S-FunktionenDie Einstellung <strong>de</strong>r Ansprechempfindlichkeit auf die Sonnenintensitäterfolgt über ein Potentiometer mit Hilfe <strong>de</strong>s mitgeliefertenEinstellwerkzeuges. Entfernen Sie hierzu die Haube <strong>de</strong>r Rollla<strong>de</strong>nsteuerungVestamatic <strong>Rollmat</strong> <strong>Plus</strong> G/S V3.1 durch leichtesZiehen.rolBereits bei geringerSonneneinstrahlung(ca. 12 kLux) fährt<strong>de</strong>r Rolla<strong>de</strong>n ab.Bei mittlererSonneneinstrahlung(ca. 17 kLux) fährt<strong>de</strong>r Rolla<strong>de</strong>n ab.Erst bei starkerSonneneinstrahlung(ca. 22 kLux) fährt<strong>de</strong>r Rolla<strong>de</strong>n ab.FehlersuchanleitungDer Rolla<strong>de</strong>n fährt nicht automatisch hoch und runter.· Ist die Spannungsversorgung gewährleistet?(Bei Stromausfall blinkt das Display)· Steht <strong>de</strong>r Wahlschalter auf Automatik (A)?· Überprüfen Sie, ob die programmierten Auf- und Abfahrzeitennoch gespeichert sind (kurzes Antippen <strong>de</strong>r Auf- bzw.Ab-Taste im Automatik-Modus).· Steht ein Glasbruch-Signal an?(Glasbruchmel<strong>de</strong>r-Symbol wird im Display angezeigt)Sonnen-Ansprechverzögerung: 1 MinuteSonnen-Rückstellverzögerung: 16 Minuten- 27 - DD- 28 -
Hinweise für <strong>de</strong>n ElektrofachbetriebInstallationInstallationHinweise für <strong>de</strong>n ElektrofachbetriebEinbau und Grun<strong>de</strong>instellungen:1. Betriebsspannung abschalten.2. Gurtwickler aus <strong>de</strong>m Gurtwicklerkasten entfernen.3. DIP-Schalter auf die gewünschte Funktion einstellen (sieheSeiten 19 bis 23).4. Vestamatic <strong>Rollmat</strong> <strong>Plus</strong> G/S V3.1 gemäß Anschlussplan(siehe Seite 32) anschließen.Achtung: Beim Anschluss sind die gelten<strong>de</strong>n VDE-Bestimmungen,insbeson<strong>de</strong>re DIN VDE 0100/0700sowie die gelten<strong>de</strong>n Vorschriften <strong>de</strong>r örtlichenEVU und UVV zu beachten.5. Vestamatic <strong>Rollmat</strong> <strong>Plus</strong> G/S V3.1 in <strong>de</strong>n Gurtwicklerkasteneinbauen.6. Wahlschalter auf Hand-Steuerung (H) stellen, d.h. bis zumAnschlag nach rechts schieben.7. Betriebsspannung einschalten und Reset-Taste drücken.8. Überprüfen, ob die Motorlaufrichtung mit <strong>de</strong>n Richtungstastenübereinstimmt. Liegt keine Übereinstimmung vor, Klemmen 6und 7 vertauschen.Wichtig: Eine parallele Ansteuerung von mehreren Rolla<strong>de</strong>n-Antriebsmotoren lässt sich nur über Trennrelais bzw.Gruppensteuergeräte realisieren.Bei einem Stromausfall än<strong>de</strong>rt sich <strong>de</strong>r Display-Kontrast. Der schwächere Display-Kontrast ist keinAnzeichen einer leeren Batterie.Für übergroße Gurtwickler-Mauerkästen verwen<strong>de</strong>n Sie bitteunsere Zwischenplatte, Artikel-Nr. 01201500.Für die Glasbrucherkennung und die Sonnenschutzfunktionkönnen wir Ihnen u.a. folgen<strong>de</strong>s Zubehör anbieten:Glasbruchmel<strong>de</strong>r, Kabellänge 1 m, Artikel-Nr. 01200120Glasbruchmel<strong>de</strong>r, Kabellänge 2 m, Artikel-Nr. 01200220Glasbruchmel<strong>de</strong>r, Kabellänge 3 m, Artikel-Nr. 01200320Glasbruchmel<strong>de</strong>r, Kabellänge 5 m, Artikel-Nr. 01200520Glasbruchmel<strong>de</strong>r, Kabellänge 8 m, Artikel-Nr. 01200820Glasbruchmel<strong>de</strong>r, Kabellänge 10 m, Artikel-Nr. 01201020Glasbruchmel<strong>de</strong>r-Verteiler, Artikel-Nr. 01201120Sonnensensor, Kabellänge 1 m, Artikel-Nr. 01130120Sonnensensor, Kabellänge 2 m, Artikel-Nr. 01130220Sonnensensor, Kabellänge 3 m, Artikel-Nr. 01130320Sonnensensor, Kabellänge 5 m, Artikel-Nr. 01130520Sonnensensor, Kabellänge 8 m, Artikel-Nr. 01130820Sonnensensor, Kabellänge 10 m, Artikel-Nr. 01131020Zur Ansteuerung von 2 Antrieben empfehlen wir unsereTrennrelais:Trennrelais TR N2S, Artikel-Nr. 01054220Trennrelais TR N2A, Artikel-Nr. 01054120.- 29 - DD- 30 -
Montageanleitung / Technische DatenInstallationInstallationAnschlussplanBetriebsspannung:230 VW, 50 HzBemessungs-Stoßspannung: 2,5 kVLeistungsaufnahme:ca. 2 WAusgang:230 VW, 50 HzSchaltleistung:250 VW, 5A, cos f > 0,8 ind.Schaltzeit:120 Sekun<strong>de</strong>nSoftwareklasse:ABetriebstemperaturbereich: 0 – 40 °CSchutzart: IP 40Verschmutzungsgrad: 2Dieses Gerät enthält eine schadstoffhaltige Batterie. Der Endverbraucher istzur ordnungsgemäßen Rückgabe verpflichtet (Richtlinie 91/157/EWG).Das CE-Zeichen ist ein Freiverkehrszeichen, das sich ausschließlich an diep Behör<strong>de</strong> wen<strong>de</strong>t und keinerlei Zusicherung von Eigenschaften beinhaltet.Eine vollständige Konformitätserklärung zu diesem Produkt fin<strong>de</strong>n Sieauf unserer Homepage im Internet unter: http://www.vestamatic.<strong>de</strong>Technische Än<strong>de</strong>rungen vorbehalten!- 31 - DD- 32 -
Glasbruchmel<strong>de</strong>rInstallationInstallationGlasbruchmel<strong>de</strong>rFür die Zusatzfunktion „Glasbruchmel<strong>de</strong>r“ wird zu je<strong>de</strong>r Rolla<strong>de</strong>nsteuerungVestamatic <strong>Rollmat</strong> <strong>Plus</strong> G/S V3.1 ein (bei größereno<strong>de</strong>r geteilten Scheiben mehrere) Glasbruchmel<strong>de</strong>r benötigt. Imnachfolgen<strong>de</strong>n Text wird beschrieben, wie die Installation durchgeführtwird.1. Wahlschalter auf Hand-Steuerung (H) stellen (nach rechtsschieben bis zum „Klick“).2. Bin<strong>de</strong>r und Härter <strong>de</strong>s 2-Komponenten-Klebers im Verhältnis1 : 1 gründlich mischen.3. Den Kleber auf die durch einen schwarzen Balken gekennzeichneteSeite <strong>de</strong>s Glasbruchmel<strong>de</strong>rs auftragen.Wichtig: Die Klebeflächen müssen sauber und fettfrei sein.4. Glasbruchmel<strong>de</strong>r min<strong>de</strong>stens 5 cm vom Fensterrahmen entferntleicht auf die Glasscheibe aufsetzen und mit Klebebandfixieren. Dabei ist darauf zu achten, dass <strong>de</strong>r Glasbruchmel<strong>de</strong>rsenkrecht (mit <strong>de</strong>m Kabelabgang nach unten) angebracht wird(siehe Abbildung Seite 33).5. Klinkenstecker <strong>de</strong>s Glasbruchmel<strong>de</strong>rs in die linke Buchse<strong>de</strong>r Rolla<strong>de</strong>nsteuerung stecken.6. Wahlschalter auf Automatik-Steuerung (A) stellen (nach linksschieben bis zum „Klick“).7. Funktionstest:Nehmen Sie eine Münze und klopfen Sie damit auf <strong>de</strong>n Glasbruchmel<strong>de</strong>r.Simulieren Sie so einen Glasbruch. Der Rollla<strong>de</strong>nsollte jetzt runter fahren und im Display das Glasbruch-Symbol erscheinen. Drücken Sie die Auf-Taste, um <strong>de</strong>n Rollla<strong>de</strong>nzu stoppen bzw. um das Glasbruch-Signal zu löschen.Nach <strong>de</strong>m Aushärten <strong>de</strong>s Klebers können Sie das Klebeban<strong>de</strong>ntfernen. Verarbeitungs- und Aushärtzeit <strong>de</strong>s Klebers entnehmenSie bitte <strong>de</strong>r Anweisung auf <strong>de</strong>r Kleberverpackung.- 33 - DD- 34 -
SonnensensorInstallationInstallationSonnensensorFür die Zusatzfunktion „Sonnenschutz“ wird zu je<strong>de</strong>r Rolla<strong>de</strong>nsteuerungVestamatic <strong>Rollmat</strong> <strong>Plus</strong> G/S V3.1 ein Sonnensensorbenötigt. Im nachfolgen<strong>de</strong>n Text wird beschrieben, wie dieInstallation durchgeführt wird.1. Klinkenstecker <strong>de</strong>s Sonnensensors in die rechte Buchse <strong>de</strong>rRolla<strong>de</strong>nsteuerung stecken.2. Sonnensensor an die gewünschte Stelle <strong>de</strong>r Fensterscheibeanbringen.3. Wahlschalter auf Automatik-Steuerung (A) stellen (nach linksschieben bis zum „Klick“).Um die Zusatzfunktion „Sonnenschutz“ nach erfolgter Installationzu überprüfen, aktivieren Sie die Schnelllauf-Funktion,in<strong>de</strong>m Sie die Uhr- und Tag-Taste für 3 Sekun<strong>de</strong>n gemeinsamdrücken (dies bewirkt, dass die Uhrzeit sechzigmal schnellerläuft). So können Sie <strong>de</strong>n gesamten Funktionsablauf innerhalbkurzer Zeit überprüfen.Beispiel eines Testdurchlaufes:1. Prüfen Sie, ob Sie sich innerhalb <strong>de</strong>r programmierten Auf- undAbfahrzeiten befin<strong>de</strong>n.2. Uhr- und Tag-Taste für 3 Sekun<strong>de</strong>n gemeinsam drücken.3. Soviel Licht an <strong>de</strong>n Sonnensensor bringen bis das Sonnen-Symbol blinkt.Nach ca. 1 Sekun<strong>de</strong> fährt <strong>de</strong>r Rolla<strong>de</strong>n in Schattenstellung.Lichtquelle entfernen.Sonnen-Symbol im Display blinkt erneut.Nach 16 Sekun<strong>de</strong>n fährt <strong>de</strong>r Rolla<strong>de</strong>n wie<strong>de</strong>r hoch.4. Nach Beendigung <strong>de</strong>s Testdurchlaufes Uhr- und Tag-Tasteerneut kurz drücken.5. Aktuelle Uhrzeit einstellen wie auf Seite 10 beschrieben.- 35 - DD- 36 -
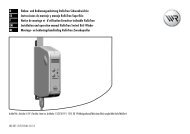
AnschlussbildÜbersicht BedienungselementeVestamatic <strong>Rollmat</strong> <strong>Plus</strong> G/S V3.1Vestamatic <strong>Rollmat</strong> <strong>Plus</strong> G/S V3.1Auf-TasteDisplayS/W-TasteAb-TasteReset-TasteStell-TasteUhr-TasteTag-TasteEinstellungSonnenintensitätZufall-TasteWahlschalterAutomatik/HandAnschlussGlasbruchmel<strong>de</strong>rAnschlussSonnensensor- 37 - DD- 38 -
<strong>Rollmat</strong> <strong>Plus</strong> G/S V3.1Safety precautions· Check the control for any signs of damage immediately afterunpacking. Do not start up the control in case there is anydamage. If there is damage due to the shipping, please notifythe supplier immediately.· Please note that the roller shutter control requires an operatingvoltage of 230 VW, 50 Hz. Make sure to contact a professionalelectrician for the installation and setting of the DIP switcheson the rear panel of the <strong>de</strong>vice.· The control was <strong>de</strong>signed for correct use as <strong>de</strong>scribed in theoperating instructions. Any changes or modifications thereofare not permissible and will result in loss of all warranty claims.· If safe operation of control or roller shutter can not be guaranteed,the control must be turned off immediately and protectedagainst unintentional operation. The same applies forwork on windows or roller shutters that are operated by thiscontrol.Installation and Operating InstructionsG- 40 -
ContentsContentsIntroduction General page 43Manual mo<strong>de</strong> page 44Automatic mo<strong>de</strong> page 45Programming General page 46the basic Summer/winter time page 47functions Current time page 48Note page 49Up time page 50Down time page 51Random generator page 52Programming Week function page 53the special Astro function / Run time correction page 54 – 57functions Astro function – Germany page 58Astro function – Europe page 59Reverse function page 60Example for DIP switch setting page 61G/S functions General page 62Functional <strong>de</strong>scriptionbroken glass indicator page 63Functional <strong>de</strong>scription sun protection page 64Setting the response (sun intensity) page 65Trouble shooting page 66Installation Notes for professional electricians page 67 – 68Installation instructions / Technical data page 69Wiring diagram page 70Installation broken glass indicator page 71 – 72Installation sun sensor page 73 – 74Wiring diagramOverview operating elementsWarranty termsInsi<strong>de</strong> back coverInsi<strong>de</strong> back coverBack cover- 41 - GG- 42 -
GeneralIntroductionIntroductionManual mo<strong>de</strong>Congratulations for buying the Vestamatic <strong>Rollmat</strong> <strong>Plus</strong> G/S V3.1roller shutter control. You have purchased a high-quality productthat features many practical programming options and has beenmanufactured according to the highest quality standards whichwill guarantee optimum efficiency and reliability. Please take thetime to read these operating instructions carefully before startingup. We have tried to make sure that all programming instructionsare easy to un<strong>de</strong>rstand.The <strong>de</strong>livery extent of the roller shutter control inclu<strong>de</strong>s the followingitems:1. Cover cap2. Basic housing3. Adjustment toolIn case of power failure, the entire display starts flashing. Yet, thepreviously programmed times remain saved for several years.The times or functions, you have previously programmed, canbe checked by performing a quick run. Press the time and daybutton simultaneously for 3 seconds to activate the quick run.The time function will now run 60 times faster. Shortly tap thetime and day button simultaneously to stop the quick run.The Vestamatic <strong>Rollmat</strong> <strong>Plus</strong> G/S V3.1 roller shutter controlfeatures a selector switch with which manual mo<strong>de</strong> (H) or automaticmo<strong>de</strong> (A) can be selected.Push the selector switch to (H), all the way to the right until youhear the “click” in or<strong>de</strong>r to activate the manual mo<strong>de</strong>.All automatic functions are now disabled. Pressing the up ordown button will move the roller shutters up or down.Simply press the opposite button to stop the motion, i.e.:· press the down button, if the roller shutter is moving up,· press the up button, if the roller shutter is moving down.Accurate positioning of the roller shutter is guaranteed becausethe roller shutter will only move up or down again after the up ordown button has been pressed.- 43 - GG- 44 -
Automatic mo<strong>de</strong>IntroductionBasic functionsGeneralPush the selector switch to (A), all the way to the left until youhear the “click” in or<strong>de</strong>r to activate the automatic mo<strong>de</strong>.The automatic mo<strong>de</strong> is now activated and the roller shutter willmove up and down at the programmed times. Regardless of theprogrammed times, it is still possible to move the roller shutterup and down by pressing the up or down button and the programmingremains unaffected.If you press the up or down button longer than 2 seconds, theroller shutter moves up or down.Simply press the opposite button to stop the motion, i.e.:· press the down button, if the roller shutter is moving up,· press the up button, if the roller shutter is moving down.The roller shutter will only move up or down again after the upor down button has been pressed.By simply pushing the selector switch to manual mo<strong>de</strong> (H), theautomatic mo<strong>de</strong> can be interrupted for an exten<strong>de</strong>d period oftime.After selecting the automatic mo<strong>de</strong> again, the Vestamatic <strong>Rollmat</strong><strong>Plus</strong> G/S V3.1 roller shutter control will execute the last pendingcommand from the automatic mo<strong>de</strong>. The last pending commandwill also be executed when resetting after power failure.After the installation has been completed correctly (for instructionsplease see pages 67 to 74), you can start programming.Important: Please note that the Vestamatic <strong>Rollmat</strong> <strong>Plus</strong> G/SV3.1 roller shutter control cannot be programmed incase of power failure.Carefully pull to remove the cover cap and press the reset buttonwith the <strong>de</strong>livered adjustment tool or something else suitable.Pressing the reset button will activate the <strong>de</strong>fault times preprogrammedby the manufacturer.· Current time – 0ß8:0ß0· Up time – 0ß6:0ß0· Down time – 2ß0:0ß0On the following pages, you will find instructions how to customizethese times to your personal requirements.- 45 - GG- 46 -
Summer/winter timeBasic functionsBasic functionsCurrent timeThe display will indicate which time has been set.The (S) in the upper left hand corner of the display stands forsummer time.(0S9:0ß0)The (W) in the upper right hand corner of the display stands forwinter time.(0ß8:0W0)By operating the combination of set and time button you can setthe current time.Setting the time can be performed as follows:1. Press the set button first and keep it pressed, then:A. Press the time button and keep it pressed to fast forwardthe time.B. Shortly tap the time button to slow forward the time.or2. Press the time button first and keep it pressed, then:A. Press the set button and keep it pressed to fast reversethe time.B. Shortly tap the set button to slow reverse the time.If the present setting is incorrect and does not correspond withthe current time, you can simply update the time by pressing thesummer/winter button. The selected setting will appear in thedisplay and the time will be changed by one hour.- 47 - GG- 48 -
NoteBasic functionsBasic functionsUp timeThe Vestamatic <strong>Rollmat</strong> <strong>Plus</strong> G/S V3.1 roller shutter control is<strong>de</strong>livered with the following manufacturer’s <strong>de</strong>fault up and downtimes (day function is activated):· Daily up time – 0ß6:0ß0 every morning· Daily down time – 2ß0:0ß0 every eveningPlease find the manufacturer’s <strong>de</strong>fault DIP switch settingsin the tables on page 58 and page 61.Important: It is important to push the selector switch “automatic/manualmo<strong>de</strong>” to automatic mo<strong>de</strong> (A), in or<strong>de</strong>rto be able to perform the following programmingsteps.Check the current setting. If the selector switch isnot set on (A), correct the setting by pushing it allthe way to the left until you hear the “click”.By operating the combination of set and up button you can setthe up time.Setting the up time can be performed as follows:1. Press the set button first and keep it pressed, then:A. Press the up button and keep it pressed to fast forwardthe up time.B. Shortly tap the up button to slow forward the up time.or2. Press the up button first and keep it pressed, then:A. Press the set button and keep it pressed to fast reversethe up time.B. Shortly tap the set button to slow reverse the up time.The display will now indicate the set value. Once the programmingbuttons are no longer operated, the display will indicate the currenttime again. Tapping the up button will check the set valueand the display will again indicate the previously set up time.After approx. 2 seconds, the display will indicate the current timeagain.- 49 - GG- 50 -
Down timeBasic functionsBasic functionsRandom generatorBy operating the combination of set and down button you canset the down time.Setting the down time can be performed as follows:1. Press the set button first and keep it pressed, then:A. Press the down button and keep it pressed to fast forwardthe down time.B. Shortly tap the down button to slow forward the downtime.or2. Press the down button first and keep it pressed, then:A. Press the set button and keep it pressed to fast reversethe down time.B. Shortly tap the set button to slow reverse the down time.The display will now indicate the set value. Once the programmingbuttons are no longer operated, the display will indicate thecurrent time again. Tapping the down button will check the setvalue and the display will again indicate the previously set downtime. After approx. 2 seconds, the display will indicate the currenttime again.The random generator generates the so-called random timewhich causes the roller shutters to move up or down with a <strong>de</strong>viationof +/-15 minutes to the previously programmed times(*).The “randomly” moving up and down roller shutters give theimpression of an inhabited house and thus provi<strong>de</strong> additionalprotection in case the house owner is absent for an exten<strong>de</strong>dperiod of time.Simply press the random button to activate the random generator.The display will now indicatea (Z) in the upper right handcorner.(0ß8:0ß0ZNote: The random generator will disable any previously setreverse function (please see page 60).Press the random button again to <strong>de</strong>activate the random generator.The random generator is now turned off, the (Z) in thedisplay will disappear and the roller shutter will move up anddown accurately at the times you have previously programmed.(*)Annotation:If the Astro function is activated, the times will<strong>de</strong>viate by +/-15 minutes from the actual sunriseand sunset times.- 51 - GG- 52 -
Week functionSpecial functionsSpecial functionsAstro functionThe week function enables you to program a particular up anddown time for each individual day of the week.In or<strong>de</strong>r to activate the week function, all DIP switches in the rearof the housing must be set according to the table on page 61.The following times were preset for this operation mo<strong>de</strong> by themanufacturer:· Up time Monday through Friday – 0ß6:0ß0· Down time Monday through Friday – 2ß0:0ß0· Saturday / Sunday – no preset time.If you wish different up or downtimes, perform the followingsteps:(QS8:0ß0)Press the day button. The displaywill show a new day of the weekafter every press. (0w8:0ß0) … etc.Perform the steps <strong>de</strong>scribed on page 50 to 51 to program theup and down times for the currently displayed day.The Astro function is basically an electronical calendar. Dependingon the stored sunrise and sunset times, the up or downtimes are automatically corrected un<strong>de</strong>r consi<strong>de</strong>ration of thegeographical location of your resi<strong>de</strong>nce. This correction isbased on the up or down times you previously set.For more information on the programming of the Astro functionplease see page 56.Example:You have activated the Astro function and previously programmedthe following up and down times according to theinstructions on page 50 and page 51:Up time – 0ß6:3ß0 (½ an hour before sunrise according tothe diagram on page 57)Down time – 1ß9:3ß0 (½ an hour before sunset according tothe diagram on page 57)Given the current calendar week 14.In this example, the roller shutter does not move up at 6:30, asprogrammed but moves up at 7:00 when the sun rises.In the evening, it moves down at 19:30 at the programmed time.- 53 - GG- 54 -
Astro functionSpecial functionsSpecial functionsAstro functionNote:If the up time is programmed before sunrise, the roller shuttermoves up at sunrise.If the up time is programmed after sunrise, the roller shuttermoves up at the programmed up time.If the down time is programmed after sunset, the roller shuttermoves down at sunset.If the down time is programmed before sunset, the roller shuttermoves down at the programmed down time.Important: Activating the Astro function automatically disablesthe week function.Activating the Astro function and setting the current calendarweek will be performed in one programming step.First press the set button and keep it pressed. Then press theday button twice.The display will indicatethe following:(ßßßß0ß1ANow set the current calendar week by pressing the day button.Keep pressing the set button. Each additional pressing of theday button will move to the next calendar week.After you have set the current calendar week and released bothbuttons, the Astro function will be activated. The display will nowswitch to the current time. The display will continue to indicatethe (A) in the upper right hand corner.Keep the set button pressed and press the day button until thedisplay indicates “0ß0” in or<strong>de</strong>r to <strong>de</strong>activate the Astro function.Note: In or<strong>de</strong>r to obtain optimum performance of the Astro function,the geographical location of your resi<strong>de</strong>nce must beset by means of the DIP switches (see tables on page 58and 59).- 55 - GG- 56 -
Astro function / Run time correctionSpecial functionsSpecial functionsAstro function – GermanyBelow the switching sequence is presented in the course of anentire year un<strong>de</strong>r consi<strong>de</strong>ration of summer/winter time, at an uptime preset at 6:30 and a down time preset at 19:30. Thesetimes relate to 10° of eastern longitu<strong>de</strong> and 50° of northern latitu<strong>de</strong>which corresponds to the geographical location of the cityof Würzburg. Setting DIP switch 6 to “ON” will <strong>de</strong>lay the downtime of the roller shutter by 30 minutes.DIP 2 DIP 3 DIP 4 DIP 5 AreaOFF OFF OFF OFF Schleswig-Holstein, Northern Lower-SaxonyOFF OFF OFF ON Mecklenburg-VorpommernOFF OFF ON OFF North-Rhine Westphalia, Southern Lower-SaxonyOFF OFF ON ON Bran<strong>de</strong>nburg, Saxony-AnhaltOFF ON OFF OFF Rhineland-Palatinate, Saarland, HesseOFF ON OFF ON Saxony, ThuringiaOFF ON ON OFF Ba<strong>de</strong>n-WürttembergOFF ON ON ON BavariaY12345C= Manufacturer’s <strong>de</strong>fault setting:Schleswig-Holstein,Northern Lower-SaxonyRun timecorrection:DIP 6OFFONCorrectionno <strong>de</strong>laydown command 30 minutes <strong>de</strong>layed- 57 - GG- 58 -
Astro function – EuropeSpecial functionsSpecial functionsReverse functionDIP 2 DIP 3 DIP 4 DIP 5 AreaON OFF OFF OFF ScandinaviaON OFF OFF ON Great BritainON OFF ON OFF Northern France, BeneluxON OFF ON ON GermanyON ON OFF OFF Southern FranceON ON OFF ON Switzerland, Austria, Northern ItalyON ON ON OFF SpainON ON ON ON Southern Italy, Sicily, Corsica, SardiniaAfter the roller shutter has moved down automatically at the programmedtime, the reverse function causes the roller shutter toshortly move up airing purposes or to let pets go outsi<strong>de</strong>.The reverse time can be set with DIP switches 7 and 8 and willonly be executed at the programmed day, week and sunrise andsunset times during automatic operation. The reverse functioncan also be executed by pressing the down button during automaticoperation.Important: The reverse function is only initiated 2 minutes afterthe down pulse has been transmitted.Setting reverse time:DIP 7 DIP 8 Reverse timeOFF OFF noneOFF ON 2 secondsON OFF 4 secondsON ON 10 secondsThe display will indicate theset reverse time with thesymbol (O).This symbol flashes on thedisplay during execution ofthe reverse time.- 59 - GG- 60 -
Example for DIP switch settingSpecial functionsG/S functionsGeneralThe table below shows the various setting options.The position of S1 <strong>de</strong>termines whether day or week functionwas selected.Preset <strong>de</strong>faultsetting:DayDay function (S1 = OFF)No Astro correction time (S6 = OFF)No reverse function (S7 and S8 = OFF)Y123$5678XExample of the DIP switch position for North-Rhine Westphalia.For other states, please see pages 58 and 59.WeekY!wert678XDIP switches S2 – S5 do not have any function for this setting.For DIP switch S6, see page 57, for S7 and S8 see page 60.Your Vestamatic <strong>Rollmat</strong> <strong>Plus</strong> G/S V3.1 roller shutter control featurestwo additional useful functions:1. Broken glass indicator (G)The function “broken glass indicator” is only activated in theautomatic mo<strong>de</strong>.2. Sun protection (S)The function “sun protection” can only be operated in theautomatic mo<strong>de</strong> within the previously programmed up anddown times.Note: Standard length of the sun sensor cable – 2.0 mStandard length of the broken glassindicator cable– 1.0 mCables of up to 10 m length can be <strong>de</strong>livered for both functions.- 61 - GG- 62 -
Functional <strong>de</strong>scription broken glass indicator G/S functionsG/S functionsFunctional <strong>de</strong>scription sun protectionIn case of broken glass, the roller shutter will move down without<strong>de</strong>lay.The display will now indicatethe broken glass symbol (g):(0S8:0g0)The previously programmed up time will no longer be consi<strong>de</strong>red,i.e. the roller shutter does not move up at the programmed uptime because of safety reasons. Simply press the up button inor<strong>de</strong>r to resume the normal operation. The broken glass symbolin the display goes off and the roller shutter moves up or downat the programmed up and down times.Annotation: A broken glass signal is released as soon as thebroken glass indicator <strong>de</strong>tects a massive shock orbroken glass within the sensing range. The sensingrange amounts to approx. 1 square meter(please refer to the picture on page 71). Therefore,several broken glass indicators and a distributorbox should be installed on larger windows.When the sun sensor is exposed to sun rays, the sun symbol willflash in the display. After the sensor measures 1 minute of continuoussunshine, the roller shutter moves as far down to coverthe sun sensor. In or<strong>de</strong>r to clear the sun sensor for further monitoring,the roller shutter then moves a few inches up. We call thisroller shutter position “sha<strong>de</strong> position”.The display indicates the current lightintensity with the correspondingsymbols (S):(Example: strong light intensity)s0S8:0ß0)If the sun sensor cannot <strong>de</strong>tect any sun rays over a continuousperiod of 16 minutes, the roller shutter will move up again. Duringthis <strong>de</strong>lay time, the sun symbol will keep flashing in the display.The sensor signals are checked on a regular basis and theposition of the roller shutter position will be corrected accordinglyin the course of a sunny day.Important: The sun sensor is only activated in between the upand down times. If the present time does not liewithin these times, the display will indicate a moonsymbol.Remove the sun sensor, if you do not need to use the sun protectionfunction for an exten<strong>de</strong>d period of time.- 63 - GG- 64 -
Setting the response (sun intensity)G/S functionsTrouble shootingSet the response to the sun intensity with the potentiometer andthe <strong>de</strong>livered adjustment tool. Carefully pull to remove the covercap of the Vestamatic <strong>Rollmat</strong> <strong>Plus</strong> G/S V3.1 roller shutter control.rolThe roller shuttermoves down at alow sun intensity(approx. 12 kLux)The roller shuttermoves down at amedium sun intensity(approx. 17 kLux)The roller shuttermoves down at ahigh sun intensity(approx. 22 kLux)The roller shutter does not move up and down automatically.· Is the power supply connected?(The display flashes in case of power failure)· Is the selector switch set to automatic (A)?· Check, if the programmed up and down times are still storedin the memory by shortly tapping the up or down button inthe automatic mo<strong>de</strong>.· Is there a broken glass signal present?(The display will indicate the broken glass indicator symbol)Sun down <strong>de</strong>lay: 1 minuteSun up <strong>de</strong>lay: 16 minutes- 65 - GG- 66 -
Notes for professional electriciansInstallationInstallationNotes for professional electriciansInstallation and basic settings:1. Switch off the power supply.2. Remove the band win<strong>de</strong>r from the band win<strong>de</strong>r case.3. Set the DIP switches to the <strong>de</strong>sired function (see pages 57to 61).4. Connect the Vestamatic <strong>Rollmat</strong> <strong>Plus</strong> G/S V3.1 according tothe wiring diagram (see page 70).Attention: Currently valid VDE standards must be observedwhen connecting the <strong>de</strong>vice, in particularDIN VDE 0100/0700 as well as the currentlyvalid regulations of your local power companyand acci<strong>de</strong>nt prevention regulations.5. Install the Vestamatic <strong>Rollmat</strong> <strong>Plus</strong> G/S V3.1 in the bandwin<strong>de</strong>r case.6. Set the selector switch to manual mo<strong>de</strong> (H), i.e. push it to theright all the way to the stop.7. Switch on the power supply and press the reset button.8. Check, if the direction of the motor rotation corresponds withthe direction buttons. If not, exchange terminal 6 with terminal7.Important: Parallel control of several roller shutter drive motorscan only be implemented by means of isolatingrelays or group control <strong>de</strong>vices.In case of power failure, the display contrast will fa<strong>de</strong>which does not indicate that the battery is empty.For extra large band win<strong>de</strong>r cases, werecommend to use our intermediate plate, article-no. 01201500.For the broken glass indication and the sun sensor function, thefollowing accessories are available:Broken glass indicator, cable length 1 m, article-no. 01200120Broken glass indicator, cable length 2 m, article-no. 01200220Broken glass indicator, cable length 3 m, article-no. 01200320Broken glass indicator, cable length 5 m, article-no. 01200520Broken glass indicator, cable length 8 m, article-no. 01200820Broken glass indicator, cable length 10 m, article-no. 01201020Broken glass indicator and distributor box, article-no. 01201120Sun sensor, cable length 1 m, article-no. 01130120Sun sensor, cable length 2 m, article-no. 01130220Sun sensor, cable length 3 m, article-no. 01130320Sun sensor, cable length 5 m, article-no. 01130520Sun sensor, cable length 8 m, article-no. 01130820Sun sensor, cable length 10 m, article-no. 01131020For control via two drives, we recommend our isolating relays:Isolating relays TR N2S, article-no. 01054220Isolating relays TR N2A, article-no. 01054120.- 67 - GG- 68 -
Installation instructions / Technical dataInstallationInstallationWiring diagramPower supply:230 VW, 50 HzImpulse voltage withstand level: 2.5 kVRated power:approx. 2 WOutput:230 VW, 50 HzMaximum load:250 VW, 5A, cos f > 0.8 ind.Switching time:120 secondsSoftware class:AOperating temperature: 0 °C (32 °F) to 40 °C (104 °F)IP class: IP 40Degree of contamination: 2This <strong>de</strong>vice comprises a battery containing toxic substances. The consumer isobliged to correctly recycle the battery (Gui<strong>de</strong>line 91/157/EWG).The CE mark is a free market mark, which exclusively refers to thep authority but does not guarantee any properties. For the comprehensive<strong>de</strong>claration of conformity for this product, please refer to our Internethomepage: http://www.vestamatic.<strong>de</strong>All technical data is subject to change!- 69 - GG- 70 -
Broken glass indicatorInstallationInstallationBroken glass indicatorThe additional function “broken glass indicator” requires an extrabroken glass indicator for each Vestamatic <strong>Rollmat</strong> <strong>Plus</strong> G/S V3.1roller shutter control (for larger or separated window panes).The installation of the sun sensor is <strong>de</strong>scribed below.1. Push the selector switch all the way to the right until it clicksto set the manual control to (H).2. Mix bin<strong>de</strong>r and har<strong>de</strong>ner of the two-component adhesivethoroughly in a 1 : 1 ratio.3. Apply the adhesive to the si<strong>de</strong> of the broken glass indicatorthat is marked with a black bar.Important: Make sure to keep the adhesive areas clean andoil-free.4. Place broken glass indicator carefully onto to the windowpane and make sure to clear the window frame by minimum2 inches. Attach the broken glass indicator with adhesivetape and ensure that it is located perpendicular, with thecable going off to the bottom (please refer to the picture onpage 71).5. Plug the jack of the broken glass indicator into the left-handsocket of the roller shutter control.6. Push the selector switch all the way to the left until it clicks toset the automatic control to (A).7. Functional test:Take a coin and tap the broken glass indicator with it in or<strong>de</strong>rto simulate breaking glass. The roller shutter will now movedown and the display will indicate the broken glass symbol.Press the up button to stop the roller shutter and <strong>de</strong>lete thebroken glass signal.Remove the adhesive tape after the adhesive has har<strong>de</strong>ned.Please check the instructions on the adhesive packaging for theprocessing and har<strong>de</strong>ning times.- 71 - GG- 72 -
Sun sensorInstallationInstallationSun sensorThe additional function “sun protection” requires an extra sunsensor for each Vestamatic <strong>Rollmat</strong> <strong>Plus</strong> G/S V3.1 roller shuttercontrol. The installation of the sun sensor is <strong>de</strong>scribed below.1. Plug the sun sensor jack into the right-hand socket of theroller shutter control.2. Attach the sun sensor on the <strong>de</strong>sired area of the window.3. Push the selector switch all the way to the left until it clicks toset the automatic control to (A).After completing the installation, activate the quick run functionin or<strong>de</strong>r to check the additional function “sun protection” bypressing the time and day button simultaneously for 3 seconds(this will make the time run 60 times faster). That way you cancheck the entire functional sequence within a short amount oftime.Example of a test run:1. Check whether you are within the range of the programmedup and down times.2. Press the time and day button simultaneously for 3 seconds.3. Expose the sun sensor to light until the sun symbol flashes.After approx. 1 second the shutter moves to the sha<strong>de</strong> position.Remove the light source.The sun symbol in the display will flash again.After 16 seconds, the roller shutter will move up again.4. Press the time and day button shortly after the test run iscompleted.5. Set the current time as <strong>de</strong>scribed on page 48.- 73 - GG- 74 -
Anschlussbild / Wiring diagramÜbersicht Bedienungselemente / Overview operating elementsVestamatic <strong>Rollmat</strong> <strong>Plus</strong> G/S V3.1Vestamatic <strong>Rollmat</strong> <strong>Plus</strong> G/S V3.1Auf-TasteUp buttonDisplayDisplayS/W-TasteSummer/winter buttonStell-TasteSet buttonUhr-TasteTime buttonTag-TasteDay buttonEinstellungSonnenintensitätSetting the sun intensityAb-TasteDown buttonReset-TasteReset buttonZufall-TasteRandom buttonWahlschalterAutomatik/HandSelector switchautomatic/manualAnschlussGlasbruchmel<strong>de</strong>rConnection tobroken glass indicatorAnschlussSonnensensorConnection tosun sensorD GD G
GarantiebedingungenWarranty termsDie Vestamatic GmbH gewährt 24 Monate für Neugeräte, dieentsprechend <strong>de</strong>r Montageanleitung montiert wur<strong>de</strong>n. DieGarantie erstreckt sich auf alle Konstruktions-, Material- undFabrikationsfehler.Nicht unter die Garantie fallen Fehler und Mängel die auf:– fehlerhaften Einbau o<strong>de</strong>r fehlerhafte Installation,– Nichtbeachtung <strong>de</strong>r Montage- und <strong>Bedienungsanleitung</strong>,– unsachgemäße Bedienung und Beanspruchung,– äußere Einwirkung wie Stöße, Schläge o<strong>de</strong>r Witterung,– Reparaturen und Än<strong>de</strong>rungen von nicht autorisierten Stellen,– Verwendung ungeeigneter Zubehörteile,zurückzuführen sind.Vestamatic beseitigt Mängel am Produkt, die innerhalb <strong>de</strong>r Garantiezeitauftreten, kostenlos. Dies erfolgt durch Reparatur o<strong>de</strong>rdurch Austausch <strong>de</strong>s Gerätes. Durch die Ersatzlieferung ausGarantiegrün<strong>de</strong>n tritt keine Verlängerung <strong>de</strong>r ursprünglichenGarantiezeit ein. Es wer<strong>de</strong>n keine Ein- und Ausbaukosten durchVestamatic übernommen.For new <strong>de</strong>vices, the Vestamatic GmbH issues a warranty periodof 24 months, starting from the date of purchase, provi<strong>de</strong>d the<strong>de</strong>vice was mounted in accordance with the installation instructions.The warranty extent applies to all <strong>de</strong>sign, material andmanufacturing <strong>de</strong>fects.Not inclu<strong>de</strong>d in the warranty extent are faults and <strong>de</strong>fects due to:– faulty mounting or installation,– non-observance of the installation and operating instructions,– inappropriate operation and strain,– <strong>de</strong>trimental effects such as impacts, blows or weather,– non-authorized repairs or modifications,– use of inappropriate accessories.Product <strong>de</strong>ficiencies occurring within the warranty period will beremedied free-of-charge by Vestamatic, either by means of repairor by exchange of the <strong>de</strong>vice. A replacement <strong>de</strong>livery due towarranty claims does not prolong the original warranty period.The buyer bears all costs for mounting and installation.Art.-Nr.: 83101311 M1DG