Bedienungsanleitung Rollmat Plus GS - Friedrich-schroeder.de
Bedienungsanleitung Rollmat Plus GS - Friedrich-schroeder.de
Bedienungsanleitung Rollmat Plus GS - Friedrich-schroeder.de
- Keine Tags gefunden...

Sie wollen auch ein ePaper? Erhöhen Sie die Reichweite Ihrer Titel.
YUMPU macht aus Druck-PDFs automatisch weboptimierte ePaper, die Google liebt.
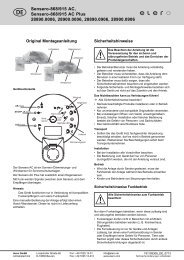
Notes for professional electriciansInstallationInstallationNotes for professional electriciansInstallation and basic settings:1. Switch off the power supply.2. Remove the band win<strong>de</strong>r from the band win<strong>de</strong>r case.3. Set the DIP switches to the <strong>de</strong>sired function (see pages 57to 61).4. Connect the Vestamatic <strong>Rollmat</strong> <strong>Plus</strong> G/S V3.1 according tothe wiring diagram (see page 70).Attention: Currently valid VDE standards must be observedwhen connecting the <strong>de</strong>vice, in particularDIN VDE 0100/0700 as well as the currentlyvalid regulations of your local power companyand acci<strong>de</strong>nt prevention regulations.5. Install the Vestamatic <strong>Rollmat</strong> <strong>Plus</strong> G/S V3.1 in the bandwin<strong>de</strong>r case.6. Set the selector switch to manual mo<strong>de</strong> (H), i.e. push it to theright all the way to the stop.7. Switch on the power supply and press the reset button.8. Check, if the direction of the motor rotation corresponds withthe direction buttons. If not, exchange terminal 6 with terminal7.Important: Parallel control of several roller shutter drive motorscan only be implemented by means of isolatingrelays or group control <strong>de</strong>vices.In case of power failure, the display contrast will fa<strong>de</strong>which does not indicate that the battery is empty.For extra large band win<strong>de</strong>r cases, werecommend to use our intermediate plate, article-no. 01201500.For the broken glass indication and the sun sensor function, thefollowing accessories are available:Broken glass indicator, cable length 1 m, article-no. 01200120Broken glass indicator, cable length 2 m, article-no. 01200220Broken glass indicator, cable length 3 m, article-no. 01200320Broken glass indicator, cable length 5 m, article-no. 01200520Broken glass indicator, cable length 8 m, article-no. 01200820Broken glass indicator, cable length 10 m, article-no. 01201020Broken glass indicator and distributor box, article-no. 01201120Sun sensor, cable length 1 m, article-no. 01130120Sun sensor, cable length 2 m, article-no. 01130220Sun sensor, cable length 3 m, article-no. 01130320Sun sensor, cable length 5 m, article-no. 01130520Sun sensor, cable length 8 m, article-no. 01130820Sun sensor, cable length 10 m, article-no. 01131020For control via two drives, we recommend our isolating relays:Isolating relays TR N2S, article-no. 01054220Isolating relays TR N2A, article-no. 01054120.- 67 - GG- 68 -