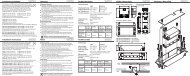
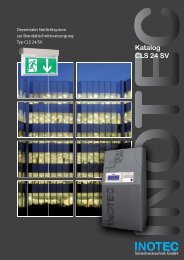
Zentralbatteriesystem CPS 220 / 20 / J-SV / J-SKÜ CPS 220 / 64 / J ...
Zentralbatteriesystem CPS 220 / 20 / J-SV / J-SKÜ CPS 220 / 64 / J ...
Zentralbatteriesystem CPS 220 / 20 / J-SV / J-SKÜ CPS 220 / 64 / J ...

Sie wollen auch ein ePaper? Erhöhen Sie die Reichweite Ihrer Titel.
YUMPU macht aus Druck-PDFs automatisch weboptimierte ePaper, die Google liebt.
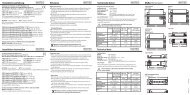
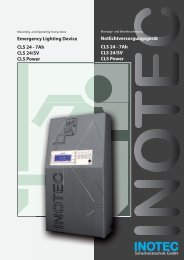
<strong>CPS</strong> <strong>2<strong>20</strong></strong>/<strong>64</strong>/<strong>SV</strong> Montage- und Betriebsanleitung <strong>CPS</strong> <strong>2<strong>20</strong></strong>/<strong>64</strong>/<strong>SV</strong> Mounting and Operating Instructions<br />
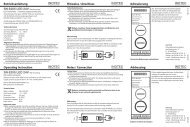
9.6.1. RTG-Adresse<br />
Für eine übergeordnete Überwachung wie INOMASTER<br />
oder <strong>CPS</strong>- MTB ist eine eindeutige RTG-Adresse anzugeben.<br />
Diese erfolgt durch �markieren des Feldes RTG-<br />
Adresse und kann mit �auswählen geändert werden.<br />
9.6.2. Datum und Uhrzeit<br />
102 102<br />
� Einstellung �markieren �auswählen<br />
� Zeitupdate �markieren �auswählen<br />
Das Steuerteil bietet neben der manuellen Einstellung<br />
des Datums und der Uhrzeit auch die Möglichkeit, diese<br />
automatisch von einem Netzwerkserver zu aktualisieren.<br />
Dazu muss das Steuerteil aber mit dem Netzwerk verbunden<br />
sein.<br />
9.6.2.1. Manuelles Zeitupdate<br />
Die Stunden, Minuten, Tage, Monate und Jahre können<br />
nach dem �markieren durch �auswählen eingestellt<br />
werden. Damit die Uhrzeit auch im Steuerteil übernommen<br />
wird, muss der Menüpunkt „Zup Manuell“ �markiert<br />
und �ausgewählt werden.<br />
Anschließend startet und initialisiert sich die Gerätesoftware<br />
neu. Das Gerät wechselt wieder in das Hauptmenü.<br />
9.6.2.2. Automatisches Zeitupdate<br />
Wenn ein Netzwerkserver mit NTP-Protokoll zur Verfügung<br />
steht und das Zentralbatteriegerät am Netzwerk<br />
angeschlossen ist, so kann das Datum und die Uhrzeit<br />
von diesem automatisch bezogen werden. Hierzu muss<br />
die IP-Adresse des Netzwerkservers mit einer USB-Tastatur<br />
eingegeben werden.<br />
Nach Eingabe der IP-Adresse Menü „ZUp Netz“<br />
�markieren und �auswählen. Anschließend startet und<br />
initialisiert sich die Gerätesoftware neu. Das Gerät wechselt<br />
wieder in das Hauptmenü.<br />
9.6.3. USB<br />
� Einstellung �markieren �auswählen<br />
� USB �markieren �auswählen<br />
9.6.1. RTG address<br />
For a higher-level monitoring such as INOMASTER or <strong>CPS</strong>-<br />
MTB, a device address and a unique RTG address must be<br />
stated. This is done by �marking the RTG address fi eld. It<br />
can now be changed with �select.<br />
9.6.2. Date and time<br />
� Setting �Mark �Select<br />
� Time update �Mark �Select<br />
In addition to manual setting of the date and time, the<br />
controller also offers the option of having these values<br />
updated automatically from a network server. This<br />
requires the controller to be connected to the network.<br />
9.6.2.1. Manual time update<br />
Hours, minutes, days, months and years can be �marked<br />
and then set with �Select. To ensure the time is also<br />
transferred to the controller, �mark and �select the<br />
menu option "TiUp manual".<br />
The device software will then re-start and re-initialise. The<br />
device then returns to the main menu.<br />
9.6.2.2. Automatic time update<br />
If a network server with NTP protocol is available and the<br />
central battery device is connected to the network, the<br />
date and time can be taken from this network automatically.<br />
This requires the IP address of the network server to<br />
be entered via a USB keyboard.<br />
Once the IP address has been entered, �mark and<br />
�select "TiUp net". The device software will then re-start<br />
and re-initialise. The device then returns to the main<br />
menu.<br />
9.6.3. USB<br />
� Setting �Mark �Select<br />
� USB �Mark �Select