Download issue 11 - Total Amiga Magazine
Download issue 11 - Total Amiga Magazine
Download issue 11 - Total Amiga Magazine

You also want an ePaper? Increase the reach of your titles
YUMPU automatically turns print PDFs into web optimized ePapers that Google loves.
Support<br />
droid it seems a little<br />
extravagant) and point two is<br />
that I already have so much<br />
hanging off the back of my<br />
tower, it would probably fall<br />
over more often than it would<br />
work. I also believe in the<br />
principle of using whatever<br />
does the job best (whilst taking<br />
account of SOME personal<br />
preferences obviously...).<br />
However, some halfway decent<br />
software and an <strong>Amiga</strong> ONE<br />
should change this setup<br />
radically but we will have to<br />
wait and see!<br />
So, here I am in my den,<br />
<strong>Amiga</strong> on, keyboard on and PC<br />
on. To do things the easy way, I<br />
could just load a MIDI file, click<br />
Record on Soundprobe, Play<br />
on the MIDI file and away we<br />
go. However, as I play<br />
keyboards myself, I make<br />
things a little more difficult by<br />
wanting to play along with the<br />
MIDI file and the way I do this<br />
is as follows:<br />
In my sequencer on the<br />
<strong>Amiga</strong>, I locate the track which<br />
contains the melody and delete<br />
all the notes! I could just delete<br />
the track itself but there is a<br />
reason for not doing this - I<br />
want to start playing a piano<br />
The End Result<br />
On the <strong>Total</strong> <strong>Amiga</strong> website<br />
are 2 audio (mp3) files and a<br />
MIDI file for you to download -<br />
a sort of “cover website” for<br />
the Mag ;-) and here is an<br />
explanation of them.<br />
The one entitled ‘Friends’ is<br />
an audio recording I made<br />
with my son, as I described<br />
earlier in this article, which<br />
uses a MIDI backing and a<br />
live recording of the audio. I<br />
picked the MIDI file up from<br />
somewhere on the ‘Net some<br />
years ago and it was quite an<br />
interesting experiment to<br />
produce this track - I am quite<br />
pleased with the result,<br />
although the original .wav file<br />
quality is superior to this, my<br />
first attempt at Mpegging. The<br />
original .wav file is around 34<br />
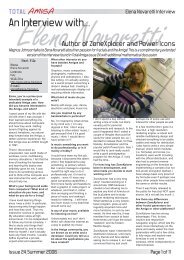
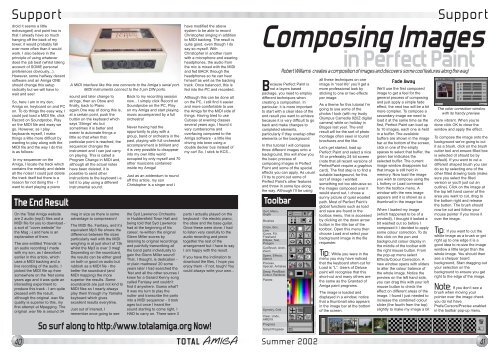
A MIDI interface like this one connects to the <strong>Amiga</strong>’s serial port.<br />
MIDI instruments connect to the 5 pin DIN ports.<br />
sound and later change to<br />
strings, then an Oboe and<br />
finally, back to Piano<br />
again.One way of doing this is,<br />
at a certain point, push the<br />
button on the keyboard which<br />
says ‘Strings’ etc but<br />
sometimes it is better and<br />
easier to automate things a<br />
little so that when that<br />
particular point is reached, the<br />
sequencer changes the<br />
instrument and I can just carry<br />
on playing. This is called a<br />
Program Change in MIDI and,<br />
although all the actual notes<br />
have been deleted, it is<br />
possible to send other<br />
instructions to the keyboard i.e.<br />
tell it to play using a different<br />
instrumental sound.<br />
meg in size so there is some<br />
advantage to compression!<br />
The MIDI file, Fantasy, and it’s<br />
equivalent Mp3 file shows the<br />
difference between file sizes<br />
particularly well with the MIDI<br />
weighing in at just short of 13k<br />
whilst the Mp3 is over 3 meg!<br />
Depending on the soundcard,<br />
the results can be either good<br />
on both or good on audio but<br />
rubbish as a MIDI file - the<br />
better the soundcard (and<br />
MIDI mapping) the more<br />
superior the results. Some<br />
soundcards are just not kind to<br />
MIDI files so I nearly always<br />
play them through my Yamaha<br />
keyboard which gives<br />
excellent results everytime.<br />
Just out of interest, I<br />
remember once going to see<br />
Back to my recording session<br />
now... I simply click Record on<br />
Soundprobe on the PC, Play<br />
on my <strong>Amiga</strong> and start playing<br />
music accompanied by a full<br />
orchestra!<br />
Never having had the<br />
opportunity to play with a<br />
group, band or orchestra in the<br />
past, playing with full orchestral<br />
accompaniment is brilliant and<br />
it is very possible to disappear<br />
into my own little world<br />
occupied by only myself and 70<br />
other musicians contained<br />
inside my <strong>Amiga</strong>!<br />
Just as an addendum to round<br />
off this article, my son<br />
Christopher is a singer and I<br />
the Syd Lawrence Orchestra<br />
in Huddersfield Town Hall and<br />
being told that Syd Lawrence<br />
had at the beginning of his<br />
career, re-written the original<br />
Glenn Miller scores by<br />
listening to original recordings<br />
and painfully transcribing all<br />
the band parts individually to<br />
gain the Glenn Miller sound!<br />
That, I thought, is dedication -<br />
or plain madness! 20 some<br />
years later I had searched the<br />
‘Net and all the other sources I<br />
knew for a Gerard Kenny song<br />
called Fantasy and couldn’t<br />
find it anywhere. Guess what?<br />
It was my turn to play the<br />
nutter and transcribe the parts<br />
into a MIDI sequencer - it took<br />
ages but once I heard the<br />
sound starting to come right, I<br />
HAD to carry on. There were 3<br />
have modified the above<br />
system to be able to record<br />
Christopher singing in addition<br />
to MIDI backing. The result is<br />
quite good, even though I do<br />
say so myself. With<br />
Christopher in another room<br />
with a microphone and wearing<br />
headphones, the audio from<br />
the mic is mixed with the MIDI<br />
and fed BACK through the<br />
headphones so he can hear<br />
himself as well as the backing<br />
track. Once balanced, this is<br />
fed into the PC and recorded.<br />
Although this can be done all<br />
on the PC, I still find it easier<br />
and more comfortable to use<br />
the <strong>Amiga</strong> for the MIDI side of<br />
things. Having tried to use<br />
Cubase at evening classes<br />
several years ago, I found it<br />
very cumbersome and<br />
overfacing compared to the<br />
<strong>Amiga</strong> software - a little like<br />
driving into town using a<br />
double decker bus instead of<br />
my car! So, I stick to KCS...<br />
parts I actually played on the<br />
keyboard - the electric piano,<br />
the oboe and the base guitar.<br />
Once these were done, I had<br />
to listen very carefully to the<br />
audio recording and piece<br />
together the rest of the<br />
arrangement but I have to say<br />
I am happy with the result.<br />
If you have the inclination to<br />
download the files, I hope you<br />
enjoy them - if not, tough! You<br />
could always write your own...<br />
So surf along to http://www.totalamiga.org Now!<br />
Because Perfect Paint is<br />
not a layers based<br />
package, you need to employ<br />
different techniques when<br />
creating a composition. In<br />
particular, it is more important<br />
to start with a clear idea of the<br />
end result you want to achieve<br />
because it is very difficult to go<br />
back and make changes to<br />
completed elements,<br />
particularly if they overlap other<br />
elements or the background.<br />
In this tutorial I will compose<br />
three different images onto a<br />
background, this will show you<br />
the basic process of<br />
composing images in Perfect<br />
Paint and some of the special<br />
effects you can apply. As usual<br />
I’ll try to point out some of<br />
Perfect Paint’s other features<br />
and throw in some tips along<br />
the way. Although I’ll be using<br />
all these techniques on one<br />
image in “real life” you’ll get a<br />
more professional look by<br />
sticking to one or two effects<br />
per image.<br />
As a theme for this tutorial I’m<br />
going to use some of the<br />
photos I took (with my trusty<br />
Olympus Camedia 920Z digital<br />
camera) while on holiday in<br />
Bruges last year. The end<br />
result will be the sort of photo<br />
montage often seen in tourist<br />
brochures and the like.<br />
Let’s get started, load up<br />
Perfect Paint and select a nice<br />
16 or preferably 24 bit screen<br />
(note that all recent versions of<br />
PerfectPaint require a graphics<br />
card). The first step is to find a<br />
suitable background, for this<br />
sort of image I wanted<br />
something not too obtrusive so<br />
the images composed over it<br />
would stand out. I chose a<br />
sunny picture of quiet wooded<br />
path. Most of Perfect Paint’s<br />
global functions such as load<br />
and save are found in the<br />
toolbox menu, this is accessed<br />
by clicking on the down arrow<br />
button in the title bar of the<br />
toolbox. Open this menu then<br />
choose Load and select your<br />
background image in the file<br />
requester.<br />
Tip: While you were in the<br />
menu you may have noticed<br />
that the keyboard short-cut for<br />
Load is “L”. Users of Deluxe<br />
paint will recognise that this<br />
short-cut and many others are<br />
the same as the Grandad of<br />
<strong>Amiga</strong> paint programs.<br />
The image is loaded and<br />
displayed in a window, notice<br />
that a thumbnail also appears<br />
in the image bar at the bottom<br />
of the screen.<br />
Support<br />
Composing Images<br />
in Perfect Paint<br />
Robert Williams creates a composition of images and discovers some cool features along the way!<br />
Toolbar<br />
40 TOTAL AMIGA Summer 2002<br />
41<br />
Quit, Menu,<br />
Depth<br />
Brushes<br />
Circle, Box,<br />
Line<br />
Curve, Fill,<br />
Freehand<br />
Ellipse, Text,<br />
Polygon<br />
Cut Brush, Anim,<br />
Zoom<br />
Spare, Effects,<br />
Stencil<br />
Process,<br />
Special, Antialias<br />
Swap, Pen/Back<br />
Colour, Rainbow<br />
Palette<br />
Symetry, Grid<br />
Clear, Undo,<br />
AREXX.<br />
Progress<br />
Script Progress<br />
Fade Away<br />
We’ll use the first composed<br />
image to get a feel for the<br />
general process of composing<br />
and just apply a simple fade<br />
effect, the next two will be a bit<br />
more complex. To compose a<br />
secondary image we need to<br />
load it at the same time as the<br />
first, Perfect Paint can load up<br />
to 10 images, each one is held<br />
in a buffer. The available<br />
buffers are shown in the image<br />
bar at the bottom of the screen,<br />
click in one of the empty<br />
spaces to select that buffer, the<br />
green bar indicates the<br />
selected buffer. The current<br />
image window disappears but<br />
that image is still held in<br />
memory. Now load the image<br />
you wish to compose using the<br />
L hotkey or Load command<br />
from the toolbox menu. A<br />
window with the new image<br />
appears and it is shown as a<br />
thumbnail in the image bar.<br />
When I loaded my image<br />
(which happened to be of a<br />
windmill), I thought it looked a<br />
bit washed out so before I<br />
composed it I decided to apply<br />
some colour correction. To do<br />
this click on the pen and<br />
background colour display in<br />
the middle of the toolbar with<br />
the right mouse button. From<br />
the pop-up menu select<br />
Effects/Colour Correction. A<br />
new window opens with sliders<br />
to alter the colour balance of<br />
the whole image. Notice the<br />
preview on the left hand side,<br />
you can drag this with your left<br />
mouse button to check the<br />
effect on different areas of the<br />
image. I found I just needed to<br />
increase the combined colour<br />
slider (the fourth from the top)<br />
slightly to make my image a bit<br />
The color correction window<br />
with its handy preview.<br />
more vibrant. When you’re<br />
done click OK to close the<br />
window and apply the effect.<br />
To compose the image onto the<br />
background we’re going to cut<br />
it as a brush, click on the brush<br />
cutter tool and ensure filled box<br />
is selected (it should be by<br />
default). If you want to cut a<br />
different shaped brush you can<br />
do so by selecting one of the<br />
other filled drawing tools (make<br />
sure you select the filled<br />
version or you’ll just cut an<br />
outline). Click on the image at<br />
the top left hand corner of the<br />
area you want to cut, drag to<br />
the bottom right and release<br />
the button. The brush should<br />
now be cut and follow your<br />
mouse pointer if you move it<br />
over the image.<br />
Tip: If you want to cut the<br />
whole image as a brush or get<br />
right up to one edge it is a<br />
good idea to re-size the image<br />
window a little larger than the<br />
whole image. You should then<br />
see a chequer board<br />
background, Start dragging out<br />
your selection on the<br />
background to ensure you get<br />
right to the edge of the image.<br />
Note: If you don’t see a<br />
brush when moving your<br />
pointer over the image check<br />
you do not have<br />
Prefs/Cursors/Precise enabled<br />
in the toolbar pop-up menu.