Dometic Manual Refrigerator Diagnostic Service Manual - WebRing
Dometic Manual Refrigerator Diagnostic Service Manual - WebRing
Dometic Manual Refrigerator Diagnostic Service Manual - WebRing

You also want an ePaper? Increase the reach of your titles
YUMPU automatically turns print PDFs into web optimized ePapers that Google loves.
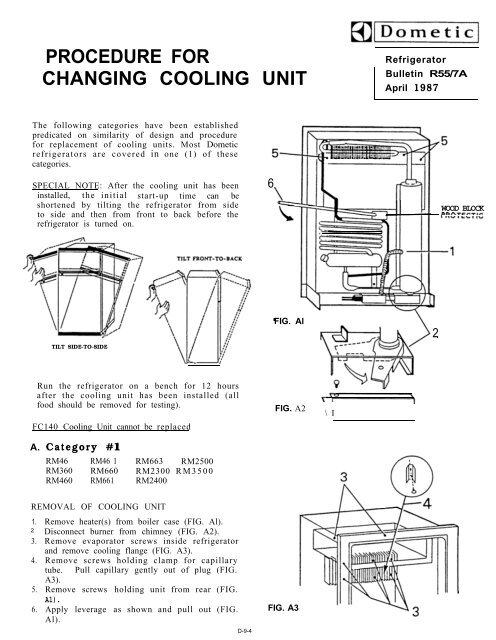
PROCEDURE FOR<br />
CHANGING COOLING UNIT<br />
The following categories have been established<br />
predicated on similarity of design and procedure<br />
for replacement of cooling units. Most <strong>Dometic</strong><br />
refrigerators are covered in one (1) of these<br />
categories.<br />
SPECIAL NOTE: After the cooling unit has been<br />
installed, the initial start-up time can be<br />
shortened by tilting the refrigerator from side<br />
to side and then from front to back before the<br />
refrigerator is turned on.<br />
TILT SIDE-TO-SIDE<br />
Run the refrigerator on a bench for 12 hours<br />
after the cooling unit has been installed (all<br />
food should be removed for testing).<br />
FC140 Cooling Unit cannot be replaced<br />
A. Category #l<br />
RM46 RM46 1 RM663 RM2500<br />
RM360 RM660 RM2300 RM3500<br />
RM460 RM661 RM2400<br />
REMOVAL OF COOLING UNIT<br />
1.<br />
2.<br />
3.<br />
4.<br />
5.<br />
6.<br />
Remove heater(s) from boiler case (FIG. Al).<br />
Disconnect burner from chimney (FIG. A2).<br />
Remove evaporator screws inside refrigerator<br />
and remove cooling flange (FIG. A3).<br />
Remove screws holding clamp for capillary<br />
tube. Pull capillary gently out of plug (FIG.<br />
A3).<br />
Remove screws holding unit from rear (FIG.<br />
Al).<br />
Apply leverage as shown and pull out (FIG.<br />
Al).<br />
D-9-4<br />
6<br />
\,<br />
FIG. Al<br />
FIG. A2<br />
FIG. A3<br />
\I<br />
<strong>Refrigerator</strong><br />
Bulletin R55/7A<br />
April 1987<br />
2<br />
WOOD BLOCK<br />
DPnTCPtth