Dometic Manual Refrigerator Diagnostic Service Manual - WebRing
Dometic Manual Refrigerator Diagnostic Service Manual - WebRing
Dometic Manual Refrigerator Diagnostic Service Manual - WebRing

Create successful ePaper yourself
Turn your PDF publications into a flip-book with our unique Google optimized e-Paper software.
Before You Change<br />
That Cooling Unit<br />
PART I. PROPER DIAGNOSIS<br />
Cooling units are sometimes diagnosed as being<br />
defective when the actual problem is something<br />
else. Cooling units are expensive to replace, so<br />
it is important to make the correct diagnosis. By<br />
using the proper test procedures, you can eliminate<br />
all other possibilities before condemning the<br />
cooling unit.<br />
Any time the cooling unit is a possible suspect,<br />
use the following step-by-step procedure before<br />
replacing it.<br />
A.<br />
1.<br />
2.<br />
3.<br />
4.<br />
PRELIMINARY CHECKS<br />
Check for an ammonia smell around the<br />
cooling unit and inside the refrigerator.<br />
This could indicate a possible refrigerant<br />
leak. Check for any deposits of yellow<br />
powder on the tubing which will sometimes<br />
form around the area of a leak. NOTE: A<br />
yellow deposit in the area of the fill valve<br />
could be due to splashing of refrigerant<br />
during manufacture, and would not indicate<br />
a leak.<br />
Determine if the refrigerator works on one<br />
heat source but not another by testing it in<br />
the alternate modes. Also, ask the customer<br />
if he gets better cooling results from one<br />
energy source than another. If this is true,<br />
it indicates the problem is NOT in the cooling<br />
unit.<br />
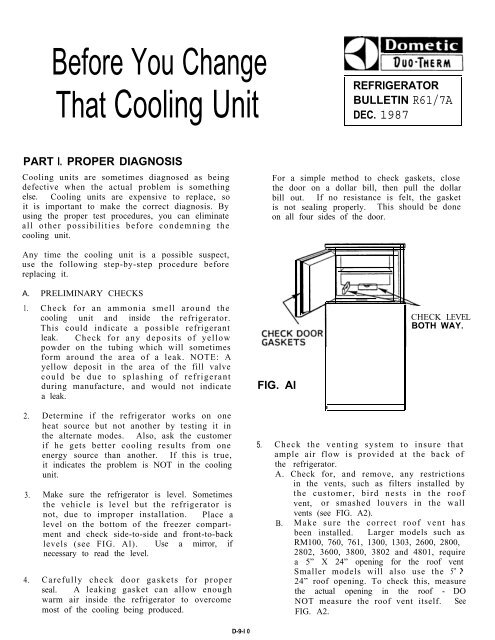
Make sure the refrigerator is level. Sometimes<br />
the vehicle is level but the refrigerator is<br />
not, due to improper installation. Place a<br />
level on the bottom of the freezer compartment<br />
and check side-to-side and front-to-back<br />
levels (see FIG. Al). Use a mirror, if<br />
necessary to read the level.<br />
Carefully check door gaskets for proper<br />
seal. A leaking gasket can allow enough<br />
warm air inside the refrigerator to overcome<br />
most of the cooling being produced.<br />
D-9-l 0<br />
REFRlGERATOR<br />
BULLETIN R61/7A<br />
DEC. 1987<br />
For a simple method to check gaskets, close<br />
the door on a dollar bill, then pull the dollar<br />
bill out. If no resistance is felt, the gasket<br />
is not sealing properly. This should be done<br />
on all four sides of the door.<br />
FIG. Al<br />
\<br />
CHECK LEVEL<br />
BOTH WAY.<br />
5. Check the venting system to insure that<br />
ample air flow is provided at the back of<br />
the refrigerator.<br />
A. Check for, and remove, any restrictions<br />
in the vents, such as filters installed by<br />
the customer, bird nests in the roof<br />
vent, or smashed louvers in the wall<br />
vents (see FIG. A2).<br />
B. Make sure the correct roof vent has<br />
been installed. Larger models such as<br />
RM100, 760, 761, 1300, 1303, 2600, 2800,<br />
2802, 3600, 3800, 3802 and 4801, require<br />
a 5” X 24” opening for the roof vent<br />
Smaller models will also use the 5” J<br />
24” roof opening. To check this, measure<br />
the actual opening in the roof - DO<br />
NOT measure the roof vent itself. See<br />
FIG. A2.