Dometic Manual Refrigerator Diagnostic Service Manual - WebRing
Dometic Manual Refrigerator Diagnostic Service Manual - WebRing
Dometic Manual Refrigerator Diagnostic Service Manual - WebRing

You also want an ePaper? Increase the reach of your titles
YUMPU automatically turns print PDFs into web optimized ePapers that Google loves.
3<br />
(Bulletin R55/7A continued)<br />
FIG. El<br />
FIG. E2<br />
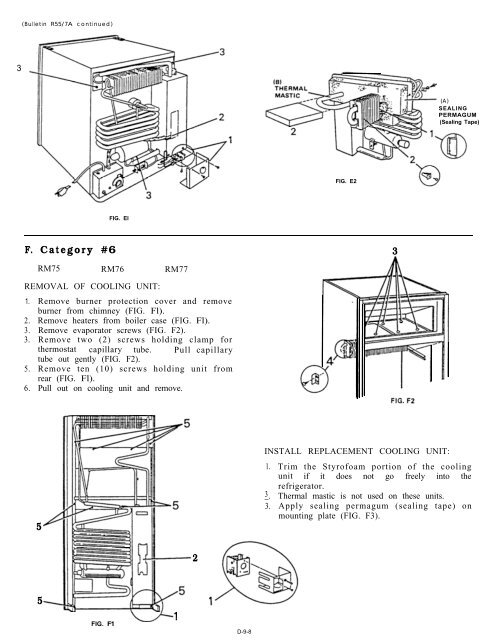
F. Category #6 3<br />
RM75 RM76 RM77<br />
REMOVAL OF COOLING UNIT:<br />
1.<br />
2.<br />
3.<br />
3.<br />
5.<br />
Remove burner protection cover and remove<br />
burner from chimney (FIG. Fl).<br />
Remove heaters from boiler case (FIG. Fl).<br />
Remove evaporator screws (FIG. F2).<br />
Remove two (2) screws holding clamp for<br />
thermostat capillary tube. Pull capillary<br />
tube out gently (FIG. F2).<br />
Remove ten (10) screws holding unit from<br />
rear (FIG. Fl).<br />
6. Pull out on cooling unit and remove.<br />
5<br />
5<br />
FIG. F1<br />
-1<br />
2<br />
D-9-8<br />
INSTALL REPLACEMENT COOLING UNIT:<br />
1.<br />
3_.<br />
3.<br />
(A)<br />
SEALING<br />
PERMAGUM<br />
(Sealing Tape)<br />
Trim the Styrofoam portion of the cooling<br />
unit if it does not go freely into the<br />
refrigerator.<br />
Thermal mastic is not used on these units.<br />
Apply sealing permagum (sealing tape) on<br />
mounting plate (FIG. F3).