Dometic Manual Refrigerator Diagnostic Service Manual - WebRing
Dometic Manual Refrigerator Diagnostic Service Manual - WebRing
Dometic Manual Refrigerator Diagnostic Service Manual - WebRing

Create successful ePaper yourself
Turn your PDF publications into a flip-book with our unique Google optimized e-Paper software.
[Bulletin R61/7A continued)<br />
B.<br />
1.<br />
3<br />
3.<br />
4.<br />
PERFORMANCE TEST<br />
First perform all the preliminary checks<br />
described previously.<br />
Remove all food from the refrigerator and<br />
place all controls in the OFF position.<br />
Place an accurate thermometer in an ice<br />
cube tray, half filled with water, and place<br />
the tray in the center of the lower food<br />
storage compartment. NOTE: If a remotereading<br />
thermometer is used (allowing<br />
temperature readings without opening the<br />
door) the tray of water is not required.<br />
Make sure the AC heating element is the<br />
correct wattage for the model being tested,<br />
and that the resistance reading is correct.<br />
(See “Checking Resistance of a Heating<br />
Element” below.)<br />
Connect 120 volt AC power directly to<br />
the heating element leads (make sure the<br />
leads are not connected to the refrigerator<br />
circuit), then check the voltage at the<br />
element with a volt meter. Reading must<br />
show at least 115 volts.<br />
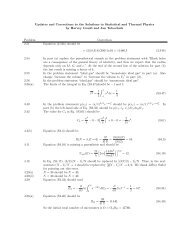
CHECKING RESISTANCE OF A HEATING ELEMENT<br />
A simple test to check a heating element is to<br />
measure the resistance through the element<br />
with an ohmmeter. The correct resistance, in<br />
ohms, can be calculated if the wattage and<br />
voltage ratings are known. (These ratings are<br />
stamped on all <strong>Dometic</strong> heating elements.)<br />
Use this Formula:<br />
Volts + (Watts + Volts) = Ohms<br />
Example:<br />
Heating element rated 135 Watts at 110 Volts.<br />
110 f (13.5 f 110) or,<br />
110 + 1.23 = 89.4 ohms<br />
The ohm reading should be within 10% of this<br />
figure, or between 80.46 and 98.34 ohms. Use<br />
the lowest setting on the ohmmeter which will<br />
give an accurate reading.<br />
When testing a 12 volt heating element, a<br />
very accurate ohmmeter must be used because<br />
of the very low readings that will be found.<br />
For example, a 200 watt element will have a<br />
reading of .72 ohms (less than 1 ohm).<br />
D-9-12<br />
5. After two hours of operation, check<br />
temperature on the back of the cooling<br />
with your hand, at the locations shown.<br />
FIG. Bl<br />
(TEMPERATURE<br />
TEST AREA)<br />
CONDENSER<br />
i3OBR<br />
ENCLOSURE<br />
the<br />
unit<br />
(TEMPERATURE<br />
TEST AREA)<br />
Under normal operation the temperature at<br />
the absorber coils (A) and the boiler (B)<br />
should be approximately the same. If the<br />
temperature at the absorber coils (A) is<br />
much hotter it indicates loss of refrigerant<br />
and the cooling unit must be replaced. If<br />
the temperature at the boiler (B) is very hot<br />
and the absorber coils (A) are cool it indicates<br />
that the refrigerant is not circulating properly.<br />
This could indicate:<br />
A. Liquid trapped in the evaporator sections,<br />
caused by out-of-level operation for a<br />
period of time. Resetting the refrigerator<br />
to a level position will not necessarily<br />
correct the problem as liquid can remain<br />
trapped even after level is corrected.<br />
Shut off the heat source and let the<br />
system cool down, then re-start it and<br />
observe the temperatures at A and B<br />
again after several hours. If the same<br />
condition exists it could indicate:<br />
B. A permanent blockage within the boiler<br />
pump tube, caused by too much heat<br />
applied to the burner (oversized orifice<br />
or heating element) or prolonged operation<br />
of the unit when out-of-level or with<br />
restricted ventilation. This type of<br />
blockage consists of hard deposits inside<br />
the boiler pump tube. This condition is<br />
not repairable and the cooling unit must<br />
be replaced.