Comfort 830 - Marantec
Comfort 830 - Marantec
Comfort 830 - Marantec

You also want an ePaper? Increase the reach of your titles
YUMPU automatically turns print PDFs into web optimized ePapers that Google loves.
6. Mounting<br />
6.1 Mounting of the floor console<br />
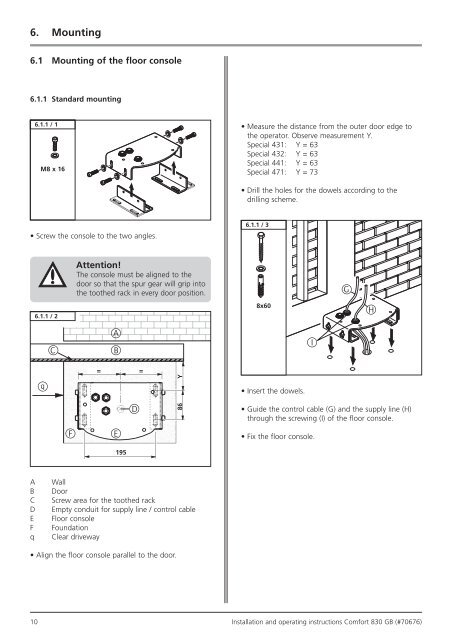
6.1.1 Standard mounting<br />
6.1.1 / 1<br />
M8 x 16<br />
• Screw the console to the two angles.<br />
6.1.1 / 2<br />
q<br />
C<br />
F<br />
Attention!<br />
The console must be aligned to the<br />
door so that the spur gear will grip into<br />
the toothed rack in every door position.<br />
A<br />
B<br />
= =<br />
E<br />
195<br />
D<br />
86 Y<br />
A Wall<br />
B Door<br />
C Screw area for the toothed rack<br />
D Empty conduit for supply line / control cable<br />
E Floor console<br />
F Foundation<br />
q Clear driveway<br />
• Align the floor console parallel to the door.<br />
• Measure the distance from the outer door edge to<br />
the operator. Observe measurement Y.<br />
Special 431: Y = 63<br />
Special 432: Y = 63<br />
Special 441: Y = 63<br />
Special 471: Y = 73<br />
• Drill the holes for the dowels according to the<br />
drilling scheme.<br />
6.1.1 / 3<br />
• Insert the dowels.<br />
• Guide the control cable (G) and the supply line (H)<br />
through the screwing (I) of the floor console.<br />
• Fix the floor console.<br />
10 Installation and operating instructions <strong>Comfort</strong> <strong>830</strong> GB (#70676)<br />
8x60<br />
I<br />
G<br />
H