Industrial Power Transmission Products - Bando USA
Industrial Power Transmission Products - Bando USA
Industrial Power Transmission Products - Bando USA

Create successful ePaper yourself
Turn your PDF publications into a flip-book with our unique Google optimized e-Paper software.
V-Belt Installation<br />
Proper installation techniques will assure that you get full service life and minimum downtime from your belt<br />
drives.<br />
1. Turn machine OFF and lock out power source. 5. Install new belts.<br />
2. Remove belt guard, loosen motor mounts, and short-<br />
Loosen the drive take up and place the new belts on<br />
en center distance between sheaves. Remove old<br />
the sheaves. Press the belts with your hand to posi-<br />
belts.<br />
tion the slack of each belt on the same side of the<br />
drive. If the slack is on different sides, start up loads<br />
can break belt tensile cords.<br />
Do not pry or force belts on the sheave. This can<br />
break the load carrying tensile “muscle” of the belt,<br />
and the belts will break or turn over shortly after<br />
installation.<br />
Take up slack until the belts fit snugly.<br />
3. Inspect, repair, or replace drive components.<br />
Clean oil, grease, and debris from sheaves; remove<br />
rust with a wire brush.<br />
Inspect and replace damaged sheaves.<br />
Get your money’s worth from a new set of belts by<br />
checking and replacing worn or damaged sheaves. In<br />
the long run, replacement sheave cost will more than<br />
be recovered in increased belt life, reduced downtime,<br />
and lower maintenance expense. Check the following:<br />
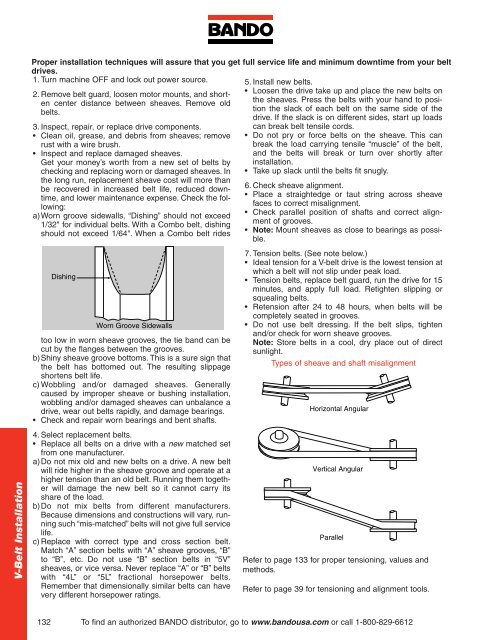
a)Worn groove sidewalls, “Dishing” should not exceed<br />
1/32" for individual belts. With a Combo belt, dishing<br />
should not exceed 1/64". When a Combo belt rides<br />
too low in worn sheave grooves, the tie band can be<br />
cut by the flanges between the grooves.<br />
b)Shiny sheave groove bottoms. This is a sure sign that<br />
the belt has bottomed out. The resulting slippage<br />
shortens belt life.<br />
c) Wobbling and/or damaged sheaves. Generally<br />
caused by improper sheave or bushing installation,<br />
wobbling and/or damaged sheaves can unbalance a<br />
drive, wear out belts rapidly, and damage bearings.<br />
Check and repair worn bearings and bent shafts.<br />
4. Select replacement belts.<br />
Replace all belts on a drive with a new matched set<br />
from one manufacturer.<br />
a)Do not mix old and new belts on a drive. A new belt<br />
will ride higher in the sheave groove and operate at a<br />
higher tension than an old belt. Running them together<br />
will damage the new belt so it cannot carry its<br />
share of the load.<br />
b)Do not mix belts from different manufacturers.<br />
Because dimensions and constructions will vary, running<br />
such “mis-matched” belts will not give full service<br />
life.<br />
c) Replace with correct type and cross section belt.<br />
Match “A” section belts with “A” sheave grooves, “B”<br />
to “B”, etc. Do not use “B” section belts in “5V”<br />
sheaves, or vice versa. Never replace “A” or “B” belts<br />
with “4L” or “5L” fractional horsepower belts.<br />
Remember that dimensionally similar belts can have<br />
very different horsepower ratings.<br />
132<br />
Dishing<br />
Worn Groove Sidewalls<br />
6. Check sheave alignment.<br />
Place a straightedge or taut string across sheave<br />
faces to correct misalignment.<br />
Check parallel position of shafts and correct alignment<br />
of grooves.<br />
Note: Mount sheaves as close to bearings as possible.<br />
7. Tension belts. (See note below.)<br />
Ideal tension for a V-belt drive is the lowest tension at<br />
which a belt will not slip under peak load.<br />
Tension belts, replace belt guard, run the drive for 15<br />
minutes, and apply full load. Retighten slipping or<br />
squealing belts.<br />
Retension after 24 to 48 hours, when belts will be<br />
completely seated in grooves.<br />
Do not use belt dressing. If the belt slips, tighten<br />
and/or check for worn sheave grooves.<br />
Note: Store belts in a cool, dry place out of direct<br />
sunlight.<br />
Types of sheave and shaft misalignment<br />
Horizontal Angular<br />
Vertical Angular<br />
Parallel<br />
Refer to page 133 for proper tensioning, values and<br />
methods.<br />
Refer to page 39 for tensioning and alignment tools.<br />
To find an authorized BANDO distributor, go to www.bandousa.com or call 1-800-829-6612