


Create successful ePaper yourself
Turn your PDF publications into a flip-book with our unique Google optimized e-Paper software.
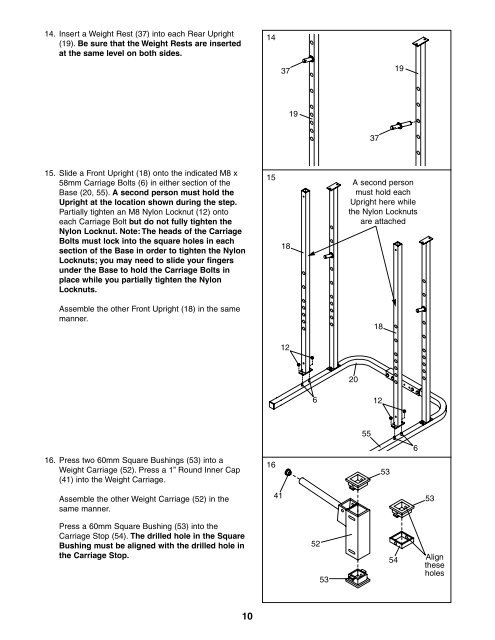
14. Insert a Weight Rest (37) into each Rear Upright<br />
(19). Be sure that the Weight Rests are inserted<br />
at the same level on both sides.<br />
15. Slide a Front Upright (18) onto the indicated M8 x<br />
58mm Carriage Bolts (6) in either section of the<br />
Base (20, 55). A second person must hold the<br />
Upright at the location shown during the step.<br />
Partially tighten an M8 Nylon Locknut (12) onto<br />
each Carriage Bolt but do not fully tighten the<br />
Nylon Locknut. Note: The heads of the Carriage<br />
Bolts must lock into the square holes in each<br />
section of the Base in order to tighten the Nylon<br />
Locknuts; you may need to slide your fingers<br />
under the Base to hold the Carriage Bolts in<br />
place while you partially tighten the Nylon<br />
Locknuts.<br />
Assemble the other Front Upright (18) in the same<br />
manner.<br />
16. Press two 60mm Square Bushings (53) into a<br />
Weight Carriage (52). Press a 1” Round Inner Cap<br />
(41) into the Weight Carriage.<br />
Assemble the other Weight Carriage (52) in the<br />
same manner.<br />
Press a 60mm Square Bushing (53) into the<br />
Carriage Stop (54). The drilled hole in the Square<br />
Bushing must be aligned with the drilled hole in<br />
the Carriage Stop.<br />
10<br />
14<br />
15<br />
16<br />
41<br />
37<br />
18<br />
12<br />
19<br />
6<br />
52<br />
53<br />
20<br />
55<br />
37<br />
18<br />
12<br />
19<br />
A second person<br />
must hold each<br />
Upright here while<br />
the Nylon Locknuts<br />
are attached<br />
53<br />
54<br />
6<br />
53<br />
Align<br />
these<br />
holes


