Download Manual - Janome
Download Manual - Janome
Download Manual - Janome
Create successful ePaper yourself
Turn your PDF publications into a flip-book with our unique Google optimized e-Paper software.
z<br />
q w e<br />
(1)<br />
q<br />
w<br />
r<br />
e<br />
(2)<br />
q<br />
x c<br />
(1) (2)<br />
t<br />
r<br />
w<br />
31<br />
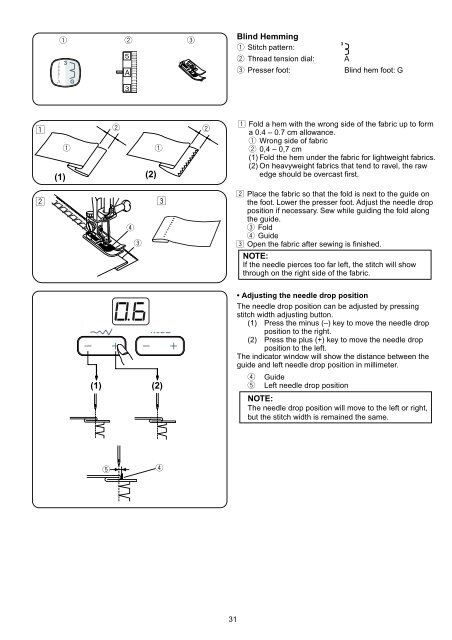
Blind Hemming<br />
q Stitch pattern:<br />
w Thread tension dial: A<br />
e Presser foot: Blind hem foot: G<br />
z Fold a hem with the wrong side of the fabric up to form<br />
a 0.4 – 0.7 cm allowance.<br />
q Wrong side of fabric<br />
w 0,4 – 0,7 cm<br />
(1) Fold the hem under the fabric for lightweight fabrics.<br />
(2) On heavyweight fabrics that tend to ravel, the raw<br />
edge should be overcast first.<br />
x Place the fabric so that the fold is next to the guide on<br />
the foot. Lower the presser foot. Adjust the needle drop<br />
position if necessary. Sew while guiding the fold along<br />
the guide.<br />
e Fold<br />
r Guide<br />
c Open the fabric after sewing is finished.<br />
NOTE:<br />
If the needle pierces too far left, the stitch will show<br />
through on the right side of the fabric.<br />
• Adjusting the needle drop position<br />
The needle drop position can be adjusted by pressing<br />
stitch width adjusting button.<br />
(1) Press the minus (–) key to move the needle drop<br />
position to the right.<br />
(2) Press the plus (+) key to move the needle drop<br />
position to the left.<br />
The indicator window will show the distance between the<br />
guide and left needle drop position in millimeter.<br />
r Guide<br />
t Left needle drop position<br />
NOTE:<br />
The needle drop position will move to the left or right,<br />
but the stitch width is remained the same.


