VFD(32,36,42 - White Mountain Hearth
VFD(32,36,42 - White Mountain Hearth
VFD(32,36,42 - White Mountain Hearth

You also want an ePaper? Increase the reach of your titles
YUMPU automatically turns print PDFs into web optimized ePapers that Google loves.
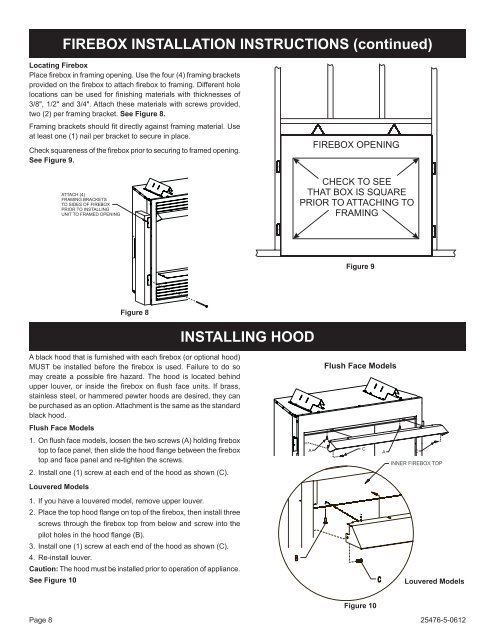
Locating Firebox<br />
Place firebox in framing opening. Use the four (4) framing brackets<br />
provided on the firebox to attach firebox to framing. Different hole<br />
locations can be used for finishing materials with thicknesses of<br />
3/8", 1/2" and 3/4". attach these materials with screws provided,<br />
two (2) per framing bracket. See Figure 8.<br />
Framing brackets should fit directly against framing material. Use<br />
at least one (1) nail per bracket to secure in place.<br />
Check squareness of the firebox prior to securing to framed opening.<br />
See Figure 9.<br />
Page 8<br />
Figure 8<br />
A black hood that is furnished with each firebox (or optional hood)<br />
MUST be installed before the firebox is used. Failure to do so<br />
may create a possible fire hazard. The hood is located behind<br />
upper louver, or inside the firebox on flush face units. If brass,<br />
stainless steel, or hammered pewter hoods are desired, they can<br />
be purchased as an option. attachment is the same as the standard<br />
black hood.<br />
Flush Face Models<br />
1. On flush face models, loosen the two screws (A) holding firebox<br />
top to face panel, then slide the hood flange between the firebox<br />
top and face panel and re-tighten the screws.<br />
2. install one (1) screw at each end of the hood as shown (c).<br />
Louvered Models<br />
FIREBOX INSTALLATION INSTRUCTIONS (continued)<br />
ATTACH (4)<br />
FRAMING BRACKETS<br />
TO SIDES OF FIREBOX<br />
PRIOR TO INSTALLING<br />
UNIT TO FRAMED OPENING<br />
1. if you have a louvered model, remove upper louver.<br />
2. Place the top hood flange on top of the firebox, then install three<br />
screws through the firebox top from below and screw into the<br />
pilot holes in the hood flange (B).<br />
3. install one (1) screw at each end of the hood as shown (c).<br />
4. Re-install louver.<br />
Caution: the hood must be installed prior to operation of appliance.<br />
See Figure 10<br />
INSTALLING hOOD<br />
B<br />
FIREBOX OPENING<br />
CHECK TO SEE<br />
THAT BOX IS SQUARE<br />
PRIOR TO ATTACHING TO<br />
FRAMING<br />
A<br />
Figure 9<br />
Flush Face Models<br />
C<br />
Figure 10<br />
C<br />
A<br />
C<br />
INNER FIREBOX TOP<br />
Louvered Models<br />
25476-5-0612