User Guide Heat • Vent • Light - IXL
User Guide Heat • Vent • Light - IXL
User Guide Heat • Vent • Light - IXL

Create successful ePaper yourself
Turn your PDF publications into a flip-book with our unique Google optimized e-Paper software.
®<br />
Tastic<br />
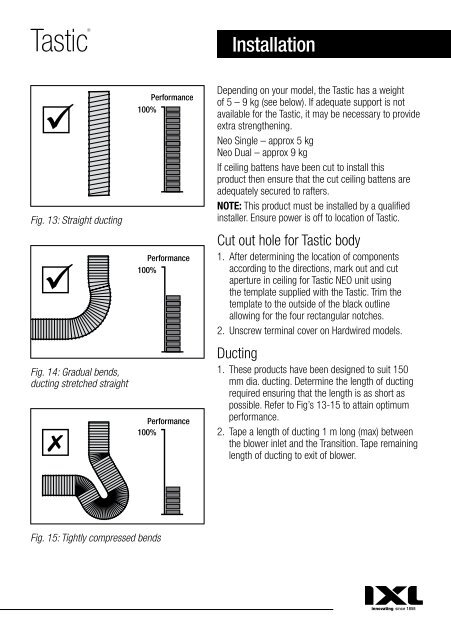
Fig. 13: Straight ducting<br />
Fig. 14: Gradual bends,<br />
ducting stretched straight<br />
Fig. 15: Tightly compressed bends<br />
Performance<br />
100%<br />
Performance<br />
100%<br />
Performance<br />
100%<br />
Installation<br />
Depending on your model, the Tastic has a weight<br />
of 5 – 9 kg (see below). If adequate support is not<br />
available for the Tastic, it may be necessary to provide<br />
extra strengthening.<br />
Neo Single – approx 5 kg<br />
Neo Dual – approx 9 kg<br />
If ceiling battens have been cut to install this<br />
product then ensure that the cut ceiling battens are<br />
adequately secured to rafters.<br />
NOTE: This product must be installed by a qualified<br />
installer. Ensure power is off to location of Tastic.<br />
Cut out hole for Tastic body<br />
1. After determining the location of components<br />
according to the directions, mark out and cut<br />
aperture in ceiling for Tastic NEO unit using<br />
the template supplied with the Tastic. Trim the<br />
template to the outside of the black outline<br />
allowing for the four rectangular notches.<br />
2. Unscrew terminal cover on Hardwired models.<br />
Ducting<br />
1. These products have been designed to suit 150<br />
mm dia. ducting. Determine the length of ducting<br />
required ensuring that the length is as short as<br />
possible. Refer to Fig’s 13-15 to attain optimum<br />
performance.<br />
2. Tape a length of ducting 1 m long (max) between<br />
the blower inlet and the Transition. Tape remaining<br />
length of ducting to exit of blower.