User Guide Heat • Vent • Light - IXL
User Guide Heat • Vent • Light - IXL
User Guide Heat • Vent • Light - IXL

Create successful ePaper yourself
Turn your PDF publications into a flip-book with our unique Google optimized e-Paper software.
®<br />
Tastic<br />
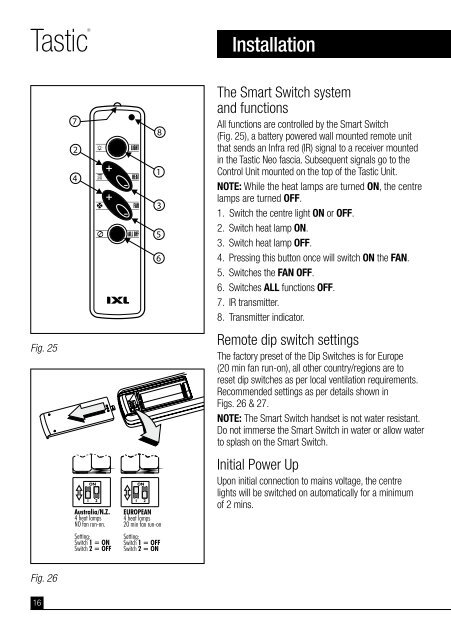
Fig. 25<br />
Fig. 26<br />
16<br />
7<br />
2<br />
4<br />
ON<br />
1 2<br />
8<br />
1<br />
3<br />
5<br />
6<br />
Installation<br />
The Smart Switch system<br />
and functions<br />
All functions are controlled by the Smart Switch<br />
(Fig. 25), a battery powered wall mounted remote unit<br />
that sends an Infra red (IR) signal to a receiver mounted<br />
in the Tastic Neo fascia. Subsequent signals go to the<br />
Control Unit mounted on the top of the Tastic Unit.<br />
NOTE: While the heat lamps are turned ON, the centre<br />
lamps are turned OFF.<br />
1. Switch the centre light ON or OFF.<br />
2. Switch heat lamp ON.<br />
3. Switch heat lamp OFF.<br />
4. Pressing this button once will switch ON the FAN.<br />
5. Switches the FAN OFF.<br />
6. Switches ALL functions OFF.<br />
7. IR transmitter.<br />
8. Transmitter indicator.<br />
Remote dip switch settings<br />
The factory preset of the Dip Switches is for Europe<br />
(20 min fan run-on), all other country/regions are to<br />
reset dip switches as per local ventilation requirements.<br />
Recommended settings as per details shown in<br />
Figs. 26 & 27.<br />
NOTE: The Smart Switch handset is not water resistant.<br />
Do not immerse the Smart Switch in water or allow water<br />
to splash on the Smart Switch.<br />
Initial Power Up<br />
Upon initial connection to mains voltage, the centre<br />
lights will be switched on automatically for a minimum<br />
of 2 mins.