User Guide Heat • Vent • Light - IXL
User Guide Heat • Vent • Light - IXL
User Guide Heat • Vent • Light - IXL

Create successful ePaper yourself
Turn your PDF publications into a flip-book with our unique Google optimized e-Paper software.
®<br />
Tastic<br />
Fig. 16<br />
Fig. 17<br />
Fig. 18<br />
14<br />
Blower<br />
power<br />
lead<br />
Interconnecting power cord<br />
Fig. 19<br />
Power<br />
cable<br />
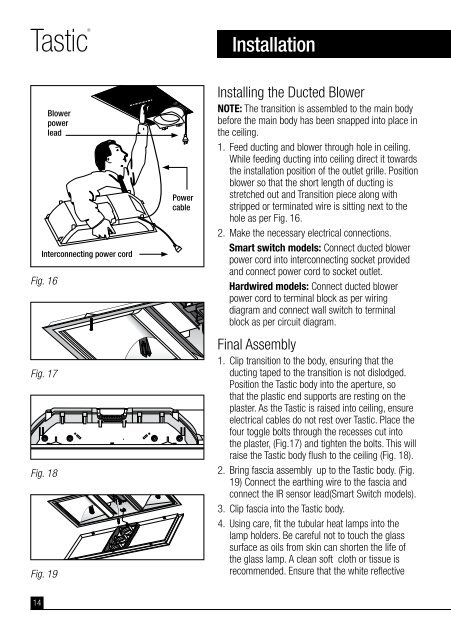
Installation<br />
Installing the Ducted Blower<br />
NOTE: The transition is assembled to the main body<br />
before the main body has been snapped into place in<br />
the ceiling.<br />
1. Feed ducting and blower through hole in ceiling.<br />
While feeding ducting into ceiling direct it towards<br />
the installation position of the outlet grille. Position<br />
blower so that the short length of ducting is<br />
stretched out and Transition piece along with<br />
stripped or terminated wire is sitting next to the<br />
hole as per Fig. 16.<br />
2. Make the necessary electrical connections.<br />
Smart switch models: Connect ducted blower<br />
power cord into interconnecting socket provided<br />
and connect power cord to socket outlet.<br />
Hardwired models: Connect ducted blower<br />
power cord to terminal block as per wiring<br />
diagram and connect wall switch to terminal<br />
block as per circuit diagram.<br />
Final Assembly<br />
1. Clip transition to the body, ensuring that the<br />
ducting taped to the transition is not dislodged.<br />
Position the Tastic body into the aperture, so<br />
that the plastic end supports are resting on the<br />
plaster. As the Tastic is raised into ceiling, ensure<br />
electrical cables do not rest over Tastic. Place the<br />
four toggle bolts through the recesses cut into<br />
the plaster, (Fig.17) and tighten the bolts. This will<br />
raise the Tastic body flush to the ceiling (Fig. 18).<br />
2. Bring fascia assembly up to the Tastic body. (Fig.<br />
19) Connect the earthing wire to the fascia and<br />
connect the IR sensor lead(Smart Switch models).<br />
3. Clip fascia into the Tastic body.<br />
4. Using care, fit the tubular heat lamps into the<br />
lamp holders. Be careful not to touch the glass<br />
surface as oils from skin can shorten the life of<br />
the glass lamp. A clean soft cloth or tissue is<br />
recommended. Ensure that the white reflective