Direct Vent Tankless Water Heater - Rinnai
Direct Vent Tankless Water Heater - Rinnai
Direct Vent Tankless Water Heater - Rinnai

You also want an ePaper? Increase the reach of your titles
YUMPU automatically turns print PDFs into web optimized ePapers that Google loves.
<strong>Water</strong> Piping<br />
Isolation Valves and Pressure Relief Valve (RL75i and RL94i)<br />
The isolation valves provide the ability to isolate the<br />
water heater from the structure’s plumbing and allow<br />
quick access to flush the heat exchanger. Check with<br />
local codes to determine if a pressure and temperature<br />
relief valve is required. The included valves meet<br />
American National Standard (ANSI Z21.10.3) /<br />
Canadian Standard (CSA 4.3) and are ANSI/NSF 61<br />
approved for potable water.<br />
Isolation Valve (Cold) 107000081<br />
Isolation Valve (Hot) 107000083<br />
Pressure Relief Valve (PRV) 107000085<br />
Isolation Valves Installation Instructions:<br />
1. Wrap the ends of the threaded water inlet & outlet<br />
on the tankless water heater,as well as the<br />
threaded end of the approved pressure relief valve<br />
with a minimum of 5 wraps of Teflon® tape.<br />
2. Screw the pressure relief valve into the 3/4”<br />
threads opposite the wing handle on the HOT<br />
water service valve. (RED drain handle) (see<br />
Pressure Relief Valve Section for proper<br />
installation requirements)<br />
3. Loosen the 3/4” union nut on the HOT water valve<br />
and connect to the HOT water outlet on the<br />
tankless water heater. If nut is removed, ensure<br />
that you realign the tailpiece accurately to the<br />
valve and that the black washer is positioned such<br />
that the raised metal edge of the valve is inside<br />
the washer.<br />
4. Align the direction of the HOT water drain to the<br />
desired position.<br />
5. Tighten the union assembly to the HOT water<br />
valve using approximately 15 foot lbs of torque.<br />
6. Repeat steps 3-5 for the COLD water valve.<br />
(BLUE drain handle) for connection to the COLD<br />
water inlet on the tankless water heater.<br />
7. Connect the INLET on the COLD water valve to<br />
the MAIN SOURCE of the water supply.<br />
8. Connect the OUTLET on the HOT water valve to<br />
the HOT WATER plumbing system.<br />
9. Ensure that both drain valve lever handles are in<br />
the closed position (perpendicular to the drain<br />
portion of the body).<br />
20 VB Series Indoor LS Manual<br />
B<br />
A<br />
C<br />
D<br />
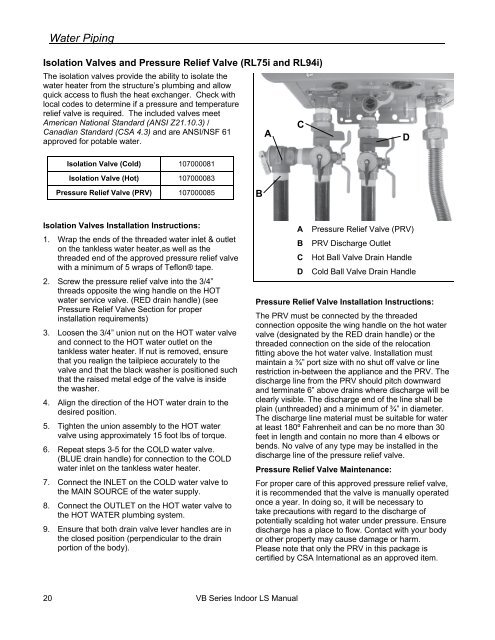
A Pressure Relief Valve (PRV)<br />
B PRV Discharge Outlet<br />
C Hot Ball Valve Drain Handle<br />
D Cold Ball Valve Drain Handle<br />
Pressure Relief Valve Installation Instructions:<br />
The PRV must be connected by the threaded<br />
connection opposite the wing handle on the hot water<br />
valve (designated by the RED drain handle) or the<br />
threaded connection on the side of the relocation<br />
fitting above the hot water valve. Installation must<br />
maintain a ¾” port size with no shut off valve or line<br />
restriction in-between the appliance and the PRV. The<br />
discharge line from the PRV should pitch downward<br />
and terminate 6” above drains where discharge will be<br />
clearly visible. The discharge end of the line shall be<br />
plain (unthreaded) and a minimum of ¾” in diameter.<br />
The discharge line material must be suitable for water<br />
at least 180º Fahrenheit and can be no more than 30<br />
feet in length and contain no more than 4 elbows or<br />
bends. No valve of any type may be installed in the<br />
discharge line of the pressure relief valve.<br />
Pressure Relief Valve Maintenance:<br />
For proper care of this approved pressure relief valve,<br />
it is recommended that the valve is manually operated<br />
once a year. In doing so, it will be necessary to<br />
take precautions with regard to the discharge of<br />
potentially scalding hot water under pressure. Ensure<br />
discharge has a place to flow. Contact with your body<br />
or other property may cause damage or harm.<br />
Please note that only the PRV in this package is<br />
certified by CSA International as an approved item.