Make Your Own Pipes - Vintage Projects
Make Your Own Pipes - Vintage Projects
Make Your Own Pipes - Vintage Projects

You also want an ePaper? Increase the reach of your titles
YUMPU automatically turns print PDFs into web optimized ePapers that Google loves.
Stop dreaming of that pipe<br />
you would like to own. With<br />
a little skill and know-how<br />
you can make one yourself. &'<br />
SO YOU WANT<br />
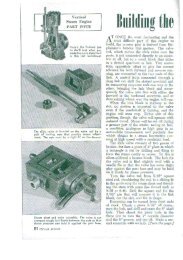
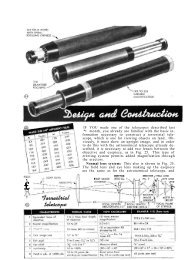
SANDED BRIARWOOD BLOCK is chucked PIPE BOWL IS ROUGH-TURNED to 1%-in.diwith<br />
a tapered wedge between block and ameter. Drill the tobacco hole %-in. deeper<br />
face plate and held fast by the tail stock. than the length of the bowl's cylinder.
TO MAKE A PIPE? ~y James Sonnooks<br />
RIAR root has been used for<br />
B centuries in the art of pipe<br />
making because of its durability,<br />
close texture, burled grain and<br />
beauty; its ability to withstand<br />
years of hard use and hold a<br />
natural polish. The best briarwood<br />
is found along the Mediterranean<br />
coastal areas, Algeria,<br />
Greece, Sicily and Italy. The<br />
roots are used for pipe bowls and<br />
it takes anywhere from 100 to 175<br />
years growth for the root to develop<br />
into a large enough piece<br />
from which small blocks can be<br />
cut. After the roots have been<br />
dug, dried and cut, they are<br />
sorted into sizes and grades. It<br />
always pays to select the best<br />
grade for a really good pipe.<br />
To start your pipe, before<br />
chucking the block in the lathe,<br />
sand the bottom and back square.<br />
Cut several wedges, Yz-in. wide,<br />
equal to the angle the bowl will<br />
be in relation to the shank. This<br />
will determine whether you have<br />
a straight or bent stem.<br />
Hold the briar block with the<br />
wedge on the bottom against your<br />
lathe's face plate and run up the<br />
tail stock until you can tighten<br />
the chuckjaws. The bowl's center<br />
SHAPING AND TRIMMING of bowl is done<br />
with a spearpoint wood chisel. Examine<br />
several pipes to get most pleasing design.<br />
SAWING ROUGHEO BLOCll<br />
lEDEE # USE0<br />
SlOES OF BOW<br />
IF BOWL OOWE US1 AI<br />
CK BASE FAIREO TO S1<br />
SK SANDER<br />
t*"<br />
TYPICAL 90°<br />
STEM I<br />
To su~<br />
TO CUT THE STEM,rechuck pipe with bowl<br />
clamped to face plate. Use b d bearing<br />
center and slide rest to turn down shank.
HOLE FOR STANDARD STEM TENON ie<br />
drilled with 5/16-in. drii to a depth of 5/s in.<br />
Use a 3/32-in. drill for long smoke hole.<br />
should be measured on the heel and<br />
two outside surfaces. Turn a cylinder,<br />
removing the two rear corners but<br />
leaving enough wood for turning the<br />
shank when you rechuck later. After<br />
cutting the cylinder, determine what<br />
size tobacco hole you want. The hole<br />
can be drilled with a round pointed 3hto<br />
%-in. drill or boring tool on the cross<br />
feed of your lathe.<br />
The bowl can now be shaped, using<br />
gauges and right- or left-hand skews.<br />
Imperfections may appear and disap-<br />
pear with a few cuts. If you have a<br />
large bowl with no flaws leave it that<br />
way since flaws may appear when going<br />
deeper.<br />
EXTEND TOBACCO .HOLE to depth of the<br />
smoke hole with round ended drill. Line<br />
up tobacco hole bottom with smoke hole.<br />
COMMERCIAL STEM TENON has to be cut<br />
down to fit into the shank. Nylon or Vulcanite<br />
black rubber bits are most commonly used.<br />
You can remove the block now and<br />
rechuck for turning the shank. <strong>Make</strong><br />
sure that you have enough stock to turn<br />
the shank round up to %-in. from the<br />
,bowl. Use a ball bearing center at the<br />
tail stock to assist in the turning of a<br />
long shank. Square off the end of the<br />
shank, then bore a $,-to %-in. diameter<br />
hole, depending on the thickness of the<br />
material around the sides; this should<br />
be strong enough for holding the stem<br />
tenon without cracking. Drill the smoke<br />
hole with a 3/32- to 5/32-in. diameter,<br />
six-inch long drill. Drill from the end<br />
of the shank to the center of the tobacco<br />
hole. If these holes do not meet on sight<br />
at the bottom of the tobacco hole, drill<br />
ALL EXCESS BRIAR is removed with a band<br />
saw, belt or disk sander. Be careful not<br />
to cut into the pipe's final dimensions.
I<br />
BOWL AND SHANK are given fiial form USE BUFFING WHEEL to obtain smooth<br />
with a file and smoothed with alumi- fiieh ccfter staining. Apply Carnaube ww,<br />
num oxide before stainiig_to desired color. after buffiig. for professional high sheen.<br />
the short distance on the drill press. It shank. Pipe stems ai-e sold in the<br />
is very important to have the smoke hole molded state with flash on the dividing<br />
at the bottom of the tobacco hole, not halves. Nylon is the best but more diffi-<br />
above or below. cult to get than the more comnlon Vul-<br />
The commercial pipe stem can be canite black rubber bits. Pipe stems<br />
chucked now and turned down to fit the come in [Continued on page 1651<br />
PLACING ROUGH TURN 10 APPROXIMATE DRILL HOLE FOR TURN OUTSIDE OF BOWL<br />
BANDSAWN BLOCK OUTSIDE DIAMETER WANTED iOBACC0 BOWL TO FINAL CONTOUR<br />
IN CHUCK JAW<br />
FINISHED SHANK<br />
5/16" OR Sb" DRILL<br />
COUNTERBORE SHANK HOLE<br />
WITH LONG SMOKE HOLE
Want To<strong>Make</strong> A Pine?<br />
[Continued from page 1191<br />
various lengths and shapes-round, oval<br />
and square. The tenon length is not included<br />
as part of the length when ordering.<br />
When the stem is properly fitted remove<br />
the excess briar block without destroying<br />
the final shape of the pipe by taking off too<br />
much material. Using band saw, belt or<br />
disk sander, lay the piece on its side and<br />
cut along the contour edge of the bowl<br />
where you stopped turning. Continue to<br />
remove excess briar in this method, being<br />
careful not to get within the outline of the<br />
finished pipe contour.<br />
Next, on your workbench, file and rasp<br />
the final shape; then, sand with a medium<br />
grit aluminum oxide cloth and finish with<br />
a fine grit.<br />
-<br />
If you want to carve the pipe, do this<br />
during the bench work after sanding has<br />
been completed. Use a high speed, 22,000<br />
rpm flexible shaft type drill, having a<br />
collet chuck that will hold %-in. diameter<br />
shanks. You can use various shapes of<br />
rotary files to get many types of grooves.<br />
When the pipe has its final shape, is<br />
smooth and shows no scratches, it is ready<br />
for staining. Stains can be various colors,<br />
black, walnut, light or dark, depending on<br />
amount of powder used.<br />
You are now ready to buff the pipe and<br />
stem with Tripoli. At this time a few light<br />
scratches will appear. Use Green Bar<br />
Tripoli for heavy buffing to take out deep<br />
scratches and Brown Tripoli for light<br />
scratches, then polish, using Blue Buffing<br />
Tripoli on the stem.<br />
The bowl can be polished with Carnube<br />
Wax or with a specially prepared polish.<br />
Wipe a little polish on the wheel and buff<br />
with an even pressure all around, using a<br />
clean flannel buff.<br />
When smoking, don't load your new pipe<br />
full the first few days. Have several pipes<br />
rotating each week and keep them clean<br />
inside and out.<br />
Some of the materials mentioned in this<br />
article can be obtained from the following: -<br />
J. H. Lowe, Box 78,Wantagh, N.Y.,for<br />
chucks, stems, wax, aluminum fittings,<br />
Tripoli, polish, etc. Highlands Briar Inc.,<br />
Box 72, Kew Gardens, N. Y., for first grade<br />
Algerian or Italian Briar. National Briar<br />
Pipe Co., Inc., 44 Montgomery St., Jersey<br />
City 2, N. J., for first grade briar.<br />
Golden Hammer Awards<br />
[Continued from page 1331<br />
Efirabeth, S. Africa ... G. Bratt Birmingham. Eng.<br />
...Richard W. Warren. St. Joseph, Mich. ... Hmrp<br />
Petrover, Haiia, Israel ... Charles Stafford. Bangor,<br />
Mich. ... Lowell E. McMeeken, Shelby, Ohio ... Sam<br />
Ingala. Chicago, Ill. ... Arthur Ridgeway, Pendleton.<br />
Ind. ... S. Machrone, Roselle, N. J. ... Charles B.<br />
DeWalt Pcrxton, Mass. ... Robert D. Trautman. Rapid<br />
City, S. D. ... Henry P. Stremmel, Hanover, Pa. ...<br />
Roger P. Dunn, New Albany, Ind. ... Harry G. Mills.<br />
Independence, Mo. ... Joe C. Forbis, Irving, Tex. ...<br />
Herbert H. Eller, Bel Air, Md. ... A. W. DeNorellir<br />
Laiayette, Colo. ...Charles R. Gaudy, Newport Del.<br />
... Joe W. Brown, Decatur, Ga. ... William 0.<br />
Blanch. Baltimore. Md. ...JamesR. Moorhead. Beaver.<br />
Pa.. ..Gordon G. Pratt. Pierre, S. D.. ..Ii. R. Murdoch,<br />
Vancouver, Can. ...Robert V. LeDuc. Clark, N. 1.<br />
... William Berg. Leipsic. Ohio ... LaMar Scadden<br />
Ogden, Utah ...Thomas P. Richards, Elyria, Ohio<br />
...Albert S. Salonen. Lubbock, Tex. ... Gerard<br />
Breslin. County Donegal, Ireland ...Pierre Vezina.<br />
County Labelle. Quebec. Ccm. ...Carl E. Hanson, So.<br />
Easton, Mass. ... George 0. Tapping. Newmarket<br />
Ontario, Can. ...Charles A. Schuster, Menomonie,<br />
Wis.<br />
Air- Condition <strong>Your</strong> Car<br />
[Continued from page 1601<br />
idling fast (about 20 mph) . Remember to<br />
keep all windows closed during operation<br />
of the system.<br />
If problems are encountered during installation<br />
of your air conditioner, it's a good<br />
idea to check with your local refrigeration<br />
expert. He can help you over the rough<br />
spots and suggest innovations applicable to<br />
your particular make of car.<br />
The cost of air conditioning your car in<br />
terms of time and money will'be repaid<br />
many times over in the coin of pleasant,<br />
comfortable motoring and in the reduction<br />
of driver fatigue.<br />
PARTS LIST<br />
Part New<br />
Compressor S 55.00<br />
.............................................<br />
Evaporator ...... : ..................................... 15.00<br />
Condenser ............................................... 23.00<br />
Dehydrator .................................................. 3.94<br />
Neo~renehoses ................... ............ 10.50<br />
Bracket ......................................................<br />
Rlnwar ......................................<br />
Croporator enslosuro ............................<br />
Insulation ...................................................<br />
Expansion valve .................. ..............<br />
Tubing. 8 feet.........................................<br />
$143.06<br />
Belt ......................................................... 1.85<br />
-<br />
$144.91<br />
Freon gas about $2.<br />
Used<br />
$ 8.00<br />
3.00<br />
4.00<br />
1 .oo<br />
10.56<br />
4.55<br />
b, 4,:E<br />
.20<br />
1.50<br />
.80<br />
Me~rtionMECHANIX ILLUSTRATED 165