New Roof Construction MANUAL - Cedar Shake and Shingle Bureau
New Roof Construction MANUAL - Cedar Shake and Shingle Bureau
New Roof Construction MANUAL - Cedar Shake and Shingle Bureau

You also want an ePaper? Increase the reach of your titles
YUMPU automatically turns print PDFs into web optimized ePapers that Google loves.
8<br />
Correct construction of roof junctures <strong>and</strong><br />
slope transitions is vital to ensure the integrity<br />
of the roof system. In the following cases,<br />
where metal flashing is employed, it should<br />
be no less than 26 gauge galvanized steel or<br />
acceptable equivalent. Check with your local<br />
building official for their preference in your<br />
area. It should be painted on both sides with a<br />
good metal or bituminous paint. Flashing<br />
materials should be painted after bending to<br />
maintain the integrity of the coating.<br />
Convex Juncture<br />
On this type of juncture (Figure 9) metal<br />
flashings should be installed to cover the top<br />
4" of the wall <strong>and</strong> the bottom 8" of the roof<br />
slope before the final course of Certi-label<br />
shakes or shingles is nailed to the top of the<br />
wall. A strip of wood molding can be applied<br />
after final wall course is installed. A double or<br />
triple starter course is then applied at the<br />
eave, with a 1 1/2" overhang over the outside<br />
wall trim. The roof can then be completed in<br />
the normal manner.<br />
Concave Juncture<br />
Metal flashings for the concave juncture are<br />
similar to those for the convex type. They<br />
should be installed to cover the top of the roof<br />
slope <strong>and</strong> the bottom 4" of the<br />
wall before the final course of Certi-label<br />
shakes or shingles is installed. The final roof<br />
course should be installed so that the tips fit<br />
as snugly as possible against the wall at the<br />
juncture. A double starter course should be<br />
applied at the start of the wall surface <strong>and</strong> the<br />
remaining wall courses applied in the<br />
recommended manner. If nails are not<br />
acceptable through exposed metal, metal clips<br />
can be used to hold down the flashing.<br />
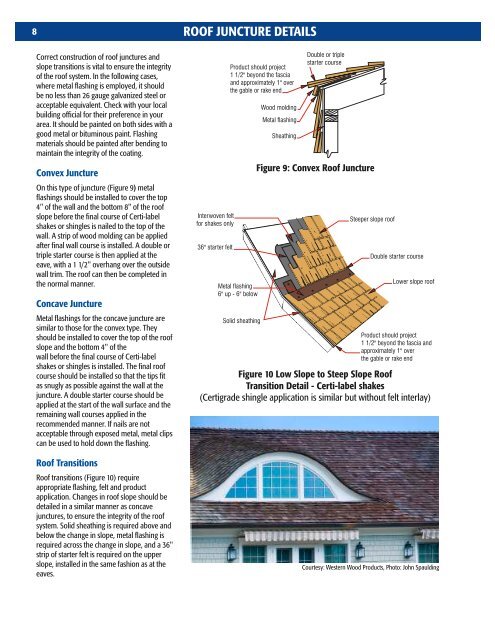
<strong>Roof</strong> Transitions<br />
<strong>Roof</strong> transitions (Figure 10) require<br />
appropriate flashing, felt <strong>and</strong> product<br />
application. Changes in roof slope should be<br />
detailed in a similar manner as concave<br />
junctures, to ensure the integrity of the roof<br />
system. Solid sheathing is required above <strong>and</strong><br />
below the change in slope, metal flashing is<br />
required across the change in slope, <strong>and</strong> a 36"<br />
strip of starter felt is required on the upper<br />
slope, installed in the same fashion as at the<br />
eaves.<br />
ROOF JUNCTURE DETAILS<br />
Interwoven felt<br />
for shakes only<br />
36" starter felt<br />
Product should project<br />
1 1/2 " beyond the fascia<br />
<strong>and</strong> approximately 1" over<br />
the gable or rake end<br />
Metal flashing<br />
6" up - 6" below<br />
Solid sheathing<br />
Wood molding<br />
Metal flashing<br />
Sheathing<br />
Double or triple<br />
starter course<br />
Figure 9: Convex <strong>Roof</strong> Juncture<br />
Steeper slope roof<br />
Double starter course<br />
Lower slope roof<br />
Product should project<br />
1 1/2 " beyond the fascia <strong>and</strong><br />
approximately 1" over<br />
the gable or rake end<br />
Figure 10 Low Slope to Steep Slope <strong>Roof</strong><br />
Transition Detail - Certi-label shakes<br />
(Certigrade shingle application is similar but without felt interlay)<br />
Courtesy: Western Wood Products, Photo: John Spaulding