New Roof Construction MANUAL - Cedar Shake and Shingle Bureau
New Roof Construction MANUAL - Cedar Shake and Shingle Bureau
New Roof Construction MANUAL - Cedar Shake and Shingle Bureau

You also want an ePaper? Increase the reach of your titles
YUMPU automatically turns print PDFs into web optimized ePapers that Google loves.
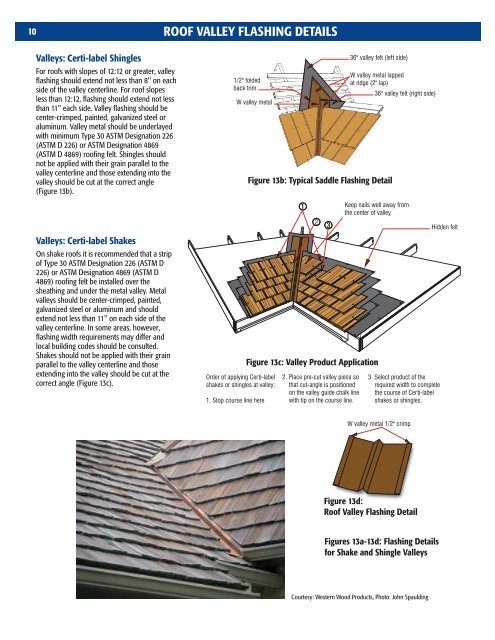
10<br />
Valleys: Certi-label <strong>Shingle</strong>s<br />
For roofs with slopes of 12:12 or greater, valley<br />
flashing should extend not less than 8" on each<br />
side of the valley centerline. For roof slopes<br />
less than 12:12, flashing should extend not less<br />
than 11” each side. Valley flashing should be<br />
center-crimped, painted, galvanized steel or<br />
aluminum. Valley metal should be underlayed<br />
with minimum Type 30 ASTM Designation 226<br />
(ASTM D 226) or ASTM Designation 4869<br />
(ASTM D 4869) roofing felt. <strong>Shingle</strong>s should<br />
not be applied with their grain parallel to the<br />
valley centerline <strong>and</strong> those extending into the<br />
valley should be cut at the correct angle<br />
(Figure 13b).<br />
Valleys: Certi-label <strong>Shake</strong>s<br />
On shake roofs it is recommended that a strip<br />
of Type 30 ASTM Designation 226 (ASTM D<br />
226) or ASTM Designation 4869 (ASTM D<br />
4869) roofing felt be installed over the<br />
sheathing <strong>and</strong> under the metal valley. Metal<br />
valleys should be center-crimped, painted,<br />
galvanized steel or aluminum <strong>and</strong> should<br />
extend not less than 11" on each side of the<br />
valley centerline. In some areas, however,<br />
flashing width requirements may differ <strong>and</strong><br />
local building codes should be consulted.<br />
<strong>Shake</strong>s should not be applied with their grain<br />
parallel to the valley centerline <strong>and</strong> those<br />
extending into the valley should be cut at the<br />
correct angle (Figure 13c).<br />
ROOF VALLEY FLASHING DETAILS<br />
1/2" folded<br />
back trim<br />
W valley metal<br />
Order of applying Certi-label<br />
shakes or shingles at valley:<br />
1. Stop course line here<br />
Figure 13b: Typical Saddle Flashing Detail<br />
1<br />
Figure 13c: Valley Product Application<br />
2<br />
2. Place pre-cut valley piece so<br />
that cut-angle is positioned<br />
on the valley guide chalk line<br />
with tip on the course line.<br />
3<br />
36" valley felt (left side)<br />
W valley metal lapped<br />
at ridge (2" lap)<br />
36" valley felt (right side)<br />
Keep nails well away from<br />
the center of valley<br />
3. Select product of the<br />
required width to complete<br />
the course of Certi-label<br />
shakes or shingles.<br />
W valley metal 1/2" crimp<br />
Figure 13d:<br />
<strong>Roof</strong> Valley Flashing Detail<br />
Figures 13a-13d: Flashing Details<br />
for <strong>Shake</strong> <strong>and</strong> <strong>Shingle</strong> Valleys<br />
Courtesy: Western Wood Products, Photo: John Spaulding<br />
Hidden felt