New Roof Construction MANUAL - Cedar Shake and Shingle Bureau
New Roof Construction MANUAL - Cedar Shake and Shingle Bureau
New Roof Construction MANUAL - Cedar Shake and Shingle Bureau

You also want an ePaper? Increase the reach of your titles
YUMPU automatically turns print PDFs into web optimized ePapers that Google loves.
4<br />
Certi-label <strong>Shake</strong>s<br />
A solid deck is recommended in seismic<br />
activity, hurricane <strong>and</strong> tornado regions <strong>and</strong> in<br />
areas where wind-driven snow is<br />
encountered. <strong>Roof</strong>ing felt system interlay<br />
between the shake courses is required<br />
whether the sheathing is spaced or solid. The<br />
felt interlay acts as a baffle that prevents<br />
wind-driven snow or other foreign material<br />
from entering the attic cavity during extreme<br />
weather conditions. The felt interlays also<br />
increase the roof's insulation value. The felt<br />
interlay system forces water to the surface.<br />
If spaced sheathing is used in shake<br />
application, the sheathing is usually 1 x 6<br />
boards spaced on centers equal to the<br />
weather exposure. (Table 4, Page 20) at<br />
which the shakes are to be laid - but never<br />
more than 7 ½” for 18” shakes <strong>and</strong> 10” for<br />
24” shakes on roof installations. When 1 x 4<br />
spaced sheathing is installed at 10” on<br />
center, additional 1 x 4 boards must be<br />
installed (i.e. maximum allowable spacing is<br />
approximately 3 ½” measured from edge to<br />
edge between the sheathing boards). Please<br />
note that the only solid sheet sheathing<br />
tested with Cert-label shakes & shingles is<br />
plywood. Check with your local building<br />
official for plywood thickness/dimensions.<br />
Special care should be taken when installing<br />
the felt interlays over spaced sheathing to<br />
ensure that an effective baffle is formed<br />
(Figure 1). The felt should be applied over<br />
the top portion of the shakes <strong>and</strong> extend on<br />
to the spaced sheathing so that the bottom<br />
edge of the felt is positioned at a distance<br />
above the butt equal to twice the weather<br />
exposure.<br />
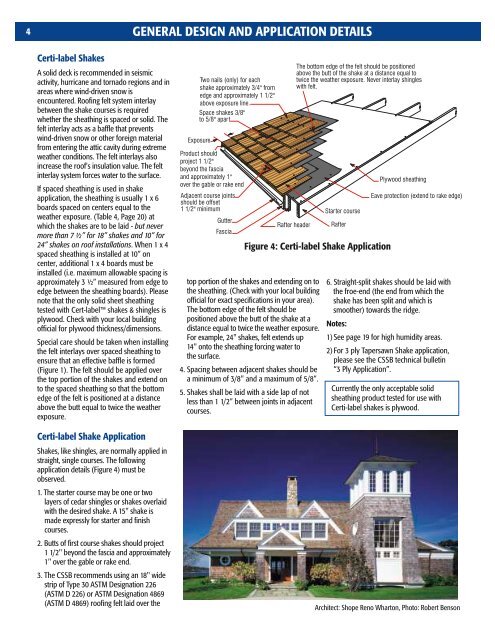
Certi-label <strong>Shake</strong> Application<br />
<strong>Shake</strong>s, like shingles, are normally applied in<br />
straight, single courses. The following<br />
application details (Figure 4) must be<br />
observed.<br />
1. The starter course may be one or two<br />
layers of cedar shingles or shakes overlaid<br />
with the desired shake. A 15" shake is<br />
made expressly for starter <strong>and</strong> finish<br />
courses.<br />
2. Butts of first course shakes should project<br />
1 1/2" beyond the fascia <strong>and</strong> approximately<br />
1" over the gable or rake end.<br />
3. The CSSB recommends using an 18" wide<br />
strip of Type 30 ASTM Designation 226<br />
(ASTM D 226) or ASTM Designation 4869<br />
(ASTM D 4869) roofing felt laid over the<br />
GENERAL DESIGN AND APPLICATION DETAILS<br />
Two nails (only) for each<br />
shake approximately 3/4" from<br />
edge <strong>and</strong> approximately 1 1/2"<br />
above exposure line.<br />
Space shakes 3/8"<br />
to 5/8" apart<br />
Exposure<br />
Product should<br />
project 1 1/2"<br />
beyond the fascia<br />
<strong>and</strong> approximately 1"<br />
over the gable or rake end<br />
Adjacent course joints<br />
should be offset<br />
1 1/2" minimum<br />
Gutter<br />
Fascia<br />
Rafter header<br />
Figure 4: Certi-label <strong>Shake</strong> Application<br />
top portion of the shakes <strong>and</strong> extending on to<br />
the sheathing. (Check with your local building<br />
official for exact specifications in your area).<br />
The bottom edge of the felt should be<br />
positioned above the butt of the shake at a<br />
distance equal to twice the weather exposure.<br />
For example, 24" shakes, felt extends up<br />
14" onto the sheathing forcing water to<br />
the surface.<br />
4. Spacing between adjacent shakes should be<br />
a minimum of 3/8" <strong>and</strong> a maximum of 5/8”.<br />
5. <strong>Shake</strong>s shall be laid with a side lap of not<br />
less than 1 1/2” between joints in adjacent<br />
courses.<br />
The bottom edge of the felt should be positioned<br />
above the butt of the shake at a distance equal to<br />
twice the weather exposure. Never interlay shingles<br />
with felt.<br />
Starter course<br />
Rafter<br />
Eave protection ( extend to rake edge)<br />
6. Straight-split shakes should be laid with<br />
the froe-end (the end from which the<br />
shake has been split <strong>and</strong> which is<br />
smoother) towards the ridge.<br />
Notes:<br />
Plywood sheathing<br />
1) See page 19 for high humidity areas.<br />
2) For 3 ply Tapersawn <strong>Shake</strong> application,<br />
please see the CSSB technical bulletin<br />
“3 Ply Application”.<br />
Currently the only acceptable solid<br />
sheathing product tested for use with<br />
Certi-label shakes is plywood.<br />
Architect: Shope Reno Wharton, Photo: Robert Benson