I Shovel Snow with a Lawn-Mower Engine - Vintage Projects
I Shovel Snow with a Lawn-Mower Engine - Vintage Projects
I Shovel Snow with a Lawn-Mower Engine - Vintage Projects

Create successful ePaper yourself
Turn your PDF publications into a flip-book with our unique Google optimized e-Paper software.
I <strong>Shovel</strong><br />
<strong>Snow</strong><br />
<strong>with</strong> a <strong>Lawn</strong>-<strong>Mower</strong> <strong>Engine</strong><br />
Blizzards needn't mean backaches if<br />
you hitch gasoline, instead of your<br />
sacroiliac, to the snow shovel.<br />
By Howard G. McEntee<br />
THOSE big rotary plows clear snow from<br />
the highways <strong>with</strong> impressive ease. My<br />
midget works on the same principle. It's not<br />
meant for Minnesota drifts, but it can handle<br />
snowfalls under 6" deep and will even<br />
take care of heavier storms if you don't<br />
mind running it back and forth during the<br />
storm.<br />
Building the plow gave me a chance to<br />
use a lawn-mower engine that would otherwise<br />
be standing idle. Now, before cold<br />
weather arrives, I simply transfer the engine<br />
OCTOBER 1951 225
—a 1.2-hp., two-cycle job—from mower to<br />
plow.<br />
When a storm comes, I roll the plow<br />
along my walk and driveway, scooping up<br />
the snow while the engine drives a whirling<br />
rotor, throwing the snow up and to one side<br />
by centrifugal action.<br />
Materials used. Wood parts were all<br />
cut from ½" exterior (weatherproof) plywood<br />
except the baseboard. Here, I used<br />
the ¾" size for additional strength. The rest<br />
of the housing is sheet metal, <strong>with</strong> some<br />
angle iron to join or reinforce various parts.<br />
For the scoop that is pushed into the<br />
snow, I chose a heavy old steel snow shovel.<br />
This is better than an aluminum one, since<br />
the steel is stronger.<br />
Making the scoop. I kept the steel<br />
edging and underneath braces of the shovel<br />
to maintain stiffness. The back edge was<br />
cut and bent to fit around the wood housing<br />
plate. The shovel should be nearly level,<br />
just enough incline so it clears the sidewalk<br />
at the rear when the wheels are in place.<br />
Two wings or cheek pieces join the scoop<br />
and housing rim.<br />
Roundhead wood screws hold the metal<br />
to the plywood plates. I made the many<br />
sheet-metal holes required <strong>with</strong> a hand<br />
punch, which is much faster than drilling.<br />
I used washers wherever nuts or bolts bear<br />
against the wood.<br />
The rotor. Mounted on the motor shaft,<br />
the rotor required careful construction and<br />
exact balancing. An unbalanced rotor could<br />
shake the plow to pieces.<br />
But balancing isn't difficult. During the<br />
course of building and changing designs, I<br />
had to rebalance the rotor several times.<br />
Smooth running showed I hit it well each<br />
time. Lock washers secure all nuts used in<br />
assembly.<br />
Final details. Express-wagon wheels of<br />
6½" diameter were used. Wheels <strong>with</strong> fatter<br />
tires would be better, for mine tend to stick<br />
in ruts. The handle came from an old lawn<br />
mower, as did the strap-iron pieces that hold,<br />
it. These were heated dull red <strong>with</strong> a gasoline<br />
blowtorch, then twisted and hammered<br />
to the desired shape.<br />
An auto choke wire, linked to the pivoted<br />
arm, controls the throttle. Radio spaghetti<br />
was slipped over the wire to protect it from<br />
moisture. Actually, the centrifugal governor<br />
controls the throttle, and the hand control<br />
limits governor action. The governor helps<br />
keep engine speed steady when the plow is<br />
pushed through snow.<br />
226 POPULAR SCIENCE<br />
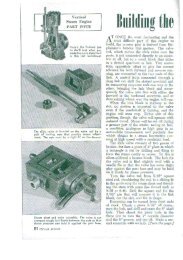
1 <strong>Engine</strong> was mounted <strong>with</strong> shaft projecting<br />
beyond one side of ¾" by 10" by 14" baseboard,<br />
bolts holding it in place. To support<br />
rotor housing, a piece of strap iron was attached<br />
to governor-shell boltholes. Two long<br />
screws and pipe spacers hold it alongside shaft.<br />
4 Rotor<br />
blades, 3½" matched lengths of 1/8"<br />
by 1½" by 1½" angle iron, are mounted <strong>with</strong><br />
¼"-20 bolts. Blades are spaced 90° apart <strong>with</strong><br />
vertical flanges radial to center of disk and the<br />
ends all equidistant from disk edge. Hub must<br />
be carefully centered for good balance.<br />
7 Front edges of housing sides were bent<br />
over and punched for bolts that secure front<br />
plywood plate ( here held in hands). This piece<br />
has a length of angle stock bolted to bottom<br />
edge for reinforcement. Iron takes shock of<br />
small ice chunks, prevents damage to wood.
2<br />
Back plate of rotor housing, cut to shape<br />
shown in drawing, was then fastened to<br />
strap iron. Two 1/4"-20 screws, run through<br />
plate and wood spacing blocks, were turned into<br />
holes tapped in strap ends. Plate was also bolted<br />
to angle iron bolted under base.<br />
5<br />
Balancing the rotor. Rest a 5/8" shaft on<br />
steel rule at edge of bench; weight down<br />
second rule over end of shaft. Slip washers on<br />
bolts until rotor stops at different place every<br />
time you spin it. Then take off nuts and clamp<br />
washers on.<br />
8<br />
Sheet-metal shield mounted like this was<br />
my solution when counterclockwise rotation<br />
of blades threw some snow out of scoop instead<br />
of up stack. Later experience has shown it may<br />
be best to omit front vertical flange of shield.<br />
Shield is bent from single metal strip.<br />
3<br />
Rotor consists of 12 1/2" disk cut from 1/8"<br />
aluminum, a 3" cast-iron V pulley (used as a<br />
hub) and four heavy angle-iron blades. Here,<br />
disk center is being found <strong>with</strong> combination<br />
square. I avoided a die-cast pulley for hub; it<br />
might fly apart under centrifugal force.<br />
6<br />
Making the scoop. Rear housing plate was<br />
removed to attach scoop and housing sides.<br />
Steel snow shovel was bent at rear to conform<br />
to housing curve. Tabs cut in edge were bent<br />
over and fastened to plate <strong>with</strong> wood screws.<br />
Wings were riveted to scoop sides, housing rim.<br />
9<br />
Tilting top, made of two pieces of plywood<br />
<strong>with</strong> curved sheet-metal hood joining them,<br />
pivots on two bolts set into stack. Bolts are<br />
drawn up just tight enough to hold, so I can<br />
swing the top and direct stream of snow to<br />
whichever side happens to be best. END