Arts & Crafts Style Chair - Fine Woodworking
Arts & Crafts Style Chair - Fine Woodworking
Arts & Crafts Style Chair - Fine Woodworking

Create successful ePaper yourself
Turn your PDF publications into a flip-book with our unique Google optimized e-Paper software.
TAUNTON’S<br />
W<strong>Arts</strong> & <strong>Crafts</strong> <strong>Style</strong> <strong>Chair</strong><br />
A project plan<br />
for building a<br />
handsome chair<br />
For more FREE<br />
project plans from<br />
<strong>Fine</strong> <strong>Woodworking</strong><br />
click here now<br />
S i m p l e , S t u r d y Wo r k b e n c h<br />
T<br />
S i m p l e , S t u r d y Wo r k b e n c h<br />
T<br />
From Getting Started in <strong>Woodworking</strong>, Season 2<br />
From Getting Started in <strong>Woodworking</strong>, Season 2<br />
B y A s A C h r i s t i A n A<br />
his workbench is easy and inexpensive<br />
to build, yet is sturdy and versatile<br />
enough for any woodworker. The base is<br />
construction lumber (4x4s and 2x4s), joined<br />
simply with long bolts and short dowels. The<br />
top is two layers of MDF (medium-density<br />
fiberboard), cut from a single sheet, with<br />
enough left over to make a handy shelf.<br />
The only tools needed to make this bench<br />
are a drill/driver, a circular saw, and a handheld<br />
router or a router table.<br />
There is room at one end for a small castiron<br />
woodworking vise, which is an essential<br />
tool in any woodworking shop. The vise is<br />
fitted with non-marring wooden jaws, and the<br />
jaws and benchtop receive dog holes, sized<br />
to fit a variety of handy bench accessories.<br />
24 in.<br />
LuMber, harDware anD suppLies LisT<br />
4 8-ft.-long 2x4s, kiln-dried<br />
2 8-ft.-long 4x4s, kiln-dried<br />
1 4x8 sheet of MDF<br />
2 Hardwood pieces for vise jaws, 71/2 in. long by 3 in. wide. Front jaw can be<br />
between 1 in. and 11/2 in. thick and the rear jaw is 3/4 in. thick.<br />
1 Filler block for mounting vise, 3/4-in.-thick plywood, 4 in. wide by 6 in. long<br />
1 bottle of yellow glue<br />
1 7-in. Groz Rapid-Action <strong>Woodworking</strong> Vise (www.woodcraft.com)<br />
4 6-ft. lengths of ⁄ -in.-dia. threaded rod<br />
16 ⁄ -in. washers<br />
16 ⁄ -in. nuts<br />
2 2-in.-long 1/4-20 bolts, nuts, washers for attaching front jaw of vise<br />
2 11/2-in.-long, 1/4-20 flathead screws for attaching rear jaw<br />
1 Box of 11/4-in.-long drywall screws for laminating benchtop<br />
4 ⁄ -in.-dia., 21/2-in.-long lag screws and washers, for attaching vise<br />
16 S-clip-type tabletop fasteners<br />
16 ⁄ -in.-dia. dowels, roughly 3 in. long<br />
11/2 in.<br />
24 in.<br />
62 in.<br />
4 in.<br />
2 ⁄ in.<br />
3 ⁄ in.<br />
1 ⁄ in.<br />
10 in.<br />
1 ⁄ in.<br />
Side<br />
Long stretchers<br />
stretchers<br />
33 ⁄ in.<br />
1 ⁄ in.<br />
1 ⁄ in. 9 ⁄ in.<br />
9 in. 9 ⁄ in.<br />
17 in.<br />
41 in.<br />
48 in.<br />
31/2 in.<br />
Visit us online at <strong>Fine</strong>woodworking.com/start to watch a two-part video detailing how to build this workbench from start to finish.<br />
1 ⁄ in.<br />
Side<br />
stretchers<br />
ViDeOs ViDeOs<br />
B y A s A C h r i s t i A n A<br />
11/2 in.<br />
2 ⁄ in.<br />
LuMber, harDware anD suppLies LisT<br />
4 8-ft.-long 2x4s, kiln-dried<br />
2 8-ft.-long 4x4s, kiln-dried<br />
1 4x8 sheet of MDF<br />
2 Hardwood pieces for vise jaws, 71/2 in. long by 3 in. wide. Front jaw can be<br />
between 1 in. and 11/2 in. thick and the rear jaw is 3/4 in. thick.<br />
1 Filler block for mounting vise, 3/4-in.-thick plywood, 4 in. wide by 6 in. long<br />
1 bottle of yellow glue<br />
1 7-in. Groz Rapid-Action <strong>Woodworking</strong> Vise (www.woodcraft.com)<br />
4 6-ft. lengths of ⁄ -in.-dia. threaded rod<br />
16 ⁄ -in. washers<br />
16 ⁄ -in. nuts<br />
2 2-in.-long 1/4-20 bolts, nuts, washers for attaching front jaw of vise<br />
2 11/2-in.-long, 1/4-20 flathead screws for attaching rear jaw<br />
1 Box of 11/4-in.-long drywall screws for laminating benchtop<br />
4 ⁄ -in.-dia., 21/2-in.-long lag screws and washers, for attaching vise<br />
16 S-clip-type tabletop fasteners<br />
16 ⁄ -in.-dia. dowels, roughly 3 in. long<br />
10 in.<br />
1 ⁄ in.<br />
9 ⁄ in.<br />
9 in. 9 ⁄ in.<br />
17 in.<br />
41 in.<br />
48 in.<br />
31/2 in.<br />
Visit us online at <strong>Fine</strong>woodworking.com/start to watch a two-part video detailing how to build this workbench from start to finish.<br />
ViDeOs ViDeOs<br />
Y<br />
Build an Oak Bookcase<br />
From Getting Started in <strong>Woodworking</strong>, Season 2<br />
B y A s A C h r i s t i A n A<br />
ou can thank Mike Pekovich,<br />
<strong>Fine</strong> <strong>Woodworking</strong>’s art director,<br />
for designing this simple but<br />
stylish bookcase. He took a straightforward<br />
form--an oak bookcase with dado<br />
and rabbet joints--and added nice proportions<br />
and elegant curves.<br />
We agreed that screws would reinforce<br />
the joints nicely, and that gave us a design<br />
option on the sides. Choose oak<br />
plugs, and align the grain carefully, and<br />
the plugs disappear. Make them from a<br />
contrasting wood, like walnut, and the<br />
rows of plugs add a nice design feature<br />
to the broad sides, hinting at the construction<br />
in a subtle way.<br />
By design the bookcase contains a<br />
number of fundamental lessons for<br />
would-be furniture-makers, and like the<br />
other projects in this video series, the<br />
whole thing can be built with just a few<br />
portable power tools: a circular saw, a<br />
drill, and a router<br />
The shelves attach to the sides with<br />
simple dadoes, and the back and backsplash<br />
drop into rabbets. Screws rein- Lumber and hardware List<br />
force the dado joints and also attach the<br />
Part QtY size materiaL<br />
lower stretcher, and wood plugs cover<br />
the screw holes. Smaller wood screws<br />
are used to attach the plywood back.<br />
sides<br />
Curves add life to rectangular pieces<br />
of furniture, and Pekovich worked in<br />
sheLVes<br />
three types, each irregular and organic<br />
(as opposed to radius curves that can<br />
seem mechanical). At the top are gen- back sPLash<br />
tle curves that speed up as they move<br />
forward, each taken from a section of<br />
arched<br />
a French curve. At the bottom are two<br />
stretcher<br />
long curves formed with a flexible wood<br />
batten, one extending end to end on the<br />
lower stretcher, and the other a short<br />
back<br />
graceful arch at the bottom of the sides,<br />
ending at a straight step at each end to screws FOr<br />
suggest legs.<br />
sheLVes<br />
--Asa Christiana, editor, <strong>Fine</strong> <strong>Woodworking</strong><br />
screws FOr<br />
back<br />
VideOs<br />
62 in.<br />
Long stretchers<br />
3 ⁄ in.<br />
4 in.<br />
1 ⁄ in.<br />
33 ⁄ in.<br />
1 ⁄ in.<br />
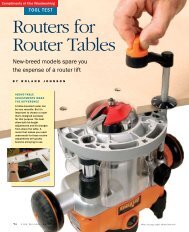
Enjoy our entire site<br />
FREE for 14 days!<br />
450+ videos, 33-year archive,<br />
blogs, and more<br />
try it now<br />
©2009 The Taunton Press
Building a <strong>Chair</strong>,<br />
<strong>Arts</strong>-and-<strong>Crafts</strong> <strong>Style</strong><br />
Joinery details make this chair strong and handsome<br />
When the curator of Dennos Museum<br />
in Traverse City, Mich.,<br />
asked me to design and build<br />
some <strong>Arts</strong>-and-<strong>Crafts</strong> style furniture for an<br />
upcoming exhibit, I jumped at the chance.<br />
We agreed that I'd look for a customer who<br />
would buy the furniture after the exhibit. I<br />
approached Jay and Sue Wisniewski, who<br />
have been steady clients on a number of<br />
projects. They were excited by the idea.<br />
I immediately ordered more than $100<br />
by Rex Alexander<br />
worth of books by or about Stickley (see<br />
the further reading box on p. 47), Greene<br />
and Greene, Roycroft and others. These<br />
books gave me a feel for designs of this<br />
period. And they told me what type of<br />
wood to use and how it should be cut and<br />
finished. I studied detailed drawings and<br />
proportions to help with the design.<br />
The deal with the museum didn't work<br />
out, but my clients gave me the go ahead<br />
for a dining table and some chairs. We still<br />
had to agree on a final design, and it had to<br />
be compatible with a reproduction Frank<br />
Lloyd Wright chandelier they had already<br />
bought for the dining room.<br />
I learned that Gustav Stickley, in designing<br />
his No. 384 chair, was influenced by<br />
Wright's work. I knew I had found the inspiration<br />
to my design problems. It was<br />
this chair (first built in 1905), with its rush<br />
seat and vertical slats on both the sides and<br />
the back, that I drew upon to arrive at the
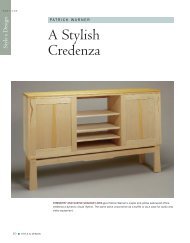
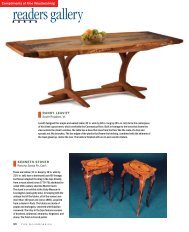
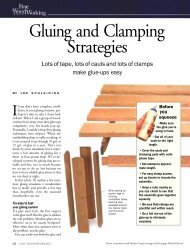
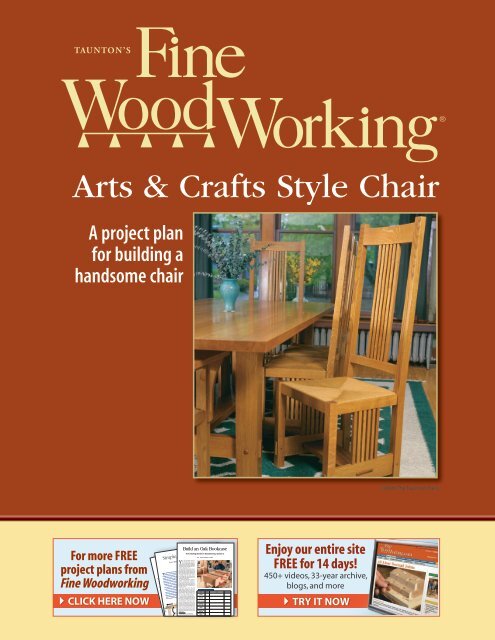
A Stickley style dining chair<br />
The author based the design for this chair on a Stickley original. Stickley<br />
was influenced by Frank Lloyd Wright. Mortise-and-tenon joinery makes<br />
this chair sturdy enough to withstand the stresses of daily use.
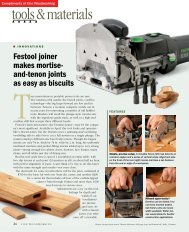
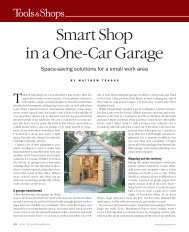
A plywood jig for<br />
shaping the back<br />
posts. A little time<br />
invested in this jig<br />
guaranteed that<br />
all back posts<br />
would be the same<br />
size and shape. A<br />
shaper with a rub<br />
collar works as<br />
well as a router.<br />
Routing back posts<br />
A jig for trimming the back posts to size and shape<br />
This jig is sized to handle two legs at a time. After cutting the profile for the front of the<br />
leg, the author moves the leg to the back of the jig and finishes the profile.<br />
1. Mount the first back post,<br />
cut slightly oversized on the<br />
bandsaw, into the jig. The<br />
top of the jig is held<br />
down with screws<br />
and T-nuts.<br />
3. Move the first back<br />
post to the back side of<br />
the jig, and insert the<br />
second back post in<br />
its place. Reassemble<br />
the jig.<br />
2. Trim the front edge by<br />
making several passes with the<br />
router, adjusting the depth of<br />
cut for each pass. A template<br />
guide rubs against the<br />
edge of the plywood jig.<br />
4. Make a pass on<br />
each leg, front and<br />
back, at each router<br />
depth setting. Clean<br />
up machined surfaces<br />
with sandpaper.<br />
final design for these chairs. The chairs are<br />
shown in the photo on p. 42.<br />
Solve problems by building<br />
a prototype<br />
I developed a scale drawing of the chair to<br />
help determine a materials list (see the<br />
drawing on p. 43). For several reasons, I<br />
also decided to build a prototype: the joinery<br />
is complicated, I had to buy tooling<br />
and make jigs, and I wanted to be sure my<br />
clients were satisfied with the comfort of<br />
this chair. Also, I could use the prototype to<br />
verify the proportions and to resolve some<br />
of the details of the frame and the fit of the<br />
inset rush seat.<br />
Building six chairs is a small production<br />
run. A prototype helped me to organize<br />
each step and avoid many construction<br />
problems. I made the prototype with<br />
poplar scraps accumulated from other jobs<br />
and assembled it without glue so it could<br />
be taken apart. A mistake with poplar at<br />
this stage would not be too costly.<br />
Once I was happy with the prototype, I<br />
took it apart and measured each piece for a<br />
final materials list. Each chair was made<br />
from front and back posts, seat rails, side<br />
stretchers, a horizontal stretcher, curved<br />
upper and lower back slats and vertical<br />
slats. There were 35 pans in all, including<br />
four oak dowels to pin the stretchers to the<br />
front and back posts.<br />
Machining the parts<br />
All the parts started out as quartersawn<br />
white oak. I could resaw the 2-in.-thick material<br />
into -in. seat rails, stretchers, and<br />
slats and still have plenty of material for the<br />
-in.-sq. front and back posts. For a table,<br />
six side chairs and two arm chairs, I ordered<br />
400 bd. ft. I wanted heavily rayed<br />
pieces for the sides of the front and back<br />
posts, the bottom side stretchers and the<br />
curved upper and lower back slats. I chose<br />
lightly figured white oak for the seat rails.<br />
Except for the back posts, I rough-cut all<br />
the chair parts on a tablesaw and then<br />
cleaned them up with a jointer and a planer.<br />
Later, after making tenons, I cut out the<br />
curved upper and lower back slats on the<br />
bandsaw (see the top photo on the facing<br />
page), marked with a -in. plywood template<br />
made to a 36 in. radius. I cleaned up<br />
the bandsaw marks with a spokeshave and<br />
a compass plane.<br />
I made a special jig to clean up the back<br />
posts after they had been rough-cut to size<br />
on the bandsaw (see the photo and drawing<br />
at left). The jig is based on one in Tage
Frid Teaches <strong>Woodworking</strong>: Furniture making<br />
(The Taunton Press, 1985).<br />
Two legs are sandwiched between two<br />
pieces of birch plywood. One side of the jig<br />
is shaped for the outside cut and the other<br />
for the inside cut. Support blocks on each<br />
end and one in the middle of the jig register<br />
the pieces to be cut. Machine screws<br />
through one side thread into T-nuts in the<br />
other side and hold the legs firmly in place.<br />
I applied strips of self-adhesive sandpaper<br />
to the inside of each piece of the plywood<br />
jig to keep the legs from slipping.<br />
I trimmed the legs to size with a 3 hp<br />
router equipped with a -in. template<br />
guide and a 4-in. solid carbide up-cut<br />
spiral bit. I cut the front of each leg first and<br />
then moved it to the other side of the jig<br />
against the registration blocks. You can<br />
avoid too much stress on the bit and prevent<br />
tearout by making several passes with<br />
the router, adjusting the depth of cut a little<br />
at a time.<br />
Cutting the mortises<br />
All the chair parts except for the vertical<br />
slats are connected with -in. mortise-andtenon<br />
joints. Years ago, I developed a simple<br />
jig to cut the mortises for a batch of<br />
screen doors, and I was able to use it again<br />
for this project (see photos 1-4 on pp. 46-<br />
47). This jig is made of -in. plywood with<br />
sides that act as a carriage for the router. A<br />
-in. slot runs down the middle of the jig,<br />
stopping 2 in. from each end. Two adjustable<br />
stop blocks sit square in the carriage<br />
and control the length of the mortise.<br />
I held the piece to be mortised in the jig<br />
by clamping it to the underside, below the<br />
-in. slot. I used my 3 hp router with a<br />
-in. by 4-in. solid carbide up-cut spiral<br />
bit, adjusting the depth of cut with stops on<br />
the router. Even with the jig, this was a<br />
time-consuming process.<br />
Router bits don't cut square-cornered<br />
mortises. Rather than cleaning out all the<br />
corners by hand, I devised a method that<br />
works really well. I chucked a Lie-Nielsen<br />
corner chisel into my drill press (make sure<br />
it's unplugged). I clamped an adjustable<br />
fence to the drill-press table to rest the<br />
stock against and squared the chisel to<br />
the fence. The rack-and-pinion force of the<br />
drill press pared a clean, sharp corner in<br />
the mortise.<br />
Cut the tenons on the tablesaw<br />
All the Stickley chairs that I've seen are<br />
wider in front than in back. The side chair<br />
in Gustav Stickley's Making Authentic<br />
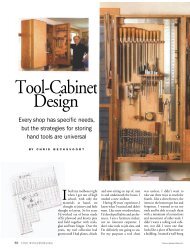
Cutting curved back slats<br />
Cutting the curved back slats—Convex and concave cuts<br />
from lumber yielded -in-thick slats, after the surfaces<br />
were scraped clean. These slats are the only curved pieces<br />
of the chair.<br />
Cutting angled tenons<br />
Double-blade tenoning on the tablesaw—With a custom-<br />
made jig, the author cut angled tenons for the side stretchers<br />
and side seat rails. Sawblades were set at a 4° pitch to the<br />
surface of the saw table and separated by a -in. spacer.
A jig for routing mortises<br />
1. Movable base supports make<br />
adjustments easy. Built for mortising a<br />
set of doors, this jig can be adjusted to<br />
cut mortises in stock of different widths.<br />
<strong>Crafts</strong>man Furniture narrows toward the<br />
back by in, I built these chairs to that<br />
dimension— in. wide at the front and<br />
18 in. wide at the back, with a seat depth of<br />
in. Because of this design detail, either<br />
the mortises or the tenons have to be angled<br />
on the seat rails and the stretchers. I<br />
decided it was easier to angle the tenons.<br />
I used the tenoning jig shown in the bottom<br />
photo on p. 45.<br />
By drawing the seat-plan view to fall size<br />
on a scrap of plywood, I determined that<br />
the front and back of the chair related to the<br />
sides by 4° off square, or 86°, so I set the<br />
sawblade to that angle. To cut the cheeks of<br />
the tenons on the seat rails and bottom<br />
stretchers, I used two blades of a dado set<br />
with a -in. spacer between them. You can<br />
adjust the height of the blades off the table<br />
to account for tenons of different length.<br />
After cutting all the angled tenons, I<br />
straightened the blade mechanism back to<br />
90° to cut all the cheeks for the horizontal<br />
stretcher, front and back seat rails, and the<br />
upper and lower back slats. The tenons for<br />
all these pieces are straight—parallel to the<br />
pieces themselves.<br />
Next I removed one of the dado blades<br />
from the table and set the remaining blade<br />
at 4° to cut half the shoulders of the angled<br />
tenons. I used a miter gauge with a positive<br />
stop. I lowered the blade, still set at 4°, and<br />
moved the miter gauge to the other slot to<br />
2. Use chair part to set jig. After<br />
securing one base piece, the author<br />
snugs the other one against a side<br />
stretcher and screws it in place.<br />
make the shoulder cuts on the other side.<br />
Then I straightened the blade and adjusted<br />
the height for cutting the shoulders of<br />
the rest of the tenons, except the horizontal<br />
stretcher. That piece has straight tenons,<br />
but the ends of the piece are cut to 86° to<br />
follow the shape of the chair seat. So the<br />
shoulder cuts for the horizontal stretcher<br />
are cut at 86° with the miter gauge.<br />
The tenons for all the -in.-sq. vertical<br />
slats were simple to make. To get -in.-sq.<br />
tenons, I cut all four sides at each end with<br />
a dado blade. A wooden backer board<br />
mounted with double-faced tape held each<br />
piece firmly against the miter gauge. I cut<br />
each piece slowly to avoid tearout on the<br />
corners of the slats. I used a sharp knife to<br />
carve the tenons down to a dowel shape to<br />
fit -in. holes drilled in the back slats, the<br />
side stretchers and the seat rails.<br />
<strong>Fine</strong>-tune and dry-fit the parts<br />
Before final assembly with glue, I always<br />
like to check the joinery by dry-fitting the<br />
parts (see the photo at right on the facing<br />
page). It helps me avoid surprises when I<br />
can least afford them. I check the fit of<br />
every piece and make adjustments as necessary<br />
with a chisel or a shoulder plane.<br />
I marked the through-dowel pins for the<br />
lower stretchers ( in. dia.) with a homemade<br />
gauge at 4 in. up from the bottom of<br />
each post. I drilled halfway in from either<br />
3. Stop blocks for the router determine<br />
the length of the mortise cuts and<br />
keep them all consistent. Pencil lines<br />
help to align the stock.<br />
side with a Forstner bit in the drill press.<br />
Scraping and sanding removed all the<br />
milling marks and provided a smooth surface<br />
for finishing. After a satisfactory dryfit,<br />
I completely disassembled the chair and<br />
stained all the parts.<br />
You have to think through the order in<br />
which the pieces of a chair go together, but<br />
it's really pretty simple. Vertical slats went<br />
in first, glued into both the back slats and<br />
the side-stretcher and seat-rail assemblies.<br />
I assembled whole sides by adding the<br />
front and back posts and clamped them to<br />
dry overnight. The next day, I put two sides<br />
together with the horizontal stretcher, the<br />
front and back seat rails, and the back-slat<br />
assembly to make a complete chair frame.<br />
I let any glue squeeze-out around the joints<br />
cure partially before removing the glue<br />
with a sharp chisel.<br />
After the glue had cured, I removed the<br />
clamps and glued and screwed -in.-thick<br />
corner blocks to the inside bottom of the<br />
chair. These add stability to the frame and<br />
support the inset rush seat. I go over the<br />
chair completely with 400-grit wet-or-dry<br />
sandpaper and follow that with a good<br />
rubdown using #0000 steel wool.<br />
A finish from Sam Maloof<br />
Oil on wood is really a beautiful finish,<br />
bringing out a depth that looks superior to<br />
any film finish. But on furniture and cabi
4. The depth of the mortise is con-<br />
trolled by the plunge mechanism on<br />
the router. The author secures stock<br />
to the jig with C-clamps.<br />
nets that come into contact with water, I<br />
had been hesitant to use such a finish until<br />
I read about Sam Maloof's three-part formula.<br />
He mixes equal parts of raw rung oil,<br />
boiled linseed oil and polyurethane. The<br />
polyurethane prevents this finish from<br />
showing water spots.<br />
With the temperature about 50° to 60°F, I<br />
sprayed this concoction on the chairs and<br />
let it soak in for 10 to 20 minutes. After that,<br />
I wiped it off with a rag, using a circular motion.<br />
I repeated this procedure two times,<br />
letting each coat dry a few days. Then I<br />
gave all the surfaces a final buff with #0000<br />
steel wool.<br />
The Maloof technique also calls for another<br />
mixture: equal parts tung oil, boiled<br />
linseed oil and beeswax. To make this, I<br />
melted some beeswax in a double boiler<br />
on the stove. While that was still in liquid<br />
form, I added the tung and linseed oils,<br />
mixing them together. When this mixture<br />
cools to a paste, it's easy to apply with a<br />
cotton cloth, rubbing in a circular motion.<br />
I applied three coats to the chairs. The<br />
beeswax gave this finish a nice, satiny glow.<br />
The frame and fiber rush seat<br />
Unlike most chairs made with a rush seat,<br />
this one has a separate frame screwed into<br />
place after it was woven. Fiber rush exerts a<br />
tremendous amount of pressure on a<br />
frame, so I decided to use plywood, figur-<br />
Dry-assemble all the pieces. This dress rehearsal for the final assembly helps the<br />
author avoid the costly mistake of glued joints that don't fit.<br />
ing the multiple alternating layers would<br />
hold up better over time. A -in. piece of<br />
plywood, cut out in the middle to make a<br />
-in.-wide frame, worked best.<br />
To learn how to weave a rush fiber seat, I<br />
consulted an article in FWW #85 (p. 51). As<br />
a source book for materials, The Carter's<br />
Handbook by Bruce W. Miller and Jim<br />
Widess came in handy. It is published by<br />
Lark Books, 50 College St., Asheville, NC<br />
28801, and it's available from Woodcraft<br />
Supply (800) 542-9115 or The Woodworkers'<br />
Store (800) 279-4441. The weaving<br />
process was time-consuming. Each seat<br />
took about a day to complete.<br />
Rex Alexander builds furniture, cabinetry<br />
and millwork in Brethren, Mich.<br />
Further reading<br />
Gustav Stickley built many fine<br />
examples of <strong>Arts</strong>-and-<strong>Crafts</strong> furniture<br />
in his factory. He also left a wealth of<br />
information in his monthly magazine<br />
The <strong>Crafts</strong>man (1901-1916). Much of<br />
this information has been republished<br />
in two books: <strong>Crafts</strong>man Homes,<br />
Architecture and Furnishings of the<br />
American <strong>Arts</strong> and <strong>Crafts</strong> Movement<br />
and Making Authentic <strong>Crafts</strong>man<br />
Furniture, both published by Dover<br />
Publications, 31 E. 2nd St., Mineola,<br />
NY 11501. These books are available<br />
through Manny's Woodworkers Place<br />
(800) 243-0713.