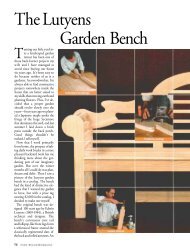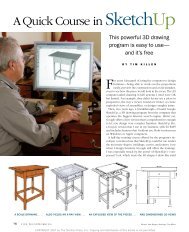
Arts & Crafts Style Chair - Fine Woodworking
Arts & Crafts Style Chair - Fine Woodworking
Arts & Crafts Style Chair - Fine Woodworking

Create successful ePaper yourself
Turn your PDF publications into a flip-book with our unique Google optimized e-Paper software.
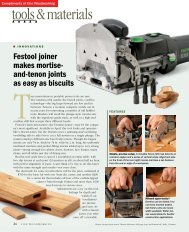
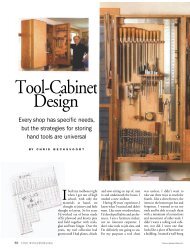
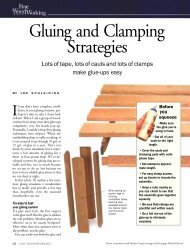
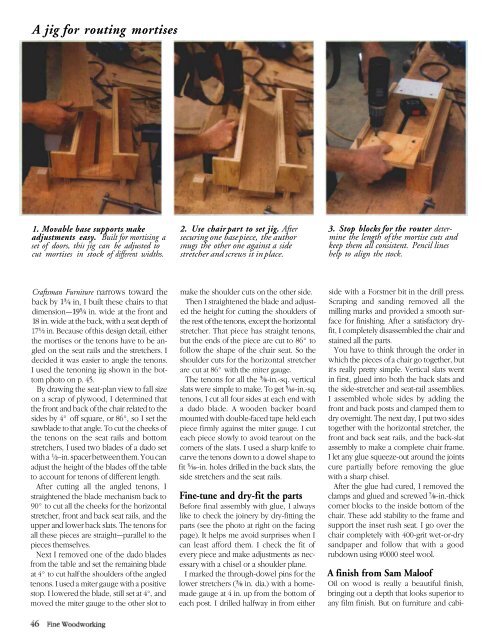
A jig for routing mortises<br />
1. Movable base supports make<br />
adjustments easy. Built for mortising a<br />
set of doors, this jig can be adjusted to<br />
cut mortises in stock of different widths.<br />
<strong>Crafts</strong>man Furniture narrows toward the<br />
back by in, I built these chairs to that<br />
dimension— in. wide at the front and<br />
18 in. wide at the back, with a seat depth of<br />
in. Because of this design detail, either<br />
the mortises or the tenons have to be angled<br />
on the seat rails and the stretchers. I<br />
decided it was easier to angle the tenons.<br />
I used the tenoning jig shown in the bottom<br />
photo on p. 45.<br />
By drawing the seat-plan view to fall size<br />
on a scrap of plywood, I determined that<br />
the front and back of the chair related to the<br />
sides by 4° off square, or 86°, so I set the<br />
sawblade to that angle. To cut the cheeks of<br />
the tenons on the seat rails and bottom<br />
stretchers, I used two blades of a dado set<br />
with a -in. spacer between them. You can<br />
adjust the height of the blades off the table<br />
to account for tenons of different length.<br />
After cutting all the angled tenons, I<br />
straightened the blade mechanism back to<br />
90° to cut all the cheeks for the horizontal<br />
stretcher, front and back seat rails, and the<br />
upper and lower back slats. The tenons for<br />
all these pieces are straight—parallel to the<br />
pieces themselves.<br />
Next I removed one of the dado blades<br />
from the table and set the remaining blade<br />
at 4° to cut half the shoulders of the angled<br />
tenons. I used a miter gauge with a positive<br />
stop. I lowered the blade, still set at 4°, and<br />
moved the miter gauge to the other slot to<br />
2. Use chair part to set jig. After<br />
securing one base piece, the author<br />
snugs the other one against a side<br />
stretcher and screws it in place.<br />
make the shoulder cuts on the other side.<br />
Then I straightened the blade and adjusted<br />
the height for cutting the shoulders of<br />
the rest of the tenons, except the horizontal<br />
stretcher. That piece has straight tenons,<br />
but the ends of the piece are cut to 86° to<br />
follow the shape of the chair seat. So the<br />
shoulder cuts for the horizontal stretcher<br />
are cut at 86° with the miter gauge.<br />
The tenons for all the -in.-sq. vertical<br />
slats were simple to make. To get -in.-sq.<br />
tenons, I cut all four sides at each end with<br />
a dado blade. A wooden backer board<br />
mounted with double-faced tape held each<br />
piece firmly against the miter gauge. I cut<br />
each piece slowly to avoid tearout on the<br />
corners of the slats. I used a sharp knife to<br />
carve the tenons down to a dowel shape to<br />
fit -in. holes drilled in the back slats, the<br />
side stretchers and the seat rails.<br />
<strong>Fine</strong>-tune and dry-fit the parts<br />
Before final assembly with glue, I always<br />
like to check the joinery by dry-fitting the<br />
parts (see the photo at right on the facing<br />
page). It helps me avoid surprises when I<br />
can least afford them. I check the fit of<br />
every piece and make adjustments as necessary<br />
with a chisel or a shoulder plane.<br />
I marked the through-dowel pins for the<br />
lower stretchers ( in. dia.) with a homemade<br />
gauge at 4 in. up from the bottom of<br />
each post. I drilled halfway in from either<br />
3. Stop blocks for the router determine<br />
the length of the mortise cuts and<br />
keep them all consistent. Pencil lines<br />
help to align the stock.<br />
side with a Forstner bit in the drill press.<br />
Scraping and sanding removed all the<br />
milling marks and provided a smooth surface<br />
for finishing. After a satisfactory dryfit,<br />
I completely disassembled the chair and<br />
stained all the parts.<br />
You have to think through the order in<br />
which the pieces of a chair go together, but<br />
it's really pretty simple. Vertical slats went<br />
in first, glued into both the back slats and<br />
the side-stretcher and seat-rail assemblies.<br />
I assembled whole sides by adding the<br />
front and back posts and clamped them to<br />
dry overnight. The next day, I put two sides<br />
together with the horizontal stretcher, the<br />
front and back seat rails, and the back-slat<br />
assembly to make a complete chair frame.<br />
I let any glue squeeze-out around the joints<br />
cure partially before removing the glue<br />
with a sharp chisel.<br />
After the glue had cured, I removed the<br />
clamps and glued and screwed -in.-thick<br />
corner blocks to the inside bottom of the<br />
chair. These add stability to the frame and<br />
support the inset rush seat. I go over the<br />
chair completely with 400-grit wet-or-dry<br />
sandpaper and follow that with a good<br />
rubdown using #0000 steel wool.<br />
A finish from Sam Maloof<br />
Oil on wood is really a beautiful finish,<br />
bringing out a depth that looks superior to<br />
any film finish. But on furniture and cabi