Arts & Crafts Style Chair - Fine Woodworking
Arts & Crafts Style Chair - Fine Woodworking
Arts & Crafts Style Chair - Fine Woodworking

You also want an ePaper? Increase the reach of your titles
YUMPU automatically turns print PDFs into web optimized ePapers that Google loves.
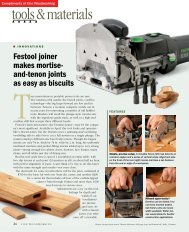
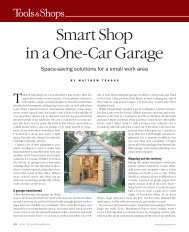
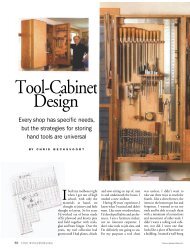
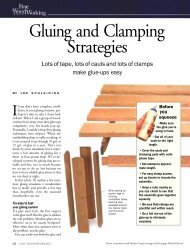
A plywood jig for<br />
shaping the back<br />
posts. A little time<br />
invested in this jig<br />
guaranteed that<br />
all back posts<br />
would be the same<br />
size and shape. A<br />
shaper with a rub<br />
collar works as<br />
well as a router.<br />
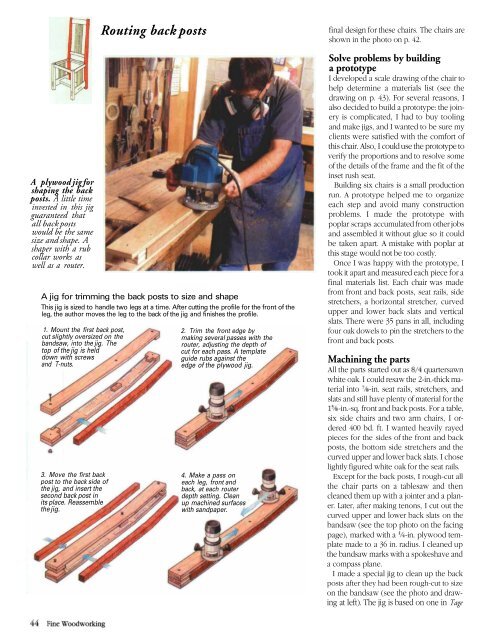
Routing back posts<br />
A jig for trimming the back posts to size and shape<br />
This jig is sized to handle two legs at a time. After cutting the profile for the front of the<br />
leg, the author moves the leg to the back of the jig and finishes the profile.<br />
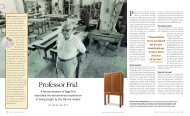
1. Mount the first back post,<br />
cut slightly oversized on the<br />
bandsaw, into the jig. The<br />
top of the jig is held<br />
down with screws<br />
and T-nuts.<br />
3. Move the first back<br />
post to the back side of<br />
the jig, and insert the<br />
second back post in<br />
its place. Reassemble<br />
the jig.<br />
2. Trim the front edge by<br />
making several passes with the<br />
router, adjusting the depth of<br />
cut for each pass. A template<br />
guide rubs against the<br />
edge of the plywood jig.<br />
4. Make a pass on<br />
each leg, front and<br />
back, at each router<br />
depth setting. Clean<br />
up machined surfaces<br />
with sandpaper.<br />
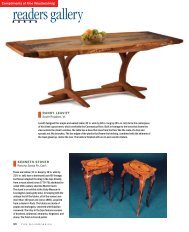
final design for these chairs. The chairs are<br />
shown in the photo on p. 42.<br />
Solve problems by building<br />
a prototype<br />
I developed a scale drawing of the chair to<br />
help determine a materials list (see the<br />
drawing on p. 43). For several reasons, I<br />
also decided to build a prototype: the joinery<br />
is complicated, I had to buy tooling<br />
and make jigs, and I wanted to be sure my<br />
clients were satisfied with the comfort of<br />
this chair. Also, I could use the prototype to<br />
verify the proportions and to resolve some<br />
of the details of the frame and the fit of the<br />
inset rush seat.<br />
Building six chairs is a small production<br />
run. A prototype helped me to organize<br />
each step and avoid many construction<br />
problems. I made the prototype with<br />
poplar scraps accumulated from other jobs<br />
and assembled it without glue so it could<br />
be taken apart. A mistake with poplar at<br />
this stage would not be too costly.<br />
Once I was happy with the prototype, I<br />
took it apart and measured each piece for a<br />
final materials list. Each chair was made<br />
from front and back posts, seat rails, side<br />
stretchers, a horizontal stretcher, curved<br />
upper and lower back slats and vertical<br />
slats. There were 35 pans in all, including<br />
four oak dowels to pin the stretchers to the<br />
front and back posts.<br />
Machining the parts<br />
All the parts started out as quartersawn<br />
white oak. I could resaw the 2-in.-thick material<br />
into -in. seat rails, stretchers, and<br />
slats and still have plenty of material for the<br />
-in.-sq. front and back posts. For a table,<br />
six side chairs and two arm chairs, I ordered<br />
400 bd. ft. I wanted heavily rayed<br />
pieces for the sides of the front and back<br />
posts, the bottom side stretchers and the<br />
curved upper and lower back slats. I chose<br />
lightly figured white oak for the seat rails.<br />
Except for the back posts, I rough-cut all<br />
the chair parts on a tablesaw and then<br />
cleaned them up with a jointer and a planer.<br />
Later, after making tenons, I cut out the<br />
curved upper and lower back slats on the<br />
bandsaw (see the top photo on the facing<br />
page), marked with a -in. plywood template<br />
made to a 36 in. radius. I cleaned up<br />
the bandsaw marks with a spokeshave and<br />
a compass plane.<br />
I made a special jig to clean up the back<br />
posts after they had been rough-cut to size<br />
on the bandsaw (see the photo and drawing<br />
at left). The jig is based on one in Tage