USB TV Stick Quick Installation Guide - MyGica
USB TV Stick Quick Installation Guide - MyGica
USB TV Stick Quick Installation Guide - MyGica

You also want an ePaper? Increase the reach of your titles
YUMPU automatically turns print PDFs into web optimized ePapers that Google loves.
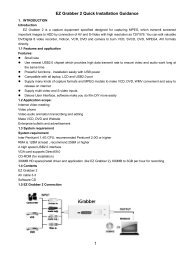
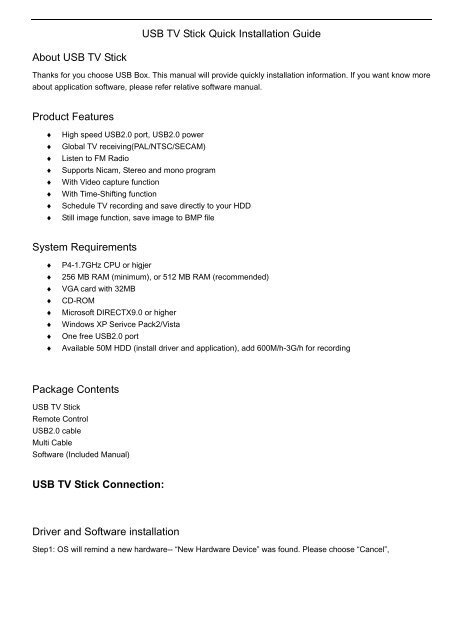
About <strong>USB</strong> <strong>TV</strong> <strong>Stick</strong><br />
<strong>USB</strong> <strong>TV</strong> <strong>Stick</strong> <strong>Quick</strong> <strong>Installation</strong> <strong>Guide</strong><br />
Thanks for you choose <strong>USB</strong> Box. This manual will provide quickly installation information. If you want know more<br />
about application software, please refer relative software manual.<br />
Product Features<br />
♦ High speed <strong>USB</strong>2.0 port, <strong>USB</strong>2.0 power<br />
♦ Global <strong>TV</strong> receiving(PAL/NTSC/SECAM)<br />
♦ Listen to FM Radio<br />
♦ Supports Nicam, Stereo and mono program<br />
♦ With Video capture function<br />
♦ With Time-Shifting function<br />
♦ Schedule <strong>TV</strong> recording and save directly to your HDD<br />
♦ Still image function, save image to BMP file<br />
System Requirements<br />
♦ P4-1.7GHz CPU or higjer<br />
♦ 256 MB RAM (minimum), or 512 MB RAM (recommended)<br />
♦ VGA card with 32MB<br />
♦ CD-ROM<br />
♦ Microsoft DIRECTX9.0 or higher<br />
♦ Windows XP Serivce Pack2/Vista<br />
♦ One free <strong>USB</strong>2.0 port<br />
♦ Available 50M HDD (install driver and application), add 600M/h-3G/h for recording<br />
Package Contents<br />
<strong>USB</strong> <strong>TV</strong> <strong>Stick</strong><br />
Remote Control<br />
<strong>USB</strong>2.0 cable<br />
Multi Cable<br />
Software (Included Manual)<br />
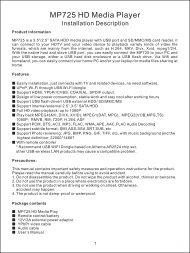
<strong>USB</strong> <strong>TV</strong> <strong>Stick</strong> Connection:<br />
Driver and Software installation<br />
Step1: OS will remind a new hardware-- “New Hardware Device” was found. Please choose “Cancel”,
Step2: When insert CD, OS will promote setup automatically. Click “Software Install”, or browse the CD to<br />
run <strong>USB</strong> _<strong>TV</strong>_<strong>Stick</strong>.exe.<br />
Step3: Choose setup language<br />
Step4: Click “yes” to install Window Media Format9
Step5: Click “Next” to entry MYGICA Install Shield Wizard.<br />
Step6: Click “Browse” to choose installation route, then click “Next” (Default route is better)<br />
Step7: Choose install the components, and click “Next”<br />
Step8: <strong>Installation</strong> need connect hardware device, please connect <strong>USB</strong> <strong>TV</strong> <strong>Stick</strong> to <strong>USB</strong>2.0 port.<br />
Step9:Click “Install” to continue installation driver<br />
Step10: OS will promote to install devices,Click “Continue Anyway”<br />
Step11: Click “Finish” to completely install the Driver Software.<br />
Step12 Install MPEG4 plugs, Click “Continue Anyway”
Step13: System will inform you to restart PC by click “finish” to finish installation.<br />
Step14: You will see that MYGICA <strong>TV</strong> icons will appear on your desktop.<br />
Step15: When its finished, please check on Control panel, select “System”—“System properties”—“Device<br />
Manager”, you can see three devices which new drivers are installed.
Remark: Please refer E-Manual for using software.<br />
Mygica <strong>TV</strong> User Interface
NO Description NO Description<br />
1 Start to record 16 Digit keys<br />
2 Play recorded files 17 Time-shifting<br />
3 Pause 18 Shift stereo<br />
4 Stop 19 Teltext<br />
5 Back forward 20 Shift video source<br />
6 Fast forward 21 Open the recorded file<br />
7 Hue control 22 Auto scan channel<br />
8 Status window 23 Switch to FM<br />
9 Minimize 24 16 channels preview<br />
10 Full screen, Window and video desktop<br />
switch<br />
25 Setting Setup menu<br />
11 Exit Mygica <strong>TV</strong> 26 Snapshot<br />
12 Jump to next channel 27 Schedule recording<br />
13 Jump to last channel 28 Mute<br />
14 Back to previous channel 29 Volume down<br />
15 Ten channels 30 Volume up<br />
Note: Functions with * are not suitable for this product.<br />
FM Interface<br />
NO Description NO Description<br />
1 Exit FM 9 Shift to <strong>TV</strong><br />
2 Minimize 10 Channel digit key<br />
3 FM copyright 11 Back to preview channel<br />
4 Volume bar 12 Open recorded files<br />
5 Start Record 13 Play recorded files<br />
Pause/stop recorded files<br />
Stop play next recorded files<br />
6 Mute 14 Display window state
7 Auto scan channel 15 Jump to next channel<br />
8 Setup menu 16 Jump to last channel<br />
Remote Control and key description<br />
Key Description<br />
NO<br />
1 Switch input source: Switch from <strong>TV</strong>, Composite<br />
video<br />
2 Turn On/Off Mygica <strong>TV</strong> application software<br />
3 Digital Keys<br />
4 Return to previous channel<br />
5 Single/double/triple digit<br />
6 CH+.CH-; Channel Up/Down<br />
VOL+.VOL-; Volume Up/Down<br />
Mute<br />
7 Brightness up<br />
8 Brightness down<br />
9 AUD:Stereo/Mono<br />
10 TTX;Teltext<br />
11 Record: Record/stop<br />
Play: Play recorded files<br />
Pause<br />
Stop/record<br />
Fast forward<br />
Back forward<br />
Auto scan channel<br />
Snapshot<br />
Setup menu<br />
Full screen window and video desktop switch<br />
FM: Switch to FM<br />
Power off: Off PC.<br />
FAQ:<br />
Q1: Why is the image discontinuit:y?
A1: 1. Please try others <strong>USB</strong> slot in your PC.<br />
2. Please check If the OS requirement is lower than the minimum request.<br />
3. DirectX Show. Please check if the VGA card supports Direct Show.<br />
4. Please Upgrade your PC to Windows XP Service pack2.<br />
Q2: Why do the drive not be installed?<br />
A2: 1. Please check if the name of Facility Management is <strong>USB</strong> <strong>TV</strong> <strong>Stick</strong>.<br />
2. Update DIRECTX9.0C is belonging to CD.<br />
Q3: Why can not see the image?<br />
A3: 1. Try to pull out reinsert application.<br />
2. Try to reinstall driver.<br />
Q4: Why do the color and sound have problem when watching <strong>TV</strong>?<br />
A4: Please check if the “Country and Zone” is correct.<br />
Remark: The accessories and bundled software may not be the exactly same as this manual. The specifications<br />
are subject to change without notice.