Total maxillectomy and Orbital Exenteration - Vula - University of ...
Total maxillectomy and Orbital Exenteration - Vula - University of ...
Total maxillectomy and Orbital Exenteration - Vula - University of ...

Create successful ePaper yourself
Turn your PDF publications into a flip-book with our unique Google optimized e-Paper software.
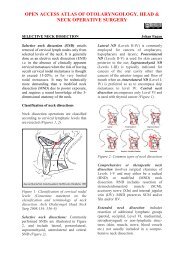
OPEN ACCESS ATLAS OF OTOLARYNGOLOGY, HEAD &<br />
NECK OPERATIVE SURGERY<br />
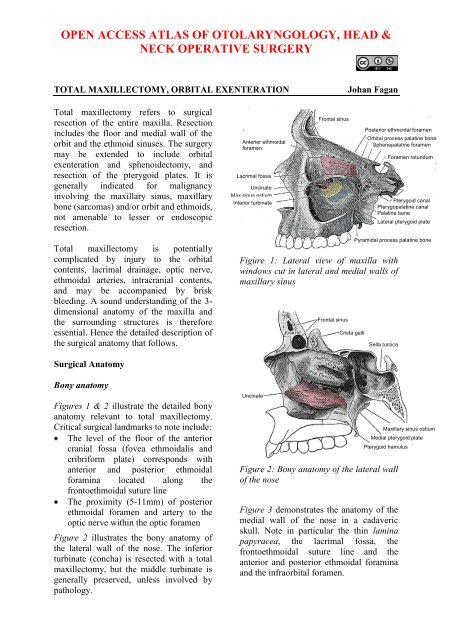
TOTAL MAXILLECTOMY, ORBITAL EXENTERATION Johan Fagan<br />
<strong>Total</strong> <strong>maxillectomy</strong> refers to surgical<br />
resection <strong>of</strong> the entire maxilla. Resection<br />
includes the floor <strong>and</strong> medial wall <strong>of</strong> the<br />
orbit <strong>and</strong> the ethmoid sinuses. The surgery<br />
may be extended to include orbital<br />
exenteration <strong>and</strong> sphenoidectomy, <strong>and</strong><br />
resection <strong>of</strong> the pterygoid plates. It is<br />
generally indicated for malignancy<br />
involving the maxillary sinus, maxillary<br />
bone (sarcomas) <strong>and</strong>/or orbit <strong>and</strong> ethmoids,<br />
not amenable to lesser or endoscopic<br />
resection.<br />
<strong>Total</strong> <strong>maxillectomy</strong> is potentially<br />
complicated by injury to the orbital<br />
contents, lacrimal drainage, optic nerve,<br />
ethmoidal arteries, intracranial contents,<br />
<strong>and</strong> may be accompanied by brisk<br />
bleeding. A sound underst<strong>and</strong>ing <strong>of</strong> the 3dimensional<br />
anatomy <strong>of</strong> the maxilla <strong>and</strong><br />
the surrounding structures is therefore<br />
essential. Hence the detailed description <strong>of</strong><br />
the surgical anatomy that follows.<br />
Surgical Anatomy<br />
Bony anatomy<br />
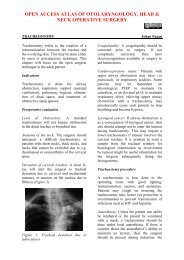
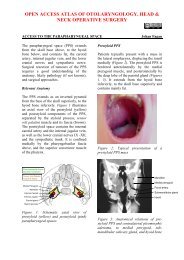
Figures 1 & 2 illustrate the detailed bony<br />
anatomy relevant to total <strong>maxillectomy</strong>.<br />
Critical surgical l<strong>and</strong>marks to note include:<br />
The level <strong>of</strong> the floor <strong>of</strong> the anterior<br />
cranial fossa (fovea ethmoidalis <strong>and</strong><br />
cribriform plate) corresponds with<br />
anterior <strong>and</strong> posterior ethmoidal<br />
foramina located along the<br />
frontoethmoidal suture line<br />
The proximity (5-11mm) <strong>of</strong> posterior<br />
ethmoidal foramen <strong>and</strong> artery to the<br />
optic nerve within the optic foramen<br />
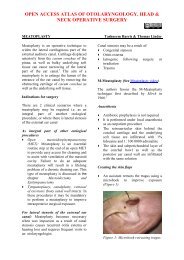
Figure 2 illustrates the bony anatomy <strong>of</strong><br />
the lateral wall <strong>of</strong> the nose. The inferior<br />
turbinate (concha) is resected with a total<br />
<strong>maxillectomy</strong>, but the middle turbinate is<br />
generally preserved, unless involved by<br />
pathology.<br />
Anterior ethmoidal<br />
foramen<br />
Lacrimal fossa<br />
Uncinate<br />
Max sinus ostium<br />
Inferior turbinate<br />
Frontal sinus<br />
Figure 1: Lateral view <strong>of</strong> maxilla with<br />
windows cut in lateral <strong>and</strong> medial walls <strong>of</strong><br />
maxillary sinus<br />
Uncinate<br />
Frontal sinus<br />
Crista galli<br />
Figure 2: Bony anatomy <strong>of</strong> the lateral wall<br />
<strong>of</strong> the nose<br />
Posterior ethmoidal foramen<br />
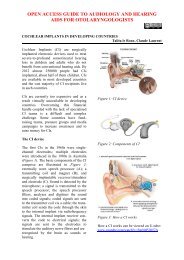
Figure 3 demonstrates the anatomy <strong>of</strong> the<br />
medial wall <strong>of</strong> the nose in a cadaveric<br />
skull. Note in particular the thin lamina<br />
papyracea, the lacrimal fossa, the<br />
frontoethmoidal suture line <strong>and</strong> the<br />
anterior <strong>and</strong> posterior ethmoidal foramina<br />
<strong>and</strong> the infraorbital foramen.<br />
<strong>Orbital</strong> process palatine bone<br />
Sphenopalatine foramen<br />
Foramen rotundum<br />
Pterygoid canal<br />
Pterygopalatine canal<br />
Palatine bone<br />
Lateral pterygoid plate<br />
Pyramidal process palatine bone<br />
Sella turcica<br />
Maxillary sinus ostium<br />
Medial pterygoid plate<br />
Pterygoid hamulus
Figure 3: Bony anatomy in cadaver<br />
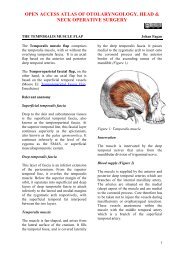
Figure 4 illustrates the coronal anatomy at<br />
the level <strong>of</strong> the anterior extent <strong>of</strong> a total<br />
<strong>maxillectomy</strong>. Specifically note the<br />
lacrimal sac, which is transected at surgery<br />
in the lacrimal fossa, <strong>and</strong> the relative<br />
heights <strong>of</strong> the floors <strong>of</strong> the antrum <strong>and</strong> the<br />
nasal cavity.<br />
Anterior cranial fossa floor<br />
Frontonasal duct<br />
Lacrimal sac in lacrimal fossa<br />
Anterior end <strong>of</strong> maxillary sinus<br />
Inferior turbinate<br />
Ant ethmoidal for<br />
Frontoethmoidal<br />
suture<br />
Post ethmoidal for<br />
Optic foramen<br />
Sup orbital fissure<br />
Lamina papyracea<br />
Inf orbital fissure<br />
Lacrimal fossa<br />
Infraorbital foramen<br />
Inferior turbinate<br />
Figure 4: Coronal CT slice through<br />
lacrimal fossa<br />
Figure 5 demonstrates the coronal<br />
anatomy midway back along a total<br />
<strong>maxillectomy</strong>. Specifically note the<br />
infraorbital nerve in the orbital floor, the<br />
thin lamina papyracea <strong>and</strong> the relative<br />
heights <strong>of</strong> the floors <strong>of</strong> the antrum <strong>and</strong> the<br />
nasal cavity.<br />
Floor anterior cranial fossa<br />
Lamina papyracea<br />
Middle turbinate<br />
Uncinate process<br />
Infraorbital nerve<br />
Maxillary sinus<br />
Inferior turbinate<br />
Figure 5: Anatomy in the coronal plane<br />
through the anterior ethmoids midway<br />
along a <strong>maxillectomy</strong><br />
Figures 6 & 7 illustrate the value <strong>of</strong> using<br />
the anterior <strong>and</strong> posterior ethmoidal<br />
arteries <strong>and</strong> frontoethmoidal suture line to<br />
determine the level <strong>of</strong> the floor <strong>of</strong> the<br />
anterior cranial fossa when opening the<br />
lamina papyracea from the orbital side<br />
during total <strong>maxillectomy</strong>.<br />
Fovea ethmoidalis<br />
Anterior ethmoidal foramen<br />
Lamina papyracea<br />
Uncinate process<br />
Infraorbital nerve<br />
Figure 6: Note the position <strong>of</strong> the anterior<br />
ethmoidal artery where it passes through<br />
its foramen which is located in the<br />
frontoethmoidal suture line<br />
2
Posterior ethmoidal foramen<br />
Optic nerve<br />
Lamina papyracea<br />
Ground lamella<br />
Inferior orbital fissure<br />
Figure 7: Coronal slice through posterior<br />
ethmoids demonstrating the posterior<br />
ethmoidal foramen <strong>and</strong> optic nerve<br />
Figure 8 demonstrates the coronal<br />
anatomy immediately posterior to the<br />
maxillary sinus, which is in the plane<br />
through which a total <strong>maxillectomy</strong> is<br />
done, <strong>and</strong> in which the internal maxillary<br />
artery <strong>and</strong> its branches as well as the<br />
sphenopalatine ganglion <strong>and</strong> its branches<br />
are encountered within the pterygopalatine<br />
fossa. The pterygopalatine fossa communicates<br />
laterally with the infratemporal fossa<br />
via the pterygomaxillary fissure, <strong>and</strong><br />
medially with the nasal cavity via the<br />
sphenopalatine foramen.<br />
<strong>Orbital</strong> apex<br />
Sphenopalatine foramen<br />
Pterygopalatine fossa<br />
Pterygomaxillary fissure<br />
Pterygoid plates<br />
Figure 8: Coronal cut immediately behind<br />
the maxillary sinus through the orbital<br />
apex, pterygoid plates <strong>and</strong> pterygopalatine<br />
fossa.<br />
Figures 9 & 10 illustrate axial views <strong>of</strong> the<br />
anatomy <strong>of</strong> the maxillary sinus. The<br />
posterior resection line <strong>of</strong> total <strong>maxillectomy</strong><br />
passes through the pterygopalatine<br />
fossa <strong>and</strong> pterygomaxillary fissure <strong>and</strong> the<br />
anterior aspect <strong>of</strong> the pterygoid plates.<br />
Infraorbital nerve<br />
Nasolacrimal duct<br />
Zygoma<br />
Pterygomaxillary<br />
fissure<br />
Pterygopalatine fossa<br />
Figure 9: Axial cut at level <strong>of</strong> infraorbital<br />
nerve <strong>and</strong> orbital floor<br />
Figure 10: Axial cut at level <strong>of</strong> infraorbital<br />
foramen <strong>and</strong> pterygoid plates<br />
The bony anatomy <strong>of</strong> the hard palate is<br />
illustrated in Figure 11.<br />
Figure 11: Anatomy <strong>of</strong> hard palate<br />
Infraorbital foramen<br />
Inferior turbinate<br />
Zygoma<br />
Pterygomaxillary fissure<br />
Pterygoid plates<br />
Incisive foramen<br />
Horizontal plate <strong>of</strong> palatine<br />
bone<br />
Greater palatine foramen<br />
Lesser palatine foramina<br />
Pterygoid plates<br />
3
Vasculature<br />
An underst<strong>and</strong>ing <strong>of</strong> the blood supply <strong>of</strong><br />
the maxilla permits the surgeon to<br />
anticipate when <strong>and</strong> where to encounter<br />
bleeding, <strong>and</strong> to plan the sequence <strong>of</strong> the<br />
surgery to reserve the bloodier parts <strong>of</strong> the<br />
surgery until last so as to minimise blood<br />
loss <strong>and</strong> to avoid blood obscuring the<br />
surgical field. The only significant vein<br />
encountered during <strong>maxillectomy</strong> is the<br />
angular vein (Figure 12) at the medial<br />
canthus.<br />
Figure 12: Vasculature around the orbit<br />
Angular vein<br />
The blood supply to the maxilla <strong>and</strong><br />
paranasal sinuses originates both from the<br />
external (Figures 13, 14) <strong>and</strong> internal<br />
carotid artery systems.<br />
The arterial supply relevant to<br />
<strong>maxillectomy</strong> is as follows:<br />
Angular artery<br />
Infraorbital<br />
artery<br />
Facial/external maxillary artery, a<br />
branch <strong>of</strong> the external carotid artery<br />
(Figures 12, 13)<br />
Internal maxillary artery, a branch <strong>of</strong><br />
the external carotid artery (Figures 13,<br />
14), passes through the pterygomaxillary<br />
fissure to enter the<br />
pterygopalatine fossa (Figures 14, 15).<br />
Transverse facial artery<br />
Internal maxillary artery<br />
External carotid artery<br />
Facial artery<br />
Figure 13: Facial artery <strong>and</strong> origin <strong>of</strong><br />
internal maxillary artery, both branches <strong>of</strong><br />
the external carotid artery<br />
Infraorbital artery<br />
Internal maxillary<br />
artery<br />
Figure 14: Internal maxillary artery<br />
viewed with m<strong>and</strong>ible removed, entering<br />
pterygopalatine fossa though the pterygomaxillary<br />
fissure<br />
Pterygomaxillary<br />
fissure<br />
Figure 15: The pterygomaxillary fissure<br />
through which internal maxillary artery<br />
passes to enter pterygopalatine fossa<br />
4
Figure 16: Branches <strong>of</strong> internal maxillary<br />
artery<br />
Branches <strong>of</strong> the internal maxillary artery<br />
<strong>of</strong> surgical significance include:<br />
Greater palatine artery (descending<br />
palatine) (Figure 16): It passes<br />
inferiorly from the pterygopalatine<br />
fossa through the pterygopalatine canal<br />
(Figure 1) <strong>and</strong> emerges from the<br />
greater palatine foramen <strong>of</strong> the hard<br />
palate (Figure 11). It then runs<br />
anteriorly medial to the superior<br />
alveolus <strong>and</strong> enters the incisive<br />
foramen (Figure 11).<br />
Infraorbital artery: It courses in the<br />
infraorbital groove <strong>and</strong> canal with the<br />
infraorbital nerve in the floor <strong>of</strong> the<br />
orbit/ro<strong>of</strong> <strong>of</strong> antrum <strong>and</strong> exits<br />
anteriorly via the infraorbital foramen<br />
to supply the overlying s<strong>of</strong>t tissues <strong>of</strong><br />
the face (Figures 12, 14).<br />
Sphenopalatine artery (Figure 16): It<br />
enters the nasal cavity through the<br />
sphenopalatine foramen at the back <strong>of</strong><br />
the superior meatus.<br />
Posterior lateral nasal arteries: They<br />
are branches <strong>of</strong> the sphenopalatine<br />
artery<br />
Posterior septal artery: This is a<br />
branch <strong>of</strong> the sphenopalatine artery <strong>and</strong><br />
crosses the posterior nasal cavity just<br />
above the posterior choana to end on<br />
the nasal septum; one branch descends<br />
in a groove in the vomer to enter the<br />
incisive canal <strong>and</strong> anastomose with the<br />
greater palatine artery.<br />
Branches <strong>of</strong> the internal carotid artery <strong>of</strong><br />
surgical significance are:<br />
Anterior ethmoidal artery: It<br />
originates from the internal carotid<br />
artery <strong>and</strong> enters the orbit through the<br />
anterior ethmoidal foramen (Figure 3)<br />
which is located 25 mm from the<br />
anterior lacrimal crest<br />
Posterior ethmoidal artery: It<br />
originates from the internal carotid<br />
artery <strong>and</strong> enters the orbit through the<br />
posterior ethmoidal foramen (Figures<br />
1, 3, 7). It is located approximately<br />
36mm from the anterior lacrimal crest,<br />
<strong>and</strong> 12mm (8-19 mm) from the anterior<br />
ethmoidal foramen<br />
Ophthalmic artery: It emerges with the<br />
optic nerve from the optic foramen,<br />
44mm from the anterior lacrimal crest<br />
<strong>and</strong> approximately 6 mm (5-11 mm)<br />
from the posterior ethmoidal foramen<br />
Nerves<br />
The maxillary division <strong>of</strong> V (V2) enters<br />
the pterygopalatine fossa via foramen<br />
rotundum. The only branch <strong>of</strong> surgical<br />
significance is the infraorbital nerve. It<br />
runs in the floor <strong>of</strong> the orbit/ro<strong>of</strong> <strong>of</strong> the<br />
antrum to exit from the infraorbital<br />
foramen (Figure 3, 17). The only other<br />
major nerve that has to be considered at<br />
<strong>maxillectomy</strong> is the optic nerve.<br />
Figure 17: V2, pterygopalatine ganglion<br />
<strong>and</strong> infraorbital nerve<br />
5
<strong>Orbital</strong> structures<br />
Figure 18: Right medial orbital wall<br />
Post ethmoidal for<br />
Ant ethmoidal for<br />
Frontoethmoidal<br />
suture<br />
Optic foramen<br />
Lamina papyracea<br />
Sup orbital fissure<br />
Lacrimal fossa<br />
Inf orbital fissure<br />
Infraorbital foramen<br />
Figure 18 shows the detailed bony<br />
anatomy <strong>of</strong> the orbit. During dissection <strong>of</strong><br />
the orbit, the following structures are<br />
encountered: medial palpebral ligament,<br />
orbital septum, lacrimal sac, periosteum,<br />
anterior <strong>and</strong> posterior ethmoidal arteries<br />
<strong>and</strong> inferior orbital fissure (Figure 18, 19).<br />
Only when doing orbital exenteration is the<br />
superior orbital fissure encountered.<br />
Supraorbital<br />
groove<br />
Lacrimal sac<br />
Medial canthal<br />
ligament<br />
<strong>Orbital</strong> septum<br />
Lacrimal fossa <strong>and</strong><br />
nasolacrimal canal<br />
Infraorbital foramen<br />
Figure 19: Right orbit showing medial<br />
palpebral ligament, orbital septum,<br />
lacrimal sac <strong>and</strong> lacrimal fossa<br />
<strong>Orbital</strong> septum (Figure 19): This<br />
connective tissue structure attaches<br />
circumferentially to the periosteum <strong>of</strong><br />
the orbital margin <strong>and</strong> acts as a<br />
diaphragm that retains the orbital<br />
contents. Laterally, it is attached to the<br />
orbital margin 1.5mm anterior to the<br />
attachment <strong>of</strong> the lateral palpebral<br />
ligament at the lateral orbital tubercle.<br />
Superomedially it crosses the supraorbital<br />
groove, passes inferomedially<br />
anterior to the trochlea, <strong>and</strong> follows the<br />
posterior lacrimal crest behind the<br />
lacrimal sac. It crosses the lacrimal sac<br />
to reach the anterior lacrimal crest,<br />
passes inferiorly along the anterior<br />
lacrimal crest <strong>and</strong> then laterally along<br />
the inferior orbital rim.<br />
Medial palpebral ligament (medial<br />
canthal tendon) (Figure 19): This<br />
fibrous b<strong>and</strong> fixes the tarsal plates to<br />
the medial orbital wall. It is intimately<br />
related to the lacrimal drainage system.<br />
It lies anterior to the canaliculi, but a<br />
deep head inserts into the posterior<br />
lacrimal crest <strong>and</strong> onto the fascia <strong>of</strong> the<br />
lacrimal sac.<br />
Lacrimal sac (Figures 18, 19, 20): It is<br />
located in the lacrimal fossa, which is<br />
bound medially by the lacrimal bone<br />
<strong>and</strong> the frontal process <strong>of</strong> the maxilla<br />
(Figures 1, 18). It is related anteriorly,<br />
laterally, <strong>and</strong> posteriorly to the medial<br />
palpebral ligament.<br />
Figure 20: Right lacrimal system<br />
Inferior orbital fissure (Figure 18,<br />
21): It is situated in the floor <strong>of</strong> the<br />
orbit <strong>and</strong> separates the sphenoid bone<br />
from the maxilla. It transmits the<br />
maxillary nerve <strong>and</strong> a few minor<br />
6
Lacrimal n<br />
VI n<br />
nerves, but no vessels <strong>of</strong> surgical<br />
significance<br />
Superior orbital fissure (Figure 18,<br />
21): This fissure lies between the lesser<br />
<strong>and</strong> greater wings <strong>of</strong> the sphenoid<br />
bone. Important anatomical structures<br />
that pass through the fissure are cranial<br />
nerves III, IV, VI; <strong>and</strong> the superior <strong>and</strong><br />
inferior divisions <strong>of</strong> ophthalmic vein.<br />
Superior<br />
orbital fissure<br />
III n<br />
Frontal n<br />
Inferior orbital<br />
fissure<br />
Figure 21: Superior <strong>and</strong> inferior orbital<br />
fissures <strong>of</strong> (R) orbit<br />
<strong>Total</strong> Maxillectomy Operation<br />
IV n<br />
Optic<br />
foramen<br />
<strong>Total</strong> <strong>maxillectomy</strong> entails resection <strong>of</strong> the<br />
entire maxilla, <strong>and</strong> including the orbital<br />
floor <strong>and</strong> medial wall <strong>of</strong> the orbit <strong>and</strong> the<br />
ethmoid sinuses (Figure 22). The surgery<br />
may be extended to include resection <strong>of</strong><br />
the lateral orbital wall <strong>and</strong> zygoma,<br />
exenteration <strong>of</strong> the orbit, sphenoidectomy,<br />
<strong>and</strong> resection <strong>of</strong> the pterygoid plates.<br />
CT scanning is an important means <strong>of</strong><br />
determining the superior (orbit <strong>and</strong> ro<strong>of</strong> <strong>of</strong><br />
ethmoids), posterior (pterygoid plates),<br />
lateral (zygoma <strong>and</strong> infratemporal fossa)<br />
<strong>and</strong> medial extent <strong>of</strong> the tumour <strong>and</strong> the<br />
resection required.<br />
Figure 22: Yellow area indicates extent <strong>of</strong><br />
bony resection <strong>of</strong> total <strong>maxillectomy</strong><br />
Once a tumour involves orbital fat<br />
<strong>and</strong>/muscle, then orbital exenteration is<br />
generally recommended. Tumour<br />
extension to involve the pterygoid muscles<br />
precludes a <strong>maxillectomy</strong>, as getting clear<br />
margins once the pterygoid muscles are<br />
invaded by cancer is unlikely.<br />
Surgical steps<br />
Preoperative consent includes discussing<br />
the need for a tracheostomy, the facial<br />
incisions, loss <strong>of</strong> sensation in the<br />
infraorbital nerve distribution, diplopia,<br />
epiphora, enophthalmos, telecanthus,<br />
potential injury to the optic nerve, <strong>and</strong> CSF<br />
leak.<br />
The operation is done under general<br />
anaesthesia, with orotracheal intubation. If<br />
the eye is to be preserved then eyelids are<br />
sutured together with 6/0 silk taking care<br />
not to invert the eyelashes as to avoid<br />
corneal abrasions, unless an orbital<br />
exenteration is planned. A tracheostomy is<br />
then done. Perioperative broad spectrum<br />
antibiotics are administered for 24hrs.<br />
Local anaesthetic with vasoconstrictor is<br />
injected along the planned skin incisions.<br />
The nasal cavity is decongested with a<br />
topical vasoconstrictor.<br />
7
The operation may be considered in 3<br />
stages: s<strong>of</strong>t tissue dissection & bone<br />
exposure; bone resection; <strong>and</strong><br />
closure/reconstruction.<br />
It is important to complete the s<strong>of</strong>t tissue<br />
dissection <strong>and</strong> bone exposure before<br />
doing any bone work so as to avoid<br />
excessive blood loss.<br />
S<strong>of</strong>t tissue dissection/bone exposure<br />
<strong>Total</strong> <strong>maxillectomy</strong> may be done via<br />
lateral rhinotomy (Figure 23),<br />
midfacial degloving (Figure 24) or<br />
Weber-Ferguson approach (Figure<br />
25). The midfacial degloving approach<br />
avoids facial scars <strong>and</strong> is suited to<br />
resections that do not extend above the<br />
orbital floor i.e. do not include<br />
resection <strong>of</strong> the lamina papyracea <strong>and</strong><br />
ethmoids. Once the resection requires<br />
removal <strong>of</strong> the medial wall <strong>of</strong> the orbit<br />
<strong>and</strong> the ethmoids, lateral rhinotomy<br />
provides better access.<br />
Figure 23: Lateral rhinotomy incision<br />
(solid line). A lip split <strong>and</strong> inferior lid<br />
(Weber-Ferguson) incision may be<br />
required for access<br />
Figure 24: Midfacial degloving approach<br />
Figure 25: Weber-Ferguson approach<br />
The sublabial mucosa is incised with<br />
electrocautery along the gingivobuccal<br />
sulcus onto the maxilla <strong>and</strong> extended<br />
all the way to the maxillary tuberosity<br />
(Figure 24, 25).<br />
The facial skin is incised with a<br />
scalpel. The remainder <strong>of</strong> the s<strong>of</strong>t<br />
tissue dissection may be done with<br />
electrocautery. The incision is<br />
extended onto the nasal bone <strong>and</strong><br />
maxilla.<br />
The angular vessels are cauterised or<br />
ligated adjacent to the medial canthus<br />
<strong>of</strong> the eye (Figure 12).<br />
With a Weber-Ferguson approach, the<br />
lower lid incision is placed close to the<br />
palpebral margin so as to avoid oedema<br />
<strong>of</strong> the lower lid above the scar<br />
following surgery. The lower lid skin is<br />
8
elevated down to the inferior orbital<br />
rim (Figure 25).<br />
The s<strong>of</strong>t tissues <strong>of</strong> the face are<br />
elevated <strong>of</strong>f the face <strong>of</strong> the maxilla<br />
using cautery or an elevator, remaining<br />
hard on bone while doing this<br />
dissection (Figure 25). Expose the<br />
entire face <strong>of</strong> the maxilla. Transect the<br />
infraorbital nerve <strong>and</strong> vessels with<br />
cautery, <strong>and</strong> if there is concern about<br />
perineural invasion, sample the nerve<br />
to ensure clear margins. Strip the<br />
tissues all the way around the maxilla<br />
up to the pterygomaxillary fissure <strong>and</strong><br />
the zygoma (Figure 15). Do not use<br />
sharp dissection beyond the fissure so<br />
as to avoid transecting the internal<br />
maxillary artery.<br />
Sequentially identify the medial<br />
palpebral ligament, anterior lacrimal<br />
crest, lacrimal sac in the lacrimal<br />
fossa, <strong>and</strong> posterior lacrimal crest<br />
(Figures 18, 19).<br />
Divide the medial palpebral ligament<br />
Elevate the lacrimal sac from its fossa.<br />
Transect the sac as distally as possible<br />
with a scalpel, so as to facilitate<br />
fashioning a dacryocystorhinostomy.<br />
Expect some bleeding from the<br />
transected sac.<br />
Next the medial <strong>and</strong> inferior orbit is<br />
exposed. Strip the orbital contents in a<br />
subperiosteal plane from the lamina<br />
papyracea <strong>and</strong> frontal bone taking care<br />
not to fracture or penetrate the paperthin<br />
bone <strong>of</strong> the lamina papyracea.<br />
Identify the frontoethmoidal suture<br />
(Figure 18). This is a crucial surgical<br />
l<strong>and</strong>mark as it corresponds with the<br />
level <strong>of</strong> the cribriform plate <strong>and</strong> the<br />
anterior <strong>and</strong> posterior ethmoidal<br />
foramina.<br />
Gently retract the orbital contents<br />
laterally <strong>and</strong> identify the anterior<br />
ethmoidal artery as it bridges the<br />
divide between the anterior ethmoidal<br />
foramen <strong>and</strong> the periorbita (Figure<br />
26). The anterior ethmoidal artery is<br />
ligated, clipped or bipolared <strong>and</strong><br />
divided (Figure 26, 27), thereby<br />
providing access to the posterior<br />
ethmoidal artery. It is generally not<br />
necessary to divide this vessel.<br />
<strong>Orbital</strong><br />
periosteum<br />
Figure 26: Anterior ethmoidal artery<br />
(AEA) exiting anterior ethmoidal foramen<br />
at level <strong>of</strong> frontoethmoidal suture line<br />
<strong>Orbital</strong><br />
periosteum<br />
AEA<br />
AEA<br />
Lamina<br />
papyracea<br />
Lamina<br />
papyracea<br />
Figure 27: Liga clips being applied to<br />
anterior ethmoidal artery (AEA)<br />
Now strip along the floor <strong>of</strong> the orbit<br />
in a subperiosteal plane. Take special<br />
care not to tear the periosteum at the<br />
inferior orbital margin at the<br />
attachment <strong>of</strong> the orbital septum so as<br />
to avoid entering the orbit <strong>and</strong> causing<br />
extrusion <strong>of</strong> orbital fat.<br />
Next free the s<strong>of</strong>t tissues from the bone<br />
up to the anterior free margin <strong>of</strong> the<br />
nasal aperture with diathermy. Retract<br />
the nasal ala <strong>and</strong> incise the lateral wall<br />
9
<strong>of</strong> the nasal vestibule to expose the<br />
ipsilateral nasal cavity <strong>and</strong> inferior<br />
turbinate, taking care not to injure the<br />
inferior turbinate or septum so as to<br />
avoid troublesome bleeding.<br />
Using a tonsil gag in the mouth to<br />
retract the tongue, visualise the hard<br />
<strong>and</strong> s<strong>of</strong>t palates. Identify the maxillary<br />
tuberosity <strong>and</strong> the bony spines <strong>of</strong> the<br />
pterygoid plates immediately posterior<br />
to the tuberosity.<br />
Using electrocautery, incise the<br />
mucosa <strong>of</strong> the hard palate along the<br />
planned medial resection margin, <strong>and</strong><br />
extend the sublabial incision laterally<br />
around the maxillary tuberosity, <strong>and</strong><br />
into the groove between the tuberosity<br />
<strong>and</strong> the pterygoid plates.<br />
Palpate <strong>and</strong> define the posterior edge <strong>of</strong><br />
the hard palate, <strong>and</strong> divide the<br />
attachment <strong>of</strong> the s<strong>of</strong>t palate to the<br />
hard palate with electrocautery,<br />
thereby entering the nasopharynx.<br />
Anticipate <strong>and</strong> diathermise bleeding<br />
from branches <strong>of</strong> the greater <strong>and</strong> lesser<br />
palatine arteries.<br />
At this point the s<strong>of</strong>t tissue dissection is<br />
complete. The bony part <strong>of</strong> the<br />
<strong>maxillectomy</strong> can now been done.<br />
Bony resection<br />
The extent <strong>of</strong> the bony resection is tailored<br />
to the primary tumour <strong>and</strong> may include the<br />
lateral wall <strong>of</strong> the orbit <strong>and</strong> zygoma,<br />
especially if the antrum is seen to extend<br />
into the zygoma on CT imaging. Figures<br />
28 – 30 illustrate the extent <strong>of</strong> the bone<br />
resection following a classic total<br />
<strong>maxillectomy</strong>.<br />
Figure 28: Coronal CT anteriorly though<br />
lacrimal fossa, demonstrating resected<br />
maxilla, inferior <strong>and</strong> medial orbital walls<br />
<strong>and</strong> transected lacrimal sac<br />
Figure 29: Coronal CT demonstrating<br />
resected lateral nasal wall including<br />
inferior turbinate <strong>and</strong> uncinate process,<br />
orbital floor including the infraorbital<br />
nerve, the lamina papyracea <strong>and</strong> anterior<br />
ethmoidectomy, with preservation <strong>of</strong> the<br />
middle turbinate<br />
10
Figure 30: Coronal CT more posteriorly<br />
demonstrating resected maxilla, inferior<br />
turbinate, medial <strong>and</strong> inferior orbital<br />
walls, <strong>and</strong> posterior ethmoidectomy with<br />
resection remaining below the level <strong>of</strong> the<br />
posterior ethmoidal foramen, <strong>and</strong> with<br />
preservation <strong>of</strong> middle turbinate<br />
The sequence <strong>of</strong> the osteotomies is<br />
planned to reserve troublesome bleeding to<br />
the end <strong>of</strong> the procedure (Figure 31 - 35).<br />
It may need to be adjusted depending on<br />
the location <strong>and</strong> extent <strong>of</strong> the tumour.<br />
1. Osteotomy through inferior orbital<br />
rim <strong>and</strong> along orbital floor (Figures<br />
29-31): A sharp osteotome/power<br />
saw/bone nibbler is used to cut through<br />
the malar buttress / inferior orbital rim.<br />
This osteotomy is placed lateral to the<br />
antrum as seen on the CT scan so as<br />
not to enter the antrum. While<br />
retracting <strong>and</strong> protecting the orbital<br />
contents with a narrow copper retractor<br />
the osteotomy is then continued<br />
posteriorly through the thin bone <strong>of</strong> the<br />
orbital floor/antral ro<strong>of</strong> using a sharp<br />
osteotome <strong>and</strong> aiming for the<br />
infraorbital fissure.<br />
2. Osteotomy through frontal process <strong>of</strong><br />
maxilla <strong>and</strong> lacrimal bone (Figures<br />
31-33): This thick bone is best<br />
transected with a Kerrison’s rongeur or<br />
oscillating saw. There is <strong>of</strong>ten<br />
persistent minor bleeding from the<br />
bone that may be controlled with bone<br />
wax or cautery. The osteotomy is<br />
directed towards, but kept a few<br />
millimetres below, the level <strong>of</strong><br />
frontoethmoidal suture line.<br />
3. Osteotomy through lamina papyracea<br />
<strong>and</strong> anterior ethmoids (Figures 6, 18,<br />
28-33): This osteotomy is done by<br />
gently tapping on an osteotome to enter<br />
the ethmoid air cell system while<br />
carefully retracting the orbital contents<br />
laterally. It is critical that this<br />
osteotomy be kept a few millimetres<br />
below the level <strong>of</strong> the frontoethmoidal<br />
suture line <strong>and</strong> the ethmoidal foramina<br />
so as to avoid fracturing or penetrating<br />
through the cribriform plate (Figures 5,<br />
6, 29, 39). The osteotomy stops short<br />
<strong>of</strong> the posterior ethmoidal artery <strong>and</strong><br />
then is directed inferiorly towards the<br />
orbital floor so as to safeguard the<br />
optic nerve.<br />
Figure 31: Osteotomies: oblique view<br />
11
Figure 32: Osteotomies (anterior view)<br />
Figure 33: Osteotomy cuts<br />
4. Palatal osteotomy (Figures 32-35, 39,<br />
40): A sharp osteotome/power saw is<br />
used to cut vertically through the<br />
superior alveolus <strong>and</strong> hard palate. The<br />
placement <strong>of</strong> this osteotomy is<br />
dependent on the palatal extent <strong>of</strong> the<br />
tumour. It is <strong>of</strong>ten preferable to extract<br />
a tooth <strong>and</strong> to place the osteotomy<br />
through the dental socket, rather than<br />
to place it between two teeth as this<br />
might devitalise the adjacent two teeth<br />
<strong>and</strong> it makes s<strong>of</strong>t tissue closure more<br />
difficult. The palatal osteotomy is<br />
extended to the posterior margin <strong>of</strong> the<br />
hard palate.<br />
Figure 34: Palatal osteotomies. Note<br />
osteotomy passes between palate <strong>and</strong><br />
pterygoid plates<br />
5. Osteotomy <strong>of</strong> nasal septum: This is<br />
only required when the palatal<br />
osteotomy is placed across the<br />
midline. The nasal septum is then<br />
divided parallel to the nasal floor with<br />
an osteotome or heavy scissors.<br />
6. Osteotomy to separate maxillary<br />
tuberosity from pterygoid plates<br />
(Figures 34-36): This is the final<br />
osteotomy, <strong>and</strong> is done by tapping<br />
with a (curved) osteotome in the<br />
groove between the maxillary<br />
tuberosity <strong>and</strong> the pterygoid bone.<br />
Superiorly this cut ends in the<br />
pterygomaxillary fissure <strong>and</strong> the<br />
pterygopalatine fossa.<br />
12
Figure 35: Osteotomy between maxillary<br />
tuberosity & pterygoid<br />
Figure 36: Curved osteotome<br />
The <strong>maxillectomy</strong> specimen can now be<br />
gently down-fractured.<br />
The internal maxillary artery tethers the<br />
specimen laterally, <strong>and</strong> is clipped <strong>and</strong><br />
divided where it enters the<br />
pterygomaxillary fissure. If the artery is<br />
inadvertently transected, it is clipped <strong>and</strong><br />
ligated. If the artery is not apparent, then it<br />
should be specifically looked for as it may<br />
have gone into spasm <strong>and</strong> may bleed later.<br />
The specimen is removed <strong>and</strong> inspected to<br />
determine the adequacy <strong>of</strong> the tumour<br />
resection (Figure 37).<br />
Figure 37: Maxillectomy specimens<br />
The remnants <strong>of</strong> the ethmoids are carefully<br />
inspected. An external ethmoidectomy<br />
may safely be completed up to the<br />
cribriform plate (Figures 29, 30, 38-40).<br />
The need for external frontoethmoidectomy<br />
+/- sphenoidectomy is determined,<br />
<strong>and</strong> evidence <strong>of</strong> a CSF leak is excluded.<br />
Arterial <strong>and</strong> venous bleeding occur from<br />
the pterygoid venous plexus it may initially<br />
be controlled with packing. Meticulous<br />
haemostasis is achieved with bipolar<br />
cautery, suture ligatures, clips, bone wax,<br />
<strong>and</strong> topical haemostatics.<br />
Figures 38-41 demonstrate total<br />
<strong>maxillectomy</strong> defects. Note the location <strong>of</strong><br />
the face <strong>of</strong> the sphenoid sinus that may be<br />
opened <strong>and</strong> stripped <strong>of</strong> mucosa for<br />
oncological reasons.<br />
Sup orbital fissure<br />
Post eth foramen<br />
Optic foramen<br />
Face <strong>of</strong> sphenoid<br />
Middle turbinate<br />
Foramen rotundum<br />
Inf orbital fissure<br />
Pterygoid plates<br />
Figure 38: Maxillectomy defect (Anterior<br />
view)<br />
13
Post eth foramen<br />
Post eth foramen<br />
Cribriform plate<br />
Optic foramen<br />
Face <strong>of</strong> sphenoid<br />
Middle turbinate<br />
Foramen rotundum<br />
Figure 39: Maxillectomy defect<br />
(Anterolateral view)<br />
Frontonasal duct<br />
Cribriform plate<br />
Face <strong>of</strong> sphenoid<br />
Figure 40: Maxillectomy defect (Inferior<br />
view)<br />
Figure 41: Maxillectomy (bilateral) defect<br />
Closure/Reconstruction<br />
The objectives <strong>of</strong> closure <strong>and</strong><br />
reconstruction are to prevent epiphora, to<br />
separate the oral cavity from the nose <strong>and</strong><br />
orbit, to preserve the facial contours, to<br />
minimise enophthalmos <strong>and</strong> diplopia, to<br />
maintain a nasal airway, <strong>and</strong> to restore<br />
dentition.<br />
Epiphora: The lacrimal sac is slit along its<br />
length <strong>and</strong> marsupialised by suturing its<br />
edges to the surrounding s<strong>of</strong>t tissue with<br />
vicryl sutures.<br />
Oronasal separation may be achieved in a<br />
number <strong>of</strong> ways:<br />
Dental obturator (Figure 42): This can<br />
be fashioned to fill the defect <strong>and</strong> to<br />
restore dentition.<br />
Figure 42: Example <strong>of</strong> obturator<br />
The inner aspect <strong>of</strong> the <strong>maxillectomy</strong><br />
cavity is lined with a split-thickness<br />
skin graft, which is kept in place with<br />
an antiseptic-impregnated gauze pack.<br />
The pack is retained with overlying<br />
sutures or by screwing a prefashioned<br />
plate to the remaining palate with lag<br />
screws. A circumferential scar b<strong>and</strong><br />
develops at the interface between the<br />
skin graft <strong>and</strong> the remaining<br />
gingivobuccal mucosa <strong>and</strong> aids to<br />
secure the obturator. A temporary<br />
obturator may be fitted after the gauze<br />
is removed on Day 5. The obturator is<br />
14
emoulded as the cavity heals <strong>and</strong><br />
contracts.<br />
Temporalis muscle flap: Special care<br />
has to be exercised not to injure the<br />
deep temporal artery supply to the flap.<br />
Anterolateral free thigh flap: This<br />
provides good bulk <strong>and</strong> palatal skin<br />
cover, but precludes wearing a denture.<br />
Scapula free flap: Although it provides<br />
oronasal separation the bone is<br />
suboptimal for dental implants.<br />
Free fibula flap (Figure 43, 44): This<br />
is an excellent option as it permits<br />
dental implants.<br />
Dentition: This may be achieved with<br />
an obturator (Figure 42) or with dental<br />
implants inserted into a free fibula flap.<br />
Figure 43: Free fibula flap reconstruction<br />
Facial contour: Other than the temporalis<br />
muscle flap, all the techniques listed above<br />
under “oronasal separation” achieve this<br />
objective.<br />
Enophthalmos, diplopia: Suture tears in<br />
the periorbita to avoid herniation <strong>of</strong> orbital<br />
fat. It is not unusual for patients to<br />
complain <strong>of</strong> some diplopia, but this usually<br />
improves with the passage <strong>of</strong> time. A<br />
degree <strong>of</strong> enophthalmos is to be expected<br />
unless the medial <strong>and</strong> inferior walls <strong>of</strong> the<br />
orbit are carefully reconstructed. If an<br />
extended resection <strong>of</strong> the orbital floor has<br />
been done, then consideration should be<br />
given to reconstructing the floor with<br />
fascia, bone or titanium mesh (Figure 44).<br />
Figure 44: Free fibula flap following<br />
bilateral <strong>maxillectomy</strong> with reconstruction<br />
<strong>of</strong> orbit with titanium mesh<br />
Extended total <strong>maxillectomy</strong> resections<br />
<strong>Total</strong> <strong>maxillectomy</strong> may be extended to<br />
include the malar complex, sphenoid sinus,<br />
cribriform plate (crani<strong>of</strong>acial resection),<br />
contralateral maxilla (Figure 45), skin<br />
(Figure 46a-c), or orbit. When resection<br />
extends to the contralateral maxilla (Figure<br />
45), then an osseocutaneous free flap<br />
reconstruction (Figures 43, 44) is<br />
imperative.<br />
Figure 45: Bilateral (total <strong>and</strong> inferior)<br />
maxillectomies<br />
15
The patient depicted in Figures 46a-c<br />
required resection <strong>of</strong> overlying skin <strong>and</strong><br />
s<strong>of</strong>t tissues, infratemporal fossa <strong>and</strong> orbit,<br />
as well as nodal metastases to the parotid<br />
<strong>and</strong> neck. The defect was reconstructed<br />
with an anterolateral free thigh flap.<br />
Figure 46a: Skin <strong>and</strong> orbital involvement<br />
Figure 46b: <strong>Orbital</strong>, infratemporal fossa<br />
<strong>and</strong> masticator space involvement<br />
Figure 46c: <strong>Total</strong> <strong>maxillectomy</strong>, orbital<br />
exenteration, resection facial skin, <strong>and</strong><br />
parotidectomy<br />
<strong>Orbital</strong> <strong>Exenteration</strong><br />
<strong>Orbital</strong> exenteration is generally indicated<br />
when tumour has extended through<br />
periosteum to involve fat (Figure 46, 47)<br />
<strong>and</strong>/or muscle <strong>and</strong>/or the globe; the<br />
eyelids; <strong>and</strong> the lacrimal apparatus.<br />
Involvement limited to the bone or<br />
periosteum can be managed by resecting<br />
the involved periosteum.<br />
Figure 47: Tumour invading orbital fat<br />
Whenever possible the eyelids are<br />
preserved (lid-sparing cf. lid-sacrificing<br />
exenteration) so they may be sutured<br />
16
together at completion <strong>of</strong> the surgery by<br />
making palpebral incisions just above <strong>and</strong><br />
below the eyelashes. The skin is then<br />
elevated from the tarsal plates with<br />
monopolar cautery up to the orbital rims<br />
circumferentially.<br />
The periosteum is incised circumferentially<br />
just medial to the orbital rim,<br />
exposing the underlying bone. Take care<br />
not to injure the supraorbital nerve so as to<br />
preserve sensation to the forehead.<br />
The medial <strong>and</strong> inferior orbital<br />
dissections are as described on Page 9 <strong>of</strong><br />
this chapter with transection <strong>of</strong> the lacrimal<br />
sac, <strong>and</strong> ligation <strong>and</strong> transection <strong>of</strong> the<br />
anterior <strong>and</strong> posterior ethmoidal arteries.<br />
Next the orbital contents are mobilised in<br />
the relatively avascular subperiosteal<br />
plane inferiorly, laterally <strong>and</strong> superiorly.<br />
This is achieved by simply stripping the<br />
periosteum from the bone with e.g. a<br />
Freer’s dissector, other than along the<br />
inferior orbital fissure where the tissues<br />
are divided with scissors.<br />
All that remains is to transect the ocular<br />
muscles <strong>and</strong> optic nerve <strong>and</strong> ophthalmic<br />
vessels at the orbital apex. Avoid undue<br />
traction on the optic nerve as this can<br />
injure the contralateral optic nerve.<br />
Exposure may be improved by<br />
decompressing the globe with a large bore<br />
needle. Use curved scissors (curved almost<br />
to 90 0 ) to transect the orbital apex <strong>and</strong> to<br />
deliver the orbital contents. Pack the orbit<br />
for a few minutes, <strong>and</strong> then use bipolar<br />
cautery or a ligature to control the brisk<br />
bleeding from the ophthalmic artery.<br />
The orbital cavity may be managed in a<br />
number <strong>of</strong> ways. Patients may be left with<br />
the orbital cavity exposed +/- an<br />
(immobile) ocular prosthesis. When<br />
wearing a prosthesis is not an option,<br />
patients prefer to have the cavity filled<br />
with a flap.<br />
Leave to granulate: This is a lengthy<br />
healing process<br />
Split skin graft in the orbital cavity<br />
kept in place with gauze packing<br />
Suturing eyelids together +/- a cheek<br />
advancement flap <strong>and</strong> inserting gauze<br />
packing to ensure that the skin is<br />
applied to the bone <strong>of</strong> the orbit as free<br />
floating skin will break down (Figure<br />
48, 49a, b).<br />
Figure 48: Eyelids sutured together<br />
Figure 49a: Cheek advancement flap<br />
17
Figure 49b: Cheek advancement flap<br />
Radial free forearm flap, with an<br />
additional fascial component folded<br />
back on itself to fill the orbit<br />
Anterolateral free thigh flap<br />
Temporalis muscle flap deep to the<br />
eyelids or with a split skin graft<br />
(Figure 50)<br />
Figure 50: Temporalis muscle filling the<br />
orbit prior to suturing spared lower lid to<br />
superior orbital margin<br />
Additional clinical examples<br />
Figure 51a: Osteosarcoma <strong>of</strong> maxilla<br />
Figure 51b: Osteosarcoma <strong>of</strong> maxilla with<br />
expansion <strong>of</strong> inferior orbital canal<br />
indicating invasion <strong>of</strong> inferior orbital<br />
nerve; MRI is indicated to assess proximal<br />
perineural spread; resection should<br />
include malar complex <strong>and</strong> frozen section<br />
<strong>of</strong> inferior orbital nerve in pterygopalatine<br />
fossa<br />
18
Author & Editor<br />
Johan Fagan MBChB, FCORL, MMed<br />
Pr<strong>of</strong>essor <strong>and</strong> Chairman<br />
Division <strong>of</strong> Otolaryngology<br />
<strong>University</strong> <strong>of</strong> Cape Town<br />
Cape Town, South Africa<br />
johannes.fagan@uct.ac.za<br />
THE OPEN ACCESS ATLAS OF<br />
OTOLARYNGOLOGY, HEAD &<br />
NECK OPERATIVE SURGERY<br />
www.entdev.uct.ac.za<br />
The Open Access Atlas <strong>of</strong> Otolaryngology, Head &<br />
Neck Operative Surgery by Johan Fagan (Editor)<br />
johannes.fagan@uct.ac.za is licensed under a Creative<br />
Commons Attribution - Non-Commercial 3.0 Unported<br />
License<br />
19