Hammer and gouge mastoidectomy for acute mastoiditis - Vula ...
Hammer and gouge mastoidectomy for acute mastoiditis - Vula ...
Hammer and gouge mastoidectomy for acute mastoiditis - Vula ...

You also want an ePaper? Increase the reach of your titles
YUMPU automatically turns print PDFs into web optimized ePapers that Google loves.
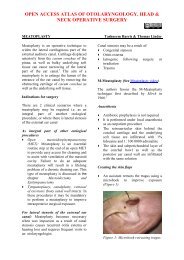
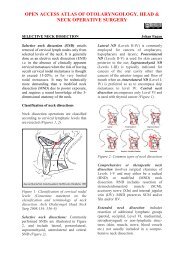
OPEN ACCESS ATLAS OF OTOLARYNGOLOGY, HEAD &NECK OPERATIVE SURGERYHAMMER & GOUGE CORTICAL MASTOIDECTOMY FOR ACUTEMASTOIDITISJohan Fagan & Robert JacklerThis surgical guide is intended <strong>for</strong> themany surgeons in the Developing Worldwho do not have access to modern mastoidsurgery equipment such functioningmastoid drills, or are regularly faced withpower cuts <strong>and</strong> there<strong>for</strong>e may be compelled to proceed with a <strong>mastoidectomy</strong> usinga hammer <strong>and</strong> <strong>gouge</strong>, <strong>and</strong> possibly only aheadlight <strong>and</strong> operating loupes.The text <strong>and</strong> illustrations are based on thedescription of mastoid surgery: A Treatiseon the Surgical Technique of Otorhinolaryngology(1939) by Georges Portmann.The text has been modified to incorporatemodern principles of otology. This operativeguide should be read in conjunctionwith the chapter <strong>Hammer</strong> <strong>and</strong> GougeRadical Mastoidectomy <strong>for</strong> Cholesteatoma,also on the IFOS educational websitewww.entdev.uct.ac.za.Mastoid surgery can only be safelyper<strong>for</strong>med when the surgeon has anintimate knowledge of temporal boneanatomy. It is imperative that surgeonspractice temporal bone dissections asdescribed in the IFOS educational website.Surgeons are also referred to a detailedTemporal bone dissection manual, <strong>and</strong> anexcellent YouTube demonstration ofsimulated modern mastoid surgery on theIFOS educational website.In<strong>for</strong>med ConsentThis should include anaesthetic <strong>and</strong>surgical risks <strong>and</strong> issues relating toaggravated hearing loss, facial nerveinjury, vertigo, taste disturbance, injury tothe brain <strong>and</strong> meninges, <strong>and</strong> woundcomplicationsAnaesthesiaSurgery may be per<strong>for</strong>med under local orgeneral anaesthesia.General anaesthesia: Avoid muscleparalysis to facilitate detection of facialnerve irritation or injury.Local anaesthesia: With six wheals<strong>for</strong>ming a semicircle, the posterior portionof the auricle <strong>and</strong> the mastoid region aresurrounded by a series of crisscrossinjections, thus obtaining a profuseinfiltration which encompasses the entireoperative field. Injections are made at thelevel of each of these wheals which notonly crisscross with the adjacent ones butinfiltrate the internal portion, resulting in adiffuse anaesthesia. The superficial levelsare infiltrated first <strong>and</strong> then the deeperones. This area of anaesthesia should bevery wide <strong>and</strong> extend considerably beyondthe limits of the mastoid region, especiallyposteriorly, <strong>for</strong> the exact extent of the bonylesions is never known be<strong>for</strong>e starting theoperation. The most posterior wheal of theanaesthetic area should be locatedapproximately 4.0 cm. from theretroauricular groove.Magnification <strong>and</strong> lightingMagnification is ideally required oncedissection reaches the middle ear, <strong>and</strong> <strong>for</strong>removal of the facial ridge. Should anoperating microscope not be available,then operating loupes with 2.5xmagnification should be used. Goodlighting is essential, especially whenworking in the middle ear. In the absenceof an operating microscope or strongoperating lights, a headlight may suffice.
InstrumentationGouges <strong>and</strong> chisels should be keptextremely sharp, so as to ensure controlledbone resection. Blunt instrumentationrequires undue <strong>for</strong>ce to be applied, <strong>and</strong><strong>gouge</strong>s/chisels may slip off bone <strong>and</strong>plunge <strong>and</strong> damage critical structures suchas brain, lateral sinus, facial nerve, innerear, <strong>and</strong> carotid artery. For the bone workthe surgeon requires the following:Curved periosteal elevatorMalletThree <strong>gouge</strong>s: Large, medium, smallFlat chiselCurettesRongeurs/bone nibblers (small,medium <strong>and</strong> large)Retractors (2), ideally self-retractingCanal elevator/McDonalds dissectorBlunt probeMicroinstruments: Curved needle,Plester knife, sickle knife, curetteSuction tipsPosition of PatientThe patient is laid supine with the headturned towards the normal ear.Position of Surgeon <strong>and</strong> AssistantsThe surgeon st<strong>and</strong>s on the side of theaffected ear. Two assistants are stationedon the other side, facing the surgeon. The1 st assistant is nearest to the head. The 2 ndassistant is exactly opposite the surgeon.Operative FieldThe mastoid, auricle, <strong>and</strong> preauricularregions are extensively swabbed withtincture of iodine. The patient is covered tothe neck with a sterile sheet. The operativefield is isolated by four towels. Over themis placed a fenestrated sheet, the orifice ofwhich encircles the auricle <strong>and</strong> mastoid.AntibioticsNo antibiotics are required <strong>for</strong><strong>mastoidectomy</strong> <strong>for</strong> uncomplicatedcholesteatoma, other than when there issecondary infection (<strong>mastoiditis</strong>).BIPP PasteBIPP Paste can be prepared <strong>and</strong> used toimpregnate ribbon gauze. This can be usedto pack the mastoid cavity or ear canal, <strong>and</strong>because of its antiseptic properties, may beleft in place <strong>for</strong> a few weeks.Bismuth subnitrate 20% w/w, iodo<strong>for</strong>m40% w/w, paraffin liquid 40% w/w (w/w =weight <strong>for</strong> weight)Figure 1: Instruments <strong>for</strong> bone work2
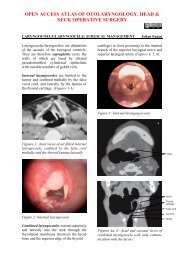
Surgical anatomy <strong>for</strong> MastoidectomyFigure 2: Coronal section through middleear <strong>and</strong> temporal boneBrown: Tympanic segment of base of squamous bone;Green: Antral region; Rose: Subantral region; Red:Region of tip; Blue: Sinus region; Yellow: Cerebellarregion or region of mastoid veinFigure 4: Surface boundaries of mastoidregionsSurgical Steps: Cortical MastoidectomyUnlike with mastoid surgery <strong>for</strong>cholesteatoma, <strong>mastoidectomy</strong> <strong>for</strong> <strong>acute</strong><strong>mastoiditis</strong> may be associated withsignificant blood loss, especially in theabsence of mono- or bipolar coagulation.Patients may even require bloodtransfusion.First Step: Incision of Superficial TissuesFigure 3: Axial view of temporal boneanatomyFigure 5: Incision of Superficial Tissues3
The 1 st assistant retracts the auricletowards himself, using both h<strong>and</strong>s. The 3 rdfinger of the lower h<strong>and</strong> is pressed stronglyunder the mastoid tip in order to compressthe posterior auricular artery. The otherassistant is prepared to sponge/swab withmastoid sponges/swabs held in angular<strong>for</strong>ceps. The surgeon incises theretroauricular crease down to bone fromleft to right, from the linea temporalis tothe inferior part of the crease, or vice versa(Figure 5). In the event of a retroauricularabscess, the abscess cavity may be enteredat this point or during periosteal elevation.Second Step: Periosteal ElevationFollowing haemostasis <strong>and</strong> ligation ofbleeding vessels, the mastoid is completelyexposed proceeding posteriorly to theincision, without elevating the anteriorcartilaginous canal. This is easy in thesuperior portion where the periosteumfrees itself, but becomes more laborioustoward the inferior <strong>and</strong> posteroinferiorportions where the muscular insertionsmust be sectioned with the elevator. Figure6 demonstrates how the cartilaginous canalhas been respected (Figure 6).Third Step: Exploration of BoneIn the absence of electrocoagulation, 2Kocher hemostats are applied to theperiosteum, one in front <strong>and</strong> one in back,assuring haemostasis. Two sharp toothedretractors are held by the assistant. One isplaced <strong>for</strong>ward to retract the auricle in thecanal without separating it from the bone.The other embraces the posterior lip of thewound, retracting it backward to uncoverthe operative surface. A self-retainingretractor may also be employed. Aftercompleting the periosteal elevation, thesurgeon carefully examines the mastoidsurface <strong>for</strong> changes in <strong>for</strong>m, colour, <strong>and</strong>surface (Figure 7).Figure 7: Examine the mastoid surfaceFigure 6: Periosteal elevationForm: In adjoining illustration one seesthe crest of the linea temporalis, the spineof Henlé, <strong>and</strong> the sieve-like region, theretromeatal depression, <strong>and</strong> the bulge ofthe posterosuperior region. The anteriormastoid portion is free of all muscularinsertions. The muscles from the nape ofthe neck <strong>and</strong> the sternocleidomastoidmuscle are inserted into the posteriorportion of the mastoid. These two regionsare separated by the posterior externalpetrosquamous suture. With <strong>acute</strong><strong>mastoiditis</strong> these l<strong>and</strong>marks may be absent<strong>and</strong> the mastoid may then present anevenly rounded bulge, having the4
appearance of an egg. The spine of Henléremains <strong>and</strong> is the only really importantl<strong>and</strong>mark.Colour: Normally the bone appears whiteor oozes blood through the porous portionsof the retromeatal region. However, in<strong>mastoiditis</strong> the external cortex bleedsdiffusely due to the deep inflammatoryprocess. If there is underlying empyema,the wall appears bluish.4 th cut: 1cm behind 1 st , thus completinga circle of trephinationThe 1 st 3 taps of the <strong>gouge</strong> areperpendicular to the bony surfaceThe 4 th tap is applied obliquely toavoid the lateral sinus which may besuperficial or prominent.Surface: Some irregularities may appearalong the surface of the mastoid. Theseoften consist of inflammatory granulationswhich are apparent through the externalposterior petrosquamous suture or of afistula, which may be verified with the aidof a probe. The existence of a fistula issought wherever the incision hasuncovered free pus.Fourth Step: Trephining - Exploration ofSuperficial Antral RegionA large <strong>gouge</strong> is placed immediately belowthe linea temporalis (Figure 8). It is heldbetween the thumb <strong>and</strong> first two fingers,with the ring finger serving as a brake. Theinstrument is held in the position shown inthe illustration, being directed vertically atright angles to the bone surface.Site of Trephination: If a fistula is present<strong>and</strong> is at the level of the antral region or itsimmediate vicinity, the trephine isper<strong>for</strong>med at that level. If no fistula existsor is very far from the antral region, thetrephining is done as follows. An area ofapproach is outlined with the <strong>gouge</strong> byapplying it above <strong>and</strong> behind the canal atthe following points (Figures 9, 10):Figure 8: Trephining <strong>and</strong> exploring antralregionFifth Step: Exploration of SuperficialSubantral Region <strong>and</strong> TipAfter trephining <strong>and</strong> curetting thesuperficial antral region, the <strong>gouge</strong> isdirected toward the inferior portion of themastoid, making a superficial verticaltrench. The instrument is held between thethumb <strong>and</strong> first two fingers of the left h<strong>and</strong>with the two remaining fingers resting onthe bony surface to provide control <strong>and</strong> toavoid dangerous slip of the <strong>gouge</strong>.1 st cut: 2 - 3mm. behind spine of Henlé2 nd cut: just below linea temporalis3 rd cut: parallels, but 1cm. below 2 ndcut5
Figure 9: 1 st & 2 nd cutsFigure 11: Gouge directed toward inferiorportion of mastoidSixth Step: Opening of Apical RegionAfter exploring <strong>and</strong> curetting the antral <strong>and</strong>subantral regions, the surgeon workstoward the tip, creating a superficial,vertical trench, <strong>and</strong> exposing diseasedmastoid cells (Figures 12, 13). Only if thetip is osteitic need it be resected with the<strong>gouge</strong> or rongeur.Figure 10: completing a circle oftrephinationFifth Step: Exploration of SuperficialSubantral Region <strong>and</strong> TipAfter trephining <strong>and</strong> curetting thesuperficial antral region, the <strong>gouge</strong> isdirected toward the inferior portion of themastoid, making a superficial verticaltrench. The instrument is held between thethumb <strong>and</strong> first two fingers of the left h<strong>and</strong>with the two remaining fingers resting onthe bony surface to provide control <strong>and</strong> toavoid dangerous slip of the <strong>gouge</strong> (Figure11).Figure 12: Creating a vertical trench6
the lateral sinus. This region ismeticulously curetted (Figure 15).Figure 13: Vertical trenchSeventh Step: Exploration of PosteroinferiorRegionThe posteroinferior region, which is alsocalled the region of the mastoid vein, isopened with the <strong>gouge</strong>. The instrument isheld in the same position as describedpreviously but is slanted obliquely frombehind <strong>for</strong>ward <strong>and</strong> gently <strong>for</strong>ced in withlight taps of the mallet. The procedureprogresses backward toward the posteriorportion of the mastoid from below up.(Figure 14)Figure 14: Opening posteroinferior regionOpening this posteroinferior regionexposes the inner table of the skull whichat this level <strong>for</strong>ms the bony outer shell ofFigure 15: Completed posteroinferiordissectionIf the bony disease is very extensive, thesoft tissues may have to be sectioned by ahorizontal incision perpendicular to theretroauricular incision, <strong>for</strong>ming a “T”, <strong>and</strong>additional posterior exposure of themastoid bone done.Eighth Step: Exploration of PosterosuperiorRegion <strong>and</strong> Lateral Sinus /Sinodural Angle (Figure 16)Trephination is continued from below up<strong>and</strong> behind <strong>for</strong>ward, burrowingprogressively into the mastoid <strong>and</strong> to jointhe superficial antral region. The taps onthe <strong>gouge</strong> are per<strong>for</strong>med cautiously. Theyare made on a tangent to permit the gradualremoval of the cortex over the lateral sinusor even to uncover the venous wall, if thisshould be necessary. The rongeur isdangerous when h<strong>and</strong>led blindly <strong>and</strong> maypenetrate dura <strong>and</strong> injure the brain. The<strong>gouge</strong> is much more manageable; its actionmore easily controlled. The posterior limitof trephination is determined by the statusof the bone. The process continues untilnormal resistant bone, which does notbleed, is encountered. If haemorrhageoccurs from the mastoid vein, this may be7
cauterized or occluded with bone wax. Agauze pack impregnated with theadrenaline <strong>and</strong> kept in place <strong>for</strong> severalminutes may reduce bleeding.obliquely on the bony surface. Smallslanting blows made with the <strong>gouge</strong> permita very careful sculpturing of the cortex ofthe lateral sinus.Lateral Sinus Thrombosis <strong>and</strong> PerisinusAbscessesAcute <strong>mastoiditis</strong> may be complicated by aperisinus (extradural) abscess, lateral sinusthrombosis, or there may be pus within thesinus (Figure 18).Figure 16: Exploring the sinodural angleNinth Step: Exploring Lateral SinusThe posterosuperior region of the mastoidis also called the region of the lateral sinus(Figure 17).Figure 18: Thrombosed (L) lateral sinuswith posterior fossa abscessFigure 17: The lateral sinusSince this vessel is sometimes verysuperficial, the <strong>gouge</strong> is the onlyinstrument that should be used. It is heldbetween the thumb <strong>and</strong> the first twofingers of the left h<strong>and</strong> <strong>and</strong> placedIn the absence of preoperative CT scanningfacilities, the sinus should be uncapped ofbone. If a perisinus abscess is encountered,it is drained into the mastoid cavity. Thesinus is aspirated with a needle <strong>and</strong>syringe. Should there be no free flow ofblood, it might be thrombosed, or theremay be an intrasinus abscess that needs tobe drained.Tenth Step: Search <strong>for</strong> AntrumThe antrum is sought with a small <strong>gouge</strong>directed from behind <strong>for</strong>ward towards thespine of Henlé, paralleling the canal <strong>and</strong>8
excavating down towards the antrum withsmall taps of the mallet (Figure 19).Figure 20: Probing the aditusFigure 19: Accessing the antrumWith the superficial antral region open,this step is particularly easy <strong>and</strong> the antrumis accessible even when small <strong>and</strong> deeplylocated. The antrum is enlarged above <strong>and</strong>posteriorly, either with a <strong>gouge</strong> or curette.Small curettes which may result indangerous slips should not be used. Theaditus is located with a blunt angularprobe. This permits a determination of thestatus of the tegmen tympani superiorly,especially at the level of the antral roof.Twelfth Step: Opening the Deep AntralRegion (Figure 21)The antrum is enlarged toward its posteriorpart. Between the posterosuperior regionjust opened <strong>and</strong> the antrum there is a bonyridge which should be resected. Thisresection is per<strong>for</strong>med with a <strong>gouge</strong> ofmedium calibre held obliquely frombehind <strong>for</strong>ward between the thumb <strong>and</strong>first two fingers of the left h<strong>and</strong>; theremaining two fingers rest on the bonysurface. Thus a horizontal trench is madewhich is almost perpendicular to theanterior vertical one.Eleventh Step: Opening the Deep AntralRegionAfter widely opening the antrum, theaditus is sought with a blunt curved probe(Figure 20). It is carefully cleansed with amedium sized curette. Very small curettesshould not be used since they may slip <strong>and</strong>cause serious injuries.Figure 21: Approaching deep antralregion9
Thirteenth Step: Exploration of DeepSubantral Region (Retrofacial Groove)Between the deep antrum <strong>and</strong> mastoid tipthere remains a bony, often cellular, masswhich it is wise to remove. The antrum isthus continued below by a deep verticaltrench. Exploration of this regionsometimes reveals large cells located verydeep in the bone. This resection may beper<strong>for</strong>med with the <strong>gouge</strong>, using verticalblows first in front of the sinus then againstthe posterior wall of the canal which mustbe preserved. The curette, directed fromabove downwards, may be used. It iscontrolled by the index finger of the left ofh<strong>and</strong> to avoid injury to the lateral sinus ora too deep curettage towards the facialnerve anteriorly. If the deep subantralregion is narrow <strong>and</strong> the lateral sinusprominent, it is preferable to use a narrowjawedcurved rongeur (Figure 22).Fourteenth Step: Exploration <strong>and</strong>Cleansing of Operative Cavity (Figures23, 24)The cavity is thoroughly explored <strong>and</strong>cleared of loose or adherent bony spicules.The edges <strong>and</strong> bottom are smoothed with acurette or rongeur. Suspicious areas areexplored with a blunt probe which locatespreviously unnoticed cells <strong>and</strong> determinesthe presence of inflammatory granulationson the dura mater.Figure 23: Cleaned cavityFigure 22: Using a narrow-jawed curvedrongeur in the deep subantral regionThe instrument is held in the right h<strong>and</strong>with the jaws parallel to the anterior aspectof the mastoid; this permits safe progressinto the deeper regions between the facialnerve in front <strong>and</strong> the lateral sinus at theback.Figure 24: Schematic representation ofanatomy of final cavity10
Fifteeeth Step: Drainage <strong>and</strong> suturing<strong>and</strong> postoperative CareA glove/corrugated/pencil drain is inserted(Figure 25). The skin edges are carefullyapproximated. A pressure dressing isapplied held in place by a b<strong>and</strong>agewrapped around the head.Figure 25: Pencil drain protruding fromwoundPost-operative antibiotics are administered.The patient should be carefully monitored<strong>for</strong> a number of days to detect intracranialseptic complications, as posterior fossacollections can have subtle clinical signs.TEMPOROZYGOMATICMASTOIDITISThe pneumatic cells adjacent to the middleear may develop not only in the mastoidbut also above the canal <strong>and</strong> thetemporomaxillary joint i.e. at the base ofthe squamous bone (zygomatic arch). Thebase of the squamosa may be pneumatizedeither by way of the intermediary of theantral system or through the cells openingdirectly into the attic. This pneumatization,however, may extend very high into thesquama temporalis. Infection of the cellsin the base of the squamous boneconstitutes a para<strong>mastoiditis</strong> or temporozygomatic<strong>mastoiditis</strong>, <strong>and</strong> necessitates aspecial operative technique.If the infection in the base of the squamousbone is a consequence of an infection ofthe antral system, i.e. a true <strong>mastoiditis</strong>, theopening of the cells of the tympanic <strong>and</strong>temporomaxillary segments will only be anadditional procedure to the <strong>mastoidectomy</strong>,which has previously been described.If, on the other h<strong>and</strong>, the temporozygomatic<strong>mastoiditis</strong> is the result of aninfection arising directly from thetympanic cavity <strong>and</strong> not including themastoid itself, which may be verifiedeasily by the absence of clinical symptomsat this level <strong>and</strong> by a normal radiographicpicture of the mastoid, the operation willconsist only of the opening of the cells inthe temporozygomatic region.First Step: IncisionThe cutaneous incision of the<strong>mastoidectomy</strong> is extended 3.0 or 4.0 cm.above <strong>and</strong> in front of the auricle of the ear.This incision obliquely crosses the lineatemporalis; it goes through to the bone,including the temporal muscle <strong>and</strong> theperiosteum.Second Step: Periosteal ElevationThe bone of the squama temporalis isexposed above <strong>and</strong> in front of the canal, ifnecessary, as far as the zygomatic arch.Whenever temporozygomatic <strong>mastoiditis</strong>is a complication of <strong>mastoiditis</strong>, theperiosteal elevation naturally extends toinclude the entire external surface of themastoid.11
This is continued until normal bone isencountered.Figure 26: Exposed boneThird Step: Exploration of the BoneKocher haemostats are applied to theperiosteal flaps <strong>and</strong> the portion of thetemporal muscle, which bleed freely.Ligatures are applied to the muscularvessels. Two hooked retractors are held bythe second assistant. The region being wellexposed, the surgeon examines it <strong>for</strong>alterations in color, <strong>for</strong>m, <strong>and</strong> surface. Heverifies the areas of osteitis <strong>and</strong> thepossible presence of a fistula, which maybe located in the squama temporalis underthe muscle (deep temporozygomatic<strong>mastoiditis</strong>) or on the zygomatic archimmediately above the canal (superficialtemporozygomatic <strong>mastoiditis</strong>).Figure 27: Trephination done above theear canalFifth Step: Exploration <strong>and</strong> Cleansing ofthe Operative CavityThe cavity is explored with great rare. Allthe bony spicules, whether free or adherentare removed. The edges of the interior ofthe cavity are smoothed with the fineangular rongeur (Figure 28). Thesucceeding steps of this operation are thesame as those in the <strong>mastoidectomy</strong>.Fourth Step: TrephiningIf a complete <strong>mastoidectomy</strong> has beenper<strong>for</strong>med, systematic exploration iscarried out with a small <strong>gouge</strong>, startingfrom the antral region <strong>and</strong> including theentire base of the squamous bone, beingguided by the existing lesions. If themastoid is normal <strong>and</strong> if the radiological<strong>and</strong> clinical examinations have shownabsolute integrity of the antral system,trephination is done above the canal inorder to curette <strong>and</strong> cleanse the cavities ofempyema <strong>and</strong> osteitic foci (Figure 27).Figure 28: Final cavity12
CERVICAL SEPSISLateral sinus thrombosis may becomplicated by extension of sepsis downthe internal jugular vein into the neck(Figure 29).<strong>gouge</strong> is usually very limited <strong>and</strong> quicklysettles. Bleeding can usually be controlledby packing off the sinus with surgical. Ifthe hemorrhage persists or threatens torecur, the cavity is firmly packed withiodo<strong>for</strong>m impregnated ribbon gauze, theend of which exits from the wound next tothe drain. It is removed a few days later.Exposure of Meninges: Exposure of themeninges is not a concern. No change inmanagement is required.Tear of Meninges with CerebrospinalFluid leak: A tear of the meninges issimply repaired with silk or other suture. Ifnecessary, muscle or fascia can be used toaugment the repair.Figure 29: Extension of sepsis downinternal jugular veinInfection of the mastoid may also lead tothe <strong>for</strong>mation of cervical abscesses whichvary according to their <strong>for</strong>m ofexteriorization:Abscess of nape of neck inposteroinferior <strong>mastoiditis</strong>Substernomastoid abscess (Bezold’sabscess)Internal aspect of mastoid tip, alongdigastric muscleDeep jugulodigastric cervical abscess(<strong>mastoiditis</strong> of Mouret)INTRAOPERATIVE INCIDENTSAccidental Opening of the Lateral Sinusor Mastoid VeinOpening of the lateral sinus is more severeif accidentally produced with a rongeur.The use of this instrument is there<strong>for</strong>ediscouraged in the posterior region of themastoid. Injury to the venous wall with theOpening of lateral or posteriorsemicircular canal: The canal is simplycovered with fascia, which is held in placeby muscle or gauze packingANTROTOMY IN THE INFANTAntrotomy is the surgical opening of theantrum, which is the principal mastoidcavity in the infant. Antrum is fullydeveloped, as opposed to the mastoid thatis not fully developed. The facial nerve ismore superficial at the mastoid tip than inthe adult.Indications include: Early <strong>acute</strong> <strong>mastoiditis</strong>unresponsive to antibiotics; complicated<strong>mastoiditis</strong>; subperiosteal abscess;intracranial complications (meningitis,abscess); facial paralysis secondary to<strong>mastoiditis</strong>; suspected tuberculous<strong>mastoiditis</strong> (remove sequestrum <strong>and</strong> obtaintissue <strong>for</strong> diagnosis of TB; <strong>and</strong> <strong>mastoiditis</strong>secondary to cholesteatoma13
Author & EditorJohan Fagan MBChB, FCORL, MMedProfessor <strong>and</strong> ChairmanDivision of OtolaryngologyUniversity of Cape TownCape TownSouth Africajohannes.fagan@uct.ac.zaAuthorRobert Jackler MDSewall Professor <strong>and</strong> ChairDepartment of Otolaryngology-Head &Neck SurgeryAssociate Dean, Postgraduate MedicalEducationStan<strong>for</strong>d University School of MedicineStan<strong>for</strong>d, CA 94305-5101USAThe Open Access Atlas of Otolaryngology, Head &Neck Operative Surgery by Johan Fagan (Editor)johannes.fagan@uct.ac.za is licensed under a CreativeCommons Attribution- Non-Commercial 3.0 UnportedLicense14