
You also want an ePaper? Increase the reach of your titles
YUMPU automatically turns print PDFs into web optimized ePapers that Google loves.
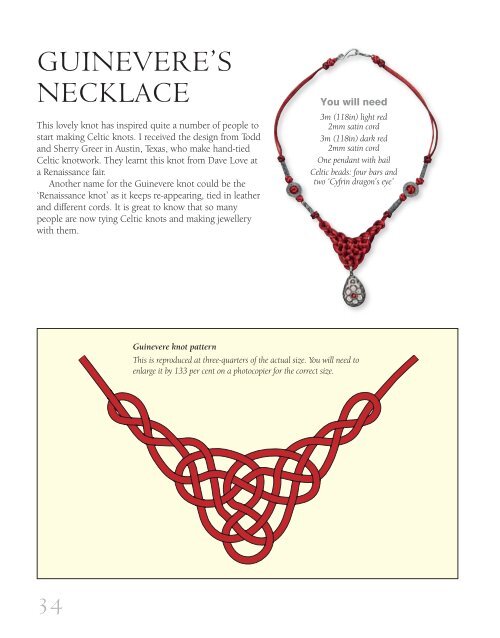
guInevere’s<br />
<strong>necKlace</strong><br />
This lovely knot has inspired quite a number of people to<br />
start making Celtic knots. I received the design from Todd<br />
and Sherry Greer in Austin, Texas, who make hand-tied<br />
Celtic knotwork. They learnt this knot from Dave Love at<br />
a Renaissance fair.<br />
Another name for the Guinevere knot could be the<br />
‘Renaissance knot’ as it keeps re-appearing, tied in leather<br />
and different cords. It is great to know that so many<br />
people are now tying Celtic knots and making jewellery<br />
with them.<br />
34<br />
You will need<br />
3m (118in) light red<br />
2mm satin cord<br />
3m (118in) dark red<br />
2mm satin cord<br />
One pendant with bail<br />
Celtic beads: four bars and<br />
two ‘Cyfrin dragon’s eye’<br />
Guinevere knot pattern<br />
This is reproduced at three-quarters of the actual size. You will need to<br />
enlarge it by 133 per cent on a photocopier for the correct size.
2. Starting with the end of the<br />
cord emerging from the right of the<br />
pendant, begin to lay the cord so<br />
that it follows where the pattern<br />
leads. Pin where necessary to keep<br />
the cord on the pattern.<br />
3. Continue laying the cord along<br />
the lines of the pattern. Where the<br />
pattern leads the cord back on itself,<br />
check whether the pattern indicates<br />
you to take the cord under or over<br />
itself to continue.<br />
1. Photocopy the pattern and pin<br />
it to your cork mat. Thread the<br />
pendant on to the middle of the<br />
light red cord and pin it in place on<br />
either side of the pendant.<br />
Tip<br />
You can enlarge the pattern on a<br />
photocopier if you wish.<br />
4. Work carefully around the<br />
pattern, making sure the cord<br />
goes under and over itself where<br />
appropriate. The pattern eventually<br />
leads the right-hand cord off to the<br />
top right corner. Secure it with a pin.<br />
5. Follow the pattern in the other<br />
direction using the cord emerging<br />
from the left of the pendant. Pay<br />
careful attention to the ‘unders<br />
and overs’ where the cords cross<br />
each other.<br />
35
6. The triangle is now fairly stable,<br />
so you can remove most of the<br />
pins. If you feel the work moves too<br />
much, you can add a couple of extra<br />
pins to support it.<br />
10. Remove all but the pin next to<br />
the pendant and begin tightening<br />
the knot by pulling the loops away<br />
from the central point. Do not try to<br />
tighten too much at once as this can<br />
distort the shape.<br />
3<br />
Note<br />
At this point, if the weaving is<br />
correct, the knot will be stable. If<br />
not, one piece of the design will<br />
spring up and loosen, so check<br />
that the overs and unders in the<br />
weaving are correct. If not, undo<br />
it and re-weave the cord.<br />
8. Follow the pattern again, laying<br />
the right-hand end of the dark red<br />
cord down next to the light red<br />
cord. Make sure that the cords<br />
remain touching, but do not allow<br />
them to cross. When the cord<br />
reaches the top right corner, pin the<br />
cord to secure it in place.<br />
9. Lay the left-hand end of the<br />
dark red cord down in the same<br />
way and pin it at the top left.<br />
11. Continue pulling the cords<br />
around the pattern, following the<br />
path in which the cords were laid<br />
down. Do not allow the light red<br />
and dark cords to cross at any point:<br />
keep them next to one another.<br />
7. Thread the dark red cord on<br />
to the pendant and run it through<br />
until the central point of the cord<br />
is in the pendant. Pin it to secure it<br />
in place within the loop of the light<br />
red cord at the bottom.
13. The piece will gradually get<br />
smaller as you tighten, so a stageby-stage<br />
approach is best. Work<br />
around and around the cord until<br />
the knot is roughly half the size of<br />
the original pattern.<br />
16. Thread both cords through one<br />
side of a Cyfrin dragon’s eye bead<br />
(see inset), then run it down to the<br />
second button knot. Make a third<br />
button knot by tying the light red<br />
cord around the dark red cord and<br />
move it down within the dragon’s<br />
eye bead. Take the ends of the cords<br />
out of the other side of the bead.<br />
(See page 16 for how to move the<br />
button knot.)<br />
14. Remove the piece from the cork<br />
mat and pattern, then tie a button<br />
knot around the light red cord on<br />
the top left using the adjacent dark<br />
red cord.<br />
17. Make a button knot above the<br />
bead using the light red cord around<br />
the dark red cord. Slip on a bar bead<br />
and then tie a sliding button knot<br />
using the dark red cord around the<br />
light red cord.<br />
Note<br />
12. Notice how tightening enlarges a loop,<br />
which is then tightened by pulling it a short<br />
distance further along the design. This<br />
gradual process keeps everything aligned in<br />
the correct shape.<br />
15. Thread a bar bead on to both<br />
cords, slide it down to the button<br />
knot, then make a second button<br />
knot next to the bead with the<br />
light red cord knotted around the<br />
dark red cord.<br />
18. Thread both cords through<br />
the hook and run it down to<br />
approximately 15cm (6in) from the<br />
last button knot.<br />
It is important to use and alternate both coloured cords to make the knots. If<br />
you use only one colour the knots will slide up and down and spoil the design.<br />
37
19. Using the free end of the<br />
light red cord, tie a sliding button<br />
knot around the other three<br />
cords. Move the knot up to the<br />
hook and then tighten.<br />
Note<br />
When there is a clasp in between<br />
the sliding knots, each sliding knot<br />
must be moved separately to adjust<br />
the length of the necklace.<br />
Both can be moved at once if there<br />
is no clasp in between them.<br />
38<br />
20. Cut and seal the end of the light<br />
red cord.<br />
21. Tie a sliding button knot<br />
around the other three cords using<br />
the free end of the dark red cord.<br />
Move the knot up to the hook and<br />
then tighten it. Cut and seal the dark<br />
red cord. You now have two sliding<br />
knots side by side which is more<br />
comfortable than a double button<br />
knot on the back of the neck. When<br />
moving them, hold both at the same<br />
time as if they were one.<br />
22. Repeat this process using the<br />
cords on the right-hand side of<br />
the piece, substituting an eye for<br />
the hook when finishing.<br />
Opposite:<br />
The finished necklace is at the bottom<br />
right. The blue necklace to the left is<br />
made with a thick firm cord which keeps<br />
stable once knotted even though it is only<br />
a single cord, while the gold necklace<br />
uses leather cords and has a feature<br />
lampwork bead by Rachelle Goldreich.