Look inside - Anything in Stained Glass
Look inside - Anything in Stained Glass
Look inside - Anything in Stained Glass

You also want an ePaper? Increase the reach of your titles
YUMPU automatically turns print PDFs into web optimized ePapers that Google loves.
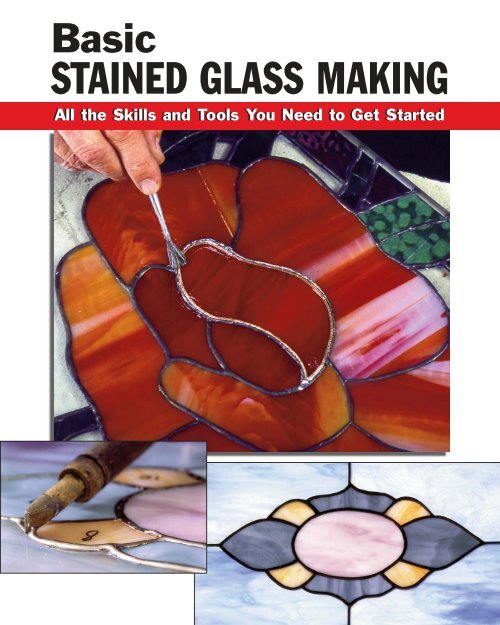
Basic<br />
STAINED GLASS MAKING<br />
All the Skills and Tools You Need to Get Started
Contents<br />
Acknowledgments . . . . . . . . . . . . . . . . . . . . . . . . iv<br />
Introduction . . . . . . . . . . . . . . . . . . . . . . . . . . . . . v<br />
1. A Good Work Environment . . . . . . . . . . . 1<br />
2. Sta<strong>in</strong>ed <strong>Glass</strong> Safety . . . . . . . . . . . . . . . . . 2<br />
3. Equipment and Materials . . . . . . . . . . . . . 3<br />
4. Understand<strong>in</strong>g <strong>Glass</strong> . . . . . . . . . . . . . . . . 17<br />
5. Basic Skills . . . . . . . . . . . . . . . . . . . . . . . . 23<br />
6. Foiled <strong>Glass</strong> Panel . . . . . . . . . . . . . . . . . . 51<br />
7. Lead Came Panel . . . . . . . . . . . . . . . . . . . 71<br />
8. Tiffany-Style Lampshade . . . . . . . . . . . . 87<br />
9. Holiday Candle . . . . . . . . . . . . . . . . . . . . 99<br />
10. Three-Dimensional Hang<strong>in</strong>g Star . . . . 107<br />
11. Mirror with Flower Overlay . . . . . . . . . 117<br />
12. Basic Sta<strong>in</strong>ed <strong>Glass</strong> Repair . . . . . . . . . . 125<br />
13. Additional Project Patterns . . . . . . . . . 129<br />
Resources . . . . . . . . . . . . . . . . . . . . . . . . . . . . . 137<br />
iii
6<br />
Foiled <strong>Glass</strong> Panel<br />
Time <strong>in</strong>vestment: 6–8 hours total<br />
Foiled <strong>Glass</strong> Panel<br />
So far you have practiced scor<strong>in</strong>g glass to achieve<br />
different shapes and curves, you have gr<strong>in</strong>ded glass<br />
to smooth it, and you have become comfortable apply<strong>in</strong>g<br />
copper foil to edges of cut pieces of sta<strong>in</strong>ed glass.<br />
It’s now time to put those new skills to use on your first<br />
complete project: a foiled glass panel.<br />
In do<strong>in</strong>g this project you will also learn techniques<br />
for mak<strong>in</strong>g and cutt<strong>in</strong>g out a paper pattern and template;<br />
solder<strong>in</strong>g pieces of glass together with a solder<strong>in</strong>g<br />
iron; add<strong>in</strong>g a lead border; and attach<strong>in</strong>g hardware<br />
needed to hang the piece when it is f<strong>in</strong>ished.<br />
This panel, also called a “w<strong>in</strong>dow” by hobbyists, is<br />
a classic that can be hung <strong>in</strong> front of a regular w<strong>in</strong>dow<br />
so sunlight streams through it and produces a lustrous<br />
glow. With a bit of practice and care, you can even build<br />
a panel to customized dimensions to fit <strong>in</strong>to an exist<strong>in</strong>g<br />
w<strong>in</strong>dow or door, such as a transom.<br />
51
SHOPPING LIST: Foiled <strong>Glass</strong> Panel<br />
This project requires a total of about 1 square foot of glass for each of the four different colors. Please note that glass<br />
estimates factor <strong>in</strong> some excess material to allow for a few mistakes.<br />
Item<br />
Quantity<br />
Foiled <strong>Glass</strong> Panel<br />
❑ <strong>Glass</strong> cutter (pages 3–4)<br />
❑ Cutt<strong>in</strong>g oil (page 4) One bottle<br />
❑ Solder<strong>in</strong>g iron (page 5)<br />
❑ Solder (page 5) One spool<br />
❑ Flux (page 6) One bottle<br />
❑ Flux brush (page 6)<br />
❑ Ruler (page 6)<br />
❑ Pattern shears (page 7)<br />
❑ Groz<strong>in</strong>g/break<strong>in</strong>g pliers (page 7)<br />
❑ Needle-nose pliers (page 8)<br />
❑ Carborundum stone (page 8)<br />
❑ Copper foil (page 9) One spool<br />
❑ Lead came (page 10) A strip at least 6 feet long<br />
❑ Lead cutters (page 11)<br />
❑ Horseshoe nails (page 11) About a dozen<br />
❑ Safety goggles (page 11)<br />
❑ Lead board (page 12)<br />
❑ Wooden or plastic fid (page 13)<br />
❑ Pat<strong>in</strong>a (page 14) One bottle<br />
❑ Rubber gloves (page 14)<br />
❑ Paper towels/clean<strong>in</strong>g rag (page 15)<br />
❑ Flux remover (page 14)<br />
❑ F<strong>in</strong>ish<strong>in</strong>g compound (page 14) One bottle<br />
❑ Carbon paper (page 16) At least one large sheet<br />
❑ Oak tag (page 16) At least one large sheet<br />
❑ Trac<strong>in</strong>g paper (page 16) At least one large sheet<br />
❑ Plastic bas<strong>in</strong> and sponge (page 15)<br />
❑ Thumbtacks and jig material (page 15) One complete kit<br />
❑ Rubber cement (page 16) One bottle<br />
❑ Colored pencils (page 16)<br />
❑ Dustpan and brush (page 11)<br />
If you have difficulty locat<strong>in</strong>g materials or equipment <strong>in</strong> your local craft store or sta<strong>in</strong>ed glass shop, you can f<strong>in</strong>d them easily on the Internet.<br />
All of the items needed to make the projects <strong>in</strong> this book can be found at www.ra<strong>in</strong>bowvisionsg.com, or you can log on to your favorite<br />
search eng<strong>in</strong>e and type “sta<strong>in</strong>ed glass mak<strong>in</strong>g” + “supplies” to contact hundreds of other onl<strong>in</strong>e retailers.<br />
52
1<br />
4<br />
5<br />
6<br />
12<br />
7<br />
13<br />
11<br />
Enlarge 165%<br />
8<br />
10<br />
2<br />
9<br />
3
Foiled <strong>Glass</strong> Panel<br />
Foiled <strong>Glass</strong> Panel<br />
1. Place the pattern from this book<br />
on a copier and enlarge by the recommended<br />
percentage.<br />
2. Next, you will need three additional<br />
sheets of paper, each measur<strong>in</strong>g<br />
roughly 24 by 18 <strong>in</strong>ches: 1) a<br />
sheet of heavy-stock paper, much<br />
like the oak tag paper used <strong>in</strong> bus<strong>in</strong>ess<br />
folders, which will be used as<br />
the pattern upon which the project is<br />
built; 2) a piece of carbon paper,<br />
which will transfer the photocopied<br />
pattern when you trace on it; and 3)<br />
a piece of trac<strong>in</strong>g paper, which will<br />
be used for the templates that are<br />
glued to the glass before cutt<strong>in</strong>g.<br />
3. You need to arrange the different<br />
k<strong>in</strong>ds of paper <strong>in</strong> the proper order to<br />
make a good copy. Make sure the<br />
heavy-stock paper is on the bottom<br />
of the stack with the carbon paper<br />
on top of it, followed by the photocopied<br />
pattern and the trac<strong>in</strong>g paper<br />
on the very top.<br />
5. Beg<strong>in</strong> trac<strong>in</strong>g the pattern. Because<br />
this particular pattern uses<br />
straight l<strong>in</strong>es to form a rectangle<br />
along the outside edges, use a ruler<br />
for accuracy. Use a ballpo<strong>in</strong>t pen or<br />
other writ<strong>in</strong>g <strong>in</strong>strument with a<br />
hard tip for trac<strong>in</strong>g; keep <strong>in</strong> m<strong>in</strong>d<br />
that you must press down firmly on<br />
the top layer of trac<strong>in</strong>g paper, leav<strong>in</strong>g<br />
enough of an impression to<br />
transfer the pattern’s image through<br />
the carbon paper and onto the heavy<br />
paper on the bottom. Felt-tipped<br />
markers are not recommended because<br />
they typically are too soft to<br />
leave the needed impression.<br />
6. Cont<strong>in</strong>ue carefully trac<strong>in</strong>g the<br />
l<strong>in</strong>es. Very slight alterations from the<br />
orig<strong>in</strong>al pattern will not affect the<br />
project, but you should retrace the<br />
pattern if l<strong>in</strong>es appear to be off by<br />
more than a 1 /4 <strong>in</strong>ch or so.<br />
7. When you f<strong>in</strong>ish trac<strong>in</strong>g, number<br />
each separate piece of the project.<br />
This will help to avoid confusion<br />
later on with pieces of similar<br />
shapes. Use a number<strong>in</strong>g system<br />
that you f<strong>in</strong>d logical and easy to understand,<br />
such as a clockwise one.<br />
8. Use a pair of regular household<br />
scissors to trim excess paper from<br />
the edges of the pattern.<br />
9. Switch to a pair of pattern shears<br />
designed for foiled glass proj ects to<br />
cut out all of the other pieces.<br />
4. Place a Homasote board or preferred<br />
surface on your work area.<br />
Arrange the papers so they are even,<br />
with the pattern directly <strong>in</strong> the center.<br />
Use tacks to hold down the corners<br />
of the papers.<br />
54
10. Pattern shears for foil projects<br />
remove a strip of paper 1 /32 <strong>in</strong>ch<br />
wide, a space allowance that will<br />
accommodate the foil used to hold<br />
pieces of sta<strong>in</strong>ed glass together.<br />
F<strong>in</strong>ish cutt<strong>in</strong>g out the shapes from<br />
the pattern.<br />
13. Use rubber cement to glue<br />
each paper shape onto the sta<strong>in</strong>ed<br />
glass sheets you have chosen.<br />
This will save you a lot of meticulous<br />
cutt<strong>in</strong>g!<br />
11. It is a good idea to reassemble<br />
the pieces of the pattern to make<br />
sure they were cut out accurately<br />
with no wide gaps between pieces.<br />
14. Make sure you follow the arrows<br />
regard<strong>in</strong>g the direction of the<br />
pattern or texture <strong>in</strong> the sta<strong>in</strong>ed<br />
glass.<br />
17. Beg<strong>in</strong> cutt<strong>in</strong>g out the pieces<br />
with your glass cutter. Score the big<br />
sheet of glass down the middle and<br />
separate it <strong>in</strong>to two pieces.<br />
Foiled <strong>Glass</strong> Panel<br />
12. Use colored pencils to mark an<br />
arrow on each piece to <strong>in</strong>dicate the<br />
direction you want the pattern or<br />
texture <strong>in</strong> the sta<strong>in</strong>ed glass to run on<br />
the project.<br />
15. Arrange pieces on the sta<strong>in</strong>ed<br />
glass to reduce unnecessary waste.<br />
16. With the four bigger corner<br />
pieces, use a full sheet of sta<strong>in</strong>ed<br />
glass and take advantage of the<br />
right-angle corners already present.<br />
55
8<br />
Tiffany-Style Lampshade<br />
Time <strong>in</strong>vestment: About 6–8 hours total<br />
This gorgeous lampshade will<br />
serve as the focal po<strong>in</strong>t of any<br />
room <strong>in</strong> the house, illum<strong>in</strong>ated as it<br />
is by an <strong>in</strong>candescent bulb that<br />
makes the sta<strong>in</strong>ed glass glisten—<br />
giv<strong>in</strong>g it a timeless quality that transcends<br />
eras.<br />
Patterned after the famed Tif fany<br />
style, this project appears at first to<br />
be more complex than it actually is.<br />
Rest assured that the basics you have<br />
learned <strong>in</strong> this book so far have prepared<br />
you to successfully craft this<br />
lampshade. The real key to the project<br />
is consistency: you must build six<br />
identical sta<strong>in</strong>ed glass panels, and<br />
then fasten them together to form a<br />
lampshade with pleas<strong>in</strong>g balance<br />
and symmetry. Take your time and<br />
treat each panel as a separate project,<br />
focus<strong>in</strong>g on uniformity <strong>in</strong> glass cutt<strong>in</strong>g,<br />
gr<strong>in</strong>d<strong>in</strong>g, and solder<strong>in</strong>g.<br />
You will learn a few new techniques<br />
<strong>in</strong> this project as well, such as<br />
re<strong>in</strong>forc<strong>in</strong>g jo<strong>in</strong>ts with stout wire<br />
and add<strong>in</strong>g a lamp base and cap to<br />
hold the shade <strong>in</strong> place properly.<br />
Keep <strong>in</strong> m<strong>in</strong>d that do-it-yourself<br />
electrical wir<strong>in</strong>g of any k<strong>in</strong>d is beyond<br />
the scope of this book and is<br />
not discussed here.<br />
If you plan to display the lamp<br />
<strong>in</strong> a particular room, it is suggested<br />
that you choose sta<strong>in</strong>ed glass colors<br />
that will complement the look and<br />
feel of the room. A lamp like this can<br />
help to accent many types of décor.<br />
Take some time to consider what<br />
will look appropriate to you.<br />
87<br />
Tiffany-Style Lampshade
12<br />
Basic Sta<strong>in</strong>ed <strong>Glass</strong> Repair<br />
If you make enough sta<strong>in</strong>ed glass projects, there <strong>in</strong>evitably will come a time when one of your creations falls on<br />
hard times—or actually, a time when someth<strong>in</strong>g hard falls on one of your creations.<br />
It is dishearten<strong>in</strong>g to see one of your projects susta<strong>in</strong> damage, but there is usually no need to trash the entire<br />
piece—especially when only one or two pieces of glass are cracked. A beg<strong>in</strong>ner can effect m<strong>in</strong>or sta<strong>in</strong>ed glass repairs<br />
such as the one detailed here. Keep <strong>in</strong> m<strong>in</strong>d that some repairs should not be tackled by amateurs; heavily damaged<br />
pieces should be handled by an expert.<br />
Replac<strong>in</strong>g Broken <strong>Glass</strong><br />
1. The best way to beg<strong>in</strong> repair<strong>in</strong>g<br />
a piece of sta<strong>in</strong>ed glass with a s<strong>in</strong>gle<br />
broken panel is to score it repeatedly<br />
with a glass cutter, mak<strong>in</strong>g sure to<br />
run the cutt<strong>in</strong>g wheel edge to edge<br />
<strong>in</strong> a cross-hatch pattern.<br />
2. Use the ball of the cutter or some<br />
other break<strong>in</strong>g tool to gently tap out<br />
loose pieces. Be careful not to strike<br />
with too much force. Pieces along<br />
the edge may be firmly held by the<br />
solder, and impact could break adjo<strong>in</strong><strong>in</strong>g<br />
pieces.<br />
3. Take a piece of steel wool and<br />
rub it along the soldered seam of the<br />
broken piece to remove oxidized<br />
material from it.<br />
4. Apply flux to the seam.<br />
125<br />
Basic Sta<strong>in</strong>ed <strong>Glass</strong> Repair
CRAFTS /Sta<strong>in</strong>ed <strong>Glass</strong> Mak<strong>in</strong>g<br />
• Complete guide to equipment and materials<br />
• Skills and projects fully illustrated with color photos<br />
• Basic repair techniques <strong>in</strong>cluded<br />
Precise, step-by-step <strong>in</strong>structions teach basic techniques<br />
Contributors<br />
Michael Johnston is a sta<strong>in</strong>ed glass expert who has been perfect<strong>in</strong>g his<br />
craft for years <strong>in</strong> the central Pennsylvania region, where he owns<br />
and operates Ra<strong>in</strong>bow Vision Sta<strong>in</strong>ed <strong>Glass</strong>. He is an accomplished<br />
teacher of sta<strong>in</strong>ed glass techniques and artistry for all skill levels.<br />
Alan Wycheck is an award-w<strong>in</strong>n<strong>in</strong>g photographer based <strong>in</strong><br />
Harrisburg, Pennsylvania.<br />
STACKPOLE<br />
BOOKS<br />
www.stackpolebooks.com<br />
$16.95 U.S.<br />
Higher <strong>in</strong> Canada<br />
Pr<strong>in</strong>ted <strong>in</strong> Ch<strong>in</strong>a