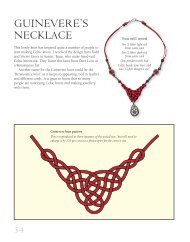
Look inside - Anything in Stained Glass
Look inside - Anything in Stained Glass
Look inside - Anything in Stained Glass

You also want an ePaper? Increase the reach of your titles
YUMPU automatically turns print PDFs into web optimized ePapers that Google loves.
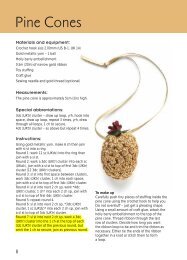
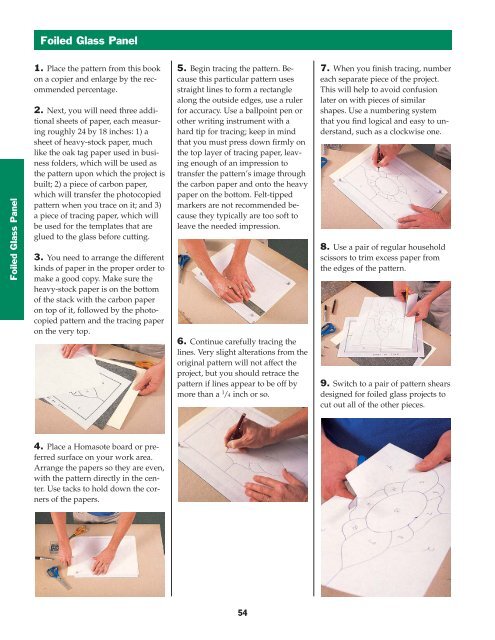
Foiled <strong>Glass</strong> Panel<br />
Foiled <strong>Glass</strong> Panel<br />
1. Place the pattern from this book<br />
on a copier and enlarge by the recommended<br />
percentage.<br />
2. Next, you will need three additional<br />
sheets of paper, each measur<strong>in</strong>g<br />
roughly 24 by 18 <strong>in</strong>ches: 1) a<br />
sheet of heavy-stock paper, much<br />
like the oak tag paper used <strong>in</strong> bus<strong>in</strong>ess<br />
folders, which will be used as<br />
the pattern upon which the project is<br />
built; 2) a piece of carbon paper,<br />
which will transfer the photocopied<br />
pattern when you trace on it; and 3)<br />
a piece of trac<strong>in</strong>g paper, which will<br />
be used for the templates that are<br />
glued to the glass before cutt<strong>in</strong>g.<br />
3. You need to arrange the different<br />
k<strong>in</strong>ds of paper <strong>in</strong> the proper order to<br />
make a good copy. Make sure the<br />
heavy-stock paper is on the bottom<br />
of the stack with the carbon paper<br />
on top of it, followed by the photocopied<br />
pattern and the trac<strong>in</strong>g paper<br />
on the very top.<br />
5. Beg<strong>in</strong> trac<strong>in</strong>g the pattern. Because<br />
this particular pattern uses<br />
straight l<strong>in</strong>es to form a rectangle<br />
along the outside edges, use a ruler<br />
for accuracy. Use a ballpo<strong>in</strong>t pen or<br />
other writ<strong>in</strong>g <strong>in</strong>strument with a<br />
hard tip for trac<strong>in</strong>g; keep <strong>in</strong> m<strong>in</strong>d<br />
that you must press down firmly on<br />
the top layer of trac<strong>in</strong>g paper, leav<strong>in</strong>g<br />
enough of an impression to<br />
transfer the pattern’s image through<br />
the carbon paper and onto the heavy<br />
paper on the bottom. Felt-tipped<br />
markers are not recommended because<br />
they typically are too soft to<br />
leave the needed impression.<br />
6. Cont<strong>in</strong>ue carefully trac<strong>in</strong>g the<br />
l<strong>in</strong>es. Very slight alterations from the<br />
orig<strong>in</strong>al pattern will not affect the<br />
project, but you should retrace the<br />
pattern if l<strong>in</strong>es appear to be off by<br />
more than a 1 /4 <strong>in</strong>ch or so.<br />
7. When you f<strong>in</strong>ish trac<strong>in</strong>g, number<br />
each separate piece of the project.<br />
This will help to avoid confusion<br />
later on with pieces of similar<br />
shapes. Use a number<strong>in</strong>g system<br />
that you f<strong>in</strong>d logical and easy to understand,<br />
such as a clockwise one.<br />
8. Use a pair of regular household<br />
scissors to trim excess paper from<br />
the edges of the pattern.<br />
9. Switch to a pair of pattern shears<br />
designed for foiled glass proj ects to<br />
cut out all of the other pieces.<br />
4. Place a Homasote board or preferred<br />
surface on your work area.<br />
Arrange the papers so they are even,<br />
with the pattern directly <strong>in</strong> the center.<br />
Use tacks to hold down the corners<br />
of the papers.<br />
54