Would you like to knit a jolly Father Christmas ? - Search Press
Would you like to knit a jolly Father Christmas ? - Search Press
Would you like to knit a jolly Father Christmas ? - Search Press

Create successful ePaper yourself
Turn your PDF publications into a flip-book with our unique Google optimized e-Paper software.
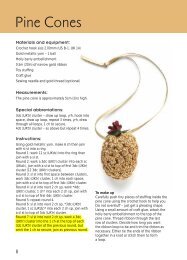
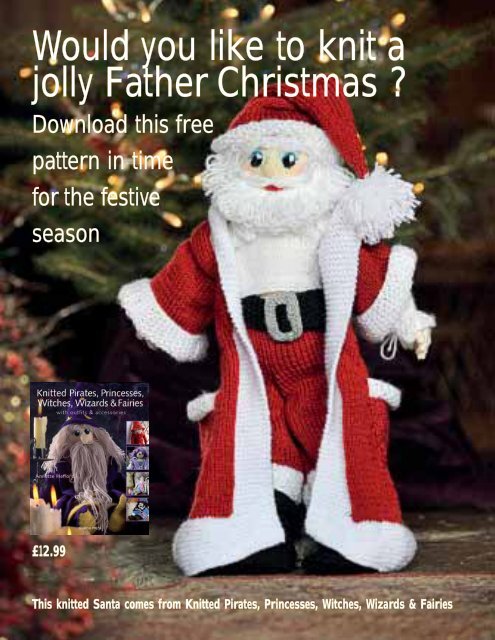
<strong>Would</strong> <strong>you</strong> <strong>like</strong> <strong>to</strong> <strong>knit</strong> a<strong>jolly</strong> <strong>Father</strong> <strong>Christmas</strong> ?Download this freepattern in timefor the festiveseason£12.99This <strong>knit</strong>ted Santa comes from Knitted Pirates, Princesses, Witches, Wizards & Fairies
Firstly <strong>you</strong> need <strong>to</strong> make the body following these directionsBasic bodyEach doll has the same basic body, for which <strong>you</strong> will need the materialsand equipment listed below. The finished height of the basic doll isapproximately 45cm (18in). Begin the doll at the feet and work upwards,finishing with the head.Materials and equipmentNeedles: one pair of 3.00mm (US 3) and one pair of2.25mm (US 1)Approx. 100g (3½oz) double <strong>knit</strong>ting (lightworsted/8ply) in light beige or any fl esh colour of<strong>you</strong>r choiceFilling: the best quality fi lling that <strong>you</strong> can buyFoot templates: cut from rigid card or plasticStitch holdersFEETBegin by copying the foot templates and use them <strong>to</strong> cut outtwo foot shapes from either rigid card or plastic. The <strong>knit</strong>ted feetare identical, but the soles (the card/plastic shapes) and fi llingform them in<strong>to</strong> one right foot and one left foot.Make two feet.For each foot:Using 2.25mm (US 1) needles, cast on 6 sts.row 1: inc in each st [12 sts].row 2: purl.row 3: inc in fi rst and every other st, <strong>to</strong> last st, K1 [18 sts].rows 4–18: commencing with a purl row, SS for 15 rows.14
Basic bodyMAKING UP1. Gather around the cast-on stitches, draw the yarn up tightlyand fasten.2. Sew the edges <strong>to</strong>gether up <strong>to</strong> the little <strong>to</strong>e position(see template).3. Slide in the cut-out foot shape, matching the shape ofthe <strong>to</strong>es.4. Stuff moderately <strong>to</strong> give shape <strong>to</strong> the ankle and foot.Remember <strong>to</strong> stuff one <strong>to</strong> shape a left foot and the other fora right foot.5. Oversew the remaining <strong>to</strong>e section.6. Put aside until <strong>you</strong> are ready <strong>to</strong> sew the feet <strong>to</strong> the legs.LEGSThe legs can be shaped <strong>to</strong> give a more mature look <strong>to</strong> the doll,or they can be left unshaped for a <strong>you</strong>nger appearance.Make two legs.UNSHAPED LEGSUsing 3.00mm (US 3) needles, cast on 16 sts.rows 1–62: commencing with a <strong>knit</strong> row (RS row), SS for62 rows.SHAPE THE TOE LINErow 19: K2<strong>to</strong>g, K14, K2<strong>to</strong>g tbl [16 sts].row 20: P2<strong>to</strong>g, P12, P2<strong>to</strong>g [14 sts].row 21: K2<strong>to</strong>g, K10, K2<strong>to</strong>g tbl [12 sts].row 22: P2<strong>to</strong>g, P8, P2<strong>to</strong>g [10 sts].row 23: cast off 2 sts, <strong>knit</strong> <strong>to</strong> end [8 sts].row 24: cast off 2 sts purlwise, purl <strong>to</strong> end [6 sts].Cast off remaining sts.SHAPED LEGSUsing 3.00mm (US 3) needles, cast on 10 sts.rows 1–6: commencing with a <strong>knit</strong> row, SS for 6 rows.row 7: inc in fi rst st, K4, inc in next st, <strong>knit</strong> <strong>to</strong> end [12 sts].rows 8–18: commencing with a purl row, SS for 11 rows.row 19: inc in fi rst st, K5, inc in next st, <strong>knit</strong> <strong>to</strong> end [14 sts].rows 20–30: commencing with a purl row, SS for 11 rows.row 31: inc in fi rst st, K6, inc in next st, <strong>knit</strong> <strong>to</strong> end [16 sts].rows 32–62: commencing with a purl row, SS for 31 rows.SHAPED AND UNSHAPED LEGS(ROW 63 ONWARDS)Break the yarn and put the stitches of the fi rst leg on <strong>to</strong> a stitchholder. Knit the second leg <strong>to</strong> row 62, then transfer the stitches<strong>to</strong> the RH needle. Replace the stitches from the stitch holder <strong>to</strong>the LH needle, then return the transferred stitches back fromthe RH <strong>to</strong> the LH needle. Work both legs with right sides facing,keeping the tension fi rm at the centre join of the legs.Shape the inside thighrow 63: inc in fi rst st, K14, inc in next 2 sts, K14, inc in last st[36 sts].row 64: inc in fi rst st, P16, inc in next 2 sts, P16, inc in last st[40 sts].row 65: inc in fi rst st, K18, inc in next 2 sts, K18, inc in last st[44 sts].row 66: P2<strong>to</strong>g, P18, (P2<strong>to</strong>g) twice, P18, P2<strong>to</strong>g [40 sts].row 67: K2<strong>to</strong>g, K16, K2<strong>to</strong>g tbl, K2<strong>to</strong>g, K16, K2<strong>to</strong>g tbl [36 sts].row 68: P2<strong>to</strong>g, P14, (P2<strong>to</strong>g) twice, P14, P2<strong>to</strong>g [32 sts].15
Basic bodyRIGHT HANDUsing 2.25 mm (US 1) needles, cast on 8 sts.rows 1–10: commencing with a purl row, SS for 10 rows.row 11: cast off 2 sts purlwise, P2, ytb, sl1, turn [6 sts].row 12: ytb, sl1, <strong>knit</strong> <strong>to</strong> end.row 13: cast on 2 sts, P4, ytb, sl1, turn [8 sts].row 14: ytb, sl1, <strong>knit</strong> <strong>to</strong> end.row 15: cast on 3 sts, purl <strong>to</strong> end [11 sts].row 16: <strong>knit</strong>.row 17: cast off 3 sts purlwise, P3, ytb, sl1, turn [8 sts].row 18: ytb, sl1, <strong>knit</strong> <strong>to</strong> end.row 19: cast off 2 sts purlwise, purl <strong>to</strong> end [6 sts].row 20: <strong>knit</strong>.row 21: cast on 8 sts, P9, ytb, sl1, turn [14 sts].row 22: ytb, sl1, <strong>knit</strong> <strong>to</strong> end.row 23: cast off 6 sts purlwise, purl <strong>to</strong> end [8 sts].row 24: <strong>knit</strong>.row 25: cast on 7 sts, P8, ytb, sl1, turn [15 sts].row 26: ytb, sl1, <strong>knit</strong> <strong>to</strong> end.row 27: cast off 7 sts purlwise, purl <strong>to</strong> end [8 sts].row 28: <strong>knit</strong>.row 29: cast on 5 sts, P7, ytb, sl1, turn [13 sts].row 30: ytb, sl1, <strong>knit</strong> <strong>to</strong> end.row 31: cast off 5 sts purlwise, purl <strong>to</strong> end [8 sts].row 32: <strong>knit</strong>.row 33: cast on 4 sts, P6, ytb, sl1, turn [12 sts].row 34: ytb, sl1, <strong>knit</strong> <strong>to</strong> end.Cast off purlwise loosely. (If <strong>you</strong> are a tight <strong>knit</strong>ter, usea larger needle.)LEFT HANDUsing 2.25 mm (US 1) needles, cast on 8 sts.rows 1–10: commencing with a <strong>knit</strong> row (RS row), SS for10 rows.row 11: cast off 2 sts, K1, yfwd, sl1, turn [6 sts].row 12: yfwd, sl1, purl <strong>to</strong> end.row 13: cast on 2 sts, K5, yfwd, sl1, turn [8 sts].row 14: yfwd, sl1, purl <strong>to</strong> end.row 15: cast on 3 sts, <strong>knit</strong> <strong>to</strong> end [11 sts].row 16: purl.row 17: cast off 3 sts, K3, yfwd, sl1, turn [8 sts].row 18: yfwd, sl1, purl <strong>to</strong> end.row 19: cast off 2 sts, <strong>knit</strong> <strong>to</strong> end [6 sts].row 20: purl.row 21: cast on 8 sts, K9, yfwd, sl1, turn [14 sts].row 22: yfwd, sl1, purl <strong>to</strong> end.row 23: cast off 6 sts, <strong>knit</strong> <strong>to</strong> end [8 sts].row 24: purl.row 25: cast on 7 sts, K8, yfwd, sl1, turn [15 sts].row 26: yfwd, sl1, purl <strong>to</strong> end.row 27: cast off 7 sts, <strong>knit</strong> <strong>to</strong> end [8 sts].row 28: purl.row 29: cast on 5 sts, K7, yfwd, sl1, turn [13 sts].row 30: yfwd, sl1, purl <strong>to</strong> end.row 31: cast off 5 sts, <strong>knit</strong> <strong>to</strong> end [8 sts].row 32: purl.row 33: cast on 4 sts, K6, yfwd, sl1, turn [12 sts].row 34: yfwd, sl1, purl <strong>to</strong> end.Cast off loosely. (If <strong>you</strong> are a tight <strong>knit</strong>ter, use a larger needle.)MAKING UP THE HANDSRead the instructions through fi rst. Start sewing up the fi ngers atthe base of the little fi nger.1. Using the waste yarn from the cast-off stitches, weave thecast-off yarn through <strong>to</strong> the base of the little fi nger and makean anchor stitch.2. With <strong>you</strong>r left thumb and index fi nger, pinch the fi nger edges<strong>to</strong>gether (purl side inside). Pick up the outer stitch either sideof the fi nger and pull the cast-on and cast-off edges in<strong>to</strong> thecentre of the fi nger, making a neat seam.3. After sewing up the fi nger, take the needle down the centreof the fi nger back <strong>to</strong> the base. Pull the yarn suffi ciently <strong>to</strong>make a fi rm, straight fi nger. Put an anchor stitch at the basebetween the little fi nger and the next fi nger.4. Continue along each fi nger then the thumb. Finally, sew the<strong>to</strong>p edge of the palm <strong>to</strong> the base of the fi ngers and join upthe side of the hand. Sometimes a little practice isneeded here.5. Fill the palm slightly.6. With the cast-on waste yarn, make gathering stitches aroundthe wrist edge.7. Attach the thumb pad <strong>to</strong> the palm under the fi rst fi nger bypinching the base of the thumb in<strong>to</strong> the palm and oversewingwith three stitches <strong>to</strong> hold it in place.Put the hands aside until <strong>you</strong> are ready <strong>to</strong> attach them <strong>to</strong>the arms.17
Basic bodyARMSShape the arms <strong>to</strong> give a more mature look <strong>to</strong> the dolls, orleave them unshaped for a <strong>you</strong>nger appearance.Make two arms.UNSHAPED ARMSStart with the wrist line.Using 3.00mm (US 3) needles, cast on 12 sts.rows 1–44: SS for 44 rows.SHAPED ARMSStart with the wrist line.Using 3.00mm (US 3) needles, cast on 8 sts.rows 1–6: SS for 6 rows.row 7: K1, inc in next st, K2, inc in next st, K3 [10 sts].rows 8–28: commencing with a purl row, SS for 21 rows.row 29: K1, inc in next st, K3, inc in next st, K4 [12 sts].rows 30–44: commencing with a purl row, SS for 15 rows.MAKING UP THE ARMS1. Gather up the cast-on edge and fi nish tightly.2. Sew the row ends <strong>to</strong>gether up <strong>to</strong> the shoulder decreases.3. Stuff the arms fi rmly with fi lling.ATTACHING THE HANDS TO THE ARMS1. Push the wrist edge of the arm in<strong>to</strong> the wrist edge of thehand, keeping the seam of the arm aligned with the centreof the palm. Pin it in place if needed. Tighten the gatheredstitching. Sew in place.2. Check the fi ngers for straightness. If further sculpting isrequired, push the needle up and down the centre of eachfi nger <strong>to</strong> add stiffness and adjust the shape of the fi nger.ATTACHING THE ARMS TO THE BODY1. Pin the arms <strong>to</strong> the body, so that the seams are on theinside, facing the body. Place them just <strong>to</strong> the side of theshoulder indica<strong>to</strong>rs (see page 16).2. Sew the arms <strong>to</strong> the body.SHAPED AND UNSHAPED ARMS(ROW 45 ONWARDS)row 45: K2<strong>to</strong>g, K8, K2<strong>to</strong>g tbl [10 sts].row 46: P2<strong>to</strong>g, P6, P2<strong>to</strong>g [8 sts].row 47: K2<strong>to</strong>g, K4, K2<strong>to</strong>g tbl [6 sts].row 48: P2<strong>to</strong>g, P2, P2<strong>to</strong>g [4 sts].Cast off remaining sts.18
Materials and equipmentAs for Alistair.Yarns (approximate amounts):100g (3½oz) cream/fl esh coloured forbasic body200g (7oz) red for cloak, hat and pants140g (4¾oz) white for shirt, hair, beardand edgingssmall amounts of black for boots and belt,black, white, red and blue for face, and greyfor buckle
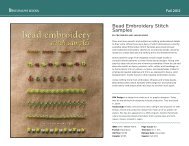
Santa ClausFACECopy Santa’s face from the pho<strong>to</strong>graph, or create <strong>you</strong>r ownfollowing the guidelines on page 19. Colour his cheeks and thetip of his nose with a <strong>to</strong>uch of pink chalk or crayon.row 5: K2<strong>to</strong>g, K1, pass fi rst st over second st.Finish off.Sew the edges and stuff the nose. Oversew the base of the noseand sew it <strong>to</strong> face.HAIRUsing white yarn, follow the basic instructions on pages 20–21<strong>to</strong> create Santa’s curly hair. Each loop is made by wrapping theyarn once around two fi ngers.BEARDUsing 2.25mm (US 1) needles and white yarn, cast on 26 sts.row 1: TLS <strong>to</strong> end.row 2: <strong>knit</strong>.row 3: TLS <strong>to</strong> end.Cast off.Turn in the cast-off edge and sew the beard <strong>to</strong> the face,meeting the hairline at each side and placing the beard justbelow Santa’s mouth.NOSEUsing 2.25mm (US 1) needles, cast on 7 sts.row 1: <strong>knit</strong>.row 2: P2<strong>to</strong>g, P3, P2<strong>to</strong>g tbl [5 sts].row 3: K2<strong>to</strong>g, K1, K2<strong>to</strong>g tbl [3 sts].row 4: purl.MOUSTACHE1. Place <strong>to</strong>gether ten strands of white yarn approximately 40cm(15¾in) long and secure them in the middle with a length ofwaste yarn.2. Pin the centre of the moustache <strong>to</strong> the face, just under thenose. Twist each side of the moustache <strong>to</strong> shape it and pin itin place <strong>to</strong> the sides of the face.3. Sew the moustache <strong>to</strong> Santa’s face <strong>to</strong> secure it, sewing ineach of the ten strands. Take the ends through <strong>to</strong> the back ofthe head.PANTSUsing 3.00mm (US 3) needles and white yarn, cast on 48 sts.rows 1–10: moss stitch.Change <strong>to</strong> red.rows 11–12: SS, commencing with a <strong>knit</strong> row.Complete as for Alistair Wizard’s pants, from row 33 onwards(see page 77).
Santa ClausCLOAKFollow the cloak pattern for Alistair Wizard (see pages 78–80),using white for the edging and cuffs and red for the cloak. Add alarge pocket on either side and replace the sleeve pattern withthe one below:SLEEVESMake two.Using 3.00mm (US 3) needles and red yarn, cast on 48 sts.rows 1–44: SS.Change <strong>to</strong> white.row 45: purl.rows 46–72: moss stitch.Cast off in pattern.Turn up the white cuff.POCKETSMake two.Using red yarn, cast on 28 sts.rows 1–22: SS.Change <strong>to</strong> white.rows 23–27: moss stitch.Cast off in pattern.Sew the pockets <strong>to</strong> the front of the cloak, using the pho<strong>to</strong>graphfor reference. Make the <strong>to</strong>p of the pocket baggier than thebot<strong>to</strong>m so that it hangs open, allowing the tiny <strong>to</strong>ys placed inside<strong>to</strong> be seen.BELTFollow the pattern for Samuel Crowe’s belt (see page 66),<strong>knit</strong>ting it in black yarn and the buckle in grey.BOOTSFollowing the pattern for Samuel Crowe’s boots, use black yarnand 2.25mm (US 1) needles <strong>to</strong> complete the two soles.For the legs, omit rows 1–24.row 25: K2, inc in next st, (K4, inc in next st) 5 times, K2[36 sts].rows 26–29: GS.row 30: K3, inc in next st, (K4, inc in next st) 6 times, K2[43 sts].rows 31–34: GS.Cast off loosely, or use a size larger needle.Sew the back seam of the leg, keeping in mind that the <strong>to</strong>p ofthe boot turns over. Oversew the GS rows and mattress stitchthe SS rows down <strong>to</strong> the heel position.HATKnit the wizard’s hat (see pages 73–74) in red and white yarn,replacing the fi rst four rows with moss stitch worked in white.Omit the embroidery and add a white pompom <strong>to</strong> the point ofthe hat.SHIRTFollow Samuel Crowe’s shirt pattern (see pages 62–64).Place tiny treasures in Santa’s pockets. These are made from single strandsof green and red yarn threaded with tiny <strong>Christmas</strong> beads.85
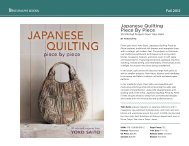
The completed shirt.SHIRTFRONTUsing white yarn and 3.00mm (US 3) needles, cast on 26 sts.rows 1–4: GS.rows 5–16: SS, commencing with a <strong>knit</strong> row.row 17: P12, K2, P12.row 18: <strong>knit</strong>.row 19: P10, K6, P10.Armhole shapingrow 20: cast off 3 sts, (with 1 st on needle) K9, turn [10 sts).Continue on these 10 sts.row 21: K3, purl <strong>to</strong> end.row 22: <strong>knit</strong>.rows 23–30: repeat rows 21 and 22, 4 times.Shaping the necklinerow 31: cast off 3 sts, purl <strong>to</strong> end [7 sts].row 32: K5, K2<strong>to</strong>g [6 sts].row 33: purl.row 34: <strong>knit</strong>.row 35: purl.Cast off.With RS facing, rejoin yarn <strong>to</strong> the right front.row 20: <strong>knit</strong> <strong>to</strong> end.Armhole shapingrow 21: cast off 3 sts, (with 1 st on needle) P6, K3 [10 sts).row 22: <strong>knit</strong>.row 23: P7, K3.rows 24–31: repeat rows 22 and 23, 4 times.Shaping the necklinerow 32: cast off 3 sts, <strong>knit</strong> <strong>to</strong> end [7 sts].row 33: P5, P2<strong>to</strong>g [6 sts].row 34: <strong>knit</strong>.row 35: purl.row 36: <strong>knit</strong>.Cast off purlwise.Sew in the loose ends.BACKThe back is similar <strong>to</strong> the shirt front, but without the neckopening.Using 3.00mm (US 3) needles, cast on 26 sts.rows 1–4: GS.rows 5–19: SS, commencing with a <strong>knit</strong> row.62
TipTo match the points of the collar, put the point of a needlein<strong>to</strong> each one and pull gently <strong>to</strong> even out the stitches.Armhole shapingrow 20: cast off 3 sts purlwise, purl <strong>to</strong> end [23 sts].row 21: cast off 3 sts, <strong>knit</strong> <strong>to</strong> end [20 sts].rows 22–32: SS, commencing with a purl row.Shaping the necklinerow 33: K7, cast off 6 sts, (with 1 st on needle) K6.Using the fi rst 7 sts on the needle:row 34: P5, P2<strong>to</strong>g [6 sts].row 35: <strong>knit</strong>.row 36: purl.Cast off.With WS facing, rejoin yarn at the neck edge of right back.row 34: P2<strong>to</strong>g, purl <strong>to</strong> end of row [6 sts].row 35: <strong>knit</strong>.row 36: purl.Cast off.Sew in the loose ends. Sew up the shoulder seams andside seams.SLEEVESMake two.Using 3.00mm (US 3) needles, cast on 35 sts.Commencing at the wrist edge:row 1: (K1, K2<strong>to</strong>g, K1, yfwd, K1) <strong>to</strong> end.row 2: <strong>knit</strong>.row 3: repeat row 1.row 4: purl.row 5: <strong>knit</strong>.row 6: purl.row 7: K1, (K2<strong>to</strong>g) <strong>to</strong> end [18 sts].row 8: purl.row 9: inc 1 st in each st [36 sts].rows 10–45: SS, commencing with a purl row. Decrease 1 st ateach end of rows 15, 21, 27 and 33 [28 sts].Cast off.MAKING UP1. Sew the sleeve edges <strong>to</strong>gether. For each sleeve, place thesleeve in the armhole RS facing. Match the sleeve seam withthe side seam of the shirt. Pin the sleeve in place and sewusing back stitch.2. Make a 30cm (11¾in) cord for each sleeve (see page 12)and weave it in<strong>to</strong> the wristline, commencing and fi nishing atthe seam. Pull <strong>to</strong>gether and tie in<strong>to</strong> a bow.COLLARThe fi rst two or three rows will be a little tight. The <strong>knit</strong>tingloosens up as the collar gets wider.row 1: with RS facing, pick up and <strong>knit</strong> 8 sts along the right frontedge of the neckline, 15 sts along the back neck edge, and 8 stsalong the left front neck edge [31 sts].row 2: K1, inc in next st, (K6, inc in next st) 4 times, K1 [36 sts].row 3: <strong>knit</strong>.row 4: K1, inc in next st, (K7, inc in next st) twice, K8, inc innext st, K7, inc in next st, K1 [41 sts].row 5: <strong>knit</strong>.row 6: K1, inc in next st, K8, inc in next st, (K9, inc in next st)twice, K8, inc in next st, K1 [46 sts].row 7: <strong>knit</strong>.row 8: K1, (inc in next st, K10) 3 times, K9, inc in next st, K1[51 sts].row 9: <strong>knit</strong>.row 10: K1, inc in next st, (K11, inc in next st) 4 times, K1[56 sts].row 11: <strong>knit</strong>.Cast off loosely (or use a larger needle). Sew in the loose ends.63