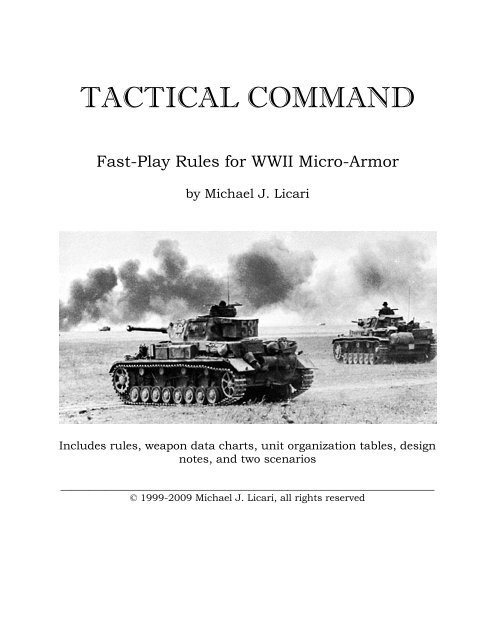
TACTICAL COMMAND
TACTICAL COMMAND
TACTICAL COMMAND

Create successful ePaper yourself
Turn your PDF publications into a flip-book with our unique Google optimized e-Paper software.
<strong>TACTICAL</strong> <strong>COMMAND</strong><br />
Fast-Play Rules for WWII Micro-Armor<br />
by Michael J. Licari<br />
Includes rules, weapon data charts, unit organization tables, design<br />
notes, and two scenarios<br />
__________________________________________________________________<br />
© 1999-2009 Michael J. Licari, all rights reserved
<strong>TACTICAL</strong> <strong>COMMAND</strong> is designed for<br />
fast play, and the core rules are only a few<br />
pages long. Although they are relatively<br />
simple, they offer built-in abstracted<br />
command rules and fairly detailed vehicle<br />
and combat characteristics. Scale is 1" =<br />
100 yards, and each stand represents a<br />
platoon of vehicles, men, or towed guns.<br />
The intention was to create a set of rules that<br />
would not take a new player all day to figure<br />
out. This means more time is spent playing<br />
and focusing on tactics than flipping through<br />
a huge rulebook. <strong>TACTICAL</strong> <strong>COMMAND</strong><br />
is a streamlined set of rules. Too many sets<br />
of rules at this level have far too much<br />
individual weapon detail. Using some<br />
games, players feel more like bookkeepers,<br />
but in <strong>TACTICAL</strong> <strong>COMMAND</strong> much of<br />
this unnecessary detail is abstracted. If you<br />
want to keep track of hit location, stand<br />
damage, and ammo supply, this is not the<br />
game for you and a skirmish-level set of<br />
rules may be more appropriate.<br />
Game Summary<br />
The lowest level of command that is<br />
represented is the battalion HQ. Since the<br />
game is designed primarily for battlegroup<br />
actions or higher, company commanders are<br />
not relevant. The "feel" of the game focuses<br />
around where your companies are, not<br />
necessarily where your platoons are. One<br />
person can easily handle several battalions,<br />
with supporting artillery. For larger games<br />
with an entire division or more per side,<br />
more players should get involved.<br />
Although the basic rules can offer a fast but<br />
intense game, for more flavor a set of<br />
optional rules is included. These can be<br />
added as players see fit. Some, all, or none<br />
may be chosen, depending on how much<br />
INTRODUCTION AND SUMMARY<br />
additional detail players want. It is<br />
recommended to play the basic rules first to<br />
get a feel for what options (if any) you<br />
might want to add.<br />
<strong>TACTICAL</strong> <strong>COMMAND</strong> has a sequence of<br />
play that forces players to plan ahead. One<br />
side "motivates" a battalion HQ, allowing its<br />
subordinate units to fire and/or move. Then<br />
the other side does the same for one of its<br />
HQs. This alternates until all units have<br />
been motivated. This forces players to<br />
consider the impacts of motivating certain<br />
units at certain times. It also forces them to<br />
consider their reactions to enemy units that<br />
have been motivated, considering other<br />
enemy units that have not yet been<br />
motivated.<br />
This system has a number of realismboosting<br />
implications. First, companies that<br />
are left unsupported by other units will<br />
probably be destroyed, and will be less<br />
effective in the attack or on defense.<br />
Second, attackers can force defenders into<br />
reacting earlier than they might like, given<br />
that the attacking side probably will have<br />
more units to motivate (particularly if he<br />
concentrates his force at the point of attack).<br />
Finally, the system creates a very fluid<br />
battle; there is nothing passive about the<br />
game, and players must be thinking at all<br />
times!
<strong>TACTICAL</strong> <strong>COMMAND</strong> ver 2.8<br />
© 1999-2009 by Michael J. Licari, all rights reserved<br />
These rules for World War II gaming are intended for use with 1/285 scale miniatures. Tactical<br />
Command is free, as long as copies are distributed with my credit. Updates will periodically be<br />
available at http://www.uni.edu/~licari/minis.html If you use them please email comments to me<br />
at mlicari@cfu.net<br />
SCALE<br />
1" = 100 yards; 1 turn = 30 minutes; 1 stand = 1 platoon of infantry, vehicles, or equipment.<br />
SEQUENCE OF PLAY<br />
At the start of a each turn, both sides roll 1D6. The side with the higher roll then attempts to<br />
motivate his first headquarters (HQ). These are typically battalion or brigade HQs. Once all of<br />
the units (companies or Russian tank battalions) under this HQ have finished all actions the<br />
opposition then attempts to motivate its first HQ. The turn continues, with each side alternating<br />
motivation attempts until both sides have attempted to motivate all of their HQs. If one side has<br />
run out of HQs to motivate, the other side simply attempts to motivate the rest of his HQs, one at<br />
a time. Once both sides have attempted to motivate all their HQs, any close combat rounds<br />
begin. After any/all close combat, both sides then make any aircraft attacks. The player that<br />
moved first in the turn makes his attacks first. Once aircraft attacks are done, a new turn begins.<br />
Most units may move and fire, or fire and move. Towed weapons and units attempting to fire<br />
indirect may move or fire. FOs may not move and spot for artillery, nor may they fire and spot.<br />
Units attempting to engage enemy aircraft must be placed on Opportunity Fire or Hold Fire.<br />
LOS<br />
Line of Sight (LOS) exists through friendly stands of the same unit, but not through any other<br />
stand. LOS exists 1" into towns, woods, forests, swamps. A stand touching the crest of a hill<br />
may see over all obstacles (but still only 1" into them). LOS does not exist between a groundlevel<br />
stand and a stand on a hill that is not touching the crest line. A stand in cover may not be<br />
seen unless it or another stand from its unit has moved or fired during the game; this LOS<br />
restriction does not apply to recon stands.<br />
MOTIVATING HQs<br />
Roll 1d10 (0 = 10). If you equal or exceed the HQ's motivation rating, the HQ passes. All units<br />
subordinate to a HQ that passes may move their full movement allowance. If you roll less than<br />
the motivation rating, the subordinate units may move up to half their movement allowance.<br />
Artillery units activate when their forward observer is motivated. Elite units have a rating of 3.<br />
Veteran units have a rating of 4. Regular units have a rating of 5, and Green units have a rating<br />
of 6. HQs may always move their full allowance. Modify the motivation roll by any and all of<br />
the situations that apply:<br />
+1 if the scenario attacker (in meeting engagements both sides are scenario attackers)
-1 per stand lost above 25% of formation for Green, 33% for Regular/Veteran, or 50% for Elite,<br />
fractions rounded down; note transport vehicles never count for this purpose.<br />
-2 per sub-unit destroyed<br />
-2 if battalion (or Soviet brigade) commander out of range of any unit (N/A to recon) or lost<br />
+1 if at least half of battalion's units in hard cover<br />
+1 if the unit has "Vigorous Attack" orders (see optional rules)<br />
If the motivation check is failed by 4, all subordinate units are pinned and may not move. If the<br />
check is failed by 5, subordinate units immediately retreat a full move to the nearest terrain<br />
feature (if in terrain feature, pin); in the next turn a "pass" result equals "pin". If the check is<br />
failed by 6 or more, one subordinate unit, chosen at random, is destroyed (considered to have<br />
surrendered or routed) and all remaining subordinate units must retreat as per above.<br />
<strong>COMMAND</strong> RANGE<br />
All stands in a unit must remain within 1" of a friendly stand in that same unit. All stands in a<br />
unit must remain within 15" (10" if Green) of a battalion (or Russian tank brigade/regiment)<br />
headquarters stand. Battalion headquarters stands must remain within 15" (10" if green) of their<br />
regimental headquarters. Recon and FO stands do not have to obey these command distance<br />
rules. If a HQ stand is destroyed, subordinate units must remain in command range of the last<br />
spot the HQ occupied. A destroyed HQ stand is replaced after 2 turns for Elite and Veteran units<br />
or 3 turns for Regular and Green units. The new HQ stand is placed on the map such that as<br />
many subordinate units as possible are within command range.<br />
MOVEMENT<br />
Stands have a max movement allowance, listed on the weapons charts. No stand may pass<br />
through another. Rough ground (e.g. woods, rocks, muddy ground) costs double for tracked and<br />
half-tracked vehicles and triple for wheeled armored cars. Trucks may not move through rough<br />
ground. Offroad movement for trucks otherwise costs triple. It costs ½ movement to load or<br />
unload infantry. APCs can carry one infantry stand. A towed weapon stand may be pulled by a<br />
truck or halftrack of the right class (using ½ movement to limber/unlimber a Class 1 or 2<br />
weapon; Class 3 weapons use a full move). Stands moving exclusively on a road may move up<br />
to 1.5 times (2 times if wheeled) their movement allowance, but stands may not pass another.<br />
OPPORTUNITY FIRE AND HOLD FIRE<br />
You can put an Opportunity Fire marker on a unit that doesn't move or fire in its turn. The unit<br />
can then fire at an enemy movement that it can see during that enemy unit's move. You can put a<br />
Hold Fire marker on a unit that is eligible to fire after movement, but doesn't. The unit can then<br />
fire at an enemy movement that it can see during that enemy unit's move. Units marked<br />
Opportunity or Hold Fire may only fire while an enemy is moving; shots may not be saved for<br />
the end of the turn.
MORALE CHECKS<br />
Roll 1d6. If you equal or exceed the stand's morale rating, the stand is passes. If not, the stand is<br />
destroyed. Green stands have a morale of 5. Regular and Veteran stands have a morale of 4.<br />
Elite stands have a morale of 3. Infantry/towed weapons in a vehicle that is destroyed are also<br />
destroyed.<br />
ANTI-TANK FIRE<br />
Roll 1d6 equal to the ROF of the firer. All shots taken by stands of the same type in a unit must<br />
be made at the same stand. A non-turreted weapon may only fire from its front arc (180 degree<br />
arc) to hit. A 4+ hits at effective range. Close range is 1/2 effective range and is +1 to the die<br />
roll. Long range is twice effective range and is -1 to the die roll. Add +1 if firer is elite, -1 if firer<br />
is green.<br />
If target is in cover, roll a save on 1d6. A 5 or 6 means the attack has no effect. If conducting<br />
fire after movement, roll a save on 1d6. A 5 or 6 means the attack has no effect. If any stand is<br />
firing a fixed weapon after movement, a 4, 5, or 6 on the save die means the attack has no effect.<br />
Example: An elite Tiger company with 2 stands fires at a British Cromwell V stand at effective<br />
range and in cover. Since the ROF of a Tiger stand is 2, the German player rolls 4 dice, each<br />
modified by +1 since the unit is elite. Since the British tank stand is in cover, a save roll is also<br />
made. If this save roll is a 5 or 6, the entire attack has no effect. Otherwise, the Tiger unit will<br />
score one hit on the British tank stand for each hit roll of 3 or greater.<br />
A hit from a firer in the target's front arc (180 degree arc) uses the target's armor value. A hit<br />
from any other angle is a flank shot and uses half the target's armor value (fractions rounded<br />
down).<br />
To determine penetration, take the weapon's Pen (Penetration) Number and subtract the target's<br />
armor. This is how many dice you get to roll. You always get at least one die. If the target's<br />
armor exceeds the penetration of the weapon, subtract the difference from the die roll.<br />
Penetration is increased by 1 at close range and decreased by 1 at long range. "H" class rounds<br />
have the same penetration at all ranges.<br />
Roll your dice. If any die is a 6, the target is destroyed. If any die is a 4 or 5, the target takes a<br />
morale check. If the difference between the penetration and armor numbers was 0, however, the<br />
target takes a morale check on a 4, 5, or 6. Infantry/towed weapons in a vehicle that is destroyed<br />
are also destroyed.<br />
Example: Presume the Tiger unit firing in the example above scored 2 hits on the front facing of<br />
the British Cromwell V. The penetration number for a Tiger is 6 and the armor of a Cromwell V<br />
is 2. This means the German player will roll 8 dice (4 for each hit). If any of these 8 rolls is a 6,<br />
the Cromwell is destroyed. If not destroyed, the Cromwell stand must take a morale check for<br />
each 4 or 5 rolled.<br />
ANTI-INFANTRY/SOFT FIRE<br />
Roll dice equal to the ROF rating of the firer. All shots made by stands of the same type in a unit<br />
must be taken at the same stand. Any roll that equals or exceeds the anti-infantry "to hit" number
of the firer causes a morale check. Each additional hit modifies the morale check roll by –1. A<br />
non-turreted weapon may only fire from its front arc (180 degrees). If conducting fire after<br />
movement, roll a save on 1d6. A 5 or 6 means the attack has no effect. If any stand is firing a<br />
fixed weapon after movement, a 4, 5, or 6 on the save die means the attack has no effect.<br />
Apply a -1 to the roll of a stand firing at a target that is in soft cover (woods/forest, swamp,<br />
entrenchments, gully, hedges, etc.) and that has not moved in the current turn.<br />
Apply a -1 to the roll of a stand firing at a target at long range and a +1 to a stand firing at short<br />
range. Note that mortars do not have a short range.<br />
Apply a -2 to the roll of a stand firing at a target that is in hard cover (towns, bunkers, walls, etc)<br />
and that has not moved in the current turn.<br />
Apply a +1 to the roll of a stand firing at a target that has moved or is moving if attacked by<br />
Overwatch/Hold Fire.<br />
CLOSE COMBAT<br />
Close combat occurs when enemy stands touch each other. Infantry can automatically dismount<br />
in close combat. Soft vehicles and towed weapons are automatically destroyed prior to any close<br />
combat rounds. Each side gets one die roll per round. High roll wins the round and the<br />
difference is the number of stands eliminated (opposition's choice). No stands are eliminated if<br />
the result is a tie. Rounds continue until all stands on one side are eliminated. The rolls are<br />
modified by<br />
+1 Per extra stand above 1<br />
+2 Per AFV vs enemy infantry (N/A if enemy AFV also in the close combat)<br />
+2 Per engineer (represents flamethrowers and satchel charges)<br />
+1 Per ATR attacking vs AFV (N/A if enemy infantry also in the close combat)<br />
+2 Per PIAT/Bazooka/ATRL vs enemy AFV (N/A if enemy infantry also in the close combat)<br />
+1 Per SMG stand vs enemy infantry (N/A if enemy AFV also in the close combat)<br />
-1 Per MG-armed AFV in CC with any enemy gun-armed AFV<br />
+1 For CC against any pinned units<br />
+2 For CC against any suppressed units<br />
FLAMETHROWERS<br />
Infantry flamethrowers may only attack in Close Combat. AFV flamethrowers always fire at the<br />
flank of enemy AFV. AFV flamethrowers ignore the effects of a target's cover.
ARTILLERY<br />
Artillery can fire indirect up to the gun's maximum indirect range listed (the number after the<br />
"slash" in the range column). Long range is anything over half the maximum range. No artillery<br />
may fire indirect at a range less than 10% of its maximum (except for mortars: their minimum<br />
range is listed as the first number in the "range" column and applies both for direct and indirect<br />
fire).<br />
Each battery can place one artillery barrage marker per turn, up to a total of four per game.<br />
Barrage markers must be placed in LOS of a FO. Total up the artillery points (AP) and roll one<br />
die on the Artillery Chart. For artillery attacks, units in entrenchments or weapons pits are<br />
considered to be in hard cover. A hit causes the stand to take a morale check. Closed-top AFVs<br />
have a +2 to their morale check if the morale check is caused solely by L-class artillery. Any<br />
stand has a +2 to its morale check if it is caused solely by artillery firing at long range. All<br />
artillery can place smoke; the coverage area for smoke is always dispersed.<br />
FOs can be designated FO units or any stand of a battalion HQ company designated prior to the<br />
start of the game. Once the HQ passes a motivation check, the HQ's subunits may fire<br />
immediately. American and British artillery is always Elite. All other artillery is of the same<br />
morale as the rest of the forces on its side. If the HQ does not pass the motivation check,<br />
subordinate units may not fire indirect barrages (although they may use direct fire, if not<br />
retreating). Once a barrage lands, it lasts until the end of the turn; units moving through the<br />
barrage are attacked. All other rules for HQ motivation apply normally.<br />
ARTILLERY FIRE CHART<br />
Artillery Points Soft/Infantry Soft/Infantry Soft/Infantry AFV<br />
in open in hard cover in soft cover<br />
1-2 5+ 6+ 4+ 6+<br />
3-4 4+ 5+ 3+ 5+<br />
5-6 3+ 4+ 2+ 4+<br />
7-8 2+ 3+ 2+ 3+<br />
9+ 2+ 2+ 1+ 2+<br />
ANTI-AIRCRAFT FIRE<br />
Once an enemy aircraft has designated a target, and that target is in effective range and in LOS<br />
of the anti-aircraft unit, roll dice equal to the ROF of the anti-aircraft unit firing. If any die is a 6,<br />
the aircraft is immediately removed from play and can not return for the remainder of the game.<br />
Line of sight to aircraft is blocked if the AA gun is in woods/forest/swamp. Anti-aircraft units<br />
on Hold Fire have their ROF halved (fractions rounded up). Only weapons with an asterisk by<br />
their ROF on the weapons charts may fire at aircraft.<br />
AIRCRAFT FIRE<br />
Once an air unit has withstood all anti-aircraft fire, it makes its attack. An airplane attacks only<br />
one stand. An airplane may only make one attack per game. If strafing, use the Artillery Fire<br />
Chart on the 3-4 factor row. If dropping bombs or firing rockets, use the 7-8 factor row. As with
artillery fire, a hit causes a morale check. If dropping bombs or firing rockets, the airplane may<br />
make a strafing attack on the same target after the bomb/rocket attack. Aircraft may not attack<br />
any target in woods/forest/swamp, and may not attack infantry in towns.<br />
LOSSES<br />
The instant a company (or Russian tank battalion) takes at least ½ losses (in stands) and for each<br />
stand lost thereafter, it must make a morale check. This morale check is subject to the following<br />
modifiers. A failed check eliminates the rest of the company (or Russian tank battalion). Soft<br />
transport vehicles do not count towards a formation's total stands.<br />
-1 If any stand is out of range of the rest of the company (or Russian tank battalion)<br />
-1 If Battalion (Russian tank brigade) HQ is lost or out of range<br />
+1 If in hard cover<br />
-1 if attacked by air/flamethrower/artillery in current turn<br />
WEAPONS CHARTS<br />
The weapons charts contain information for most combatants in World War II.<br />
If "APC" appears after the name of the stand, that stand may transport up to 1 infantry stand or 2<br />
support stands (MG, Bazooka, ATR, etc.) unless further indication gives the carrying capacity<br />
for the stand.<br />
The "Mov" column gives the movement allowance in inches for the stand. A "t" in this column<br />
means the stand must be towed. A "w" after the movement allowance means the stand is<br />
wheeled.<br />
The "Armor" column gives the armor number for the front facing of the stand. An "s" in this<br />
column means the vehicular stand is a soft target. Infantry and towed weapon stands are always<br />
soft targets.<br />
The "Pen" column gives the penetration number for the stand. A "-" in this column means the<br />
stand has no anti-tank capability (note that a value of 0 still allows anti-tank fire). An "h" in this<br />
column means the stand fires HEAT ammunition.<br />
The "ROF" column gives the rate of fire for the stand. An asterisk in this column means the<br />
stand has anti-aircraft capability.<br />
The "Rng" column gives the effective range of the stand. For stands with indirect fire capability,<br />
two values will be given: direct fire effective range before the slash, and indirect maximum range<br />
after the slash. A "-" before the slash means the stand may not use direct fire. For example, a<br />
British 25pdr firing directly at an enemy stand has an effective range of 8. That same 25pdr can<br />
fire an indirect artillery mission up to 130 inches away (see Artillery rules for the minimum<br />
range of indirect fire). For mortars the numbers preceding the slash give the effective range for<br />
direct fire. For example, the effective direct-fire range for the German 120mm mortar is between
3 and 8 inches. Long range direct fire for this stand is between 8 and 12 inches, and there is no<br />
"short range".<br />
The "Inf" column gives the stand's infantry/soft target "to hit" number. A "-" means the stand has<br />
no anti-infantry/soft capability.<br />
The "Gun" column gives weapon information. A "t" means the stand is turreted. An "f" means<br />
the stand is non-turreted. Also in this column is towing information for vehicles and guns.<br />
Soft vehicle information gives the towing and carrying capacity for these stands.<br />
Artillery information gives the number of Artillery Points per stand as well as the size of the<br />
barrage.
RARE VEHICLES<br />
OPTIONAL RULES<br />
The British Churchill AVRE and German Sturmmoerser Tiger must obey these special rules.<br />
The Sturmmoerser may not fire and move in the same turn. The AVRE may do so, but must add<br />
a +1 to its hit die roll or infantry die roll. Both ignore the effects of a target's cover. Any morale<br />
check made by infantry/soft targets due to a Sturmmoerser or AVRE attack is modified by –1. A<br />
Sturmmoerser stand may not fire more than 4 times in one game. An AVRE stand may not fire<br />
more than 6 times in one game.<br />
MINEFIELDS<br />
Any infantry stand moving into an antipersonnel minefield zone takes a morale check; one check<br />
is made per inch moved (fractions rounded up). Vehicles are immune to AP mines. Any vehicle<br />
moving into an antitank minefield zone takes a morale check; one check is made per inch moved<br />
(fractions rounded up). Personnel units are immune to AT mines.<br />
Infantry engineers are immune to minefields. An engineer stand can clear a path through<br />
minefields by spending 2 turns in a minefield without moving or shooting. Engineer clearance<br />
vehicles (dozers, rollers, flails) are immune to mines and clear a path just by moving through.<br />
The German Sturmmoerser and British AVRE can clear a path just by firing at the minefield.<br />
BARBED WIRE<br />
Infantry, halftracks, and wheeled vehicles must stop upon entering barbed wire and may move<br />
out only in their next turn. Fully-tracked vehicles are immune. Infantry engineers are immune to<br />
barbed wire and an engineer stand can clear a path by spending 1 turn in wire without moving or<br />
shooting. An engineer stand can set up 1" of wire each turn by spending the turn without moving<br />
or shooting. The German Sturmmoerser and British AVRE can clear 1" of wire just by firing at<br />
it.<br />
ROADBLOCKS<br />
No vehicles may cross a roadblock. Infantry stands may cross roadblocks, and gain hard cover<br />
hiding behind them. An engineer stand may clear a roadblock by spending 1 turn without<br />
moving or shooting. An engineer stand may set up a roadblock by spending 2 turns without<br />
moving or shooting (1 turn if helped by a bulldozer). Bulldozers automatically remove a<br />
roadblock just by moving through. The German Sturmmoerser and British AVRE can clear a<br />
roadblock just by firing at it.<br />
LULL IN FIGHTING<br />
If the die roll to determine which side moves first at the start of the turn results in a tie, there is a<br />
lull in the fighting. Players may carry out any or all of the following actions:<br />
Improve Positions: Personnel units may dig trenches and towed weapons may dig gun<br />
emplacements (gaining soft cover).
Regroup: Two destroyed personnel stands of the same type (e.g. two SMG stands) may be<br />
reformed into one stand by a battalion HQ (or appropriate Russian HQ). Reformed stands are<br />
then immediately assigned to an existing company or formed into a new company and placed on<br />
the table. If a recovery vehicle is available (on-table), two destroyed vehicle stands of the same<br />
type may be reformed into one stand. This stand is then assigned to an existing company.<br />
Redeploy: Each side may move units up to double their movement rate (attacker moves any/all<br />
of his stands first). As a unit redeploys, it may not move within 10" of an enemy unit, nor may it<br />
end its redeployment within 10" of an enemy unit.<br />
Engineering: Engineers may create or destroy roadblocks (one per stand), clear or lay mines (1"<br />
x 1" per stand), clear or set up wire (2" per stand).<br />
Resupply: All artillery, Sturmmoersers and AVREs are resupplied with full ammo.<br />
WEATHER<br />
Weather conditions can influence the combat performance of all units.<br />
Mud and Deep Snow: All movement costs double (triple if wheeled) unless on cleared roads.<br />
This is prior to the addition for rough ground, which is 4x (9x if wheeled).<br />
Rain, Mist, Falling Snow: All Line of Sight is limited to 10". No aircraft may attack.<br />
Fog, Heavy Rain, Blizzard: All Line of Sight is limited to 5". No aircraft may attack. Add +1 to<br />
all "to hit" rolls. Mud and Deep Snow will often accompany Heavy Rain and Blizzard,<br />
respectively.<br />
ADVANCED SUPPLY<br />
1. Engineer stands that have their transport destroyed may no longer perform engineering<br />
activities; they may still perform combat.<br />
2. After the 8 th turn, there is an automatic Lull in Fighting.<br />
3. Artillery battalions may have supply trucks (one per battalion). Each battery in the battalion is<br />
assumed to be resupplied for one additional fire mission every time the supply truck makes a trip<br />
from battalion HQ to the friendly board edge and back.<br />
ADVANCED LINE OF SIGHT<br />
1. Any stand that has its HQ within 6" and in LOS of a recon HQ may see hidden enemy stands<br />
if a recon stand also has LOS to that enemy stand.<br />
2. A stand on a crestline may see over obstacles, but will have a blind spot equal to 1" per inch<br />
between the crestline and the obstacle.
RANDOM EVENTS<br />
Each time a player rolls a 6 on the die roll to determine who moves first in the turn, that player<br />
draws a Random Event Card. If both players roll a 6, both players draw. After every draw, the<br />
card chosen is reshuffled into the deck. There are 12 Random Event Cards:<br />
4 "No Event" cards: nothing happens<br />
1 "Rain/Mist/Falling Snow" card: Rain/Mist/Falling Snow occurs, depending on appropriate<br />
season.<br />
1 "Fog/Heavy Rain/Blizzard card: Fog/Heavy Rain/Blizzard occurs, depending on appropriate<br />
season.<br />
3 "Weather Clears" cards: Any adverse weather is automatically cleared.<br />
2 "Disrupted Communications" cards: If using basic command rules, all movement in one<br />
battalion is halved (choose randomly between battalions). If using advanced command rules, all<br />
movement in one battalion is halved, and that battalion may not receive new orders this turn<br />
(choose randomly between battalions).<br />
1 "Mass Confusion" card: All of the player's stands are considered Pinned for the turn (still roll<br />
for Motivation to check for "retreat" or "destroyed" results) and no new orders may be issued.<br />
ADVANCED <strong>COMMAND</strong><br />
Each battalion must have orders given to it before the start of the game (exception: recon units<br />
never need orders). Orders may be changed during the course of the game. This may only occur<br />
if all subordinate stands are within the command range of the battalion HQ. To change orders,<br />
the battalion HQ must pass an unmodified motivation check (this is for orders purposes only, and<br />
second motivation check must be made per the standard rules). German elite battalions that are<br />
part of Panzer, Panzergrenadier, and Motorized divisions may always automatically have their<br />
orders changed. The orders are:<br />
Defend: stands in the battalion may not move more than 10" from a terrain feature (e.g. a town or<br />
hill).<br />
Attack and Hold: unit must move toward a terrain feature, engage and try to defeat any enemy<br />
defenders there, occupy that feature, then automatically switch to "Defend" orders.<br />
Vigorous Attack: unit must engage and try to defeat enemy units in an attempt to break through<br />
to rear areas; orders must state where breakthrough will occur and once it has been achieved, the<br />
unit must attempt to destroy rear-area troops (enemy HQ's and artillery). Tank and Motorized<br />
units of Veteran or better rating with "Vigorous Attack" orders may ignore all command distance<br />
rules. Vigorous Attack orders are only available to the following: German Panzer and<br />
Motorized/Panzergrenadier units from 1939-1945; Russian tank and motorized units 1944-1945;<br />
select British and US Tank and Armored Infantry units 1944-1945.
Disengage: unit(s) in the battalion must use its movement to put more distance between them and<br />
the enemy. At least one unit must put more distance between them and the enemy; other units<br />
may Defend.<br />
Flank: a special order that can be given only to tank, fully motorized, or cavalry battalions;<br />
allows the battalion to enter on one of the side edges (side must be determined in the order). On<br />
turns 4-5, the flanking battalion may enter on the side edge but no farther than half the map away<br />
from the friendly edge. On/after turn 6, the flanking battalion may enter anywhere on the side<br />
edge. The turn of entry must be specified, and this order must be used in conjunction with an<br />
"Attack and Hold" or "Vigorous Attack" order. On the turn of entry, roll for losses to represent<br />
off-board fighting. Roll 1d4; this represents the number of combat stands destroyed (owner's<br />
choice); these stands are removed from play (i.e. they never enter the game). Flank orders<br />
should not be used unless specifically available in the scenario outline.<br />
HIDDEN STANDS<br />
To add "fog of war" to the game, any stand that is hidden at game start (i.e. that sets up in cover)<br />
may be represented on board with a marker. The stand is placed on the board only when the<br />
enemy player has LOS (e.g. an enemy recon unit has LOS or a member of the unit fires or<br />
moves). For additional deception, players may decide to allow for a number of fake markers.<br />
AIRBORNE TROOPS<br />
These rules assume daylight drops in good conditions. All airborne landings and their DZs must<br />
be pre-programmed to take place during a specific turn of the game. These orders may not be<br />
superseded. All Airborne units must land with orders taken from the ‘advanced command’<br />
listing.<br />
a. Parachute Landing<br />
i. Airdrops<br />
A piece of paper measuring 1” square represents each stand in the parachute drop. All paper<br />
squares are placed in a small box that is then turned over, releasing the squares 2 feet above the<br />
DZ. Stands are placed where their paper square lands on the board. Stands landing in woods,<br />
rivers and other waterways are lost. Stands landing within BUAs or within 4” of enemy troop or<br />
6” of AAA stands in LOS and on Overwatch/Hold Fire must role 5+ (d6) or are lost. Stands<br />
landing off the table are lost.<br />
For larger ‘formation’ drops, a maximum of 20 paper squares/stands may be dropped over any<br />
one DZ.<br />
ii. Troop stands<br />
Airborne troop stands may start to move from their drop point, using the ‘Motivating HQ’ rules,<br />
one turn after landing. Stands not within command distance of their HQ count as ‘lost’ until they<br />
rejoin their units.
iii. Heavy weapons stands<br />
On landing, heavy weapon and vehicle stands must role 3+ (1d6) in order to survive the drop.<br />
Heavy weapons and vehicles may start to move from the DZ, using the ‘Motivating HQ’ rules,<br />
two turns after landing. Stands not within command distance of their HQ count as ‘lost’ until<br />
they rejoin their units.<br />
b. Glider Landing<br />
Gliders require a 12” ‘landing run’, clear of obstacles, in order to make a successful landing,<br />
nominating the start point and direction of their ‘landing run’ before any measurement is made.<br />
On landing, gliders must role 4+ (1d6) to ensure no losses. If this role is failed, any stand the<br />
glider carries must role a 4+ (1d6) save or is lost.<br />
All gliders must be landed before any of the above ‘save roles’ is made. All successfully landed<br />
troop stands may move up to half their normal move distance and fire in the same turn as their<br />
glider lands, ignoring the ‘Motivating HQ’ rules for this turn only. All other successfully landed<br />
stands are operational at the start of the turn after landing.<br />
AA fire is allowed at Gliders at the start of their landing run. Normal AA rules apply, with the<br />
following modification: any role of 5 causes the glider to take a morale check. Once landed and<br />
all save rolls are made, successfully landed stands become eligible targets for enemy units on<br />
Overwatch/Hold Fire (i.e. landed units are considered to have exited the gliders before taking<br />
fire).<br />
ADVANCED FIRE AND MOVEMENT<br />
Stands may move a portion of their movement allowance, fire at enemy targets, and then move<br />
again, up to the remaining portion of their movement allowance. Stands using this fire-andmovement<br />
technique are still penalized for firing after having moved. All other fire and<br />
movement rules still apply.<br />
MOVEMENT AND UNIT COHESION<br />
Green stands from different battalions may not come within 1" of each other.<br />
Stands on a road prevent the use of that part of the road for all other stands.<br />
COUNTERBATTERY FIRE<br />
Corps-level or Army-level artillery stands may conduct counter-battery fire. Rockets may never<br />
conduct counterbattery fire. To use counter-battery fire, the artillery battalion’s FO must have<br />
LOS to a current enemy barrage marker and the battalion must pass a motivation check per the<br />
normal rules. Once motivated, the artillery battalion designates one enemy artillery stand that is<br />
currently firing as a target. The Artillery Fire Chart and procedures are used normally, with the
following modifications. Counterbattery fire is always considered to be at “long range” and the<br />
artillery die roll is always modified by -1. If counterbattery fire is directed at a rocket stand,<br />
modify the artillery die roll by an additional +1 (for a net of 0). If counterbattery fire is directed<br />
at a horse-drawn artillery stand, modify the artillery die roll by an additional +1. If<br />
counterbattery fire is directed at an armored self-propelled artillery stand, modify the artillery die<br />
roll by an additional -1. If an enemy artillery stand is destroyed by counterbattery fire, adjust the<br />
artillery strength points that the barrage marker represents accordingly.<br />
EXPANDED AIRCRAFT RULES<br />
As a way to add more variety in the aircraft section, players may use these guidelines, which<br />
provide for differences between airplanes.<br />
Fighterbombers (e.g. P51, P47, FW190, Spitfire) attack per the normal rules. Dedicated<br />
divebombers (JU87 Stuka, HS123) strafe on the 1-2 column, and make bombing attacks on the<br />
9+ column. Ground-attack planes or other more heavily armed planes (e.g. JU87 “G”, HS129,<br />
Sturmovik, P38, P39, Tempest, Typhoon) may make two attacks on the 7-8 column. Due to their<br />
armor, Sturmoviks hit exclusively by anti-aircraft fire of 20mm or less are not automatically<br />
removed from play; instead they must pass a morale check (regular morale) or be removed.<br />
"SOFT" TRANSPORT VEHICLE VULNERABILITY<br />
Players may want to account for the fact that unarmored vehicles were extremely vulnerable. In<br />
the normal rules, unarmored stands take a morale check when hit, and a truck stand is therefore<br />
just as durable as an infantry stand. To fix this, apply a -1 to morale checks made by unarmored<br />
soft transport vehicles and a -2 to morale checks made by horse-drawn transport. Armed<br />
vehicles and cavalry are excluded, since they are combat units and thus trained to react<br />
appropriately to incoming fire.<br />
SUPRESSIVE FIRE<br />
Non-armored enemy units may be suppressed by friendly units exclusively firing weapons with<br />
an infantry "to-hit" number of 4 or lower. Artillery fire representing at least 4 artillery points<br />
may also use suppressive fire, and always rolls on the "soft/infantry in open" column. All stands<br />
in a firing unit using direct fire must have LOS to at least one enemy stand in the target unit. A<br />
unit that has moved may not use suppressive fire, nor may a unit move after using suppressive<br />
fire.<br />
Roll one die for the firing unit. There are no modifiers to the "hit" roll for any form of<br />
suppressive fire. If the "to-hit" number is exceeded by at least two, the enemy unit is<br />
automatically suppressed. If the "to-hit" number is met, or exceeded by less than two, the enemy<br />
unit must pass a morale check to avoid being suppressed. A suppressed unit suffers a -2 penalty<br />
to all hit rolls made during the current turn, and has its movement allowance halved. A unit that<br />
is moving when suppressed must stop immediately.
REASSIGNING UNITS<br />
Units may be reassigned to a new HQ prior to, or in some cases, during the game. Only units<br />
with a Regular or better motivation rating may be reassigned. Only units with Veteran or Elite<br />
ratings may be reassigned during the game.<br />
To reassign a unit prior to the game, simply declare the unit to be subordinate to the new HQ. To<br />
reassign a unit during the game, the unit's current HQ must pass its motivation check and the unit<br />
to be reassigned must be within command range of the new HQ. The reassignment is effective<br />
immediately.
Suggestions and Notes for Tactical Command<br />
Motivation: The motivation rolls are intended to simulate command and control problems that<br />
faced units in World War II. The motivation rules are designed so that green battalions will<br />
become difficult to control once they start taking casualties. They will also disintegrate rather<br />
quickly once losses begin to get relatively heavy (especially after a company in the battalion is<br />
destroyed). Watch out for a chain reaction effect once a subunit is destroyed…the rest of the<br />
battalion is probably soon to follow! Contrary to this, elite formations will be able to take a lot of<br />
punishment before degenerating into routed troops. Consequently, they will be combat-effective<br />
for longer.<br />
Artillery: Some will object to the "instant" firing of artillery. Typically, in miniature wargame<br />
rules, players need to plan at least one turn in advance for artillery missions. I abandoned this for<br />
a couple of reasons. First, it meant that player rarely used artillery assets. It's a lot of work to<br />
keep track of these plans. Consequently, planned missions are forgotten about or they're not<br />
planned at all. Second, the time frame for one turn is half an hour. This is plenty of time to call in<br />
a mission and have it fired in the span of a turn. The number of missions available (4) is kept low<br />
in order to reflect the time frame of a turn (and thus a fire mission).<br />
German Infantry Guns: The 75mm leIG and the 150mm sIG were employed in both direct and<br />
indirect fire roles. Due to the requirement that indirect fire be spotted by a designated FO or the<br />
Battalion HQ, these guns will probably be firing direct in the game. This is fine, since most of<br />
these towed guns operated as single platoons in a heavy weapons company. If players wish to<br />
have batteries of self-propelled sIGs firing indirect, the order of battle should be designed to<br />
include a FO stand for that battery. For example, the 1st, 2nd, and 3rd SS Panzer Divisions starting<br />
in the summer of 1943 had batteries of twelve sIG 33 Ausf Pz 38(t) self-propelled guns that often<br />
operated as additional indirect artillery support. Players could thus include 3 sIG 33 Ausf Pz<br />
38(t) stands and an FO stand to represent the flexibility these batteries offered. Similar<br />
procedures could also be used for Cannon Companies in US divisions.<br />
Advanced Command: These rules will further reflect command and control issues. Green<br />
battalions will be unable to react and change orders as quickly as better units. Vigorous attack<br />
orders are only available to certain units throughout the war in order to reflect the operational<br />
theories and doctrine of the respective armies. The Russians, after several years, did eventually<br />
learn the value of deep penetrations with tank and mobile units, but were unable to employ those<br />
tactics successfully until 1944 (with the possible exception of the Stalingrad encirclement).<br />
Arguably, the British and American forces never really were able to take advantage of this<br />
doctrine, with the exception of particular units (perhaps the U.S. 2nd and 4th Armored Divisions).<br />
Optional Rules That Shouldn’t be Optional:<br />
Hidden Stands: For a small reduction in speed of play, the Fog of War optional rule<br />
allowing players to place markers for stands out of LOS is quite fun. The use of markers (with<br />
stand ID facing down) allows some fog of war without the use of a referee. The opposing player<br />
will know that something is there, but won't know what it is.
Advanced LOS: The rule change about seeing over obstacles isn't much of problem; it<br />
just requires a pause to measure. It can be ignored without much effect. The Advanced LOS rule<br />
that shouldn’t be ignored, however, is the part about the recon units and spotting hidden stands.<br />
This really makes recon units useful and gives players a reason to keep them alive. As long as<br />
there is coordination between the recon unit and another unit, the recon stands can "report the<br />
locations" of the enemy.<br />
Advanced Fire and Movement: This adds a lot to the game without adding any<br />
complexity. It allows fast units to use their speed to engage the enemy with “hit and run” tactics.<br />
Motivation Ratings: The first thing to note is that the ratings work best when they’re thought of<br />
in relative terms (i.e. as a comparative assessment of the two sides in the battle). This way, if<br />
both sides were “regular” troops, but one side was obviously better, that side could be rated<br />
“veteran”. Thus, the ratings are situational: a unit may rate “veteran” in one scenario but<br />
“regular” in another when facing better troops. Some generalizations can be made, though.<br />
Some suggested ratings are Green for French units in 1940, as well as for Russian units in 1941<br />
and 1942 (by 1942, some units may be Regular). A Green rating can also be used for German<br />
conscript units at the end of the war (Volkssturm units). Regular ratings can be used for units<br />
that have some experience, or at least good training and sound doctrine. Infantry of the BEF in<br />
1940, for example, probably rates Regular, as do most of the units hitting the shores on or after<br />
D-Day. Veteran ratings should be reserved for units that have extensive combat experience (for<br />
example, the U.S. 1st Infantry Division in Normandy should be rated Veteran). Elite ratings can<br />
be given to US Ranger units, US and British Airborne units, most Soviet Guards units, and<br />
certain German SS units (but not the myriad SS divisions created in the last year or so of the<br />
war). These ratings do not serve to designate that the individuals in the units were of<br />
certain quality. Rather, the ratings serve to reflect the command and control structures, unit<br />
cohesiveness, as well as officer initiative. This is why French units in 1940 or Italian units in<br />
North Africa should be given the Green rating; their individual soldiers were brave, but their<br />
doctrine and methods of command were generally outmoded.<br />
Cover: Infantry, artillery, and guns that start a scenario set up on the map probably should be<br />
assumed to be in soft cover where they are set up. This reflects trenches, foxholes, firing<br />
positions and gun pits prepared prior to the engagement.<br />
Front Arc and Armor Ratings: Armor ratings for the sides and rear of AFVs were initially set<br />
to 0, even though most AFVs in World War II had all-around armored protection. This was to<br />
reflect the fact that a company that has been flanked is in a much worse tactical position than<br />
when the enemy is head-on. Based on player feedback, I changed the armor rating to half that of<br />
the front arc value. This still makes AFVs extremely vulnerable to flank and rear shots, yet still<br />
provides some variations to better reflect the few armored behemoths that were occasionally<br />
encountered (the Char B1 in 1940, the KV 2 in 1941, or the Tiger from 1942/43) that had good<br />
all-around protection. If players want, they can set rear arc armor ratings to 0 to reflect not only<br />
the poor rear armor of nearly every AFV, but also the confusion and surprise involved in being<br />
attacked from the rear.<br />
Firing at the Enemy: All similar stands of a company must fire at the same enemy stand. This<br />
was done for a number of reasons. First, I unashamedly admit it was done to speed up the game.
It minimizes the number of distinct attacks per turn (players can just roll a fist full of dice for all<br />
of a company’s shots) and thus the pace of the game is faster. Second, a company commander<br />
will only be able to spot and direct fire at a certain number of targets; since one stand does<br />
represent a platoon, it is reasonable to have all fire directed at one enemy stand. For companies<br />
with multiple weapon types, this requirement has been relaxed to reflect the obvious different<br />
roles of the weapons. For example, a heavy weapons company with machinegun and mortar<br />
stands may fire at separate targets, and the mortars may even use spotted indirect fire missions.<br />
Fire After Movement: The save die roll for firing after movement can really make it difficult to<br />
attack the enemy after having changed positions. Indeed a tank company’s attack will be voided<br />
a third of the time if it fires after having moved. This is to reflect the fact that fire control<br />
systems in World War II were not widespread. The few armies that did have them (American<br />
and American-equipped allies) rarely used them. Simply, tanks that parked and shot were much<br />
more likely to hit their targets. For vehicles without turrets, this problem was even more<br />
pronounced as the entire vehicle had to be steered into proper firing position.<br />
Vehicle and Weapon Data: An attempt was made to include a reasonably extensive list for each<br />
nationality. The armor, ROF, penetration, range, and infantry "hit" numbers are abstractions from<br />
actual data. Heavy AA guns can not fire at enemy aircraft, as these weapons were designed for<br />
high-altitude firing at bombers and do not have the rate of fire or traverse speed to fire at groundattack<br />
aircraft. Dedicated AT weapons or vehicles generally have worse infantry hit numbers<br />
than other guns of similar size since their mission was to kill tanks, not infantry (and thus, they<br />
typically were given fewer, if any, HE rounds). HEAT ammunition, while available in small<br />
amounts to many artillery pieces of most nationalities, was not given to most towed weapons.<br />
This is in an effort to keep players from using their howitzers as anti-tank guns. Other<br />
penetration adjustments were made where howitzers exclusively fired HE ammunition.<br />
Counterbattery Fire: These rules are very simple and abstract, but functionally I think the<br />
outcome of their application is appropriate. The various modifiers need justification. Always<br />
figuring counterbattery fire as long range, and modifying the artillery die roll by -1, stem from<br />
the fact that the area of impact is not observed. This reduces accuracy, and therefore I felt the<br />
need to reduce the effectiveness of these missions. Horse-drawn artillery targets are easier to hit<br />
because of the increased vulnerability of their transport (the horses) and the fact that changing<br />
positions is more difficult. Rocket artillery is also easier to hit because the smoke trails made it<br />
easy to guide counterbattery fire. Self-propelled armored artillery units are harder to hit because<br />
of their mobility and protection.<br />
Expanded Aircraft Rules: The basic rules are very abstract, although I think they capture the<br />
essence of air support. However, for added “flavor” I’ve included some suggested changes as an<br />
optional rule to better model the varying effectiveness of the wide range of aircraft employed<br />
during the war.<br />
Changes From Version 2.4: For Version 2.5, added a comment about fake markers in Hidden<br />
Stands optional rule. Added Advanced Fire and Movement optional rule. Added Counterbattery<br />
Fire optional rule. Added Expanded Aircraft rules. Made some changes to Suggestions and<br />
Notes section. Fixed numerous spelling errors. Changes for 2.6 include adding Polish weapon
data, and adjusting movement allowances for several French vehicles (AMR 33, AMR 35, H39,<br />
S35, B1-bis, and the Lorraine Schlepper APC). The Arracourt scenario was also significantly<br />
updated. Changes for 2.71 include the introduction of the Soft Vehicle Vulnerability optional<br />
rule and some corrections in the Vehicle and Weapons data. Changes for 2.8 include an<br />
adjustment to the save roll for stands firing fixed weapons after movement; added Suppressive<br />
Fire optional rule; adjusted the beaten zones for indirect fire; adjusted target armor value for<br />
flank shots. Unit reassignment optional rule added.
Motivation Table<br />
Modifier Elite (3) Veteran (4) Regular (5) Green (6)<br />
+2<br />
+1<br />
0<br />
-1<br />
-2<br />
-3<br />
-4<br />
-5<br />
-6<br />
Pass 1<br />
Pin -<br />
Retreat -<br />
Pass 2<br />
Pin -<br />
Retreat -<br />
Pass 3<br />
Pin -<br />
Retreat -<br />
Pass 4<br />
Pin -<br />
Retreat -<br />
Pass 5<br />
Pin 1<br />
Retreat -<br />
Pass 6<br />
Pin 2<br />
Retreat 1<br />
Pass 7<br />
Pin 3<br />
Retreat 2<br />
Pass 8<br />
Pin 4<br />
Retreat 3<br />
Pass 9<br />
Pin 5<br />
Retreat 4<br />
Pass 10<br />
Pin 6<br />
Retreat 5<br />
Pass -<br />
Pin 7<br />
Retreat 6<br />
Pass -<br />
Pin 8<br />
Retreat 7<br />
Notes:<br />
“-“ indicates result is not possible.<br />
Results between Pass and Pin gives all subordinate units half of their movement capability.<br />
Retreat results in a full move away from the enemy towards the nearest terrain feature. The next turn after a Retreat,<br />
a Pin result is the best result possible for the HQ.<br />
Results below Retreat result in elimination of one subordinate unit, chosen at random.<br />
Modifiers:<br />
+1 if the scenario attacker (in meeting engagements both sides are scenario attackers)<br />
-1 per stand lost in battalion above 25% for Green, 33% for Regular and Veteran, or 50% for Elite<br />
-2 per subordinate unit destroyed<br />
-2 if battalion (or Soviet brigade or regiment) commander out of range (N/A to recon) or lost<br />
+1 if at least half of battalion's units in hard cover<br />
+1 if the unit has "Vigorous Attack" orders (see optional rules)
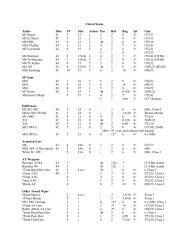
Vehicle and Weapons Data<br />
United States<br />
Tanks Date PV Mov Armor Pen Rof Rng Inf Gun<br />
M3 Stuart 41 5 21 1 3 2 8 5+ t37L53<br />
M5A1 Stuart 42 5 21 2 3 2 8 5+ t37L53<br />
M8 HMC 43 6 21 2 4h 2 6 4+ t75L16<br />
M24 Chaffee 44 6 21 2 4 2 7 5+ t75L41<br />
M3 Lee/Grant 42 6 15 3 4 1 6 5+ f75L31<br />
3 1 8 t37L53<br />
M4 Sherman 42 6 15(18) 3 4 2 7 5+ t75L41 (HVSS)<br />
M4/76 Sherman 44 7 15(18) 3 5 2 8 5+ t76L52 (HVSS)<br />
M4/76 Jumbo 44 9 15 5 5 2 8 5+ t76L52<br />
M4/105 43 8 15(18) 3 4h 1 8 4+ t105L22 (HVSS)<br />
M26 Pershing 45 10 15 5 6 2 10 5+ t90L53<br />
SP Guns<br />
M10 42 7 18 3 5 2 8 6+ t76L52<br />
M36 44 9 18 3 6 2 10 6+ t90L53<br />
M18 43 8 27 1 5 2 8 6+ t76L52<br />
M7 Priest 42 7 18 1 4h 1 8/120 4+ f105L22<br />
Sherman Calliope 9 15 3 4 2 7 5+ t75L41<br />
2 1 4/46 3+ t4.5" Rockets<br />
Halftracks<br />
M2/M3 APC 40 2 24 0 - 2 6 6+ tMG; Class 2<br />
M4A1/M21 HTMC 41 3 24 0 - 3 1-6/30 5+ f81mm Mortar<br />
M3 GMC 41 4 21 0 4 2 6 5+ f75L31<br />
T19 42 6 18 0 4h 1 8/120 4+ f105L22<br />
T30 42 5 21 0 4h 2 6/90 4+ f75L16<br />
M15 SPAA 42 5 21 0 2 3 8 4+ t37L98, 2xMG<br />
(Rof = 9* vs air and infantry/soft targets)<br />
M16 SPAA 43 5 21 0 0 12* 6 4+ 4 x tMG<br />
Armored Cars<br />
M8 43 4 24w 0 3 2 8 5+ t37L53<br />
M20 APC (1 Baz stand) 43 2 24w 0 - 2 6 6+ tMG<br />
White SC APC 2 21w 0 - 2 6 5+ tMG; Class 1<br />
AT Weapons<br />
Bazooka '43/44 43 1 4h 1(2) 1 (2 if Baz stand)<br />
Bazooka '44 44 1 5h 1(2) 1 (2 if Baz stand)<br />
57mm Recoilless Gun 45 3 6 or t 3h 1 6 6+ t; Class 1<br />
37mm ATG 40 3 3 3 8 6+ f37L53; Class 1<br />
57mm ATG 4 4 3 8 6+ f57L52; Class 1<br />
3inch ATG 5 5 2 8 6+ f76L52; Class 2<br />
90mm AA 6 6 2 10 5+ t90L53; Class 3<br />
Other Towed Wpns<br />
82mm Mortar 2 6 or t - 3 1-6/30 5+ fClass 1<br />
107mm Mortar 3 t - 2 3-8/60 4+ fClass 1<br />
M51 MG Carriage 3 t 0 12* 6 4+ 4 x tMG; Class 1<br />
37mm AA Gun 3 t 2 3* 10 4+ t37L98; Class 2<br />
Bofors 40mm AA Gun 3 t 2 3* 8 4+ t40L56; Class 2<br />
75mm Recoilless Gun 3 t 4h 2 6 6+ t; Class 1
75mm Pack Hwz 3 t 1 2 6/90 4+ f75L16; Class 1<br />
75mm Field Gun 4 t 4 2 7/120 5+ f75L36; Class 2<br />
Other Towed Wpns PV Mov Armor Pen Rof Rng Inf Gun<br />
105mm Hwz 4 t 3 2 8/120 4+ f105L22; Class 2<br />
4.5in Gun 5 t 3 1 8/250 4+ f114L42; Class 2<br />
155mm Howitzer M1918 5 t 4 1 8/120 3+ f155L14; Class 2<br />
155mm Howitzer 5 t 4 1 8/150 3+ f155L20; Class 3<br />
155mm Field Gun M1A1 5 t 4 1 8/200 3+ f155L36; Class 3<br />
8in Howitzer 6 t 5 1 8/180 2+ f203L25; Class 3<br />
8in Gun 7 t 5 1 8/350 2+ f203L50; Class 3<br />
Infantry AT Weapon<br />
Infantry/Armored Infantry 2 9 2 6 4+ See note<br />
Airborne/Engineer 3 9 2 4 3+ See note<br />
US MG 3 6 3 8 3+ None<br />
Bazooka Stand 1 9 4h/5h 2 1 - Bazooka<br />
Note: As of 1943, all infantry, armored infantry, airborne, and engineer stands have integral bazooka.<br />
Soft Vehicles PV Move Carry Tow<br />
Jeep 1 24w MG/Weapon Crew Class 1<br />
Light Truck (3/4 ton) 1 21w 1 Infantry Stand Class 1<br />
Medium Truck (2.5 ton) 1 18w 2 Infantry Stands Class 2<br />
Heavy Truck (7.5 ton) 1 15w 2 Infantry Stands Class 3<br />
Artillery Converged Dispersed<br />
AP Zone AP Zone<br />
75mm-90mm 1L 2" -- --<br />
105-122mm 2L 2" 1L 4"<br />
150/155mm 2 2" 1 4"<br />
160mm+ 3 2" 2L 4"<br />
80mm-100mm MTR 1L 2" -- --<br />
101mm+ MTR 2L 2" 1L 4"<br />
4.5" Rockets -- -- 1L 6"
Germany<br />
Tanks Date PV Mov Armor Pen Rof Rng Inf Gun<br />
PzKw I 34 2 18 0 0 2 6 5+ 2 x tMG<br />
PzKwIIB 35 3 18 0 1 3 8 5+ t20L55<br />
PzKwIIF,L 41 3 18 1 1 3 8 5+ t20L55<br />
PzKw 35(t) 39 4 15 1 2 2 8 5+ t37L40<br />
PzKw IIIE,F 39 4 15 1 2 2 8 5+ t37L45<br />
PzKw 38(t) 40 4 18 1 2 2 8 5+ t37L49<br />
PzKw IIIG,H 41 5 15 1 3 2 7 5+ t50L42<br />
PzKW IIIJ,L,M 42 6 15 2 4 2 8 5+ t50L60<br />
PzKw IIIN 43 5 15 2 2 2 6 4+ t75L24<br />
PzKw III Fl 5 15 3 2 1 1 2+ tFlamethrower<br />
PzKw IVA,B,C,D 38 4 15 1 2 2 6 4+ t75L24<br />
PzKw IVE,F1 40 5 15 2 2 2 6 4+ t75L24<br />
PzKw IVF2 42 6 15 2 5 2 7 5+ t75L43<br />
PzKw IVH,J 43 7 15 2 5 2 8 5+ t75L48<br />
PzKw VD,G Panther 43 10 18 5 7 2 10 5+ t75L70<br />
PzKw VIE Tiger 42 9 15 4 6 2 10 5+ t88L56<br />
PzKw VIB Konigstiger 44 11 12 6 8 2 12 5+ t88L71<br />
Assault Guns and SPA<br />
Sturmgeshuetz IIIB,D 41 4 15 2 2 2 6 4+ f75L24<br />
StuG IIIF 42 5 15 3 5 2 7 5+ f75L43<br />
StuG IIIG 43 6 15 3 5 2 8 5+ f75L48<br />
StuH 42 43 5 15 3 4h 1 8 4+ f105L30<br />
Sturmpz. IV Brumbar 44 6 14 4 5h 1 8 3+ f150L11<br />
StuG IV 43 6 15 3 5 2 8 5+ f75L48<br />
sIG 33 Ausf Pz I 40 6 15 0 4 1 8/120 3+ f150L11<br />
sIG 33 Ausf Pz 38(t) 42 6 15 0 4 1 8/120 3+ f150L11<br />
Wepse 43 6 15 0 3 1 8/130 4+ f105L30<br />
Hummel 43 7 15 1 4 1 8/140 3+ f150L30<br />
Sturmmoerser Tiger 11 12 6 12h 1 4 1+ f380mm<br />
Tank Destroyers<br />
PzJg IB 40 4 18 0 3 2 8 6+ f47L43<br />
Marder II 42 5 15 0 5 2 7 6+ f75L43<br />
Marder IIIH 42 6 15 1 5 2 10 6+ f76L54<br />
Marder IIIM 43 5 18 0 5 2 7 6+ f75L43<br />
PzJg III,IV Hornet 43 10 15 1 8 2 12 6+ f88L71<br />
JgPz38(t) Hetzer 44 7 15 4 5 1 8 6+ f75L48<br />
JgPz IV 44 7 15 4 5 2 8 6+ f75L48<br />
JgPz IV 70 44 9 13 4 7 2 10 6+ f75L70<br />
JgPz V Jagdpanther 44 13 18 5 8 2 12 6+ f88L71<br />
JgPz Tiger 43 9 11 5 8 2 12 6+ f88L71<br />
JgPz VI JgTiger 44 9 12 7 10 1 10 6+ f128L55<br />
Halftracks<br />
SdKfz 251/1 APC 38 2 18 0 - 2 6 6+ tMG; Class 2<br />
SdKfz 250/1 APC 38 2 21 0 - 2 6 6+ tMG<br />
SdKfz 251/2 40 3 18 0 - 3 1-6/25 5+ f8cm Mortar<br />
SdKfz 250/7 40 3 21 0 - 3 1-6/25 5+ f8cm Mortar<br />
SdKfz 251/9 41 4 18 0 2 2 6 4+ f75L24<br />
SdKfz 250/8 41 4 21 0 2 2 6 4+ f75L24
Halftracks Date PV Mov Armor Pen Rof Rng Inf Gun<br />
SdKfz 250/9 3 21 0 1 3 8 5+ t20L55<br />
SdKfz 251/10 APC (MG/crew) 4 18 0 2 2 8 6+ f37L45<br />
SdKfz 250/10 APC (MG/crew) 4 21 0 2 2 8 6+ f37L45<br />
SdKfz 251/16 4 21 0 2 2 1 2+ tFlamethrower<br />
SdKfz 251/22 6 18 0 5 2 8 6+ f75L48<br />
SdKfz 251/1 w/ 28cm Rockets 6 18 0 - 2 -/21 2+ f28cm Rocket<br />
Armored Cars<br />
SdKfz 221 2 24w 0 - 2 6 6+ tMG<br />
SdKfz 222 3 24w 0 1 3 8 5+ t20L55<br />
SdKfz 231(6) 2 15w 0 1 3 8 5+ t20L55<br />
SdKfz 231/232(8) & 234/1 3 24w 1 1 3 8 5+ t20L55<br />
SdKfz 233 & 234/3 4 24w 1 2 2 6 4+ f75L24<br />
SdKfz 234/2 5 24w 1 4 2 8 5+ t50L60<br />
SdKfz 234/4 6 24w 1 5 2 8 5+ f75L48<br />
SP AAA<br />
Flak Pz 38(t) 4 15 0 1 3* 8 4+ t20L55<br />
Moebelwagon/Ostwind 5 15 2 2 3* 10 4+ t37L98<br />
FlakPz IV/20 Wirbelwind 5 15 1 1 12* 8 4+ 4 x t20L55<br />
SdKfz10/4 3 18 s 1 3* 8 5+ t20L55<br />
SdKfz 7/1 4 18 s 1 12* 8 4+ 4 x t20L55<br />
SdKfz 6/2 4 18 s 2 3* 10 4+ t37L98<br />
AT Weapons<br />
AT Rifle 39 1 0 1 4 -<br />
PzFst ATRL 44 1 10h 1 .5 -<br />
RkPzB ATRL 43 1 8h 1(2) 1 - (2 if RkPz stand)<br />
sPzB 41 ATR 41 2 2 3 10 -<br />
3.7cm PaK 35/36 36 3 t 2 3 8 6+ f37L45; Class 1<br />
5cm PaK 38 41 4 t 4 3 8 6+ f50L60; Class 1<br />
7.5cm Pak 40 42 5 t 5 2 8 6+ f75L48; Class 2<br />
76.2cm PaK 36r 42 5 t 5 2 10 6+ f76L54; Class 2<br />
8.8cm FlaK 36 33 6 t 6 2 10 5+ t88L56; Class 3<br />
8.8cm PaK 43 43 7 t 8 2 12 6+ t88L71; Class 3<br />
Other Towed Wpns<br />
8cm Mortar 2 t or 6 - 3 1-6/25 5+ fClass 1<br />
12cm Mortar 3 t - 2 3-8/60 4+ fClass 1<br />
2cm FlaK 30 38 3 t 1 3* 8 5+ t20L55; Class 1<br />
2cm FlaK 38 38 3 t 1 3* 8 4+ t20L55; Class 1<br />
2cm Flakvierling 38 4 t 1 12* 8 4+ 4xt20L55;Class2<br />
3.7cm FlaK 36/37 3 t 2 3* 10 4+ t37L98; Class 2<br />
75L10 Recoilless Gun 41 3 t 4h 2 6 6+ tClass 1<br />
105L13 Recoilless Gun 43 3 t 4h 2 6 5+ tClass 1<br />
7.5cm leIG 27 3 t 1 2 6/90 4+ f75L12; Class 1<br />
10.5cm leFH 18 36 4 t 3 2 8/130 4+ f105L30; Class 2<br />
10.5cm K18 34 4 t 3 1 8/200 4+ f105L52; Class 3<br />
15cm sIG 27 5 t 4 1 8/120 3+ f150L11; Class 2<br />
15cm sFH 18 5 t 4 1 8/140 3+ f150L30; Class 3<br />
15cm K18 8 8 1 8/270 3+ f150L55; Class 3<br />
17cm K18 33 7 t 5 1 8/320 2+ f170L50; Class 3<br />
15cm Nebelwerfer 5 t - 2 -/73 3+ f15cm Rocket<br />
21cm Nebelwerfer 5 t - 1 -/86 3+ f21cm Rocket
Infantry PV Mov Pen ROF Rng Inf AT Weapon<br />
German Infantry 2 9 (12 on bicycles) 2 6 4+ See note<br />
Recon Infantry 1 9 2 6 5+ See note<br />
Panzergrenadier 2 9 2 4 3+ See note<br />
Engineers/SMG Infantry 3 9 2 3 3+ See note<br />
German Cav/Motorcycle Infantry 3 16 2 4 4+ See note<br />
German MG 3 6 (9 on bicycles) 3 8 3+ None<br />
RkPzB Stand 1 9 8h 2 1 - RkPzB<br />
Note: All stands have integral AT weapons; ATR from 39-43, and PzF from 44-45.<br />
Soft Vehicles PV Move Carry Tow<br />
Kubelwagen 1 24w MG/Weapon Crew Class 1<br />
Opel Blitz Med. Truck 1 21w 2 Infantry Stands Class 2<br />
Buessing Hvy. Truck 1 18w 2 Infantry Stands Class 3<br />
SdKfz 7 1 18 1 Infantry Stand Class 3<br />
SdKfz 11 1 21 1 Infantry Stand Class 2<br />
Artillery<br />
—Converged— —Dispersed—<br />
Artillery AP Zone AP Zone<br />
75mm-90mm 1L 2" -- --<br />
105-122mm 2L 2" 1L 4"<br />
150/155mm 2 2" 1 4"<br />
160mm+ 3 2" 2L 4"<br />
80mm-100mm MTR 1L 2" -- --<br />
101mm+ MTR 2L 2" 1L 4"<br />
15cm/21cm Rocket -- -- 1L 6"<br />
28cm Rocket -- -- 1 6"
Russians<br />
Tanks Date PV Mov Armor Pen Rof Rng Inf Gun<br />
T-37, 38, 40 33 2 18 0 - 1 6 5+ 2 x tMG<br />
T-40S 41 3 18 0 1 2 8 5+ t20L75<br />
T-60A,B 41 3 18 1 1 2 8 5+ t20L75<br />
T-70, T-70A 42 4 18 1 2 1 8 5+ t45L46<br />
BT-5, BT-7 33 4 24 0 2 2 8 5+ t45L46<br />
BT-7A 37 4 24 0 2 1 6 4+ t76L19<br />
T-26 33 3 15 0 2 2 8 5+ t45L46<br />
T-28 38 3 15 1 2 1 6 4+ t76L19<br />
T-28E 40 3 12 2 2 1 6 4+ t76L19<br />
T-34/76 M40 40 7 21 3 4 1 6 5+ t76L35<br />
T-34/76 M41,M43 41 8 21 3 4 2 8 5+ t76L39<br />
T-34/85 44 9 21 3 5 2 8 5+ t85L53<br />
OT-34 10 21 3 4 2 8 5+ t76L39<br />
2 1 1 2+ fFlamethrower<br />
M4/76(a) 44 7 15 3 5 2 8 5+ t76L52<br />
T-35 33 6 12 1 2 1 6 4+ t76L19<br />
2 1 8 2 x t45L46<br />
KV-1 40 6 15 3 4 1 6 5+ t76L35<br />
KV-1E,M41,M42 41 7 12 3 4 1 8 5+ t76L39<br />
KV-2 40 7 11 3 6 1 8 3+ t152L23<br />
KV-85 43 8 15 3 6 2 8 5+ t85L53<br />
IS-2 44 9 15 5 8 1 8 4+ t122L45<br />
IS-2m 44 10 15 6 8 1 8 4+ t122L45<br />
Assault Guns/SPA<br />
SU-76M 43 5 21 1 4 2 8 5+ f76L39<br />
SU-122 43 7 21 3 5h 1 7 3+ f122L22<br />
ISU-122 44 8 15 4 8 1 8 4+ f122L45<br />
SU-152 43 7 15 3 6 1 8 3+ f152L29<br />
ISU-152 44 7 15 4 6 1 8 3+ f152L29<br />
SU-85 43 8 21 3 5 2 8 5+ f85L53<br />
SU-100 45 10 18 3 8 1 10 5+ f100L60<br />
M-13 Katyusha 6 18w - - 2 -/90 3+ f132mm Rocket<br />
Armored Cars and HTs<br />
BA-6 (aka BA-10) 35 3 15w 0 2 2 8 5+ t45L46<br />
BA-64 42 2 21w 0 - 2 6 6+ tMG<br />
White SC APC 2 21w 0 - 2 6 5+ tMG; Class 1<br />
M2/M3 HT APC 2 24 0 - 2 6 6+ tMG; Class 2<br />
SPAA<br />
GAZ-4M-AA 35 4 18w s - 12* 6 4+ 4 x tMG<br />
IAG-10-AA 40 4 15w s 5 2 10 5+ t76L53<br />
Antitank Guns<br />
Anti-tank Rifle 1 1 1(2) 4 (2 if ATR stand)<br />
37L45 AT Gun 36 2 t 2 3 8 6+ f37L45; Class 1<br />
37L70 AA Gun 39 3 t 2 3* 8 4+ t37L70; Class 1<br />
45L46 AT Gun 37 3 t 2 3 8 6+ f45L46; Class 1<br />
45L66 AT Gun 42 3 t 3 3 8 6+ f45L66; Class 1<br />
76L53 AA Gun 38 5 t 5 2 10 5+ t76L53; Class 2<br />
85L53 AT Gun 39 5 t 5 2 8 6+ f85L53; Class 2<br />
100L60 AT Gun 44 6 t 8 2 10 6+ f100L60; Class 2
Other Towed Wpns Date PV Mov Armor Pen Rof Rng Inf Gun<br />
82mm Mortar 2 t or 6 - 3 1-6/30 5+ fClass 1<br />
120mm Mortar 3 t - 2 5-8/60 4+ fClass 1<br />
76.2mm Model 02/27 3 t 2 2 6/85 4+ f76L19; Class 2<br />
76.2mm Model 02/30 4 t 3 2 6/130 4+ f76L26; Class 2<br />
76.2mm Model 1936 5 t 5 2 10/150 5+ f76L54; Class 2<br />
76.2mm Model 39/42 4 t 4 2 8/140 5+ f76L39; Class 2<br />
122mm Model 38 5 t 5h 2 7/120 3+ f122L22; Class 3<br />
122mm Model 31 8 t 8 1 8/200 4+ f122L45; Class 3<br />
152mm Model 38 howitzer 7 t 6 1 8/130 3+ f152L23; Class 3<br />
152mm Model 27 gun 7 t 6 1 8/180 3+ f152L29; Class 3<br />
203mm Model 1931 8 t 8 1 8/180 2+ f203L25; Class 3<br />
Infantry AT Weapon<br />
Russian Infantry 2 9 2 4 5+ -- -- -- --<br />
Russian Infantry w/ATR 2 9 2 4 5+ Anti-tank Rifle<br />
Russian SMG Inf 2 9 2 3 4+ -- -- -- --<br />
Russian Assault Engineers 3 9 2 3 3+ -- -- -- --<br />
Cavalry/Motorcycle Infantry 3 16 2 3 5+ -- -- -- --<br />
Russian MG 3 6 3 8 3+ -- -- -- --<br />
ATR Stand 1 9 1 2 4 - Anti-tank Rifle<br />
Soft Vehicles Move Carry Tow<br />
GAZ-67 1 24w MG/Weapon Crew Class 1<br />
Light Truck 1 21w 1 Infantry Stand Class 1<br />
Medium Truck 1 18w 2 Infantry Stands Class 2<br />
Heavy Truck 1 15w 2 Infantry Stands Class 3<br />
Artillery<br />
—Converged— —Dispersed—<br />
Artillery AP Zone AP Zone<br />
75mm-90mm 1L 2" -- --<br />
105/122mm 2L 2" 1L 4"<br />
152/155mm 2 2" 1 4"<br />
160mm+ 3 2" 2L 4"<br />
80mm-100mm Mortar 1L 2" -- --<br />
101mm+ Mortar 2L 2" 1L 4"<br />
132mm Rocket -- -- 1L 6"
British<br />
Tanks Date PV Mov Armor Pen Rof Rng Inf Gun<br />
Light Tank Mk VIB/C 2 21 0 0 2 6 5+ tMG/15mm<br />
Stuart I/III 5 21 1 3 2 8 6+ t37L53<br />
Stuart V 5 21 2 3 2 8 6+ t37L53<br />
A9 Cruiser Mk I 4 18 0 2 2 8 6+ t40L45<br />
A9CS Cruiser Mk ICS 4 18 0 2 1 7 4+ t94L13<br />
A10 Cruiser Mk II 3 12 1 2 2 8 6+ t40L45<br />
A10CS Cruiser Mk IICS 3 12 1 2 1 7 4+ t94L13<br />
A13 Cruiser Mk III 4 18 0 2 2 8 6+ t40L45<br />
A13 Cruiser Mk IV 4 18 1 2 2 8 6+ t40L45<br />
A13CS Cruiser Mk IVCS 4 18 1 2 1 7 4+ t94L13<br />
A15 Crusader I/II 4 18 1 2 2 8 6+ t40L45<br />
A15CS Crusader I/IICS 4 18 1 1 2 6 4+ t76L25<br />
Crusader III 5 18 1 4 2 8 6+ t57L45<br />
Grant/Lee 6 15 3 4 1 6 5+ f75L31<br />
3 1 8 t37L53<br />
M4 Sherman 6 15 3 4 2 7 5+ t75L41<br />
M4/76 Sherman 7 15 3 5 2 8 5+ t76L52<br />
Sherman II/IIIC Firefly 9 15 3 7 2 10 6+ t76L60<br />
Sherman IB 8 15 3 4h 1 8 4+ t105L22<br />
Cromwell IV and VII 7 20 2 4 2 7 5+ t75L40<br />
Cromwell V and VIII 8 20 2 5h 1 7 4+ t95L21<br />
A30 Challenger 9 18 2 7 1 10 6+ t76L60<br />
A34 Comet 8 18 3 6 2 8 5+ t77L50<br />
A11 Matilda I 2 9 2 - 2 6 6+ tMG<br />
A12 Matilda II 4 10 3 2 2 8 6+ t40L45<br />
Valentine II/V 4 12 2 2 2 8 6+ t40L45<br />
Valentine VIII 5 12 2 4 2 8 6+ t57L45<br />
Valentine XI 5 12 2 4 1 7 5+ t75L40<br />
A22 Churchill I 5 12 3 1 1 6 4+ f75L25<br />
2 1 8 t40L45<br />
Churchill IV 6 12 3 4 2 8 6+ t57L45<br />
Churchill V 7 12 3 5h 1 7 4+ t95L21<br />
Churchill VI 6 12 3 4 2 7 5+ t75L40<br />
Churchill VII 6 10 4 4 2 7 5+ t75L40<br />
Churchill VIII 6 10 4 4h 1 6 4+ t75L21<br />
Churchill Crocodile 8 9 4 4 2 7 5+ t75L40<br />
2 1 1 2+ fFlamethrower<br />
Tank Destroyers<br />
Wolverine 7 18 3 5 2 8 6+ t76L52<br />
Achilles 8 18 3 7 2 10 6+ t76L60<br />
Archer 8 15 2 7 2 10 6+ f76L60<br />
Self-Propelled Guns<br />
Bishop 7 12 2 4 1 8/130 4+ f88L28<br />
Priest 7 18 1 4h 2 8/120 4+ f105L22<br />
Sexton 7 18 1 4 2 8/130 4+ f88L28<br />
M3 GMC 4 21 0 4 2 6 5+ f75L31<br />
Churchill AVRE 11 10 4 10 1 1 1+ t290mm
APCs Date PV Mov Armor Pen Rof Rng Inf Gun<br />
Carrier APC (MG/crew/recon) 2 21 0 - 2 6 6+ tMG; Class 1<br />
U.S. M2/M3 Halftrack APC 2 24 0 - 2 6 6+ tMG; Class 2<br />
White SC APC 2 21w 0 - 2 6 5+ tMG; Class 1<br />
Armored Cars<br />
Daimler/Humber/Lynx SC 2 24w 1 - 2 6 6+ fMG<br />
Rolls Royce/Morris/Marmon-H 2 15w 0 0 1 4 6+ tATR<br />
Humber II/III AC 2 21w 0 0 2 6 5+ t15mm<br />
Humber IV AC 4 21w 0 3 2 8 6+ t37L53<br />
Daimler AC 4 24w 0 2 2 8 6+ t40L45<br />
Staghound I 4 24w 1 3 2 8 6+ t37L53<br />
Staghound II 4 24w 1 1 2 6 4+ t75L25<br />
Humber/Otter LRC 2 18w 0 - 2 6 6+ fMG<br />
SPAA<br />
Crusader AA 5 18 1 1 6* 8 4+ 2 x t20L55<br />
M17 5 21 0 0 12* 6 4+ 4 x tMG<br />
Antitank Guns<br />
ATR 1 0 1 4 -<br />
PIAT 1 4h 1 1 -<br />
2pdr 3 t 2 3 8 6+ t40L45; Class 1<br />
6pdr 4 t 4 3 8 6+ f57L45; Class 1<br />
17pdr 6 t 7 2 10 6+ f76L60; Class 2<br />
Other Towed Weapons<br />
3in Mortar 2 t or 6 - 3 1-6/25 5+ fClass 1<br />
4.2in Mortar 3 t - 3 3-8/40 4+ fClass 1<br />
75mm Pack Howitzer 3 t 1 2 6/90 4+ f75L16; Class 1<br />
25pdr 4 t 3 2 8/130 4+ t88L28; Class 2<br />
3.7in Howitzer 3 t 2 2 7/60 4+ t94L13; Class 1<br />
4.5in Howitzer 3 t 3 2 8/70 4+ f114L16; Class 2<br />
4.5in Gun 5 t 4 1 8/200 4+ f114L43; Class 3<br />
5.5in Gun 5 t 5 1 8/140 4+ f140L15; Class 3<br />
6in Howitzer 6 t 5 1 8/100 3+ f152L15; Class 3<br />
7.2in Howitzer 8 t 7 1 8/200 2+ f183L34; Class 3<br />
Bofors 40mm AA Gun 3 t 2 3* 8 4+ t40L56; Class 1<br />
3in AA Gun 3 t 2 1 8 4+ t76L47; Class 3<br />
3.7in AA Gun 4 t 3 1 8 4+ t94L50; Class 3<br />
Infantry AT Weapon<br />
British Infantry 2 9 2 6 5+ See note<br />
Airborne 2 9 2 4 4+ See note<br />
Engineers 3 9 2 3 3+ See note<br />
Carrier Recon Infantry 1 9 2 6 6+ See note<br />
British MG 3 6 3 8 3+ None<br />
Note: all non-MG stands have integral ATR from 1939-1942, and PIAT from 1943-1945.<br />
Soft Vehicles PV Move Carry Tow<br />
Loyd Carrier 1 18 1 Infantry Stand Class 1<br />
Jeep 1 24w MG/Weapon Crew Class 1<br />
Quad FAT 1 21w MG/Weapon Crew Class 2<br />
Light Truck (15cwt) 1 18w 1 Infantry Stand Class 1<br />
Medium Truck (30cwt) 1 18w 2 Infantry Stands Class 2<br />
Heavy Truck (3 ton) 1 15w 3 Infantry Stands Class 3
Artillery --Converged-- --Dispersed--<br />
AP Zone AP Zone<br />
75mm-99mm 1L 2" -- --<br />
100mm-140mm 2L 2" 1L 4"<br />
150mm/152mm 2 2" 1 4"<br />
160mm+ 3 2" 2L 4"<br />
80mm-100mm Mortar 1L 2" -- --<br />
101mm+ Mortar 2L 2" 1L 4"
French<br />
Tanks Date PV Mov Armor Pen Rof Rng Inf Gun<br />
FT-17m 1 6 0 - 2 6 6+ tMG<br />
FT-17c 1 6 0 1 1 6 5+ t37L21<br />
FT-17 75 1 6 0 1 1 6 4+ t75L17<br />
AMR 33 2 15 0 - 2 6 6+ tMG<br />
AMR 35 2 16 0 - 2 6 5+ tMG<br />
R35 2 7 1 1 1 6 5+ t37L21<br />
H35 2 8 1 1 1 6 5+ t37L21<br />
FCM 36 2 7 1 1 1 6 5+ t37L21<br />
H39 3 11 1 1 1 6 5+ t37L21<br />
R40 2 7 1 1 1 7 5+ t37L33<br />
D1/D2 2 7 1 1 1 7 5+ t47L21<br />
S35 3 12 2 2 1 7 5+ t47L35<br />
B1-bis 4 10 2 2 1 7 5+ t47L35<br />
1 1 6 4+ f75L17<br />
Armed Trucks/Armored Cars<br />
AM Dodge 2 12w - 1 2 6 5+ t37L21<br />
AMD 20 2 12w 0 1 1 6 5+ t37L21<br />
AMD 50 2 10w 0 1 1 6 5+ t37L21<br />
AMD 80 2 12w 0 0 2 6 5+ t12.7mm<br />
AMD 35 Panhard 3 16w 1 2 2 8 6+ t25L72<br />
Laffly CdC 3 14w - 3 2 8 6+ f47L53<br />
Lorraine Schlepper APC 1 12 0 - - - - Class 1<br />
Towed Weapons<br />
ATR 1 0 1 4 -<br />
8cm Mortar 2 t or 6 - 3 1-6/25 5+ f; Class 1<br />
Antichar de 25 2 t 2 3 8 6+ f25L72; Class 1<br />
Antichar de 47 4 t 3 3 8 6+ f47L53; Class 1<br />
Canon de 37 3 t or 6 1 2 6 5+ f37L21; Class 1<br />
Canon de 65 3 t 1 2 6 4+ f65L21; Class 1<br />
Canon de 75 mle 28 3 t 1 2 6/90 4+ f75L19; Class 1<br />
Canon de 75 mle 1897 4 t 4 2 7/120 5+ f75L36; Class 2<br />
Canon de 105 mle 28 and 35 4 t 2 1 8/110 4+ f105L20; Class 2<br />
Canon de 105 mle 13 and 36 4 t 2 1 8/130 4+ f105L38; Class 2<br />
Canon de 155 mle 17 5 t 4 1 8/120 3+ f155L15; Class 2<br />
Canon de 155 GPF 5 t 4 1 8/150 3+ f155L38; Class 3<br />
Mitrailleuse de 13.2 AA 3 t 0 6* 8 4+ t13.2mm; Class 2<br />
20mm AA 3 t 1 3* 8 5+ t20L55; Class 1<br />
25mm AA 3 t 2 3* 8 4+ t25L72; Class 1<br />
Canon de 75 AA 3 t 1 2 8 4+ t75L53; Class 3<br />
Infantry AT Weapon<br />
French Infantry 2 9 2 5 5+ None<br />
French Infantry with ATR 2 9 2 5 5+ ATR<br />
French MG 3 6 3 7 3+ None<br />
Soft Vehicles PV Move Carry Tow<br />
Citroen-Kegresse D17/19 1 11 1 MG/Weapon Crew Class 1<br />
Somua MCG 1 10 1 MG/Weapon Crew Class 3<br />
Light Truck 1 21w 1 Infantry Stand Class 1<br />
Medium Truck (30cwt) 1 18w 2 Infantry Stands Class 2<br />
Heavy Truck (3 ton) 1 15w 3 Infantry Stands Class 3
Artillery --Converged-- --Dispersed--<br />
AP Zone AP Zone<br />
75mm-99mm 1L 2" -- --<br />
100mm-140mm 2L 2" 1L 4"<br />
150mm/152mm 2 2" 1 4"<br />
160mm+ 3 2" 2L 4"<br />
80mm-100mm Mortar 1L 2" -- --<br />
101mm+ Mortar 2L 2" 1L 4"
Italy<br />
Tanks Date PV Mov Armor Pen Rof Rng Inf Gun<br />
Fiat 3000 1923 1 6 0 - 2 6 6+ tMG<br />
Fiat 3000 1930 1 6 0 1 1 6 5+ t37L21<br />
L3/33 2 18 0 - 2 6 6+ fMG<br />
L3/38 3 18 0 1 3 8 6+ f20mm<br />
L3/LF 4 18 0 2 1 1 2+ flamethrower<br />
L6/40 3 18 1 1 3 8 6+ t20mm<br />
M11/39 4 15 1 2 1 6 5+ f37L40<br />
- 1 6 6+ tMG<br />
M13/40 4 15 1 2 2 7 5+ t47L32<br />
Assault Guns/SPGs<br />
Semovente 47/32 3 18 1 2 1 7 6+ f47L32<br />
Semovente 75/18 3 16 1 1 2 6 4+ f75L18<br />
Semovente 75/34 5 16 1 4 2 7 5+ f75L34<br />
Semovente 75/46 6 16 2 5 2 8 5+ f75L46<br />
Semovente 90/53 7 15 0 6 2 10 5+ f90L53<br />
Armored Cars<br />
Autoblinda 40 2 21w 0 - 2 6 6+ tMG<br />
Autoblinda 41 3 21w 0 1 3 8 5+ t20mm<br />
Towed Weapons<br />
ATR 1 0 1 4 -<br />
20mm ATR 2 1 2 6 -<br />
8cm Mortar 2 t or 6 - 3 1-6/25 5+ f; Class 1<br />
Cannone-mit. 20/65 3 t 1 3* 8 5+ t20L65; Class 1<br />
Cannone-aa 75/39 and 75/46 4 t 4 2 6 5+ t75L39; Class 2<br />
Cannone-aa 90/53 6 t 6 2 10 5+ t90L53; Class 3<br />
Cannone da 37/45 3 t 2 3 8 6+ f37L45; Class 1<br />
Cannone da 47/32 3 t 2 3 7 5+ f47L42; Class 1<br />
Cannone da 65/17 3 t 1 2 6 4+ f65L17; Class 1<br />
Cannone da 75/27 3 t 2 2 6/110 4+ f75L27; Class 2<br />
Cannone da 75/32 4 t 4 2 6/130 5+ f75L32; Class 2<br />
Obice da 75/18 3 t 1 2 6/100 4+ f75L18; Class 1<br />
Obice da 100/17 4 t 2 1 8/100 4+ f100L17; Class 2<br />
Cannone da 105/28 4 t 2 1 8/130 4+ f105L28; Class 2<br />
Obice da 149/13 5 t 4 1 8/120 3+ f150L13; Class 3<br />
Cannone da 149/40 5 t 4 1 8/140 3+ f150L40; Class 3<br />
Infantry AT Weapon<br />
Italian Infantry 2 9 2 4 5+ None<br />
Italian Infantry w/ATR 2 9 2 4 5+ ATR<br />
Italian MG 3 6 3 7 4+ None<br />
Italian AT Platoon 2 6 1 2 6 - 20mm ATR<br />
Soft Vehicles Move Carry Tow<br />
Light Truck 1 21w 1 Infantry Stand Class 1<br />
SPA35 Medium Truck 1 18w 2 Infantry Stands Class 2<br />
Lancia Heavy Truck 1 15w 3 Infantry Stands Class 3<br />
Prime Mover 1 18w 1 Infantry Stand Class 3
Artillery --Converged-- --Dispersed--<br />
AP Zone AP Zone<br />
75mm-99mm 1L 2" -- --<br />
100mm-140mm 2L 2" 1L 4"<br />
150mm/152mm 2 2" 1 4"<br />
160mm+ 3 2" 2L 4"<br />
80mm-100mm Mortar 1L 2" -- --<br />
101mm+ Mortar 2L 2" 1L 4"
Poland<br />
Tanks Date PV Mov Armor Pen Rof Rng Inf Gun<br />
TKS 1 14 0 - 2 6 6+ fMG<br />
TKS(L) 1 14 0 1 2 8 6+ f20L75<br />
Vickers Edw 2 13 1 0 2 6 5+ 2 x tMG<br />
Vickers Ejw 3 13 1 1 1 7 5+ t47L21<br />
7TPdw 2 13 1 0 2 6 5+ 2 x tMG<br />
7TPjw 4 13 1 2 1 8 5+ t37L45<br />
H35 2 8 1 1 1 6 5+ t37L21<br />
Armored Cars<br />
wz. 29 "Ursus" 1 8w 0 1 1 6 5+ t37L21<br />
wz. 34 I 1 14w 0 0 2 6 6+ tMG<br />
wz. 34 II 2 13w 0 1 1 6 5+ t37L21<br />
Towed Weapons<br />
ATR 1 1 1 4 -<br />
8cm mortar 1 t or 6 - 3 1-6/25 5+ f; Class 1<br />
37mm Bofors ATG 3 t 2 3 8 6+ f37L45; Class 1<br />
47mm Bohler M35 3 t 2 3 7 5+ f47L42; Class 1<br />
65mm wz. 06 3 t 1 2 6 4+ f65L21; Class 1<br />
75mm wz. 02/26 3 t 2 2 6/85 4+ f75L19; Class 2<br />
75mm wz. 97 4 t 4 2 7/120 4+ f75L36; Class 2<br />
100mm wz. 14/19 4 t 2 2 8/100 4+ f100L17; Class 2<br />
105mm wz. 29/34 4 t 2 2 8/130 4+ f105L38; Class 2<br />
120mm wz. 09/31 5 t 3 1 7/120 3+ f120L22; Class 2<br />
155mm Model 175 5 t 4 1 8/120 3+ f155L15; Class 2<br />
40mm wz. 36 AA 3 t 2 3* 8 4+ t40L56; Class 1<br />
75mm wz. 97/25 AA 3 t 1 2 8 4+ t75L53; Class 3<br />
Infantry AT Weapon<br />
Polish Infantry 2 9 2 4 5+ None<br />
Polish Infantry w/ATR 2 9 2 4 5+ ATR<br />
Polish MG 3 6 3 7 4+ None<br />
Polish Engineer 3 9 2 5 5+ None<br />
Polish Cavalry 3 16 2 5 5+ None<br />
Polish Cavalry MG 4 16 3 7 4+ None<br />
Soft Vehicles Move Carry Tow<br />
Light Truck 1 21w 1 Infantry Stand Class 1<br />
Medium Truck 1 18w 2 Infantry Stands Class 2<br />
Heavy Truck 1 15w 3 Infantry Stands Class 3<br />
C4P Prime Mover 1 10 1 Infantry Stand Class 2<br />
Citroen-Kegresse D17/19 1 11 1 MG/Weapon Crew Class 1<br />
Artillery --Converged-- --Dispersed--<br />
AP Zone AP Zone<br />
75mm-99mm 1L 2" -- --<br />
100mm-140mm 2L 2" 1L 4"<br />
150mm/152mm 2 2" 1 4"<br />
160mm+ 3 2" 2L 4"<br />
80mm-100mm Mortar 1L 2" -- --<br />
101mm+ Mortar 2L 2" 1L 4"
Tactical Command Scenario 1: The Tigers are Burning, July 12 1943.<br />
Elements of 29 th Tank Corps run into the 1 st SS Panzer Regiment and the 2 nd SS PanzerGrenadier<br />
Regiment on the north slopes of Hill 252.2 in front of Prokhorovka.<br />
31 st Tank Brigade; Motivation Rating: Regular<br />
Brigade HQ: 1 HQ stand<br />
Recon Coy: 1 BA64 stand<br />
ATR Coy: 3 ATR stands<br />
AT Battery: 1 76.2mm ATG stand, 1 Med. Truck stand (attach to any non-tank coy)<br />
AAMG Coy: 2 MG stands<br />
Tank Battalion HQ: 1 HQ stand<br />
1 Med. Coy: 3 T34 stands<br />
1 Med. Coy: 3 T34 stands<br />
Tank Battalion HQ: 1 HQ stand<br />
1 Med. Coy: 3 T34 Stands<br />
1 Light Coy: 3 T70 Stands<br />
1 Light Coy: 3 T70 Stands<br />
Motor-Rifle Battalion HQ: 1 HQ stand, 1 FOO stand for Wpns Coy<br />
1 Rifle Coy: 4 Inf stands<br />
1 Rifle Coy: 4 Inf stands<br />
1 SMG Coy: 3 SMG stands<br />
1 Wpns Coy: 4 81mm Mortar stands, 4 truck stands<br />
32 nd Tank Brigade; Motivation Rating: Regular<br />
Brigade HQ: 1 HQ stand<br />
Recon Coy: 1 BA64 stand<br />
ATR Coy: 3 ATR stands<br />
AT Battery: 1 76.2mm ATG stand, 1 Med. Truck stand (attach to any non-tank coy)<br />
AAMG Coy: 2 MG stands<br />
Tank Battalion HQ: 1 HQ stand<br />
1 Med Coy: 3 T34 stands<br />
1 Med Coy: 3 T34 stands<br />
Tank Battalion HQ: 1 HQ stand<br />
1 Med Coy: 3 T34 stand<br />
1 Med Coy: 3 T34 stand<br />
Motor-Rifle Battalion HQ: 1 HQ stand, 1 FOO stand for Wpns Coy<br />
1 Rifle Coy: 4 Inf stands<br />
1 Rifle Coy: 4 Inf stands<br />
1 SMG Coy: 3 SMG stands<br />
1 Wpns Coy: 4 81mm Mortar stands, 4 truck stands<br />
271 st Mortar Regiment (-); Motivation Ration: Regular<br />
Regiment HQ: 1 HQ stand<br />
Mortar Battalion HQ: 1 HQ stand, 3 120mm Mortar stands, 3 Truck stands, 1 FOO stand<br />
Mortar Battalion HQ: 1 HQ stand, 3 120mm Mortar stands, 3 Truck stands, 1 FOO stand
2 nd SS Panzer Battalion; Motivation Rating: Elite<br />
Battalion HQ: 1 HQ stand<br />
1 Hvy Coy: 1 PzKw VIE (may operate as individual coy or be attached)<br />
1 Light Pltn: 1 PzKw IIF (must attach to coy in battalion)<br />
1 Light Pltn: 1 PzKw I (must attach to coy in battalion)<br />
1 Med. Coy: 3 PzKw IVF2 stands, 1 PzKw IIIJ stand<br />
1 Med. Coy: 3 PzKw IVF2 stands, 1 PzKw IIIJ stand<br />
1 Med. Coy: 3 PzKw IVF2 stands, 1 PzKw IIIJ stand<br />
1 Eng. Coy: 3 Engineer Stands, 3 SdKfz 251/1 stands<br />
2 nd SS PanzerGrenadier Regiment; Motivation Rating: Elite<br />
Regiment HQ: 1 HQ stand, 1 FOO stand for Infantry Gun Coy.<br />
1 Infantry Gun Coy: 2 sIG33 ausf Pz 38(t)<br />
1 FlaK Coy: 3 SdKfz 10/4 stands<br />
1 TD Coy: 3 75mm ATG stands, 3 Med. Truck stands<br />
1 Recon Coy: 3 Recon Inf stands on motorcycles<br />
1 Eng. Coy: 3 Engineer stands, 3 SdKfz 251/1, 1 MG stand, 1<br />
Battalion HQ: 1 HQ stand, 1 FOO stand for Wpns Coy<br />
1 Inf Coy: 3 Inf stands, 1 MG stand, 1 81mm MTR stand (direct fire)<br />
1 Inf Coy: 3 Inf stands, 1 MG stand, 1 81mm MTR stand (direct fire)<br />
1 Inf Coy: 3 Inf stands, 1 MG stand, 1 81mm MTR stand (direct fire)<br />
1 Wpns Coy: 3 MG stands, 2 81mm MTR stands<br />
1 Heavy Coy: 1 Eng stand, 1 50mm ATG stand, 1 75mm leIG stand,<br />
3 Medium Truck stands<br />
Battalion HQ: 1 HQ stand<br />
1 Inf Coy: 3 Inf stands, 1MG stand, 1 SdKfz 251/10, 3 SdKfz 251/1<br />
1 Inf Coy: 3 Inf stands, 1MG stand, 1 SdKfz 251/10, 3 SdKfz 251/1<br />
1 Inf Coy: 3 Inf stands, 1MG stand, 1 SdKfz 251/10, 3 SdKfz 251/1<br />
1 Wpns Coy: 1 SdKfz 251/9, 1 SdKfz 251/2 (direct fire), 1 50mm ATG<br />
stand, 2 MG stands, 3 SdKfz 251/1<br />
2 nd SS Artillery Regiment(-); Motivation Rating: Elite<br />
1 Battalion: 1 HQ stand, 3 10.5cm leFH 18 stands, 3 SdKfz 11, 1 FOO stand<br />
1 Battalion: 1 HQ stand, 3 15cm sFH 18 stands, 3 SdKfz 7, 1 FOO stand
Map. Playing area should be minimum 4' by 6'<br />
Germans set up anywhere south and west of the dashed red line.<br />
Russians set up anywhere north and east of the dashed red line.<br />
Victory Conditions: The Germans win if they capture both the Collective Farm and the Town<br />
The Russians win if they capture the hill.<br />
Special Rules for scenario start:<br />
The sequence of play rule is unchanged for the scenario. However, due to the fact that the<br />
scenario represents a battle that has already started, all units of both sides on the first turn are<br />
considered to be marked "hold fire" until they are actually activated. Thus, on the first turn a<br />
unit may fire at enemy movement even if it has not yet been activated.
Tactical Command Scenario 2: Battle for Arracourt, Sept 19 1944.<br />
The green and hastily organized German 113 th Panzer Brigade attacks Combat Command A of<br />
the US 4 th Armored Division near Arracourt, France.<br />
German OB All German units are Green<br />
113 th Panzer Brigade: all units enter on east edge of map<br />
Kampfgruppe Brose (enter on Turn 1):<br />
113 th Brigade HQ: 1 HQ stand, 1 SdKfz 251/1<br />
1 Coy (composite): 1 Engineer stand, 1 150mm INF, 1 20mm FlaK38, 3 trucks<br />
I Battalion HQ: 1 HQ stand, 1 Kubelwagen<br />
3 Coys: 3 Rifle stands, 3 trucks<br />
1 Coy: 1 7.5cm PaK 40, 1 120mm mortar, 2 trucks<br />
I Bn/130 Pz Lehr HQ: 1 Pz V<br />
3 Coys: 3 Pz V stands<br />
1 Coy: 1 Wirbelwind, 1 Mobelwagen<br />
1198 Artillery Battalion HQ: 1 HQ stand, 1 FOO stand, 2 kubelwagens<br />
3 150mm sFH18<br />
(sets up 10" off east edge, except for FOO stand and 1 kubelwagen)<br />
Kampfgruppe Feiss (enter on Turn 1):<br />
2113 th Pz Grenadier Regiment HQ: 1 HQ stand, 1 Kubelwagen<br />
HQ Coy: 1 m/c SMG stand, 1 5cm PaK 38, 1 truck<br />
1 Coy (composite): 1 Engineer stand, 1 120mm MTR, 1 20mm FlaK38, 3 trucks<br />
II Battalion HQ: 1 HQ stand, 1 Kubelwagen<br />
3 Coys: 3 Rifle stands, 3 trucks<br />
1 Coy: 1 7.5cm PaK 40, 1 120mm mortar, 2 trucks<br />
2113 th Panzer Battalion HQ: 1 Pz IVH<br />
3 Coys: 3 Pz IVH stands<br />
Brigade Reserve (Enter on turn 2):<br />
58 th Recon Battalion HQ: 1 HQ stand, 1 kubelwagen<br />
113 th Recon Coy : 1 SdKfz 222, 1 Rifle stand, 1 SdKfz 251/1<br />
1 Coy (composite): 2 81mm MTRs, 2 MG stands, 1 75mm INF, 4 med. trucks
US OB all units are Veteran<br />
Set up on map, as indicated:<br />
Combat Command A, 4 th Armored Division<br />
CCA HQ: 1 HQ stand, 1 M3 Halftrack (CCA HQ may operate as a replacement for a destroyed<br />
HQ stand until the HQ is reformed). (set up west of Rechicourt)<br />
37 th Tank Battalion HQ: 1 HQ M4 Sherman (set up anywhere)<br />
HQ Coy: 1 M4A1 HTMC, 1 M4(105) (set up anywhere)<br />
C Coy: 2 M4 Sherman, 1 M4/76 Sherman (set up at Lezey)<br />
D Coy: 3 M5A1 Stuart (set up at Moncourt)<br />
D Troop, 25 th Cav Recon (attached): 3 recon M8 Armored Car (set up anywhere)<br />
53 rd Armored Infantry Battalion HQ: 1 HQ stand, 1 Jeep (set up anywhere)<br />
HQ Coy: 1 M4A1 HTMC, 1 M8 HMC, 1 MG stand, 1 57mm ATG, 2 M3 Halftrack<br />
3 Coys: 3 Rifle stands, 1 MG stand, 4 M3 Halftrack (set up anywhere)<br />
1 TD Coy (attached from 704 th TD Bn): 3 M18, 1 M20 AC, 1 Jeep with MG (set up at<br />
Bezange)<br />
24 th Armored Engineer Battalion HQ: 1 HQ stand, 1 jeep (set up anywhere)<br />
3 Coys, 3 Engineer stands, 1 M3 halftrack, 1 medium truck (set up anywhere)<br />
66 th Armored Field Artillery Battalion: 1 HQ stand, 1 M4 Sherman FOO, 1 jeep (HQ stand and<br />
jeep set up with CCA HQ, FOO stand sets up anywhere)<br />
3 M7 HMC (set up with CCA HQ)<br />
AAA AW Battery (attached): 2 M16, 2 M15 (set up with CCA HQ)<br />
Set up Off Board (5" from west edge)<br />
191 st Artillery Battalion: 1 HQ stand, 1 FOO stand, 2 Jeeps<br />
3 155mm Howitzer stands, 3 heavy trucks<br />
(the FOO stand and jeep may set up on map)<br />
94 th Armored Field Artillery Battalion: 1 HQ stand, 1 FOO stand, 2 Jeeps<br />
3 M7 HMC<br />
(the FOO stand and jeep may set up on map)<br />
Enter on Turn 6 on west edge:<br />
A and B coys, 37 th Tank Battalion, each with: 2 M4 Sherman, 1 M4/76 Sherman<br />
(these may be attached to 37 th Tank Bn, or to CCA headquarters)
Map<br />
Map notes: The shaded grey areas are towns. The grey outlines are hills. The green areas are<br />
woods. The black lines are roads. The open areas should be divided into large fields by hedges.<br />
These hedges block LOS, and provide soft cover for infantry and guns. They do not impede the<br />
movement of fully tracked vehicles, but it takes half the movement allowance of wheeled and<br />
halftracked vehicles to cross them. All roads should also be lined with hedges.<br />
Special Rules: The weather is foggy. LOS is limited to 5" on the map until turn 10 when the fog<br />
burns off. All US infantry and towed guns may start the game dug in (soft cover) if not in a<br />
town. The Germans were badly organized, ill-trained, and not well motivated. Consequently,<br />
they do not receive the +1 modifier to their motivation checks, despite being the attacking side in<br />
the scenario.<br />
Game Length: 12 Turns<br />
Victory Conditions:<br />
German Victory: capture Moncourt, Bezange, Lezey, and one additional town.<br />
German Decisive Victory: capture all six towns.<br />
US Decisive Victory: hold at least five towns.<br />
US Victory: hold at least four towns
1944 BRITISH ARMORED DIVISION:<br />
QUALITY: All REGULAR.<br />
BASE FORCE:<br />
SAMPLE ALLIED ORGANIZATIONS<br />
ARMORED BRIGADE:<br />
BRIGADE HQ: HQ Sherman<br />
1st & 2nd ARMORED REGIMENTS, each with:<br />
HQ Sherman<br />
HQ Company: 1 M5A1, 1 Daimler Dingo Scout Car, 1 Crusader AA<br />
3 Coys: 3 Sherman(75), 1 Firefly<br />
1st MOTOR BATTALION:<br />
Battalion HQ: 1 HQ Stand, 1 Jeep<br />
3 Coys: 3 Rifle Platoons & Trucks, 1 Carrier.<br />
1 Coy: 1 6pdr ATG, 1 3" Mortar, 2 HMG Platoons, 4 Trucks.<br />
LORRIED INFANTRY BRIGADE:<br />
1st INFANTRY BATTALION:<br />
Battalion HQ: 1 HQ Stand & Truck.<br />
4 Rifle Coys: 3 Rifle stands, 3 Trucks.<br />
1 Coy: 1 6pdr ATG, 1 3" Mortar, 1 Carrier, 1 Engineer stand, 3 Trucks.<br />
1st ROYAL HORSE ARTILLERY REGIMENT:<br />
Regiment HQ: 1 HQ stand, 1 FO, 2 Jeeps<br />
A Battery: 2 25pdr & Tractors.<br />
B Battery: 2 25pdr & Tractors.<br />
C Battery: 2 25pdr & Tractors<br />
OPTIONS:<br />
MEETING ENGAGEMENT: Any ONE of the following options may be selected.<br />
ATTACK: Any TWO of the following options may be selected.<br />
DEFEND: No options may be selected.<br />
OPTION #1:<br />
3rd ARMORED REGIMENT:<br />
1 HQ Sherman<br />
HQ Coy: 1 M5A1, 1 Daimler Dingo Scout Car, 1 Crusader AA<br />
2 Coys: 1 Firefly, 3 Sherman(75)<br />
OPTION #2:<br />
DIVISIONAL ANTI-TANK (attach to AT Regiment if option 3 chosen, otherwise to any HQ):<br />
1st BATTERY: 4 Achilles<br />
DIVISIONAL ENGINEERS (attach to infantry battalion or motor battalion):<br />
1st FIELD SQUADRON (COY): 2 Engineer Platoons & Trucks.<br />
2nd ROYAL HORSE ARTILLERY REGIMENT:<br />
HQ: 1 HQ Stand, 1 FO stand, 2 jeeps<br />
D Battery: 2 25pdr & Tractors<br />
E Battery: 2 25pdr & Tractors<br />
F Battery: 2 25pdr & Tractors
OPTION #3:<br />
DIVISIONAL ANTI-TANK REGIMENT (-):<br />
REGIMENT HQ: 1 HQ stand, 1 Jeep<br />
3 rd BATTERY: 4 17pdr ATG stands, 4 M3 APC.<br />
ROYAL AIR FORCE: 2 fighterbombers with rockets.<br />
1st MEDIUM ARTILLERY REGIMENT:<br />
HQ: 1 HQ stand, 1 Jeep, 1 Sherman FO<br />
Y Battery: 2 Sextons<br />
Z Battery: 2 Sextons<br />
OPTION #4:<br />
LORRIED INFANTRY BRIGADE:<br />
BRIGADE HQ: 1 HQ stand, 1 Rifle stand, 2 Trucks.<br />
MG Coy: 3 MG stands, 1 4.2" Mortar 3 Trucks.<br />
2nd INFANTRY BATTALION:<br />
HQ: HQ Stand & Truck.<br />
4 Coys, each: 3 Rifle stands, 3 Trucks.<br />
1 Coy: 1 6pdr ATG, 1 3" Mortar, 1 Carrier, 1 Engineer stand, 3 Trucks.<br />
DIVISIONAL AA (attach to any battalion or regiment HQ):<br />
1st BATTERY: 3 40mm AA, 3 Trucks<br />
OPTION #5:<br />
ARMORED CAR REGIMENT (-):<br />
HQ: 1HQ Staghound I AC<br />
HQ Coy: 2 M3 GMC, 2 Humber SC<br />
'A' SQUADRON (Recon): 2 Daimler II, 2 Daimler Dingo, 1 Rifle stand, 1 M3 APC.<br />
'B' SQUADRON (Recon): 2 Daimler II, 2 Daimler Dingo, 1 Rifle stand, 1 M3 APC.<br />
DIVISIONAL ANTI-TANK (attach to AT regiment if option 3 chosen, otherwise to any HQ):<br />
4 th BATTERY: 4 17pdr ATG stands, 4 M3 APC.<br />
NOTES:<br />
All British Armored Divisions were equipped with the Sherman except for the 7th. This was equipped with<br />
Cromwells. Therefore if desired all Shermans may be replaced by Cromwell VIIs, and all Fireflys by Challengers.<br />
(This is an all or nothing deal; a mix of Shermans and Cromwells may not be used). If Cromwells are used there<br />
may be 1 95mm CS version in each Regiment replacing one of the Cromwell 75mm's (any Cromwells may also be<br />
downgraded to 6pdr armed if desired). Archers may be used as substitutes for the Achilles.<br />
1944 BRITISH INFANTRY DIVISION:<br />
QUALITY: All REGULAR.<br />
BASE FORCE:<br />
1st BATTALION ROYAL TANK REGIMENT:<br />
HQ: 1 HQ stand, 1 Jeep,<br />
HQ Coy: Churchill CS, 1 Crusader AA, 2 M5 Stuart<br />
3 Squadrons: 5 Churchill VII<br />
1st INFANTRY BRIGADE:<br />
HQ: 1 HQ stand, 1 Rifle stand, 2 Trucks.
1st, 2nd, & 3rd INFANTRY BATTALIONS, each with:<br />
BATTALION HQ: 1 HQ Stand & Truck.<br />
4 Coys: 3 Rifle stands, 3 Trucks.<br />
1 Coy: 1 6pdr ATG, 1 3" Mortar, 1 Carrier, 1 Engineer stand, 2 Med. Trucks<br />
1st FIELD ARTILLERY REGIMENT:<br />
HQ: 1 HQ stand, 1 FO stand, 2 jeeps.<br />
3 Batteries: 2 25pdr, 2 Tractors<br />
OPTIONS:<br />
MEETING ENGAGEMENT: Any ONE of the following options may be selected.<br />
ATTACK: Any TWO of the following options may be selected.<br />
DEFEND: No options may be selected.<br />
OPTION #1:<br />
DIVISIONAL ARMORED CARS (attach each to any regiment or brigade hq):<br />
2 Sqdrns (recon): 1 Humber SC, 2 Daimler AC, 1 Rifle stand, 1 M3 APC<br />
ROYAL AIR FORCE: 3 Fighterbombers with bombs<br />
1st MEDIUM ARTILLERY REGIMENT:<br />
HQ: 1 HQ stand, 1 FO stand, 2 jeeps<br />
2 Batteries: 2 5.5" Gun/Howitzers, 2 Tractors<br />
OPTION #2:<br />
DIVISIONAL ANTI-TANK (attach to AT regiment if Option 3 chosen, otherwise to any HQ):<br />
1 Battery: 4 17pdr ATG, 4 Trucks.<br />
DIVISIONAL MG (attach to MG Bn if Option 3 chosen, otherwise to Inf Regiment HQ):<br />
1 Coy: 3 MG stands, 1 4.2" Mortar, 2 Med. Trucks<br />
2nd FIELD ARTILLERY REGIMENT:<br />
HQ: 1 HQ stand, 1 FO stand, 2jeeps<br />
3 Batteries: 2 25pdr, 2 Tractors<br />
OPTION #3:<br />
DIVISIONAL ANTI-TANK REGIMENT (-):<br />
HQ: 1 HQ stand, 1 Jeep<br />
1 Battery: 4 Archers*<br />
1 Battery: 4 17pdr ATG, 4 Trucks<br />
DIVISIONAL MG BATTALION (-):<br />
HQ: 1 HQ stand, 1 Jeep<br />
1 Coy: 3 MG stands, 1 4.2" Mortar, 2 Med. Trucks<br />
OPTION #4:<br />
DIVISIONAL AA (attach to any brigade or regiment HQ):<br />
1 Battery: 3 40mm AA, 3 Trucks<br />
3rd FIELD ARTILLERY REGIMENT:<br />
HQ: 1 HQ stand, 1 FO, 2 jeeps<br />
3 Batteries: 2 25pdr, 2 Tractors
DIVISIONAL ENGINEERS (attach to infantry brigade HQ):<br />
1 Squadron: 3 Engineer Stands, 3 Trucks.<br />
NOTES:<br />
*Towed 17pdr may be substituted for the Archers.<br />
1943-45 SOVIET RIFLE DIVISION:<br />
QUALITY: ALL REGULAR (Veteran if Guards)<br />
BASE FORCE:<br />
1 RIFLE REGIMENT, with:<br />
REGIMENT HQ: 1 HQ stand, 1 Engineer stand, 1 recon cavalry SMG stand<br />
AT Coy: 1 45L66 ATG, 1 limber (2 of each in Guards divisions)<br />
AT Rifle Coy: 2 ATR stands (3 stands in Guards divisions)<br />
SMG Coy: 2 SMG stands (2 coys in Guards divisions)<br />
Gun Coy: 1 76L16 Gun, 1 limber<br />
MTR Coy: 1 120mm MTR, 1 truck<br />
I BATTALION<br />
HQ: 1 HQ stand<br />
3 Coys: 2 Rifle stands<br />
1 Coy: 1 MG stand (2 stands in Guards divisions)<br />
1 Coy: 1 Rifle w/ATR stand (2 stand in Guards divisions)<br />
1 Coy: 1 82mm MTR<br />
II and III BATTALIONS: As I BATTALION<br />
ARTILLERY BATTALION:<br />
HQ: 1 HQ stand, 1 FOO, 1 car<br />
1 Battery: 2 76mm Model 39/42, 1 122mm Model 38, 3 limbers<br />
OPTIONS:<br />
MEETING ENGAGEMENT: Any TWO of the following options may be selected<br />
ATTACK: Any THREE of the following options may be selected<br />
DEFEND: Any ONE of the following options may be selected<br />
OPTION #1:<br />
OPTION #2:<br />
OPTION #3:<br />
DIVISIONAL ANTI-TANK BATTALION:<br />
HQ: 1 HQ stand<br />
1 Coy: 3 45L66, 3 limbers<br />
1 Coy: 3 ATR stands<br />
DIVISIONAL ARTILLERY:<br />
HQ: 1 HQ stand, 1 FOO, 1 car<br />
1 Battery: 2 76mm Model 39/42, 1 122mm Model 38, 3 limbers<br />
DIVISIONAL ENGINEERS:<br />
HQ: 1HQ stand<br />
1 Coy: 3 Engineer stands
OPTION #4:<br />
OPTION #5:<br />
DIVISIONAL RECON (attach to any HQ):<br />
1 Coy: 2 recon cavalry SMG stands<br />
ATTACHED MORTAR BATTALION:<br />
HQ: 1 HQ stand, 1 FOO stand, 2 jeeps<br />
1 Battery: 2 B13 Katyusha MRL<br />
ATTACHED SP REGIMENT:<br />
HQ: 1 HQ SU-76<br />
1 Battery: 3 SU-76<br />
1944 SOVIET TANK CORPS:<br />
QUALITY: All REGULAR.<br />
BASE FORCE:<br />
1st TANK BRIGADE, with:<br />
BRIGADE HQ: 1 HQ BA64, 1 Recon SMG stand with Motorcycle.<br />
1 Tank Battalion: 4 T34/85<br />
2 Tank Battalions: 4 T34/76M43<br />
1st MOTOR RIFLE BATTALION:<br />
BATTALION HQ: 1 HQ Stand & Jeep, 1 Recon BA32.<br />
2 Coys: 3 Rifle Stands, 3 Trucks.<br />
1 Tank Desant Coy: 3 SMG Stands.<br />
1 Coy: 1 81mm Mortar, 1 76.2mm M42 Field Gun, 2 Trucks, 2 GAZ-4M-AA.<br />
2nd TANK BRIGADE, with:<br />
BRIGADE HQ: 1 HQ BA64, 1 Recon SMG with Motorcycle.<br />
1 Tank Battalion: 5 T34/85<br />
2 Tank Battalions: 4 T34/76M43<br />
2nd MOTOR RIFLE BATTALION:<br />
BATTALION HQ: 1 HQ stand & Jeep, 1 Recon BA32<br />
2 Coys: 3 Rifle Stands, 3 Trucks.<br />
1 Tank Desant Coy: 3 SMG stands.<br />
1 Coy: 1 81mm Mortar, 1 76.2mm M42 Field Gun, 2 Trucks, 2 GAZ-4M-AA<br />
LIGHT SPG REGIMENT:<br />
HQ: 1 SU76<br />
1 Battery: 3 SU76<br />
LIGHT ARTILLERY REGIMENT:<br />
HQ: 1 HQ stand, 1 FO, 2 Jeeps<br />
1 Battery: 3 76.2mm M42 Field Guns, 3 Trucks<br />
GUARDS MORTAR BATTALION:<br />
HQ: 1 HQ stand, 1 FO, 2 Jeeps<br />
1 Battery: 2 BM13 Katyusha MRLs<br />
OPTIONS:<br />
MEETING ENGAGEMENT: Any ONE of the following options may be selected.<br />
ATTACK: Any ONE of the following options may be selected.<br />
DEFEND: No options may be selected.
OPTION #1:<br />
OPTION #2:<br />
OPTION #3:<br />
3rd TANK BRIGADE, with:<br />
BRIGADE HQ: 1 HQ BA64, 1 Recon SMG stand with Motorcycle.<br />
1 Tank Battalion: 5 T34/85<br />
2 Tank Battalions: 4 T34/76M43<br />
FRONT (ARMY GROUP) SUPPORT: 2 Fighterbombers with bombs<br />
CORPS ENGINEERS (attach to any Rifle Battalion HQ):<br />
1 Coy: 3 Engineer stands, 3 Trucks<br />
3rd MOTOR RIFLE BATTALION:<br />
BATTALION HQ: 1 HQ stand & Truck, 1 Recon BA32<br />
2 Coys: 3 Rifle Platoons & Trucks.<br />
1 Tank Desant Coy: 3 SMG Platoons.<br />
1 Coy: 1 81mm Mortar, 1 76.2mm M42 Field Gun, 2 Trucks, 2 GAZ-4M-AA<br />
CORPS HEAVY TANK REGIMENT:<br />
HQ: 1 HQ stand, 1 Jeep<br />
1 Regiment: 3 IS-2, 1 Engineer stand, 1 Truck.<br />
CORPS MORTAR REGIMENT:<br />
HQ: 1 HQ stand, 1 FO stand, 2 jeeps<br />
1st BATTALION: 3 120mm Mortars, 3 Trucks<br />
CORPS MOTORCYCLE BATTALION:<br />
HQ: 1 HQ BA64.<br />
1st Recon Coy: 3 Recon SMG Motorcycle stands.<br />
2nd Recon Coy: 2 Recon T34/76M43.<br />
3rd Coy: 1 45L66 ATG, 1 Truck, 1 GAZ-4M-AA.<br />
CORPS ANTI-AIRCRAFT REGIMENT:<br />
HQ: 1 HQ Stand & Car<br />
1 Battery: 4 37L70 AA Guns, 4 Trucks.<br />
MOTORIZED RIFLE BRIGADE, with:<br />
BRIGADE HQ: 1 HQ stand & Car.<br />
1 Recon Coy: 1 Recon BA32, 1 Recon SMG stand, 1 M3 Scout Car<br />
1 Artillery Battalion:<br />
HQ: 1 HQ stand, 1 FO, 2 jeeps<br />
1 Battery: 3 76.2mm M42 Field Guns, 3 Trucks<br />
1st & 2nd MOTORIZED INFANTRY BATTALIONS, each with:<br />
BATTALION HQ: 1 HQ stand & Truck.<br />
3 Coys: 3 Rifle stands, 3 Trucks.<br />
1 Coy: 1 MG stand, 1 81mm Mortar, 1 45L66 ATG, 3 Trucks<br />
CORPS TANK DESTROYERS:<br />
HQ: 1 SU-85<br />
1 Regiment: 3 SU-85.
CORPS HEAVY SPGs:<br />
HQ: 1 SU-152<br />
1 Regiment: 3 SU-152.<br />
FRONT (ARMY GROUP) SUPPORTS:<br />
SOVIET AIR FORCE: 1 Fighterbomber with bombs<br />
1943-1944 U.S. ARMORED DIVISION:<br />
QUALITY: All REGULAR<br />
BASE FORCE:<br />
1st ARMORED REGIMENT:<br />
REGIMENTAL HQ: HQ stand, 1 Jeep<br />
1 Coy: 2 Recon Jeeps w/MG, 2 Recon M8 ACs<br />
1st and 2nd ARMORED BATTALIONS, each with:<br />
1 HQ M4 Sherman,<br />
1 Coy: 1 M4/105, 1 M4A1 HTMC<br />
3 Coys: 1 M4/76, 2 M4 Sherman<br />
1 Coy: 3 M5A1 Stuart<br />
1st and 2nd ARMORED INFANTRY BATTALIONS, each with:<br />
1 HQ stand, 1 Jeep.<br />
3 Coys: 3 Rifle stands, 3 M3 Half-tracks.<br />
1 Coy: 1 57mm ATG, 1 M4A1 HTMC, 1 MG stand, 2 M3 Half-tracks, 1 M8 HMC<br />
1st & 2nd ARMORED ARTILLERY BATTALIONS, each with:<br />
HQ: 1 HQ stand, 1 FO stand, 2 jeeps<br />
1 Battery: 3 M7 HMC<br />
UNITED STATES AIR FORCE:<br />
3 Fighter-Bombers with bombs<br />
OPTIONS:<br />
MEETING ENGAGEMENT: Any TWO of the following options may be selected.<br />
ATTACK: Any THREE of the following options may be selected.<br />
DEFEND: Any ONE of the following options may be selected.<br />
OPTION #1:<br />
3rd ARMORED INFANTRY BATTALION:<br />
BATTALION HQ: 1 HQ stand, 1 Jeep.<br />
3 Coys: 3 Rifle stands, 3 M3 Half-tracks.<br />
1 Coy: 1 57mm ATG, 1 M4A1 HTMC, 1 MG stand, 2 M3 Half-tracks, 1 M8 HMC<br />
DIVISIONAL TDs (attach to TD Bn HQ if Option 3 chosen, otherwise to any HQ):<br />
1 Coy: 3 M10, 1 M20 Scout Car, 1 Baz stand<br />
DIVISIONAL ANTI-AIRCRAFT (attach to any HQ):<br />
1 Battery: 2 M15 AA Half-tracks, 2 M16 AA Half-tracks.<br />
OPTION #2:<br />
DIVISIONAL ENGINEER BATTALION:<br />
HQ: 1 HQ stand, 1 Jeep<br />
3 Coys: 3 Engineer stands, 3 Trucks.
DIVISIONAL TDs (attach to TD Bn HQ if Option 3 chosen, otherwise to any HQ):<br />
1 Coy: 3 M10, 1 M20 Scout Car, 1 Baz stand<br />
DIVISIONAL RECONNAISSANCE BATTALION (-):<br />
HQ: 1 HQ M8 AC<br />
1 Coy (cavalry troop): 2 Recon Jeep w/MG, 2 Recon M8 AC<br />
1 Coy (cavalry troop): 2 M8 HMC<br />
OPTION #3:<br />
COMBAT <strong>COMMAND</strong> "A" HEADQUARTERS:<br />
1 HQ stand, 1 Jeep, 1 Recon M5 Stuart.<br />
3rd ARMORED ARTILLERY BATTALION:<br />
HQ: 1 HQ stand, 1 FO stand, 2 jeeps<br />
1 Battery: 3 M7 HMC<br />
DIVISIONAL TD BATTALION (-):<br />
HQ: 1 HQ stand, 1 Jeep<br />
1 Coy: 3 M36, 1 M20 Scout Car, 1 Baz stand<br />
DIVISIONAL RECON (attach to Recon Bn if Option 2 chosen, otherwise to any HQ):<br />
1 Coy: 3 Recon M5 Stuarts<br />
1 Coy: 2 Recon Jeeps with MG, 2 Recon M8 AC<br />
UNITED STATES AIR FORCE:<br />
2 Fighter-Bombers with bombs<br />
OPTION #4:<br />
COMBAT <strong>COMMAND</strong> "B" HEADQUARTERS:<br />
1 HQ Platoon & Jeep.<br />
3rd ARMORED BATTALION:<br />
BATTALION HQ: 1 HQ M4 Sherman<br />
1 Coy: 1 M4A1 HTMC, 1 M4/105,<br />
2 Coys: 1 M4/76, 2 M4 Sherman<br />
1 Coy: 3 M5A1 Stuart<br />
DIVISIONAL ANTI-AIRCRAFT (attach to any HQ):<br />
1 Battery: 2 M16 AA Half-tracks, 2 M15 AA Half-tracks<br />
1943-1944 U.S. INFANTRY DIVISION<br />
QUALITY: All REGULAR<br />
BASE FORCE:<br />
1 INFANTRY REGIMENT, with:<br />
REGIMENT HQ: 1 HQ stand, 1 Jeep, 1 Recon Infantry stand<br />
1 Coy: 1 105mm howitzer, 1 truck<br />
1 Coy: 2 57mm ATG, 1 Engineer stand, 3 lt. trucks<br />
I INFANTRY BATTALION:<br />
HQ: 1 HQ stand, 1 Jeep, 1 37mm ATG*, 1 lt truck<br />
3 Coys: 3 Infantry stands, 1 MG stand<br />
1 Coy: 1 81mm Mortar, 2 MG stands, 1 Baz stand, 3 med. trucks
II INFANTRY BASTION:<br />
HQ: 1 HQ stand, 1 Jeep, 1 37mm ATG*, 1 lt. truck<br />
3 Coys: 3 Infantry stands, 1 MG stand<br />
1 Coy: 1 81mm Mortar, 2 MG stands, 1 Baz stand, 3 med. trucks<br />
FIELD ARTILLERY BATTALION:<br />
HQ: 1 HQ stand, 1 FO stand, 2 Jeeps<br />
1 Battery: 3 105mm howitzer, 3 trucks<br />
OPTIONS:<br />
MEETING ENGAGEMENT: Any THREE of the following may be selected.<br />
ATTACK: Any FOUR of the following may be selected.<br />
DEFEND: Any TWO of the following may be selected.<br />
OPTION #1:<br />
DIVISIONAL ENGINEER BATTALION:<br />
HQ: 1 HQ stand, 1 Jeep<br />
3 Coys: 3 Engineer stands, 2 medium trucks<br />
OPTION #2:<br />
ATTACHED TANK BATTALION (-):<br />
HQ: 1 HQ M4 Sherman<br />
HQ Coy: 1 M4A1 HTMC, 1 M8 HMC**<br />
2 Coys: 3 M4 Sherman<br />
ATTACHED ANTI-AIRCRAFT (attach to AA Bn HQ if Option 3 chosen, otherwise to any HQ):<br />
1 Battery: 2 M16 AA Half-track, 2 40mm AA gun, 2 trucks<br />
OPTION #3:<br />
ATTACHED ANTI-AIRCRAFT BATTALION (-):<br />
HQ: 1 HQ stand, 1 Jeep<br />
2 Batteries: 2 M16 AA Half-track, 2 40mm AA gun, 2 trucks<br />
MEDIUM ARTILLERY BATTALION:<br />
HQ: 1 HQ stand, 1 FO stand, 2 Jeeps<br />
1 Battery: 3 155mm howitzer, 3 heavy trucks<br />
OPTION #4:<br />
TANK BATTALION (attach to Tank Bn if Option 1 chosen, otherwise to any battalion HQ):<br />
1 Coy: 3 M4 Jumbo<br />
1 Coy: 3 M5 Stuart<br />
OPTION #5:<br />
ATTACHED TANK DESTROYER BASTION (-):***<br />
HQ: 1 HQ stand, 1 Jeep<br />
2 Coys: 3 M10, 1 M20 AC, 1 Baz stand<br />
OPTION #6:<br />
ATTACHED TDs (attach to TD Bn if Option 5 chosen, otherwise to any HQ):<br />
1 Coy: 3 M10, 1 M20 AC, 1 Baz stand<br />
1 Coy: 4 Jeeps w/MG, 2 M8 AC
FIELD ARTILLERY BATTALION:<br />
HQ: 1 HQ stand, 1 FO stand, 2 Jeeps<br />
1 Battery: 3 105mm howitzer, 3 trucks<br />
NOTES:<br />
* by 1944 the 37mm ATG had been replaced with 57mm guns.<br />
** by 1944 the M8 HMC in tank battalions had been replaced with the M4(105)<br />
*** some infantry divisions are equipped with towed 3-inch guns instead of the M10<br />
1942-43 U.S. HEAVY ARMORED DIVISION (N. Africa/Tunisia, 1 st and 2 nd Armored Divs)*<br />
QUALITY: GREEN<br />
BASE FORCE:<br />
ARMORED REGIMENT:<br />
REGIMENTAL HQ: 1 HQ stand, 1 jeep<br />
1 Coy: 4 recon jeeps w/MG, 2 recon M8 ACs, 1 T30 HMC<br />
1 LIGHT BATTALION HQ: 1 HQ M3 lt. tank<br />
1 Coy: 1 recon jeep w/MG, 1 M4 HTMC, 1 T30 HMC<br />
3 Coys: 3 M3 lt. tanks<br />
2 MEDIUM BATTALIONS: 1 HQ M4(75)<br />
1 Coy: 1 recon jeep w/MG, 1 M4 HTMC, 1 T30 HMC<br />
3 Coys: 3 M4(75)<br />
ARMORED INFANTRY REGIMENT:<br />
REGIMENTAL HQ: 1 HQ stand, 1 jeep<br />
2 ARMORED INFANTRY BATTALIONS: 1 HQ stand, 1 jeep<br />
1 Coy: 1 recon jeep w/MG, 1 M4 HTMC, 1 MG stand, 1 halftrack, 1 T30<br />
3 Coys: 2 Infantry stands, 1 37mm ATG, 3 halftracks<br />
2 ARMORED FIELD ARTILLERY BATTALIONS, each with:<br />
HQ: 1 HQ stand, 1 FOO, 2 jeeps<br />
Battery: 3 T19 HMC<br />
OPTION:<br />
MEETING ENGAGEMENT: Any TWO of the following options may be selected<br />
ATTACK: Any THREE of the following options may be selected<br />
DEFEND: Any ONE of the following options may be selected<br />
OPTION #1:<br />
ARMORED INFANTRY BATTALION:<br />
HQ: 1 HQ stand, 1 jeep<br />
1 Coy: 1 recon jeep w/MG, 1 M4 HTMC, 1 MG stand, 1 halftrack, 1 T30 HMC<br />
3 Coys: 2 Infantry stands, 1 37mm ATG, 3 halftracks<br />
DIVISIONAL TDs (attach to TD Battalion if Option 2 chosen, otherwise to any HQ):<br />
1 Coy: 1 recon jeep w/MG, 2 M3 GMC, 1 M15 MGMC<br />
DIVISIONAL RECON (attach to Recon Battalion if Option 3 chosen, otherwise to any HQ):<br />
1 Coy: 4 recon jeeps w/MG, 2 recon M3 scout cars
OPTION #2:<br />
TANK DESTROYER BATTALION(-):<br />
HQ: 1 HQ stand, 1jeep<br />
2 Coys: 1 recon jeep w/MG, 2 M3 GMC, 1 M15 MGMC<br />
1 Coy: 3 recon jeep w/MG, 2 recon M3 scout cars<br />
DIVISIONAL ENGINEERS (attach to Engineer Bn if Option 4 chosen, otherwise to any HQ):<br />
1 Coy: 3 Engineer stands, 1 halftrack, 1 med truck<br />
OPTION #3:<br />
RECON BATTALION(-):<br />
HQ: 1 HQ M3 scout car<br />
2 Coys: 4 recon jeeps w/MG, 2 recon M3 scout cars<br />
1 Coy: 3 M3 lt. tanks<br />
ARMORED FIELD ARTILLERY BASTION:<br />
HQ: 1 HQ stand, 1 FOO stand, 2 jeeps<br />
Battery: 3 T19 HMC<br />
OPTION #4:<br />
ENGINEER BATTALION(-)<br />
HQ: 1 HQ stand, 1 jeep<br />
2 Coys: 3 Engineer stands, 1 halftrack, 1 med truck<br />
U.S. AIR FORCE:<br />
2 Fighterbombers with bombs<br />
OPTION #5:<br />
MEDIUM TANK BATTALION:<br />
HQ: 1 HQ M3 medium tank<br />
1 Coy: 1 recon jeep w/MG, 1 M4 HTMC, 1 T30 HMC<br />
3 Coys: 3 M3 medium tanks<br />
NOTES:<br />
* Only Combat Command B of the 2 nd Armored Division saw combat in North Africa<br />
1943-45 US HEAVY ARMORED DIVISION*<br />
QUALITY: REGULAR<br />
ARMORED REGIMENT:<br />
HQ: 1 HQ stand, 1 jeep<br />
1 Coy: 4 recon jeeps w/MG, 2 recon M8 ACs<br />
1 LIGHT BATTALION HQ: 1 HQ M3 lt. tank**<br />
1 Coy: 1 M4 HTMC, 1 M8 HMC***<br />
3 Coys: 3 M3 lt. tanks<br />
2 MEDIUM BATTALIONS: 1 HQ M4(75)<br />
1 Coy: 1 M4 HTMC, 1 M8 HMC<br />
3 Coys: 3 M4(75)****<br />
ARMORED INFANTRY REGIMENT:<br />
HQ: 1 HQ stand 1 jeep
2 ARMORED INFANTRY BATTALIONS: 1 HQ stand, 1 jeep<br />
1 Coy: 1 recon jeep w/MG, 1 M4 HTMC, 1 MG stand, 2 halftracks, 1 57mm ATG,<br />
1 M8 HMC<br />
3 Coys: 2 Infantry stands, 1 MG stand, 3 halftracks<br />
2 ARMORED FIELD ARTILLERY BATTALIONS:<br />
HQ: 1 HQ stand, 1 FOO, 2 jeeps<br />
Battery: 3 M7 HMC*****<br />
OPTIONS:<br />
MEETING ENGAGEMENT: Any TWO of the following options may be selected<br />
ATTACK: Any THREE of the following options may be selected<br />
DEFEND: Any ONE of the following options may be selected<br />
OPTION #1:<br />
ARMORED INFANTRY BATTALION<br />
HQ: 1 HQ stand, 1 jeep<br />
1 Coy: 1 recon jeep w/MG, 1 M4 HTMC, 1 MG stand, 2 halftracks, 1 57mm ATG, 1 M8 HMC<br />
3 Coys: 2 Infantry stands, 1 MG stand, 3 halftracks<br />
DIVISIONAL AA (attach to AA Battalion if Option 5 chosen, otherwise to any HQ):<br />
1 Battery: 2 M16 MGMC, 2 M15 MGMC<br />
OPTION #2:<br />
TANK DESTROYER BATTALION(-)<br />
HQ: 1 HQ stand, 1 jeep<br />
2 Coys: 1 M20 AC, 1 BAZ stand, 1 recon jeep w/MG, 3 M10******<br />
1 Coy: 3 recon jeeps w/MG, 2 recon M8 ACs<br />
DIVISIONAL ENGINEERS (attach to Engineer Bn if Option 3 chosen, otherwise to any HQ):<br />
1 Coy: 3 Engineer stands, 1 halftrack, 1 med. truck<br />
OPTION #3:<br />
ENGINEER BATTALION(-)<br />
HQ: 1 HQ stand, 1 jeep<br />
2 Coys: 3 Engineer stands, 1 halftrack, 1 med. truck<br />
DIVISIONAL RECON (attach to Recon Battalion if Option 4 chosen, otherwise to any HQ):<br />
1 Coy: 4 recon jeeps w/MG, 2 recon M8 ACs<br />
OPTION #4:<br />
RECON BATTALION(-)<br />
HQ: 1 HQ M8 AC<br />
2 Coys: 4 recon jeeps w/MG, 2 recon M8 ACs<br />
1 Coy: 3 M3 lt tanks<br />
ARMORED FIELD ARTILLERY BATTALION:<br />
HQ: 1 HQ stand, 1 FOO, 2 jeeps<br />
Battery: 3 M7 HMC
OPTION #5:<br />
ANTI-AIRCRAFT BATTALION(-)<br />
HQ: 1 HQ stand, 1 jeep<br />
3 Batteries: 2 M15 MGMC, 2 M16 MGMC<br />
DIVISIONAL TDs (attach to TD Battalion if Option 2 chosen, otherwise to any HQ):<br />
1 Coy: 1 M20 AC, 1 BAZ stand, 1 recon jeep w/MG, 3 M10<br />
U.S. AIR FORCE:<br />
3 Fighterbombers with bombs<br />
OPTION #6:<br />
MEDIUM TANK BATTALION:<br />
HQ: 1 HQ M4(75)<br />
1 Coy: 1 M4 HTMC, 1 M8 HMC<br />
3 Coys: 3 M4(75)<br />
NOTES:<br />
* In July of 1944 the 1 st Armored Division reorganized into a Light Armored Division. The 2 nd and 3 rd Armored<br />
Divisions were the only other heavy divisions; they maintained this TO&E until the end of the war. The 1 st<br />
Armored Division was the only U.S. Armored Division to fight in Italy. Both the 1 st and 2 nd Armored Divisions<br />
fought in Sicily.<br />
** By 1944, all M3 lt tanks are replaced with M5 lt tanks<br />
*** In Sicily, all M8 HMCs should be T30 HMCs. Through the rest of 1943 in Italy (i.e. for the 1 st Armored<br />
Division), M8 HMCs gradually replaced the T30 HMCs. In 1944, all Medium Tank Battalions should replace the<br />
M8 HMC with the M4(105).<br />
**** By Fall of 1944, a medium tank company should be 2 M4(75) and 1 M4(76)<br />
***** In 1943 the M7 HMC should be T19 HMCs<br />
****** By Fall of 1944, M10s may be replaced with M18 or M36<br />
1942-1943 U.S. INFANTRY DIVISION<br />
QUALITY: GREEN in TUNISIA, REGULAR AFTERWARDS<br />
BASE FORCE:<br />
1 INFANTRY REGIMENT, with:<br />
HQ: 1 HQ stand, 1 jeep, 1 recon infantry stand<br />
1 Coy: 1 T30 HMC<br />
1 Coy: 2 37mm ATG, 1 Engineer stand, 3 lt. trucks<br />
I BATTALION and II BATTALION<br />
HQ: 1 HQ stand, 1 jeeps<br />
1 Coy: 1 37mm ATG, 1 lt truck<br />
3 Coys: 3 Infantry stands, 1 MG stand<br />
1 Coy: 1 81mm MTR, 2 MG stands, 1 BAZ stand, 3 med trucks<br />
2 FIELD ARTILLERY BATTALIONS, each with:<br />
HQ: 1 HQ stand, 1 FOO, 2 jeeps
BATTERY: 3 105mm Hwz, 3 med trucks<br />
OPTIONS:<br />
MEETING ENGAGEMENT: Any TWO of the following options may be selected<br />
ATTACK: Any THREE of the following options may be selected<br />
DEFEND: Any ONE of the following options may be selected<br />
OPTION #1:<br />
ENGINEER BATTALION(-):<br />
HQ: 1 HQ stand, 1 jeep<br />
2 Coys: 3 Engineer stands, 2 med. trucks<br />
DIVISIONAL TD (attach to TD battalion if Option 2 chosen, otherwise to any HQ):<br />
1 Coy: 1 recon jeep w/MG, 1 M15 MGMC, 2 M3 GMC<br />
OPTION #2:<br />
TANK DESTROYER BATTALION(-):<br />
HQ: 1 HQ stand, 1 jeep<br />
2 Coys: 1 recon jeep, w/MG, 1 M15 MGMC, 2 M3 GMC<br />
DIVISIONAL ENGINEERS (attach to Engineer Bn if Option 1 chosen, otherwise to any HQ):<br />
1 Coy: 3 Engineer stands, 2 med. trucks<br />
OPTION #3:<br />
MEDIUM FIELD ARTILLERY BATTALION:<br />
HQ: 1 HQ stand, 1 FOO, 2 jeeps<br />
BATTERY: 3 155mm Howitzers, 3 hvy trucks<br />
OPTION #4:<br />
RECON TROOP:<br />
HQ: 1 HQ jeep w/MG<br />
Coy: 3 recon jeep w/MG, 2 M3A1 Scout Cars<br />
INFANTRY WEAPONS COY (attach to III Battalion if Option 5 chosen, otherwise to any HQ):<br />
Coy: 1 81mm MTR, 2 MG stands, 1 BAZ stand, 3 med. trucks<br />
OPTION #5:<br />
III INFANTRY BATTALION(-):<br />
HQ: 1 HQ stand, 1 jeep<br />
Coy: 1 37mm ATG, 1 lt. truck<br />
3 Coys: 3 Infantry stands, 1 MG stand
SAMPLE GERMAN ORGANIZATIONS<br />
1944 S.S. PANZER DIVISION<br />
QUALITY: VETERAN; some divisions may be ELITE<br />
BASE FORCE:<br />
PANZER REGIMENT, with:<br />
OPTIONS:<br />
REGIMENTAL HQ COMPANY: 1 HQ Panther, 1 Recon Pzkpfw IVH, 1 Ostwind*.<br />
I PANZER BATTALION: 1 HQ Panther<br />
1 Coy: 1 Engineer stand, 1 SdKfz 251/1, 1 Wirbelwind<br />
2 Coys: 3 Panthers<br />
II PANZER BATTALION: 1 HQ Pzkpfw IVH<br />
1 Coy: 1 Engineer stand, 1 SdKfz 251/1, 1 Wirbelwind,<br />
2 Coys: 3 Pzkpfw IVH<br />
I GEPANZERT PzGr BATTALION:<br />
BATTALION HQ: 1 HQ stand & Sdkfz 250/1<br />
2 Coys: 2 Rifle stands, 2 Sdkfz 251/1, 1 MG stand, 1 SdKfz 251/10<br />
1 Coy: 3 Rifle stands, 3 SdKfz 251/1, 1 MG stand, 1 SdKfz 251/10<br />
1 Coy: 2 Sdkfz 251/2, 2 Sdkfz 251/9<br />
I PANZER ARTILLERY BATTALION:<br />
HQ: 1 HQ stand, 1 FOO, 2 Kubelwagen<br />
1 Battery: 1 Hummel, 3 Wespe<br />
MEETING ENGAGEMENT: Any TWO of the following options may be selected<br />
ATTACK: Any THREE of the following options may be selected.<br />
DEFEND: ONE option may be selected.<br />
OPTION #1:<br />
PzGr AT Coy: (attach to PzGr Reg if Option 2 chosen, otherwise to I or II Gep PzGr Bn)<br />
3 75mm ATG, 3 RSO<br />
II GEPANZERT PzGr BATTALION (-):<br />
BATTALION HQ: 1 HQ Platoon & Sdkfz 251/1.<br />
2 Coys: 3 Rifle stands, 3 Sdkfz 251/1, 1 MG stand, 1 SdKfz 251/10<br />
1 Coy: 1 Sdkfz 251/9, 1 120mm Mortar, 1 Sdkfz 251/1.<br />
DIVISIONAL FLAK BATTALION (-)<br />
BATTALION HQ: 1 HQ stand, 1 Kubelwagen<br />
1st BATTERY: 1 88mm Flak, 1 20mm FlaK, 1 Sdkfz 7, 1 lt. truck<br />
3rd BATTERY: 2 SdKfz 7/1<br />
OPTION #2:<br />
GEPANZERT PzGr REGIMENT:<br />
HQ: 1 HQ Stand, 1 Sdkfz 251/1, 1 FOO, 1 Recon Rifle stand, 2 Sdkfz 250/1<br />
1 Coy: 2 sIG33 ausf 38(t)<br />
PANZERJAGER BATTALION (-)<br />
HQ: 1 JgPz IV/70
OPTION #3:<br />
2 Coys: 3 JgPz IV/70<br />
RECON BATTALION (-):<br />
HQ: 1 SdKfz 266 (8rad command AC)<br />
1 Coy: 2 Sdkfz 234/1, 1 Sdkfz 234/2, 1 Sdkfz 234/3<br />
1 Coy: 2 Recon Rifle stands, 2 SdKfz 250/1<br />
PANZERJAGER COY (attach to PzJg Bn if Option 2 chosen, otherwise to any HQ):<br />
1 Coy: 2 JgPz IV/70<br />
DIVISIONAL HQ DEFENSE GROUP (attach to any battalion or regiment HQ):<br />
1 Coy: 1 SdKfz 7/1<br />
OPTION #4:<br />
ENGINEER BATTALION (-)<br />
HQ: 1 HQ stand, 1 Kubelwagen<br />
2 Coys: 3 Engineer stands, 3 SdKfz 251/1<br />
1 Coy: 2 Engineer stands, 1 MG stand, 1 81mm MTR, 2 SdKfz 251/1, 1 truck<br />
DIVISIONAL AA (attach to FlaK Bn if Option 1 chosen, otherwise to any HQ):<br />
1 Battery: 1 8.8cm FlaK, 1 20mm FlaK, 1 SdKfz 7, 1 lt. truck<br />
OPTION #5:<br />
Gp PzGr ENGINEERS (attach to Eng Bn if Option 4 chosen, otherwise to any HQ)<br />
1 Coy: 2 Engineer stands, 2 Sdkfz 251/1.<br />
III SCHUTZEN PzGr BATTALION:<br />
HQ: 1 HQ stand, 1 Kubelwagen<br />
2 Coys: 2 Rifle stands, 1 MG stand, 1 Med Truck, 1 lt. Truck<br />
1 Coy: 3 Rifle stands, 1 MG stand, 2 Med Trucks<br />
1 Coy: 1 120mm Mortar, 1 Truck.<br />
CORPS SUPPORTS (attach to any regiment or battalion HQ):<br />
1st HEAVY TANK COMPANY: 2 Tiger I.<br />
OPTION #6:<br />
DIVISIONAL RECON (attach to Recon Bn if option 3 chosen, otherwise to any HQ)<br />
1 Coy: 2 Rifle recon stands, 2 Sdkfz 250/1.<br />
1 Coy: 1 Engineer stand, 1 Sdkfz 251/1, 1 Sdkfz 250/8<br />
CORPS SUPPORTS:<br />
VOLKS WERFER BRIGADE (Morale Green):<br />
I and II Battalion, each with:<br />
Battalion HQ: 1 HQ stand, 1 FOO, 2 Kubelwagens<br />
1 Battery: 3 15cm Nebelwerfers, 3 Trucks<br />
LUFTWAFFE: 2 Fighter-Bombers with bombs<br />
NOTES:<br />
* Any of these flak vehicles may be downgraded, if desired, to any type below them on the following list;<br />
Wirbelwind (Quad 20mm), Ostwind (37mm), SdKfz 7/1, Mobelwagon (20mm), SdKfz 6/2, SdKfz 10/4.
1944 WEHRMACHT PANZER DIVISION<br />
QUALITY: All REGULAR.<br />
BASE FORCE:<br />
PANZER REGIMENT, with:<br />
REGIMENTAL HQ: 1 HQ PzKw IVH, 1 SdKfz 7/1*, 1 Engineer stand, Sdkfz 251/1.<br />
I BATTALION: 1 HQ Panther, 1 Recon PzKw IIF**, 1 Wirbelwind*.<br />
1 Coy: 3 Panther<br />
2 Coy: 2 Panther<br />
II BATTALION: 1 HQ PzKw IVH, 1 Recon PzKw IIF**, 1 Wirbelwind*.<br />
2 Coys: 3 PzKw IVH<br />
PANZER GRENADIER REGIMENT, with:<br />
OPTIONS:<br />
REGIMENTAL HQ: 1 HQ stand, 1 Sdkfz 251/1, 1 Recon SMG M/cycle stand<br />
1 Coy: 1 sIG 33 ausf 38(t).<br />
1 Coy: 2 Engineer stands, 2 Sdkfz 251/1.<br />
I PANZER GRENADIER BATTALION:<br />
BATTALION HQ: 1 HQ stand & Sdkfz 251/1.<br />
1 Coy: 3 Rifle stands, 1 MG stand, 3 Sdkfz 251/1, 1 SdKfz 251/10<br />
1 Coy: 3 Rifle stands, 1 MG stand, 2 Med. Trucks<br />
1 Coy: 2 Rifle stands, 1 MG stand, 1 Med. Truck, 1 Lt. Truck<br />
1 Coy: 1 Sdkfz 251/9, 1 120mm Mortar, 1 Truck, 1 SdKfz 10/4.<br />
I ARTILLERY BATTALION:<br />
HQ: 1 HQ stand, 1 FOO, 2 Kubelwagen<br />
1 Battery: 3 leFH18 (105mm), 3 Trucks.<br />
MEETING ENGAGEMENT: Any TWO of the following options may be chosen<br />
ATTACK: Any THREE of the following options may be chosen<br />
DEFEND: ONE option may be chosen.<br />
OPTION #1:<br />
DIVISIONAL ENGINEER BATTALION (-):<br />
HQ: 1 HQ Stand & Sdkfz 251/1, 1 Recon Sdkfz 222.<br />
1 Coy: 2 Engineer stands, 2 Sdkfz 251/1.<br />
2 Coys: 3 Engineer Stands, 3 Med. Trucks.<br />
OPTION #2:<br />
II ARTILLERY BATTALION:<br />
HQ: 1 HQ stand, 1 FOO, 2 Kubelwagens<br />
3 sFH18 or sFH36 (150mm), 3 Trucks.<br />
DIVISIONAL FLAK BATTALION(-):<br />
HQ: 1 HQ stand, 1 Kubelwagen<br />
1 FLAK BATTERY: 1 88mm Flak & Sdkfz 7<br />
1 FLAK BATTERY: 2 SdKfz 7/1<br />
OPTION #3:<br />
DIVISIONAL RECON BATTALION (-):
HQ: 1 Sdkfz 266 (8rad command)<br />
1 Coy: 2 Sdkfz 234/1, 1 Sdkfz 234/3, 1 Recon Inf stand & Sdkfz 250/1<br />
1 Coy: 2 Rifle stands, 2 Lt. Trucks<br />
DIVISIONAL PANZERJAGER (attach to PzJgr Bn if Option 4 chosen, otherwise to any HQ):<br />
1 Coy: 2 StuG IIIG<br />
OPTION #4:<br />
DIVISIONAL PANZERJAGER BATTALION (-):<br />
HQ: 1 HQ StuG IIIG<br />
1 Coy: 3 Stug IIIG<br />
1 Coy: 3 PaK 40 ATG, 3 trucks<br />
OPTION #5:<br />
DIVISIONAL RECON (attach to Recon Bn if Option 3 chosen, otherwise to any HQ):<br />
1 Coy: 3 Sdkfz 250/9<br />
1 Coy: 1 Sdkfz 250/7, 1 Marder II<br />
DIVISIONAL AA (attach to AA Bn is Option 2 chosen, otherwise to any HQ):<br />
1 Battery: 1 8.8cm FlaK, 1 tractor<br />
1 Battery: 1 2cm FlaK, 1 Lt. truck<br />
LUFTWAFFE: 1 Divebomber with bombs<br />
OPTION #6:<br />
II PANZER GRENADIER BATTALION:<br />
BATTALION HQ: 1 HQ stand,1 Kubelwagen<br />
2 Coys: 2 Rifle stands, 1 MG stand, 1 Med Truck, 1 Lt. Truck<br />
1 Coy: 3 Rifle stands, 1 MG stand, 2 Med Trucks<br />
1 Coy: 1 Pak 40 ATG, 1 81mm Mortar, 2 Trucks, 1 SdKfz 10/4<br />
DIVISIONAL RECON (attach to Recon Bn if Option 3 chosen, otherwise to any HQ):<br />
1 Coy: 3 Rifle recon stands, 3 Sdkfz 250/1.<br />
III ARTILLERY BATTALION:<br />
HQ: 1 HQ stand, 1 FOO, 2 Kubelwagens<br />
1 Battery: 2 Wespe, 1 Hummel<br />
NOTES:<br />
* Any of these flak vehicles may be downgraded, if desired, to any type below them on the following list;<br />
Wirbelwind, Ostwind, SdKfz 7/1, Mobelwagon, SdKfz 6/1, SdKfz 10/4.<br />
** These can be either Pz IIF, or late war vehicles such as the VK 601 (Pz.IC) or Pz IIL "Luchs".<br />
1944 WEHRMACHT INFANTRY DIVISION<br />
QUALITY: REGULAR or VETERAN<br />
1 INFANTRY REGIMENT, with<br />
INFANTRY REGIMENT HQ: 1 HQ stand, 1 kubelwagen, 2 recon b/c SMG stands<br />
1 Coy: 2 75mm Inf Guns, 2 lt. trucks<br />
1 Coy: 1 50mm ATG, 4 RkPzB stands, 1 RSO, 2 Med. Trucks
OPTIONS:<br />
I INFANTRY BATTALION<br />
HQ: 1 HQ stand, 1 car<br />
2 Coys: 3 Infantry stands, 1 MG stand<br />
1 Coy: 2 Infantry stands, 1 MG stand<br />
1 Coy: 1 MG stand, 1 8cm MTR, 1 12cm MTR, 1 truck<br />
II INFANTRY BATTALION<br />
HQ: 1 HQ stand, 1 car<br />
2 Coys: 2 Infantry stands, 1 MG stand<br />
1 Coy: 3 Infantry stands, 1 MG stand<br />
1 Coy: 1 MG stand, 1 8cm MTR, 1 12cm MTR, 1 truck<br />
I ARTILLERY BATTALION<br />
HQ: 1 HQ stand, 1 FOO, 2 Kubelwagens<br />
1 Battery: 3 leFH18 (105mm), 3 tractors<br />
MEETING ENGAGEMENT: Any TWO of the following may be chosen<br />
ATTACK: Any THREE of the following options may be chosen<br />
DEFEND: ONE of the following options may be chosen<br />
OPTION 1:<br />
ENGINEER BATTALION<br />
HQ: 1 HQ stand, 1 8cm MTR<br />
1 Coy: 2 Engineer stands<br />
2 Coys: 3 Engineer stands<br />
OPTION 2:<br />
II ARTILLERY BATTALION<br />
HQ: 1 HQ stand, 1 FOO, 2 Kubelwagens<br />
Battery: 3 leFH18 (105mm), 3 tractors<br />
III INFANTRY BATTALION<br />
HQ: 1 HQ stand, 1 car<br />
2 Coys: 2 Infantry stands, 1 MG stand<br />
1 Coy: 3 Infantry stands, 1 MG stand<br />
1 Coy: 1 MG stand, 1 8cm MTR, 1 12cm MTR, 1 truck<br />
OPTION 3:<br />
FUSILIER BATTALION (-)<br />
HQ: 1 HQ stand<br />
1 Coy: 3 Motorcycle Infantry Stands, 1 Motorcycle MG stand<br />
2 Coys: 3 Recon Infantry Stands, 1 MG stand<br />
1 Coy: 1 MG stand, 1 8cm MTR, 1 12cm MTR, 1 Med Truck<br />
DIVISIONAL ANTI-TANK (attach to AT Battalion if Option 5 chosen, otherwise to any HQ)<br />
1 Coy: 2 75mm ATG, 2 RSO<br />
OPTION 4:<br />
IV ARTILLERY BATTALION<br />
HQ: 1 HQ stand, 1 FOO, 2 Kubelwagens<br />
Battery: 3 sFH18 (150mm), 3 tractors
DIVISIONAL FUSILIERS (attach to Fusilier Battalion if Option 3 chosen, otherwise to any HQ)<br />
1 Coy: 3 Recon Infantry Stands, 1 MG stand<br />
OPTION 5:<br />
ANTI-TANK BATTALION(-)<br />
HQ: 1 HQ stand, 1 car<br />
1 Coy: 3 StuG IIIG<br />
1 Coy: 2 SdKfz 10/4<br />
1944 WEHRMACHT PANZERGRENADIER DIVISION<br />
QUALITY: VETERAN or REGULAR<br />
1 PANZERGRENADIER REGIMENTS, with:<br />
OPTIONS:<br />
REGIMENTAL HQ: 1 HQ stand, 1 car, 1 recon SMG m/c stand, 1 75mm ATG, 1 truck<br />
1 Coy: 1 sIG33 ausf Pz38(t)<br />
1 Coy: 3 RkPzB stands, 3 lt. trucks<br />
1 Coy: 2 20mm AA guns, 2 lt. trucks<br />
I BATTALION<br />
HQ: 1 HQ stand, 1 car<br />
2 Coys: 3 Infantry stands, 1 MG stand, 2 med. trucks<br />
1 Coy: 2 Infantry stands, 1 MG stand, 2 med. trucks<br />
1 Coy: 1 12cm MTR, 1 75mm ATG, 2 trucks<br />
II BATTALION<br />
HQ 1 HQ stand, 1 car<br />
2 Coys: 2 Infantry stands, 1 MG stand, 2 med. trucks<br />
1 Coy: 3 Infantry stands, 1 MG stand, 2 med. trucks<br />
1 Coy: 1 12cm MTR, 1 75mm ATG, 2 trucks<br />
I PANZER ARTILLERY BATTALION<br />
HQ: 1 HQ stand, 1 FOO stand, 2 SdKfz 250/1<br />
Battery: 2 Wespe, 1 Hummel<br />
MEETING ENGAGEMENT: Any TWO of the following options may be selected<br />
ATTACK: Any THREE of the following options may be selected<br />
DEFEND: Any ONE of the following options may be selected<br />
OPTION 1:<br />
PANZER BATTALION<br />
HQ: 1 HQ StuG IIIG<br />
3 Coys: 2 StuG IIIG<br />
OPTION 2:<br />
II ARTILLERY BATTALION<br />
HQ: 1 HQ stand, 1 FOO, 2 Kubelwagens<br />
Battery: 3 leFH18 (105mm), 3 tractors<br />
DIVISIONAL AA (attach to AA Battalion if Option 3 chosen, otherwise to any HQ)<br />
1 Battery: 3 SdKfz 7/1
III BATTALION<br />
HQ 1 HQ stand, 1 car<br />
2 Coys: 2 Infantry stands, 1 MG stand, 2 med. trucks<br />
1 Coy: 3 Infantry stands, 1 MG stand, 2 med. trucks<br />
1 Coy: 1 12cm MTR, 1 75mm ATG, 2 trucks<br />
OPTION 3:<br />
ANTI-AIRCRAFT BATTALION (-)<br />
HQ: 1 HQ stand, 1 car<br />
2 Batteries: 1 8.8cm FlaK 36, 1 hvy tractor<br />
DIVISIONAL RECON (attach to Recon Battalion if Option 4 chosen, otherwise to any HQ)<br />
1 Coy: 3 Infantry Stands, 1 MG stand, 3 SdKfz 251/1, 1 SdKfz 251/10<br />
OPTION 4:<br />
RECON BATTALION (-)<br />
HQ: 1 HQ SdKfz 234/1<br />
1 Coy: 2 recon SdKfz 234/2, 2 recon SdKfz 234/3<br />
1 Coy: 3 Recon Infantry stands, 1 MG stand, 3 SdKfz 250/1, 1 SdKfz 250/10*<br />
1 Coy: 1 Engineer stand, 1 SdKfz 251/1, 1 SdKfz 251/9*, 1 SdKfz 251/2*<br />
DIVISIONAL ANTI-TANK (attach to AT Battalion if Option 5 chosen, otherwise to any HQ)<br />
1 Coy: 2 75mm ATG, 2 RSOs<br />
OPTION 5:<br />
ANTI-TANK BATTALION (-)<br />
HQ: 1 HQ Marder II or III**<br />
1 Coy: 2 Marder II or III<br />
1 Coy: 3 Marder II or III<br />
OPTION 6:<br />
III ARTILLERY BATTALION<br />
HQ: 1 HQ stand, 1 FOO, 2 Kubelwagens<br />
Battery: 3 sFH18 (150mm), 3 hvy tractors<br />
DIVISIONAL ENGINEERS (attach to Eng Battalion if Option 7 chosen, otherwise to any HQ)<br />
1 Coy: 2 Engineer stands, 2 lt. trucks<br />
OPTION 7:<br />
ENGINEER BATTALION (-)<br />
HQ: 1 HQ stand, 1 Kubelwagen<br />
3 Coys: 3 Engineer stands, 1 MG stand, 2 Med. Trucks.<br />
NOTES:<br />
* In the Recon Battalion, a SdKfz 251/10 may be substituted for the SdKfz 250/10. A SdKfz 250/8 and a SdKfz<br />
250/7 may be substituted for the SdKfz 251/9 and SdKfz 251/2 respectively.<br />
** In the Anti-Tank Battalion, all vehicles must be the same type.
1944 VOLKSGRENADIER DIVISION<br />
QUALITY: REGULAR or GREEN<br />
1 BICYCLE GRENADIER REGIMENT, with:<br />
REGIMENTAL HQ: 1 HQ stand, 1 Kubelwagen, 1 recon b/c SMG stand<br />
1 Coy: 1 7.5cm leIG, 1 15cm sIG, 2 limbers<br />
1 Coy: 6 RkPzB stands<br />
I BICYCLE BATTALION<br />
HQ: 1 b/c HQ stand<br />
2 Coys: 3 b/c Infantry stands<br />
1 Coy: 2 b/c Infantry stand<br />
1 Coy: 2 b/c MG stands, 1 8cm MTR, 1 7.5cm leIG, 2 limbers<br />
II BATTALION<br />
HQ: 1 HQ stand<br />
2 Coys: 3 SMG stands<br />
1 Coy: 2 SMG stands<br />
1 Coy: 2 MG stands, 1 8cm MTR, 1 7.5cm leIG, 1 limber<br />
1 INFANTRY REGIMENT, with:<br />
OPTIONS:<br />
REGIMENTAL HQ: 1 HQ stand, 1 Kubelwagen, 1 recon b/c SMG stand<br />
1 Coy: 1 7.5cm leIG, 1 15cm sIG, 2 limbers<br />
I BATTALION<br />
HQ: 1 HQ stand<br />
2 Coys: 2 SMG stands, 1 Rifle stand<br />
1 Coy: 1 SMG stand, 1 Rifle stand<br />
1 Coy: 2 MG stands, 1 8cm MTR, 1 7.5cm leIG, 1 limber<br />
II BATTALION<br />
HQ: 1 HQ stand<br />
2 Coy: 1 SMG stand, 1 Rifle stand<br />
1 Coy: 2 SMG stands, 1 Rifle stand<br />
1 Coy: 2 MG stands, 1 8cm MTR, 1 7.5cm leIG, 1 limber<br />
I ARTILLERY BATTALION<br />
HQ: 1 HQ stand, 1 FOO, 2 cars<br />
Battery: 2 leFH18 (105mm), 2 limbers<br />
MEETING ENGAGEMENT: Any TWO of the following options may be selected<br />
ATTACK: Any THREE of the following options may be selected<br />
DEFEND: Any ONE of the following options may be selected<br />
OPTION 1:<br />
ENGINEER BATTALION<br />
HQ: 1 b/c HQ stand<br />
2 Coys: 3 b/c Engineer stands, 1 b/c MG stand<br />
OPTION 2:<br />
II ARTILLERY BATTALION<br />
HQ: 1 HQ stand, 1 FOO, 2 cars<br />
Battery: 2 leFH18 (105mm), 2 limbers
DIVISIONAL FUSILIERS (attach to any HQ)<br />
1 Coy: 2 recon b/c SMG stands, 1 b/c MG stand<br />
OPTION 3:<br />
DIVISIONAL ANTI-TANK (attach to AT Battalion if Option 4 chosen, otherwise to any HQ)<br />
1 Coy: 2 75mm ATG, 2 RSOs<br />
REGIMENTAL ANTI-TANK (attach to Infantry Regiment)<br />
1 Coy: 6 RkPzB stands<br />
OPTION 4:<br />
ANTI-TANK BATTALION (-)<br />
HQ: 1 HQ stand, 1 Kubelwagen<br />
2 Coys: 3 StuG IIIG*<br />
OPTION 5:<br />
IV ARTILLERY BATTALION<br />
HQ: 1 HQ stand, 1 FOO, 2 cars<br />
Battery: 2 sFH18 (150mm), 2 limbers<br />
NOTES:<br />
* In the Anti-Tank Battalion, the StuG IIIGs may be replaced with Hetzers to represent divisions organized in Fall<br />
of 1944.<br />
1943 WEHRMACHT INFANTRY DIVISION<br />
QUALITY: VETERAN or REGULAR<br />
1 GRENADIER REGIMENT, with:<br />
REGIMENTAL HQ: 1 HQ stand, 1 kubelwagen, 1 recon m/cycle SMG stand<br />
1 Coy: 1 75mm ATG, 1 50mm ATG, 2 limbers<br />
1 Coy: 1 7.5cm lIG, 1 15cm sIG, 2 limbers<br />
I BATTALION<br />
HQ: 1 HQ stand<br />
2 Coys: 3 Infantry stands<br />
1 Coy: 2 Infantry stands<br />
1 Coy: 3 MG stands, 1 8cm MTR, 1 sPzB 41 ATR<br />
II BATTALION<br />
HQ: 1 HQ stand<br />
2 Coys: 2 Infantry stands<br />
1 Coy: 3 Infantry stands<br />
1 Coy: 3 MG stands, 1 8cm MTR, 1 sPzB 41 ATR<br />
1 ARTILLERY BATTALION:<br />
HQ: 1 HQ stand, 1 FOO, 2 kubelwagens<br />
Battery: 3 leFH18 (105mm) Howitzers, 3 limbers<br />
OPTIONS:<br />
MEETING ENGAGEMENT: Any TWO of the following options may be selected<br />
ATTACK: Any THREE of the following options may be selected<br />
DEFEND: Any ONE of the following options may be selected
OPTION 1:<br />
ENGINEER BATTALION:<br />
HQ: 1 HQ stand, 1 KUBELWAGEN<br />
1 Coy: 3 Engineer stands, 1 MG stand, 1 8cm MTR, 3 medium trucks<br />
2 Coys: 3 Engineer stands<br />
DIVISIONAL RECON (attach to Recon Battalion if Option 3 chosen, otherwise to any HQ).<br />
1 Coy: 3 Recon Infantry m/cycle stands, 1 MG m/cycle stand<br />
OPTION 2:<br />
ARTILLERY BATTALION:<br />
HQ: 1 HQ stand, 1 FOO, 2 kubelwagens<br />
Battery: 3 leFH18 (105mm) Howitzers, 3 limbers<br />
III GRENADIER BATTALION:<br />
HQ: 1 HQ stand<br />
2 Coys: 2 Infantry stands<br />
1 Coy: 3 Infantry stands<br />
1 Coy: 3 MG stands, 1 8cm MTR, 1 sPzB 41 ATR<br />
OPTION 3:<br />
RECON BATTALION (-)<br />
HQ: 1 HQ stand, 1 kubelwagen<br />
1 Coy: 3 Recon Infantry m/cycle stands, 1 MG m/cycle stand<br />
1 Coy: 1 Engineer stand, 1 sPzB ATR, 1 7.5cm lIG, 1 50mm ATG, 4 lt. trucks<br />
OPTION 4:<br />
ARTILLERY BATTALION:<br />
HQ: 1 HQ stand, 1 FOO, 2 kubelwagens<br />
Battery: 3 sFH18 (150mm) Howitzers, 3 limbers<br />
DIVISIONAL ANTITANK (attach to AT Battalion if Option 5 chosen, otherwise to any HQ):<br />
1 Coy: 3 SdKfz 10/4<br />
OPTION 5:<br />
ANTITANK BATTALION (-):<br />
HQ: 1 HQ stand, 1 kubelwagen<br />
1 Coy: 3 Marder III*<br />
1 Coy: 3 75mm ATG, 3 med. trucks<br />
NOTES:<br />
* In the Antitank Battalion, the Marder IIIs may be replaced with Marder IIs.<br />
1943 WEHRMACHT PANZERGRENADIER DIVISION<br />
QUALITY: REGULAR or VETERAN<br />
1 PANZERGRENADIER REGIMENTS, with:<br />
REGIMENTAL HQ: 1 HQ stand, 1 kubelwagen<br />
1 Coy: 1 Recon SMG m/cycle stand, 1 75mm ATG, 1 med. truck
1 Coy: 1 7.5cm lIG, 1 15cm sIG, 2 med. trucks<br />
1 Coy: 3 SdKfz 10/4<br />
1 Coy: 4 Engineer stands, 2 med. trucks<br />
I BATTALION<br />
HQ: 1 HQ stand, 1 KUBELWAGEN<br />
2 Coys: 3 Infantry stands, 1 MG stand, 2 med. trucks<br />
1 Coy: 2 Infantry stands, 1 MG stand, 2 med. trucks<br />
II BATTALION<br />
HQ: 1 HQ stand, 1 kubelwagen<br />
2 Coys: 2 Infantry stands, 1 MG stand, 2 med. trucks<br />
1 Coy: 3 Infantry stands, 1 MG stand, 2 med. trucks<br />
1 ARTILLERY BATTALION:<br />
HQ: 1 HQ stand, 1 FOO, 2 kubelwagens<br />
Battery: 3 leFH18 (105mm), 3 med. trucks<br />
OPTIONS:<br />
MEETING ENGAGEMENT: Any TWO of the following Options may be selected<br />
ATTACK: Any THREE of the following Options may be selected<br />
DEFEND: Any ONE of the following Options may be selected<br />
OPTION 1:<br />
PANZER BATTALION:<br />
HQ: 1 HQ stand, 1 kubelwagen<br />
2 Coys: 3 StuG IIIG<br />
1 Coy: 2 StuG IIIG<br />
OPTION 2:<br />
ARTILLERY BATTALION:<br />
HQ: 1 HQ stand, 1 FOO, 2 kubelwagens<br />
Battery: 3 leFH18 (105mm), 3 med. trucks<br />
DIVISIONAL ENGINEERS (attach to Eng Battalion if Option 3 chosen, otherwise to any HQ):<br />
1 Coy: 3 Engineer stands, 1 MG stand, 2 med. trucks<br />
OPTION 3:<br />
ENGINEER BATTALION (-):<br />
HQ: 1 HQ stand, 1 kubelwagen<br />
2 Coys: 3 Engineer stands, 1 MG stand, 2 med. trucks<br />
1 Coy: 2 Engineer stands, 1 med. truck<br />
OPTION 4:<br />
ARTILLERY BATTALION:<br />
HQ: 1 HQ stand, 1 FOO, 2 Kubelwagens<br />
Battery: 1 10.5cm K18, 2 sFH 18 (150mm), 3 hvy tractors<br />
DIVISIONAL ANTIAIRCRAFT (attach to AA Bn if Option 5 chosen, otherwise to any HQ):<br />
1 Battery: 3 20mm AA guns, 3 lt. trucks<br />
OPTION 5:<br />
ANTIAIRCRAFT BATTALION (-)
HQ: 1 HQ stand, 1 kubelwagen<br />
2 Batteries: 1 8.8cm FlaK 36, 1 20mm AA gun, 1 hvy tractor, 1 lt. truck<br />
DIVISIONAL RECON (attach to Recon Bn if Option 6 chosen, otherwise to any HQ):<br />
1 Coy: 3 m/cycle Infantry stands, 1 m/cycle MG stand<br />
III PANZERGRENADIER BATTALION<br />
HQ: 1 HQ stand, 1 kubelwagen<br />
2 Coys: 2 Infantry stands, 1 MG stand, 2 med. trucks<br />
1 Coy: 3 Infantry stands, 1 MG stand, 2 med. trucks<br />
OPTION 6:<br />
RECON BATTALION (-)<br />
HQ: 1 SdKfz 231<br />
1 Coy: 2 SdKfz 231, 1 SdKfz 233<br />
2 Coys: 3 m/cycle Infantry stands, 1 m/cycle MG stand<br />
1 Coy: 1 7.5cm lIG, 1 75mm ATG, 1 Engineer stand, 2 md. trucks, 1 lt truck<br />
DIVISIONAL ANTITANK (attach to AT Battalion if Option 7 chosen, otherwise to any HQ):<br />
1 Coy: 2 75mm ATG, 2 med. trucks<br />
OPTION 7:<br />
ANTITANK BATTALION (-)<br />
HQ: 1 HQ stand, 1 kubelwagen<br />
2 Coy: 3 Marder II*<br />
1 Coy: 3 SdKfz 10/4<br />
NOTES:<br />
* In the Antitank Battalion, Marder IIs may be exchanged for Marder IIIs.<br />
1943 WEHRMACHT PANZER DIVISION (Until August 1943)<br />
QUALITY: VETERAN (some may be REGULAR)<br />
PANZER REGIMENT:<br />
REGIMENT HQ: 1 HQ Pz IVF2<br />
HQ Coy: 1 Recon Pz IIF<br />
I BATTALION<br />
HQ: 1 HQ Pz IVF2<br />
1 HQ Coy: 1 Recon Pz IIF, 2 Recon m/cycle SMG stands, 1 SdKfz 10/4<br />
2 Coys: 1 Pz IIF, 3 Pz IIIL<br />
1 Coy: 4 Pz IVF2<br />
II BATTALION<br />
HQ: 1 HQ Pz IVF2<br />
1 HQ Coy: 1 Recon Pz IIF, 2 Recon m/cycle SMG stands, 1 SdKfz 10/4<br />
2 Coys: 1 Pz IIF, 3 Pz IIIL<br />
1 Coy: 4 Pz IVF2<br />
I PANZERGRENADIER BATTALION<br />
HQ: 1 HQ stand, 1 SdKfz 250/1<br />
2 Coys: 3 Infantry stands, 1 MG stand, 1 SdKfz 251/10, 3 SdKfz 251/1<br />
1 Coy: 2 Infantry stands, 1 MG stand, 1 SdKfz 251/10, 2 SdKfz 251/1<br />
1 Coy: 2 SdKfz 251/9
ARTILLERY BATTALION<br />
HQ: 1 HQ stand, 1 FOO, 2 kubelwagens<br />
1 Battery: 3 Wespe, 1 Hummel<br />
OPTIONS:<br />
MEETING ENGAGEMENT: Any TWO of the following options may be chosen<br />
ATTACK: Any THREE of the following options may be chosen<br />
DEFEND: Any ONE of the following options may be chosen<br />
OPTION #1:<br />
ENGINEER BATTALION (-)<br />
BATTALION HQ: 1 HQ stand, 1 kubelwagen<br />
1 Coy: 4 Engineer stands, 2 med. trucks<br />
1 Coy: 4 Engineer stands, 4 SdKfz 251/1, 1 SdKfz 251/2<br />
DIVISIONAL ANTI-TANK (attach to AT battalion if Option 2 chosen, otherwise to any HQ):<br />
1 Coy: 3 Marder II or III*<br />
OPTION #2:<br />
ANTI-TANK BATTALION(-)<br />
BATTALION HQ: 1 HQ stand, 1 kubelwagen<br />
2 Coys: 3 Marder II or III*<br />
DIVISIONAL RECON (attach to Recon battalion if Option 3 chosen, otherwise to any HQ):<br />
1 Coy: 3 Recon Infantry stands, 1 MG stand, 1 SdKfz 251/10, 3 SdKfz 251/1<br />
OPTION #3:<br />
RECON BATTALION (-)<br />
BATTALION HQ: 1 HQ stand, kubelwagen<br />
1 Coy: 3 SdKfz 222, 2 SdKfz 231 (8rad), 1 SdKfz 233<br />
1 Coy: 2 SdFfz 250/9<br />
1 Coy: 3 Recon Infantry stands, 1 MG stand, 1 SdKfz 250/10, 3 SdKFz 250/1<br />
1 Coy: 2 Eng stands, 1 75mm ATG, 1 SdKfz 250/7, 1 SdKfz 250/8, 3 SdKfz 25/1<br />
ARTILLERY BATTALION:<br />
BATTALION HQ: 1 HQ stand, 1 FOO, 2 kubelwagens<br />
1 Battery: 3 leFH 18 (105mm), 3 tractors<br />
OPTION #4:<br />
DIVISIONAL ENGINEERS (attach to Eng bn if Option 1 chosen, otherwise to any HQ):<br />
1 Coy: 4 Engineer stands, 2 med trucks<br />
REGIMENT HQ: 1 HQ stand, 1 kubelwagen<br />
1 Coy: 3 SdKfz 10/4<br />
1 Coy: 1 sIG 33 ausf 38(t)<br />
II PANZERGRENADIER BATTALION (-)<br />
BATTALION HQ: 1 HQ stand, 1 kubelwagen<br />
1 Coy: 3 Infantry stands, 1 MG stand, 2 med trucks<br />
1 Coy: 2 Infantry stands, 1 MG stand, 2 med trucks<br />
1 Coy: 1 75mm ATG, 1 7.5cm lIG, 1 8cm MTR, 3 med trucks
OPTION #5:<br />
ARTILLERY BATTALION:<br />
BATTALION HQ: 1 HQ stand, 1 FOO, 2 kubelwagens<br />
1 Battery: 3 sFH 18 (150mm) 3 hvy tractors<br />
II PANZERGRENADIER REGIMENT (mtz):<br />
HQ: 1 HQ stand, 1 kubelwagen<br />
1 Coy: 3 SdKfz 10/4<br />
1 Coy: 1 sIG 33 ausf 38(t)<br />
DIVISIONAL PZ. GRENADIERS (attach to II Bn if Option 4 chosen, otherwise to any HQ):<br />
1 Coy: 3 Infantry stands, 1 MG stand, 2 med trucks<br />
OPTION #6:<br />
LUFTWAFFE: 2 Divebombers with bombs<br />
CORPS ARTILLERY:<br />
BATTALION HQ: 1 HQ stand, 1 FOO, 2 kubelwagens<br />
1 BATTERY: 3 17cm K18, 3 hvy tractors<br />
CORPS ASSAULT GUNS:<br />
BATTERY HQ: 1 StuG IIIG<br />
1 BATTERY: 1 StuH 42, 2 StuG IIIG<br />
NOTES:<br />
* All Marders must be of same type. StuG IIIF may be substituted in one or all of the companies.<br />
Late 1943 WEHRMACHT PANZER DIVISION (August-December 1943)<br />
QUALITY: VETERAN (some may be REGULAR)<br />
PANZER REGIMENT:<br />
REGIMENTAL HQ: 1 HQ Pz IVF2<br />
1 Coy: 1 Recon Pz IIIM<br />
I BATTALION<br />
HQ: 1 HQ Pz IVF2<br />
HQ Coy: 2 Recon m/cycle SMG stands, 1 Recon Pz IIIM, 1 SdKfz 10/4<br />
2 Coys: 3 Pz IIIM, 1 Pz IIIN<br />
2 Coys: 3 Pz IVF2<br />
I PANZERGRENADIER BATTALION(gpzt):<br />
HQ: 1 HQ stand, 1 SdKfz 250/1<br />
2 Coys: 3 Infantry stands, 1 MG stand, 1 SdKfz 251/10, 3 SdKfz 251/1<br />
1 Coy: 2 Infantry stands, 1 MG stand, 1 SdKfz 251/10, 2 SdKfz 251/1<br />
1 Coy: 1 75mm ATG, 1 SdKfz 251/1, 2 SdKfz 251/9<br />
ARTILLERY BATTALION<br />
HQ: 1 HQ stand, 1 FOO, 2 kubelwagens<br />
Battery: 3 Wespe, 1 Hummel<br />
OPTIONS:<br />
MEETING ENGAGEMENT: Any TWO of the following options may be selected
ATTACK: Any THREE of the following options may be selected<br />
DEFEND: Any ONE of the following options may be selected<br />
OPTION #1:<br />
ENGINEER BATTALION (-)<br />
BATTALION HQ: 1 HQ stand, 1 kubelwagen<br />
1 Coy: 4 Engineer stands, 2 med trucks<br />
1 Coy: 4 Engineer stands, 4 SdKfz 251/1, 1 SdKfz 251/2<br />
DIVISIONAL ANTI-TANK (attach to AT battalion if Option 2 is chosen, otherwise to any HQ):<br />
1 Coy: 3 Marder II or III*<br />
OPTION #2:<br />
ANTI-TANK BATTALION (-)<br />
BATTALION HQ: 1 HQ stand, 1 kubelwagen<br />
2 Coys: 3 Marder II or III*<br />
DIVISIONAL RECON (attach to Recon battalion if Option 3 is chosen, otherwise to any HQ):<br />
1 Coy: 3 Recon Infantry stands, 1 MG stand, 1 SdKfz 250/10, 3 SdKfz 250/1<br />
DIVISIONAL ENGINEERS (attach to Eng Battalion if Option 1 chosen, otherwise to any HQ):<br />
1 Coy: 4 Engineer stands, 2 med trucks<br />
OPTION #3:<br />
RECON BATTALION (-)<br />
BATTALION HQ: 1 HQ stand, 1 kubelwagen<br />
1 Coy: 3 SdKfz 222, 2 SdKfz 231 (8 rad), 1 SdKfz 233<br />
1 Coy: 3 SdKfz 250/9<br />
1 Coy: 4 Recon kettenkrad (m/cycle) Infantry stands<br />
1 Coy: 1 Engineer stand, 1 75mm ATG, 1 SdKfz 250/8, 2 SdKfz 251/1<br />
ARTILLERY BATTALION<br />
BATTALION HQ: 1 HQ stand, 1 FOO, 2 kubelwagens<br />
1 Battery: 3 leFH 18 (105mm), 3 tractors<br />
OPTION #4:<br />
Panzergrenadier REGIMENTAL HQ: 1 HQ stand, 1 Kubelwagen<br />
1 Coy: 1 Recon m/cycle SMG stand, 1 Eng. stand, 1 75mm ATG, 1 md. truck, 1 lt truck<br />
1 Coy: 3 SdKfz 7/1<br />
1 Coy: 1 sIG 33 ausf 38(t)<br />
1 Coy: 3 Engineer stands, 1 med. truck, 1 SdKfz 251/1<br />
II PANZERGRENADIER BATTALION (-)<br />
BATTALION HQ: 1 HQ stand, 1 kubelwagen<br />
1 Coy: 3 Infantry stands, 1 MG stand, 2 med trucks<br />
1 Coy: 2 Infantry stands, 1 MG stand, 2 med trucks<br />
1 Coy: 1 75mm ATG, 1 12cm MTR, 2 med trucks<br />
OPTION #5:<br />
ANTI-AIRCRAFT BATTALION (-)<br />
BATTALION HQ: 1 HQ stand, 1 kubelwagen<br />
1 Battery: 1 8.8cm FlaK 36, 1 2cm FlaK 38, 1 hvy tractor, 1 lt tractor<br />
1 Battery: 3 2cm FlaK 28, 3 lt trucks
ARTILLERY BATTALION:<br />
BATTALION HQ: 1 HQ stand, 1 FOO, 2 kubelwagens<br />
1 Battery: 3 leFH 18 (105mm), 3 tractors<br />
OPTION #6:<br />
DIVISIONAL AA (attach to AA Battalion if Option 5 chosen, otherwise to any HQ):<br />
1 Battery: 1 8.8cm FlaK 36, 1 2cm FlaK 38, 1 hvy tractor, 1 lt tractor<br />
ARTILLERY BATTALION:<br />
BATTALION HQ: 1 HQ stand, 1 FOO, 2 kubelwagens<br />
1 Battery: 3 sFH 18 (150mm), 3 tractors<br />
LUFTWAFFE: 1 Divebomber with bombs