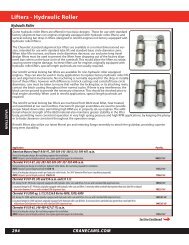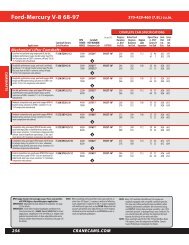
Hi-4 single fire motorcycle ignition - Crane Cams
Hi-4 single fire motorcycle ignition - Crane Cams
Hi-4 single fire motorcycle ignition - Crane Cams

You also want an ePaper? Increase the reach of your titles
YUMPU automatically turns print PDFs into web optimized ePapers that Google loves.
TWIN for 1340cc FX and FL models. Select OTHER for all<br />
other engine types.<br />
The bottom switch sets the starting mode. Kick<br />
start mode <strong>fire</strong>s the first cylinder for quickest starting.<br />
Electric start mode delays firing for 2-3 revolutions of the<br />
motor for smoother starts and less strain on the starter<br />
motor.<br />
Trimpots on the HI-4 allow adjustment of advance<br />
and RPM limit settings. Use the screwdriver supplied in<br />
the parts kit to adjust the trimpots. Trimpot setting is indicated<br />
by the slot that has two small dots on each side.<br />
NOTE: Each trimpot can be adjusted<br />
over a range of just under one turn. At<br />
the ends of the adjustment range,<br />
mechanical stops prevent further rotation<br />
of the trimpot. Do not attempt to<br />
turn the trimpots past their limits.<br />
The advance curve is adjustable over a limited<br />
range via the advance trimpot (SPK ADV). Advance<br />
curves are given in Figures 5 and 6. Each set of advance<br />
curves includes minimum and maximum curves. The actual<br />
advance curve will be between the minimum and maximum<br />
curves depending on advance trimpot setting.<br />
If you have a passenger or are using low octane<br />
gasoline, minimum advance will reduce spark knock.<br />
Maximum advance will give higher performance, but may<br />
require the use of high octane gasoline.<br />
The RPM limit trimpot (REV LIM) is adjustable<br />
from 4,000 to 8,000 RPM. Use a safe RPM limit for your<br />
engine.<br />
The HI-4 timing LED should light up when the <strong>ignition</strong><br />
key is turned on. The timing LED will go off when the<br />
flywheel is rotated past TDC. During cranking, the LED<br />
will blink.<br />
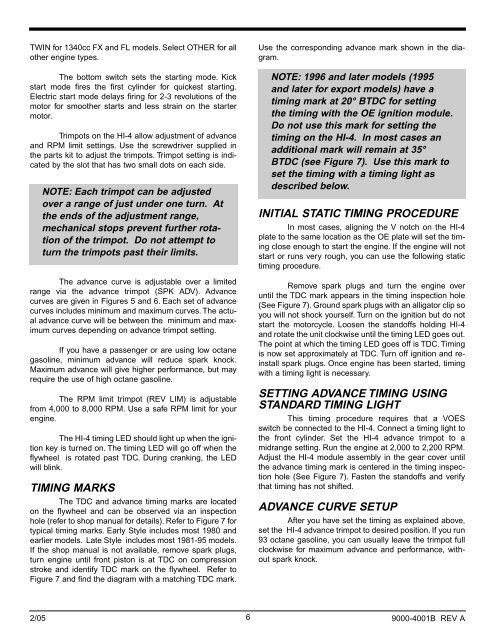
TIMING MARKS<br />
The TDC and advance timing marks are located<br />
on the flywheel and can be observed via an inspection<br />
hole (refer to shop manual for details). Refer to Figure 7 for<br />
typical timing marks. Early Style includes most 1980 and<br />
earlier models. Late Style includes most 1981-95 models.<br />
If the shop manual is not available, remove spark plugs,<br />
turn engine until front piston is at TDC on compression<br />
stroke and identify TDC mark on the flywheel. Refer to<br />
Figure 7 and find the diagram with a matching TDC mark.<br />
Use the corresponding advance mark shown in the diagram.<br />
NOTE: 1996 and later models (1995<br />
and later for export models) have a<br />
timing mark at 20° BTDC for setting<br />
the timing with the OE <strong>ignition</strong> module.<br />
Do not use this mark for setting the<br />
timing on the HI-4. In most cases an<br />
additional mark will remain at 35°<br />
BTDC (see Figure 7). Use this mark to<br />
set the timing with a timing light as<br />
described below.<br />
INITIAL STATIC TIMING PROCEDURE<br />
In most cases, aligning the V notch on the HI-4<br />
plate to the same location as the OE plate will set the timing<br />
close enough to start the engine. If the engine will not<br />
start or runs very rough, you can use the following static<br />
timing procedure.<br />
Remove spark plugs and turn the engine over<br />
until the TDC mark appears in the timing inspection hole<br />
(See Figure 7). Ground spark plugs with an alligator clip so<br />
you will not shock yourself. Turn on the <strong>ignition</strong> but do not<br />
start the <strong>motorcycle</strong>. Loosen the standoffs holding HI-4<br />
and rotate the unit clockwise until the timing LED goes out.<br />
The point at which the timing LED goes off is TDC. Timing<br />
is now set approximately at TDC. Turn off <strong>ignition</strong> and reinstall<br />
spark plugs. Once engine has been started, timing<br />
with a timing light is necessary.<br />
SETTING ADVANCE TIMING USING<br />
STANDARD TIMING LIGHT<br />
This timing procedure requires that a VOES<br />
switch be connected to the HI-4. Connect a timing light to<br />
the front cylinder. Set the HI-4 advance trimpot to a<br />
midrange setting. Run the engine at 2,000 to 2,200 RPM.<br />
Adjust the HI-4 module assembly in the gear cover until<br />
the advance timing mark is centered in the timing inspection<br />
hole (See Figure 7). Fasten the standoffs and verify<br />
that timing has not shifted.<br />
ADVANCE CURVE SETUP<br />
After you have set the timing as explained above,<br />
set the HI-4 advance trimpot to desired position. If you run<br />
93 octane gasoline, you can usually leave the trimpot full<br />
clockwise for maximum advance and performance, without<br />
spark knock.<br />
6<br />
2/05 9000-4001B REV A