Hi-4 single fire motorcycle ignition - Crane Cams
Hi-4 single fire motorcycle ignition - Crane Cams
Hi-4 single fire motorcycle ignition - Crane Cams

You also want an ePaper? Increase the reach of your titles
YUMPU automatically turns print PDFs into web optimized ePapers that Google loves.
2/05<br />
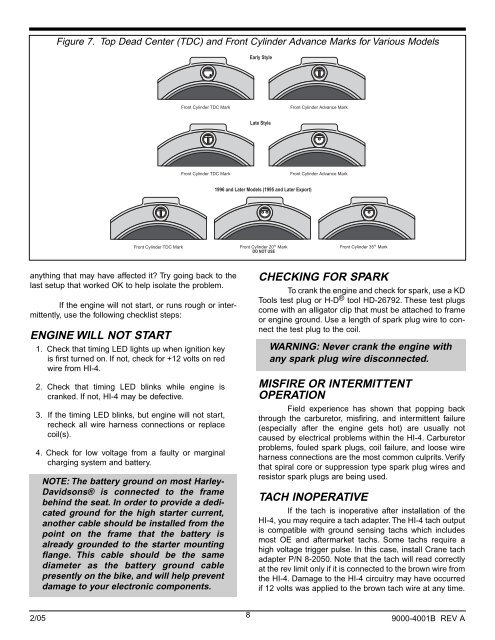
Figure 7. Top Dead Center (TDC) and Front Cylinder Advance Marks for Various Models<br />
Front Cylinder TDC Mark<br />
anything that may have affected it? Try going back to the<br />
last setup that worked OK to help isolate the problem.<br />
If the engine will not start, or runs rough or intermittently,<br />
use the following checklist steps:<br />
ENGINE WILL NOT START<br />
Front Cylinder TDC Mark<br />
1. Check that timing LED lights up when <strong>ignition</strong> key<br />
is first turned on. If not, check for +12 volts on red<br />
wire from HI-4.<br />
2. Check that timing LED blinks while engine is<br />
cranked. If not, HI-4 may be defective.<br />
3. If the timing LED blinks, but engine will not start,<br />
recheck all wire harness connections or replace<br />
coil(s).<br />
4. Check for low voltage from a faulty or marginal<br />
charging system and battery.<br />
NOTE: The battery ground on most Harley-<br />
Davidsons® is connected to the frame<br />
behind the seat. In order to provide a dedicated<br />
ground for the high starter current,<br />
another cable should be installed from the<br />
point on the frame that the battery is<br />
already grounded to the starter mounting<br />
flange. This cable should be the same<br />
diameter as the battery ground cable<br />
presently on the bike, and will help prevent<br />
damage to your electronic components.<br />
8<br />
Early Style<br />
Late Style<br />
Front Cylinder Advance Mark<br />
Front Cylinder TDC Mark Front Cylinder Advance Mark<br />
1996 and Later Models (1995 and Later Export)<br />
Front Cylinder 20° Mark<br />
DO NOT USE<br />
Front Cylinder 35° Mark<br />
CHECKING FOR SPARK<br />
To crank the engine and check for spark, use a KD<br />
Tools test plug or H-D ® tool HD-26792. These test plugs<br />
come with an alligator clip that must be attached to frame<br />
or engine ground. Use a length of spark plug wire to connect<br />
the test plug to the coil.<br />
WARNING: Never crank the engine with<br />
any spark plug wire disconnected.<br />
MISFIRE OR INTERMITTENT<br />
OPERATION<br />
Field experience has shown that popping back<br />
through the carburetor, misfiring, and intermittent failure<br />
(especially after the engine gets hot) are usually not<br />
caused by electrical problems within the HI-4. Carburetor<br />
problems, fouled spark plugs, coil failure, and loose wire<br />
harness connections are the most common culprits. Verify<br />
that spiral core or suppression type spark plug wires and<br />
resistor spark plugs are being used.<br />
TACH INOPERATIVE<br />
If the tach is inoperative after installation of the<br />
HI-4, you may require a tach adapter. The HI-4 tach output<br />
is compatible with ground sensing tachs which includes<br />
most OE and aftermarket tachs. Some tachs require a<br />
high voltage trigger pulse. In this case, install <strong>Crane</strong> tach<br />
adapter P/N 8-2050. Note that the tach will read correctly<br />
at the rev limit only if it is connected to the brown wire from<br />
the HI-4. Damage to the HI-4 circuitry may have occurred<br />
if 12 volts was applied to the brown tach wire at any time.<br />
9000-4001B REV A